Table of Contents
Advertisement
Quick Links
Advertisement
Table of Contents

Related Manuals for Transcend MP630


Summary of Contents for Transcend MP630
- Page 1 MP630 Digital Music Player User’s Manual...
-
Page 2: Table Of Contents
Shuffle: Play Random Tracks ...9 Repeat All Tracks in a Folder...9 A-B Repeat: Repeat a Section of a Track...9 Lock ...9 Reset the MP630 ...9 MUSIC Mode ...10 Play MP3, WMA and WMA-DRM10 (Subscription) Music ...10 File Navigator Mode...10 Delete a file in the MUSIC Mode...11 RADIO Mode ...12... - Page 3 Driver Installation for Mac Driver Installation for Linux Connecting to a Computer ...38 Download and Upload Music and other Files ...39 Disconnecting from a Computer ...41 Removing the MP630 in Windows ® Me, 2000 and XP...37 ™ OS 10.0, or Later ...37 ™...
- Page 4 PC-Lock Function for Windows Lock Your Computer ...48 Unlock Your Computer...48 Partition & Security Function ...49 Enable the Security Function in Windows Use the MP630 Security Features ...50 Changing your Password...50 Forgotten your Password...51 Troubleshooting ...52 Specifications ...55 Ordering Information...55 Transcend Limited Warranty ...56...
-
Page 5: Introduction
Line-In recording, Karaoke-type Lyrics display, A-B repeat functions and variable Track Playback speeds. Your MP630 supports Hi-speed USB 2.0 for faster uploading and downloading of data, or music files to and from a computer. Using the A-B repeat and variable Track Playback speed features allows you to continuously replay a designated section of a track at slower/faster speeds;... -
Page 6: Table Of Contents
Quick Instruction Guide Features MP3 Player that supports MP3, WMA, WMA-DRM10 (subscription music) and WAV music formats FM Radio (FM Radio recording and the ability to preset 20 FM radio stations) Advanced Digital Voice Recorder: specify an individual (memo), or group (meeting) environment One-Touch Recording: even when Powered OFF, press and hold the REC button to start the Built-in Microphone Recording Karaoke-type lyrics display... -
Page 7: System Requirements
System Requirements Desktop or notebook computer with a working USB port. One of following Operating Systems (OS): ® Windows ® Windows 2000 ® Windows ™ OS 10.0, or later ™ Linux Kernel 2.4, or later... -
Page 8: Safety Precautions
These usage and safety guidelines are IMPORTANT! Please follow them carefully. Your MP630 is connected to a computer using a Mini USB to USB A-Type cable. Please ensure that you connect the cable ends to the ports correctly. General Use Carefully unpack the contents of the MP630 package. -
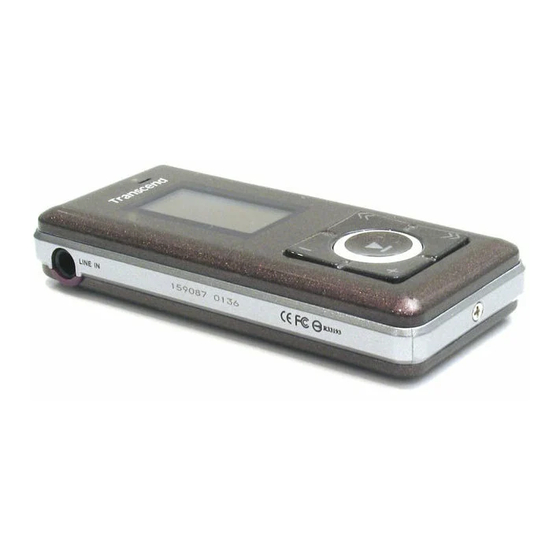
Page 9: Product Overview
Product Overview Figure 1. MP630 Reset Switch A-B Repeat/Rec Button Menu Button LOCK Switch Hi-Speed Mini USB 2.0 Port Back-Fast Rewind Button Next-Fast Forward Button PLAY/PAUSE/PWR ON-OFF Volume Up Button Volume Down Button Line-In Port White Text OLED Display Microphone... -
Page 10: Oled Display
ICON Indicates that the Player is setup to auto Power OFF Sleep Mode A-B Repeat/ Indicates the A-B Repeat/Repeat/Shuffle modes: Normal, Repeat One, Repeat/Shuffle Repeat All, Shuffle and Repeat in Folder Modes Preset the player to make an automatic Radio, MIC recording Preset Record Indicates the Equalizer (EQ) mode: Normal, POP, Rock, Classical, Jazz, EQ Mode... -
Page 11: Basic Operation
Charging the Battery Plug the small end of the Mini USB to USB A-Type cable into the Mini USB connector on the MP630 and plug the large end of the cable into an available USB port on your desktop, or notebook computer. The MP630’s internal Li-ion battery will begin charging. -
Page 12: Power Off
Previous track. to Fast Forward a track. to Fast Rewind a track. until you reach the desired volume in any Mode to enter the Main Menu. The Main Menu gives you to Power OFF the MP630. until you reach the desired... -
Page 13: Make An Audio Recording
Make an Audio Recording The Default Recording Mode for the MP630 is its Built-in Microphone. Press and Hold the “A-B/REC” button in any mode except the RADIO Mode will activate the MP630’s built-in microphone and begin recording. Press and Hold the “A-B/REC” button the recording. -
Page 14: Music Mode
MP3/WMA, or WMA-DRM10 file. 4. Press the “PLAY/PAUSE/PWR ON-OFF” button music file. MP630 only supports Mpeg I Layer 3 and WMA files compressed at a rate between 32Kbps – 320Kbps. File Navigator Mode The File Navigator is a fast and convenient way of moving between tracks, files and folders. You can also use the File Navigator to select tracks for your own personal Playlist. -
Page 15: Delete A File In The Music Mode
5. Pressing the “Menu” button 6. Pressing the “Menu” button (top folder level). 7. Pressing the “Menu” button Navigator. Delete a file in the MUSIC Mode 1. In the MUSIC Mode, Press and Hold the “Menu” button 2. Press the “Next-Fast Forward” button folder. -
Page 16: Radio Mode
Saving a Radio Station You can save your 20 favorite Radio stations from CH 01 to CH 20 in the MP630’s memory. 1. Select the Radio station (FM frequency) that you wish to save. - Page 17 3. Press the “Next-Fast Forward” button , or “Back-Fast Rewind” button to select the channel number where you want to save the Radio station. 4. Press the “A-B/REC” button again to save the selected station to the channel number.
-
Page 18: Recall A Saved Station
Good (32KHz) High (44KHz) If not enough memory space is available, or the battery power is too low, the MP630 cannot support the maximum recording capacity as outlined in the above table. to display the channel numbers 1 to 20 on , or “Back-Fast Rewind”... -
Page 19: Record Sound
Audio Recordings. The FM Radio recording feature has been covered in the previous section If you want to make a recording using the MP630’s Built-In Microphone you must select the “MIC” as the recording source. Select a Recording Device The default Audio Recording method for the MP630 is its Built-In Microphone. -
Page 20: Record Using The Built-In Microphone
If not enough memory space is available, or the battery power is too low, the MP630 cannot support the maximum recording capacity as outlined in the above table. The closer you move the MP630’s Microphone to the source of the sound the higher the quality of the recording. -
Page 21: Record Using The Line-In Connection
1. In the REC INPUT DEVICE Mode select Line-In as the recording device. 2. Plug the Line-In cable into the MP630’s Line-In port and connect the other end of the Line-In cable to a compatible source device e.g. CD Player. -
Page 22: Play A Recorded Sound File
Med (22KHz) Good (32KHz) High (44KHz) If not enough memory space is available, or the battery power is too low, the MP630 cannot support the maximum recording capacity as outlined in the above table. Play a Recorded Sound File 1. Press the “Menu” button 2. -
Page 23: Delete A File In The Record Mode
Delete a file in the RECORD Mode 1. In the RECORD Mode, Press and Hold the “Menu” button 2. Press the “Next-Fast Forward” button folder. 3. Press the “PLAY/PAUSE/PWR ON-OFF” button Forward” button , or “Back-Fast Rewind” button “A-B/REC” button , or “Back-Fast Rewind”... -
Page 24: Settings
Enter the Settings Menu 1. Press the “Menu” button 2. Press the “Next-Fast Forward” button the “SETTINGS” icon , then press the “PLAY/PAUSE/PWR ON-OFF” button the SETTINGS Mode. Repeat Mode There are several REPEAT Modes to choose from: Normal, Repeat One, Repeat All, Repeat Shuffle and Repeat Folder. - Page 25 setting and return to the SETTINGS Menu. You will instantly hear the different sound effect in your earphones.
-
Page 26: User Eq Customization
User EQ Customization The User EQ allows you to customize the settings of a 5 Band Equalizer to your personal preferences. 1. In the EQUALIZER Mode, press the “Next-Fast Forward” button button to select the Set User EQ icon button to enter the Set USER EQ Mode. -
Page 28: Sleep
Contrast level and return to the SETTINGS Menu. Language Sets the MP630’s User language, including the display of song and artist titles. The player supports 12 User languages. 1. In the SETTINGS Menu, press the “Next-Fast Forward” button... -
Page 29: Sync Lyrics
“PLAY/PAUSE/PWR ON-OFF” button SETTINGS Menu. FM Reset Resets the saved Radio stations, so the next time you enter the RADIO Mode the MP630 will automatically scan and save the 20 strongest Radio station signals. , or “Back-Fast Rewind” button , or “Back-Fast Rewind”... -
Page 30: Music Transfer Mode
MTP (Media Transfer Protocol) Music Transfer Mode to transfer and synchronize music files between the computer and your MP630. If you are using a Mac, or Linux computer, please select the USB (WMA-DRM10 NOT supported) Music Transfer Mode. -
Page 31: About
3. Enabling the Playlist Manager feature will allow you to play your Playlist the next time you go into the MUSIC Mode. About Displays information about the MP630’s firmware version and memory capacity. 1. In the SETTINGS Menu, press the “Next-Fast Forward” button button to select the About icon to display the ABOUT information on the OLED screen. -
Page 32: Time Settings
The MP630 has Advanced TIME features. The TIME Settings Menu contains the features that can be customized to your preferences including, an RTC (Real Time Clock), World Time and DST (Daylight Saving Time). Real Time Clock (RTC) The MP630’s RTC displays the local date and time, both of which can be adjusted. -
Page 33: World Time
World Time The MP630 has the ability to display the local time for different time zones; this is a handy feature if you are traveling. 1. In the SETTINGS Menu, press the “Next-Fast Forward” button button to select the TIME Settings icon button to enter the TIME Settings Menu. -
Page 34: Daylight Saving Time (Dst)
Daylight Saving Time (DST) The MP630 can be setup to enable Daylight Saving Time, so the official local Summer and Winter times are displayed. 1. In the SETTINGS Menu, press the “Next-Fast Forward” button button to select the TIME Settings icon button to enter the TIME Settings Menu. -
Page 35: Advanced Record Settings
If not enough memory space is available, or the battery power is too low, the MP630 cannot support the maximum recording capacity as outlined in the above table. The closer you move the MP630’s Microphone to the source of the sound the higher the quality of the recording. - Page 36 Recordings are recorded in Stereo, or Mono depending on the Line-In device that is used.
-
Page 37: Rec Environment
REC Environment Sets the sensitivity of the MP630’s Built-in Microphone, so you can record a Memo (record a person speaking), or Meeting (record a group speaking). 1. In the SETTINGS Menu, press the “Next-Fast Forward” button button to select the REC Settings icon button to enter the REC Settings Menu. -
Page 39: Vad (Voice Activation Detection)
REC Settings Menu. Preset REC Set a date and time for the MP630 to automatically make an Audio Recording from the Radio, or using its Built-in Microphone, or an External Microphone. 1. In the Settings Menu, press the “Next-Fast Forward” button... - Page 40 Alternatively, you can Press and Hold the “Volume Up” button “Volume Down” button 6. Press the “PLAY/PAUSE/PWR ON-OFF” button 7. Input the time you want the MP630 to make the automatic recording. Press the “Next-Fast Forward” button , or “Back-Fast Rewind” button Press the “Volume Up”...
-
Page 41: Driver Installation
Removable Disk drive with a newly assigned drive letter will appear in the My Computer window. Driver Installation for Mac No drivers are required. Plug your MP630 into an available USB port and your computer will automatically detect it. Driver Installation for Linux No drivers are required. -
Page 42: Connecting To A Computer
MP630. 1. Plug the small end of the Mini USB to USB A-Type cable into the Mini USB connector on the MP630 and plug the large end of the cable into an available USB port on your desktop, or notebook computer. -
Page 43: Download And Upload Music And Other Files
WMA-DRM10 music, please see the Music Transfer Mode section in SETTINGS. 2. Plug the small end of the Mini USB to USB A-Type cable into the MP630’s Mini USB port and plug the large end of the cable into an available USB port on a computer. When connected to a computer the unit’s rechargeable Li-ion battery will begin charging and the MP630 can only be used for transferring... - Page 44 4. In the MTP (Media Transfer Mode) use Windows Media Player 10 to transfer and synchronize your WMA-DRM10 Music files with the MP630’s MTP Folder, all other files should be dropped on to the Data Folder. In the USB Mode (WMA-DRM10 NOT supported) you can drag and drop your MP3, WMA, or other files and folders onto the MP630’s corresponding Removable Disk drive letter, at this...
-
Page 45: Disconnecting From A Computer
3. A window will appear stating “The ‘USB Mass Storage Device’ device can now be safely removed from the system.” Unplug the Digital Music Player. Removing the MP630 in Mac Drag and drop the Disk icon corresponding to your MP630 into the trashcan. Then unplug your MP630 from the USB port. Remove the MP630 in Linux Execute umount /mnt/ MP630 to un-mount the device. -
Page 46: Transcend Digital Music Player Utility
Transcend Digital Music Player Utility The MP630 comes with some very useful bundled software that can increase your productivity. Before using the Transcend Digital Music Player Utility program, please read the following sections carefully. The Utility is not supported on Mac... - Page 47 3. The “InstallShield Wizard” window appears. Click on the “Next” button to continue. The InstallShield Wizard will guide you through the Digital Music Player Utility Program installation process. Figure 13. Digital Music Player Utility Program InstallShield Wizard 4. When the Digital Music Player Utility is finished installing, click on the “Finish” button to exit the wizard.
- Page 48 5. The Digital Music Player Utility Software Program can be found in: “ -> Programs -> Transcend -> Transcend Digital Music Player Utility.”...
-
Page 49: Using The Digital Music Player Utility
Using the Digital Music Player Utility The Transcend Digital Music Player Utility provides you with several software options including a: Figure 15. Transcend Digital Music Player Utility Menu To use the Utility, you must log in to the Windows PC-Lock Function Partition &... -
Page 50: Pc-Lock Function
When the PC-Lock Function is enabled, you can use your Digital Music Player as a key to lock your computer protecting it from use by others. The PC-Lock function is not supported in the Mac To use the PC-Lock function, you must log in to the Windows OS with Administrator rights. PC-Lock Function for Windows 1. - Page 51 3. After selecting the Enable PC-Lock you can type the Text to be displayed on the screen while the computer is locked. 4. If you want to set a timer to automatically unlock your computer select the “Enable Timer” option. Input the Lock Period in Hours and Minutes, after the time elapses your computer is automatically unlocked.
-
Page 52: Lock Your Computer
5. Click on the “OK” button to start the PC-Lock. Figure 20. Enable PC-Lock Lock Your Computer After the PC-Lock function is enabled, your computer will be locked whenever you remove your Digital Music Player. When your computer is locked, the screen will display the Text screen saver. Unlock Your Computer To unlock the computer, you must re-insert your Digital Music Player. -
Page 53: Partition & Security Function
1. Click on the “Partition” button in the “Digital Music Player Utility” window. 2. The “Partition” window will appear. Partition the MP630 into a Public and Private partition by using the mouse to move the disk partition bar on the slider until the Public Disk Area and Private Disk Area have the desired memory capacity sizes. -
Page 54: Use The Mp630 Security Features
Use the MP630 Security Features 1. Click on the “Login/Logout” button in the “Digital Music Player Utility” window. 2. The “Login/out” window will appear. Input your Password and click on the “Login” button to enter the MP630 Security area. 3. When you are finished using the Secure Area and no data is being transferred between the Digital Music Player and the computer, click on the “Logout”... -
Page 55: Forgotten Your Password
If you forget your password use the password hint to try and remember your password. However, if the hint does not work you can use the Partition Function to repartition your Digital Music Player. Any data that you saved on the MP630’s unprotected Public Disk Partition should be backed-up before re-partitioning the MP630. -
Page 56: Troubleshooting
1. Is your MP630 properly connected to the USB port? If not, unplug it and plug it in again. 2. Is your MP630 connected to the Mac keyboard? If yes, unplug it and plug it into an available USB port on your Mac Desktop. - Page 57 Digital Music Player Powers OFF automatically MP630 features a SLEEP Mode, which acts as a Power Saving feature. You can preset your Digital Music Player to Power OFF automatically after 15, 30, or 60 minutes. Please refer to the “Sleep” section in SETTINGS.
- Page 58 3. The version of your Windows Media Player will be displayed on the computer screen. Cannot listen to DRM music on my MP630? 1. The MP630 only supports WMA-DRM10 music files, is this the file type you are using? 2. Did you use the MTP “Music Transfer Mode” to transfer music to the MP630? Sync Lyrics: Why can’t I see the words of the song I am listening to?
-
Page 59: Specifications
• Certificates: • Warranty: Ordering Information Device Description MP630 Digital Music Player MP630 Digital Music Player 73 mm × 33 mm × 12.5 mm 30g (with Li-ion battery) MP3 WMA and WMA-DRM10 (Subscription music) IMA_ADPCM (WAV) 15 hours (fully charged battery) -
Page 60: Transcend Limited Warranty
Duration of Warranty: The Transcend MP630 is covered by this warranty for a period of two (2) years from the date of purchase. Proof of purchase including the date of purchase is required to collect on the warranty. -
Page 61: Glossary Icons
Select this icon to customize the MP630’s settings to your specific preferences. Screen Saver: Select this icon to specify the time interval before the MP630 Powers OFF due to inactivity. Sleep: Select this icon to increase, or decrease the speed at which audio files play. - Page 62 Select this icon to set the sensitivity of recording audio from a person, or REC Environment: group. Select this icon to choose the method of recording: Built-in Microphone, or REC Input Device: Line-In (external microphone, CD Player). Voice Activation Detection, Select this icon to setup for gapless audio recordings. VAD: Select this icon to preset the player to make an automatic audio recording.
-
Page 63: Terminology
Terminology A-B repeat...2, 3 Function that allows a user to mark a designated section of a track for continuous replay. auto-scan...12, 27 Automatically-scan begins a search process that will continue until a recognized signal is arrived at. cable...2, 4, 7, 31, 32 Device that is used to connect one hardware device to another without a loss in function. - Page 64 MPEG Audio Layer 3 is a digital audio file compression technology. Navigator ...2, 3, 10, 11, 13, 15, 16, 21, 47 Gives you access to the files and folders that are saved onto the MP630's memory. OLED...2, 3, 5, 6, 7, 8, 10, 12, 19, 20, 23, 34, 47 Organic Light Emitting Device is a new technology used in the manufacture of displays.