England's Stove Works 25-PDVC Installation And Operation Manual
Hide thumbs
Also See for 25-PDVC:
- Installation & operation manual (57 pages) ,
- Installation & operation manual (77 pages)
Table of Contents
Advertisement
INSTALLATION AND OPERATION MANUAL
MODEL NUMBERS: 25-PDVC , 55-SHP10 , & 55-TRP10
(NOTE: MANUAL ALSO APPLIES TO "AMERICAN STANDARD"
Thank you for purchasing this product from a fine line of heating equipment. We wish
you many years of safe heating pleasure with your new heating appliance.
NOTE: IF YOU HAVE A PROBLEM WITH THIS UNIT DO NOT RETURN IT TO
THE DEALER. CONTACT CUSTOMER SERVICE @ 1-800-245-6489.
Questions? Need Parts or Options?
Please Note the Following Precautionary Statements:
WE DO NOT RECOMMEND PELLET UNITS AS YOUR ONLY SOURCE OF HEAT.
England's Stove Works highly recommends the use of smoke detectors and Carbon
Monoxide detectors with any hearth product, including this unit. Follow all manufacturer's
instructions when using smoke or Carbon Monoxide detectors.
CAUTION: These units must be installed in accordance with the instructions and
comply with your local building and fire codes. Please read this entire manual
before installation and use of this pellet fuel burning room heater.
WARNING: USE OF OUTSIDE AIR IS MANDATORY WITH THIS UNIT.
DO NOT OPERATE UNIT WITH HOPPER OPEN. LID MUST BE SHUT AND SECURED TIGHTLY.
DO NOT OPERATE WITH DOOR OPEN. OPEN DOOR ONLY WHEN LIGHTING.
The freestanding pellet units are approved for mobile home installation with
outside combustion air hook-up. See "Flue System" section of manual.
CAUTION: The structural integrity of the mobile home floor, wall, and ceiling/roof
must be maintained. Do not install in a sleeping room.
Mobile home installation should be in accordance with the Manufactured Home
and Safety Standard (HUD), CFR 3280, Part 24.
FAILURE TO FOLLOW THESE INSTRUCTIONS COULD RESULT IN PROPERTY DAMAGE, BODILY
INJURY OR EVEN DEATH. FOR YOUR SAFETY AND PROTECTION, FOLLOW ALL THE
INSTALLATION INSTRUCTIONS. CONTACT YOUR LOCAL BUILDING OR FIRE OFFICIALS FOR
RESTRICTIONS AND INSTALLATION INSPECTIONS IN YOUR AREA.
AND 55-SHP10L PELLET UNITS)
Save These Instructions.
www.englandsstoveworks.com
SAFETY NOTICE
Rev. 11/03
Advertisement
Table of Contents

Related Manuals for England's Stove Works 25-PDVC


Summary of Contents for England's Stove Works 25-PDVC
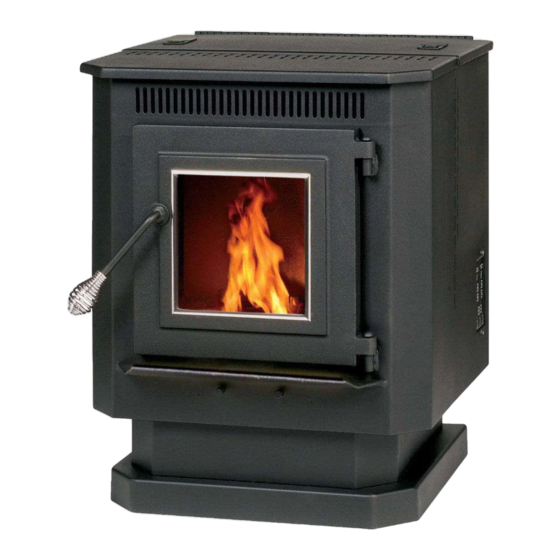
- Page 1 INSTALLATION AND OPERATION MANUAL MODEL NUMBERS: 25-PDVC , 55-SHP10 , & 55-TRP10 (NOTE: MANUAL ALSO APPLIES TO “AMERICAN STANDARD” AND 55-SHP10L PELLET UNITS) Thank you for purchasing this product from a fine line of heating equipment. We wish you many years of safe heating pleasure with your new heating appliance.
- Page 2 IMPORTANT INFORMATION 1. Check local installation codes for your area. Call your Homeowner’s Insurance representative for inspection of your stove’s installation. 2. Read and comply with the instructions in this manual. 3. This unit should be tested (dry run) before loading pellets for 30 minutes. The stove should automatically shut itself off after the 30-minute dry run.
- Page 3 12. Horizontal runs should not exceed four feet (4’) with a max. vertical flue height of thirty- five feet (35’). At fifteen feet (15’), the pipe should be increased to 4” pellet vent pipe. 13. This unit should be turned off and allowed to cool prior to cleaning. Any ashes should be kept in an airtight metal container completely away from all combustibles and should not be disposed of until they are completely cooled.
-
Page 4: Unit Preparation
UNIT PREPARATION 1. Attach the spring handle to the door by turning it counterclockwise. Important: Hopper Latches must be tight so that the top is sealed to prevent back-burn. 2. Test your 110-volt outlet for current and then plug in the unit. (We highly recommend a surge protector for our pellet unit, as the control panel is electronic). - Page 5 This unit is equipped with a negative draft system that pulls air through the burn pot and pushes the exhaust out of the dwelling. If this unit is connected to a flue system other than the way explained in this manual, it will not function properly. Pellet Vent Pipe The UL approved pellet vent pipe that we recommend is a twist lock system;...
-
Page 6: Floor And Wall Protection
If you are replacing a wood stove with a pellet unit the chimney or pipe should be cleaned thoroughly before proceeding with the installation. The flue system should be either masonry or a UL approved pre-manufactured Class A flue system. The flue thimble or pipe will be either six inches (6”) or eight inches (8”) and the proper reducer (6”... -
Page 7: Start-Up Procedure
Horizontal Feed System This unit has a top and a bottom auger that are separated by four inches (4”); a 1- RPM motor drives each auger. The top auger drops pellets to the bottom auger tube, and the bottom auger pushes the pellets forward to the burn pot. This assures there is no build up of fuel in the bottom auger tube. -
Page 8: Daily Operation
Note: If the room temperature stays above 70 degrees the unit will remain in the shut down mode for 54 minutes, regardless of the temperature at the heat sensor. If the stove stays on this long and you are sure the fire is out, the cord can be unplugged from the outlet. After approximately 10 seconds the unit can be connected to the power source and the control board will be reset. -
Page 9: Ash Removal And Disposal
ASH REMOVAL AND DISPOSAL IMPORTANT: While the amount of ash generated by this unit is not excessive compared to log-burning woodstoves, keeping the unit clean and free of ash is essential for peak performance. Too much ash build-up hampers airflow and reduces the unit’s efficiency, and can cause smoke-back. -
Page 10: Maintenance
MAINTENANCE CAUTION: UNPLUG THIS UNIT PRIOR TO ANY SERVICE WORK. SEE EXPLODED DIAGRAM (ILLUSTRATION 4) FOR PARTS REFERENCE Note: To do any service on this unit the rear steel access panel must be removed. Eight (8) screws hold this panel to the rear of the stove. Parts Orders: (800) 516-3636 www.englandsstoveworks.com Questions: (800) 245-6489... - Page 11 Gaskets IMPORTANT: IMPROPER GASKET MAINTENANCE, INCLUDING FAILURE TO REPLACE GASKETS, CAN CAUSE AIR LEAKS RESULTING IN SMOKE-BACKS. This unit comes with a 3/4” rope gasket around the door, which should be replaced every two years. To replace the door gasket (Part #AC-DGKC), the old gasket must first be removed entirely -- this may require you to scrape the old material from the channel before adding the new cement.
- Page 12 Recommended Heat Ranges for Pellet Unit Control Board: Low Burn: Heat Range setting: 1 Room Air Blower setting: 1 Medium Low: Heat Range setting: 2 – 3 Room Air Blower setting: * Medium High: Heat Range setting: 5 – 8 Room Air Blower setting: * High Burn: Heat Range setting: 9...
-
Page 13: Hopper Lid Latches
The control board (PART #PU-CB98) is a digital read-out board. This board offers a wide variety of settings to operate the unit. The bottom controls are preset at the factory and should not require any changes on start-up of the unit. This part can be removed from the unit by loosening the two screws on the outside of the stove, and then pulling it back to the inside of the stove. - Page 14 Have this information on hand if you phone the factory or your dealer regarding this product. Retain for your files: Model Number __________________________ Date of Purchase ________________________ Date of Manufacture _________________ Serial #_____________________ LIMITED 5 YEAR WARRANTY FROM THE DATE OF PURCHASE TO THE ORIGINAL OWNER The manufacturer extends the following warranties: Five Year Period:...
- Page 15 Pellet Stove Exploded View Dimensions of 25-PDVC/55-SHP10/55-TRP10: 23”W x 28”H x 21”D Illustration 4 (Approx. 13 ½” from floor to center of exhaust)
- Page 16 REPLACEMENT PARTS AND OPTIONS LIST AC-GGK GLASS GASKET KIT (gasket only, no glass) AC-DGKC DOOR GASKET KIT (#2 on diagram) AC-G9 9” X 9” GLASS with Gasket (#3 on diagram) AC-SH BRASS DOOR SPRING HANDLE AC-SHN NICKEL DOOR SPRING HANDLE AC-MCSP HI-TEMPERATURE CHARCOAL PAINT AC-MBSP...
-
Page 17: Troubleshooting Guide
TROUBLE-SHOOTING GUIDE WARNING: TO AVOID ELECTRICAL SHOCK ALWAYS DISCONNECT THE UNIT FROM THE POWER SOURCE BEFORE ATTEMPTING ANY REPAIR. IF THIS GUIDE DOES NOT CORRECT THE PROBLEM CALL YOUR LOCAL DEALER, OR OUR CUSTOMER SERVICE AT 1-800-245-6489. Problem Cause Solution 1. -
Page 19: Warranty Registration
WARRANTY REGISTRATION Purchased by (Name) ______________________________________________ Address _________________________________________________________ City ________________________ State __________ Zip _________________ Telephone _______________________________________________________ Email (Optional) ___________________________________________________ DEALER INFORMATION Purchased From (Dealer) ___________________________________________ Address _________________________________________________________ City ________________________ State __________ Zip _________________ UNIT INFORMATION Model Number _____________________ Purchase Date* _________________ Serial Number _____________________ Mfg.