Table of Contents
Advertisement
Quick Links
Instructions - - Parts List
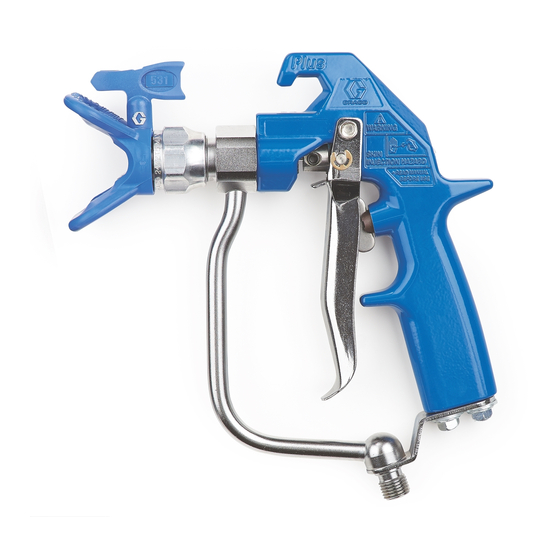
Texture Airless Spray Gun
27.6 MPa (276 bar, 4000 psi) Maximum Working Pressure
Part No. 241705, Series B
Includes a RACr Tip Guard and LTX531 Switch Tipr
Part No. 289605 (Europe Only), Series B
Includes a RACr Tip Guard and HDA531 Switch Tipr
Important Safety Instructions
Read all warnings and instructions in this manual.
Save these instructions.
See page 2 for Table of Contents.
GRACO INC. P.O. BOX 1441 MINNEAPOLIS, MN 55440- 1441
Copyright 2002, Graco Inc. is registered to I.S. EN ISO 9001
308491S
03965
II 2 G
Advertisement
Table of Contents

Related Manuals for Graco 241705


Summary of Contents for Graco 241705
- Page 1 Instructions - - Parts List Texture Airless Spray Gun 27.6 MPa (276 bar, 4000 psi) Maximum Working Pressure Part No. 241705, Series B Includes a RACr Tip Guard and LTX531 Switch Tipr Part No. 289605 (Europe Only), Series B Includes a RACr Tip Guard and HDA531 Switch Tipr Important Safety Instructions Read all warnings and instructions in this manual.
-
Page 2: Table Of Contents
Table of Contents Symbols ....... . . Warnings ....... . . Installation/Operation . - Page 3 SKIN INJECTION HAZARD Spray from the gun, leaks or ruptured components can inject fluid into your body and cause ex- tremely serious injury, including the need for amputation. Fluid splashed in the eyes or on the skin can also cause serious injury. D Fluid injected into the skin may look like just a cut, but it is a serious injury.
-
Page 4: Warnings
EQUIPMENT MISUSE HAZARD Equipment misuse can cause the equipment to rupture, malfunction or start unexpectedly and result INSTRUCTIONS in serious injury. D This equipment is for professional use only. D Read all instruction manuals, tags, and labels before operating the equipment. D Use the equipment only for its intended purpose. -
Page 5: Installation/Operation
Installation/Operation System Requirements WARNING Keep the wallet-sized warning card provided with this gun with the operator at all times. The card contains important treatment information should an injection injury occur. Additional cards are available at no charge from Graco Inc. 1. -
Page 6: How To Use The Gun
Installation/Operation How to Operate the Gun WARNING To reduce the risk of component rupture, and seri- ous injury, including fluid injection, do not exceed the gun’s 4000 psi (276 bar, 27.6 MPa) Maximum Working Pressure or the maximum working pres- sure of lowest rated component in the system. -
Page 7: Care Of The Spray Tip And Tip Guard
Installation/Operation Care of the Spray Tip and Tip Guard WARNING To reduce the risk of fluid injection or splashing in the eyes or on the skin, do not hold a hand, body or rag in front of the spray tip when cleaning or checking a clogged tip. -
Page 8: How To Flush The Gun
Installation/Operation How to Flush the Gun WARNING To reduce the risk of serious injury, including splashing fluid in the eyes or on the skin, or static electric discharge when flushing: D Be sure the entire system, including flushing pails, are properly grounded. D Remove the tip guard and spray tip. -
Page 9: How To Check The Gun Diffuser Operation
Installation/Operation How to Check the Gun Diffuser Operation The Standard Needle and Seat Kit, 237398, has the number 090 stamped on the needle and seat. The seat does have a diffuser. The optional Non-diffused Needle and Seat Kit, 237260, has the number 125 stamped on the needle and seat. -
Page 10: Service
WARNING To reduce the risk of serious injury from fluid injec- tion or splashing, always follow the Pressure Relief Procedure on page 5 before servicing the gun. Repair Notes The needle and seat are available only as a kit which includes items 2a to 2e. - Page 11 Fig. 10 6. Loosen the setscrew (15). Pull the fluid housing (22) away from the gun body (1). See Fig. 10. Fig. 11 7. While supporting the spring guide (16) to prevent bending the needle, loosen the setscrews (17). Remove the spring guide (16). See Fig. 11. Service Fig.
- Page 12 Fig. 14 2. Lightly grease the small end of the needle (2c) and then guide it into the large end of the fluid housing (22). Grease the threads Torque to 20- -25 ft- -lb (27- -34 N.m) Fig. 15 3. Place the gasket (2b) on the valve seat (2a). Grease the threads of the valve seat (2a).
- Page 13 Fig. 20 8. Position the trigger (25) on the gun body. Insert the pivot pin (28) into the top hole (A) and secure with the screw (29) on the other side. Place an e-clip (27) on one end of the trigger pin (18). Slide the pin through lower trigger holes and through the slot (B) in the spring guide (16) (turn the spring guide to align, as needed).
-
Page 14: Parts
Part No. 241705, Series B Texture Airless Spray Gun Ref. Part No. Description 237680 TEXTURE GUN BODY 237260 NEEDLE AND SEAT KIT (parts not sold separately) VALVE SEAT GASKET NEEDLE SEAL RETAINER SEAL LTX531 SwitchTip, size 531 (Model 241705) HDA531... -
Page 15: Technical Data
Technical Data Fluid orifice size ....Inlet size ......Fluid tube inside diameter . -
Page 16: The Graco Warranty And Disclaimers
The Graco Warranty and Disclaimers Graco warrants all equipment referenced in this document which is manufactured by Graco and bearing its name to be free from defects in material and workmanship on the date of sale to the original purchaser for use. With the exception of any special, extended, or limited warranty published by Graco, Graco will, for a period of twelve months from the date of sale, repair or replace any part of the equipment determined by Graco to be defective.