Xerox Color J75 Press User Manual
Hide thumbs
Also See for Color J75 Press:
- System administration manual (286 pages) ,
- Quick start manual (26 pages)
Table of Contents
Advertisement
Quick Links
Advertisement
Table of Contents

Related Manuals for Xerox Color J75 Press


Summary of Contents for Xerox Color J75 Press
-
Page 1: User Guide
Version 1.0 February 2013 702P00985 Xerox Color J75 Press ® User Guide... - Page 2 FreeFlow ® , SquareFold ® , Xerox prInteract , MeterAssistant ® , SuppliesAssistant ® , CentreWare ® , Scan to PC Desktop ® , and Xerox Extensible Interface Platform ® , are trademarks of Xerox Corporation in the United States and/or other countries. Product status, build status, and/or specifications are subject to change without notice.
-
Page 3: Table Of Contents
3 Submitting a print job................3-1 Printing from your computer...................3-1 Printing from the Xerox FreeFlow Print Server............3-1 Printing from the Xerox EX Print Server, Powered by EFI........3-2 4 Paper and other media................4-1 Loading media in trays 1, 2, and 3................4-1 Loading paper in trays 1, 2, and 3..............4-1 Loading tab stock in trays 1, 2, and 3.............4-2... - Page 4 Layout Adjustment tab....................5-10 Book Copying......................5-11 2 Sided Book Copying..................5-12 Original Size......................5-12 Edge Erase.......................5-12 Image Shift......................5-13 Image Rotation.....................5-13 Invert Image......................5-14 Original Orientation....................5-15 Output Format tab......................5-16 Booklet Creation....................5-16 Covers........................5-18 Transparency Options..................5-22 Page Layout......................5-22 Poster........................5-24 Annotations......................5-24 Xerox Color J75 Press ® User Guide...
- Page 5 Store to Folder components................6-17 Web Services for Devices (WSD)..................6-18 Store to WSD component.................6-18 Store to WSD procedure..................6-18 7 Job Status.....................7-1 Job Status overview......................7-1 Active Jobs tab........................7-1 Completed Jobs tab......................7-1 8 Machine Status..................8-1 Machine Status........................8-1 Xerox Color J75 Press ® User Guide...
- Page 6 Paper jams in the Bypass (Tray 5)..............10-11 Envelope jams in the Bypass tray..........10-12 Inverter jams (bottom right cover)............10-12 Fault Codes........................10-14 General problems......................10-29 Other faults........................10-31 Image quality........................10-31 Hints and tips........................10-37 Fuser hints and tips...................10-37 Xerox Color J75 Press ® User Guide...
- Page 7 OHCF fault codes....................12-19 OHCF (Trays 6/7) specifications................12-27 13 Interface Module..................13-1 Overview..........................13-1 Control panel......................13-2 Paper path......................13-3 Paper curl settings on the Interface Module............13-3 Preset decurler settings..................13-3 Manual decurler buttons...................13-4 Internal spectrophotometer (ILS)................13-4 Problem solving........................13-5 Xerox Color J75 Press ® User Guide...
- Page 8 Paper jams at lever 1d..................15-16 Paper jams at lever 1b..................15-17 Paper jams at lever 3b and 3d..............15-18 Paper jams at lever 3e and knob 3c............15-20 Paper jams at lever 3g and knob 3f............15-21 Xerox Color J75 Press ® User Guide...
- Page 9 Trim guidelines......................16-9 Accessing the Trimmer options..............16-11 Accessing the Trimmer options for network print jobs......................16-11 Accessing the Trimmer options for copy jobs......16-11 Hints and tips........................16-12 Printing full-page images on booklets............16-12 Follow these tips....................16-13 Problem solving.......................16-13 Xerox Color J75 Press ® User Guide...
- Page 10 Table of Contents Jam clearance.....................16-13 Clearing jams..................16-14 Clearing E1/E2 jams................16-14 Clearing E3 jams..................16-16 Fault codes......................16-17 Technical data........................16-27 Specifications......................16-27 viii Xerox Color J75 Press ® User Guide...
-
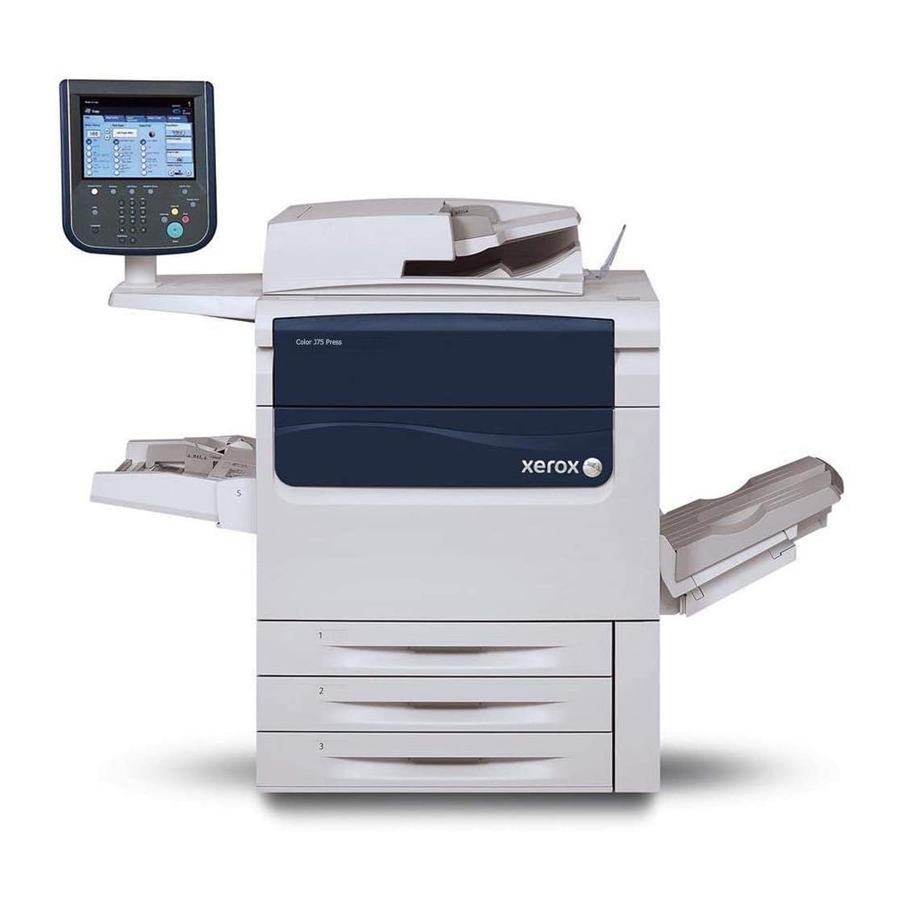
Page 11: Product Overview
The User Interface (UI) consists of the touch screen and control panel with the buttons and keypad. 3 Duplex Automatic Document Feeder (DADF) Automatically feeds 1- and 2-sided original documents. A maximum of 250 two-sided documents can be scanned at one time. Xerox Color J75 Press ® User Guide... -
Page 12: Bypass (Tray 5)
When the tray is in use and it is lowered, the tray can be extended to support long length stock. Note The mounting location for the Bypass tray varies when optional feeding devices are added to the machine configuration. Xerox Color J75 Press ® User Guide... -
Page 13: Document Feeder
Remove any staples and paper clips from the documents before loading them in the document feeder. For best output, ensure that the documents are in good condition. Xerox Color J75 Press ® User Guide... -
Page 14: User Interface (Ui)
1. Touch screen 2. Services Home 3. Services 4. Job Status 5. Machine Status 6. Log In/Out 7. Energy Saver 8. Clear All 9. Stop 10. Start 11. Interrupt 12. Keypad 13. Language 14. Help Xerox Color J75 Press ® User Guide... -
Page 15: Print Server Overview
2. Main power switch: This switch is located behind the front door/cover. It is used mainly by the Xerox Service Representative when servicing the machine. In rare problem solving cases, you may be directed to power off the machine with this switch. -
Page 16: Power On
Low Power: After remaining inactive for a preset time period, the machine enters the Low Power mode. Sleep Mode: After entering Low Power and remaining inactive for another preset time period, the machine enters the Sleep mode. Xerox Color J75 Press ® User Guide... -
Page 17: Exiting The Energy Saver Mode
The Oversized High Capacity Feeder (OHCF) is available in a 1-tray or 2-tray option. The OHCF feeds a variety of stock sizes, including standard and oversized stock up to 13 x 19.2 in./330.2 x 488 mm. Each tray holds 2,000 sheets. Xerox Color J75 Press ® User Guide... -
Page 18: Interface Module
1-tray OHCF (with Bypass and storage cabinet above the tray) Interface Module The Interface Module is required with all finishing devices. The Interface Module provides communication between the print engine and any attached finishing device. Xerox Color J75 Press ® User Guide... -
Page 19: Gbc ® Advancedpunch
User Documentation link. High Capacity Stacker The High Capacity Stacker (HCS) is an optional finishing device that provides stacking and offsetting capabilities for output to a Stacker Tray. Xerox Color J75 Press ® User Guide... -
Page 20: Standard/Booklet Maker Finisher
Standard Finisher with optional C/Z Folder Booklet Maker Finisher with optional C/Z Folder Note Both the Standard Finisher and the Booklet Maker Finisher are shown here with the required Interface Module. 1-10 Xerox Color J75 Press ® User Guide... -
Page 21: Squarefold Trimmer Module
The SquareFold Trimmer Module is an optional finishing device that is used in conjunction with a finishing device that contains a booklet maker. Note The SquareFold Trimmer Module is shown here with the required Interface Module and the required Booklet Maker Finisher. Xerox Color J75 Press 1-11 ® User Guide... - Page 22 Product overview 1-12 Xerox Color J75 Press ® User Guide...
-
Page 23: Where To Find Help
Where to find help Help on the World Wide Web Xerox on the World Wide Web: For system support, user help, customer documentation, and service support, go to www.xerox.com and click the Contact Us link for specific contact information/telephone numbers in your area. - Page 24 Where to find help Xerox Color J75 Press ® User Guide...
-
Page 25: Submitting A Print Job
6. Select OK to close the Properties window. 7. Select OK to send the job to the printer. Printing from the Xerox FreeFlow Print Server 1. Copy the customer documentation PDF files onto a storage device such as a flash drive or CD/DVD. -
Page 26: Printing From The Xerox Ex Print Server, Powered By Efi
1. Copy the customer documentation PDF files onto a storage device such as a flash drive or CD/DVD. 2. Connect your storage device to the print server. 3. From the Xerox EX Printer Server, select File > Import Job. 4. Select the desired queue such as Print or Hold. 5. Select Add. -
Page 27: Paper And Other Media
6. Adjust the paper guides by pressing in the guide release and carefully moving the Edge Guide until it lightly touches the edge of the material in the tray. Do not load materials above the MAX line located on the rear Edge Guide. Xerox Color J75 Press ® User Guide... -
Page 28: Loading Tab Stock In Trays 1, 2, And 3
7. If changes have been made to the paper tray, select the Change Settings button; otherwise, proceed to the next step. a) Make the desired selections for Paper Type/Paper Weight, Paper Size, and Paper Color. Xerox Color J75 Press ® User Guide... -
Page 29: Loading Transparencies In Trays 1, 2, And 3
Make the desired selections for Paper Type/Paper Weight, Paper Size, and Paper Color. b) If necessary, make the desired changes to paper curl and alignment adjustment. Xerox Color J75 Press ® User Guide... -
Page 30: Loading Pre-Drilled Stock In Trays 1, 2, And 3
Refer to the System Administration Guide for detailed information on the paper curl and alignment adjustment options. c) Select Save until you are returned to the tray settings window. 9. Select Confirm to close the window. Xerox Color J75 Press ® User Guide... -
Page 31: Loading Media In The Bypass Tray
2. Hold the center of the paper guides and slide them to the desired paper size. 3. Select the appropriate paper stock for your print job. 4. Open the ream of paper with the seam side facing up. 5. Fan the sheets before loading them into the tray. Xerox Color J75 Press ® User Guide... -
Page 32: Loading Tab Stock In The Bypass Tray (Tray 5)
2. Hold the center of the paper guides and slide them to the desired paper size. 3. Select the appropriate paper stock for your print job. 4. Fan the tab paper before loading into the tray. Xerox Color J75 Press ® User Guide... -
Page 33: Loading Transparencies In The Bypass Tray (Tray 5)
9. Select Confirm to close the window. 10. For network print jobs, refer to your print server customer documentation for instructions on loading tab stock into a tray. Loading transparencies in the Bypass tray (Tray 5) Xerox Color J75 Press ® User Guide... - Page 34 Refer to the System Administration Guide for detailed information on the paper curl and alignment adjustment options. c) Select Save until you are returned to the tray settings window. 9. Select Confirm to close the window. Xerox Color J75 Press ® User Guide...
-
Page 35: Loading Pre-Drilled Stock In The Bypass Tray (Tray 5)
Make the desired selections for Paper Type/Paper Weight, Paper Size, and Paper Color. b) If necessary, make the desired changes to paper curl and alignment adjustment. Note Refer to the System Administration Guide for detailed information on the paper curl and alignment adjustment options. Xerox Color J75 Press ® User Guide... -
Page 36: Loading Media In Optional Feeding Devices
When the optional GBC AdvancedPunch is attached to your machine, tab stock is loaded differently into paper trays. For information on how to load media into the paper trays when a GBC AdvancedPunch is attached, refer to the GBC AdvancedPunch customer documentation. 4-10 Xerox Color J75 Press ® User Guide... -
Page 37: Copy
The confirmation indicator lights to show that the documents are loaded correctly. 3. Press the Services Home button. 4. Select Copy on the Services Home screen. 5. From the Copy screen, select the desired features/options. Xerox Color J75 Press ® User Guide... -
Page 38: Basic Copy Using The Document Glass
2. Place the document face down by aligning it as shown in the illustration. 3. Press the Services Home button. 4. Select Copy on the Services Home screen. 5. From the Copy screen, select the desired features/options. Reduce/Enlarge Paper Supply Xerox Color J75 Press ® User Guide... -
Page 39: Copy Tab
You can also set the R/E ratio by using the up or down buttons. In this case, the ratio is displayed in the R/E entry box. Xerox Color J75 Press ® User Guide... -
Page 40: Reduce/Enlarge More Options
This option automatically detects the size of the original document and selects the proper tray for output. Tray buttons Allows you to select a specific tray containing the desired media for your job. Xerox Color J75 Press ® User Guide... -
Page 41: Output Color
Copy Output Important Copy output options vary depending on the finishing devices attached to your machine. Note Copy output may be accessed either from the main Copy screen or from the Output Format tab. Xerox Color J75 Press ® User Guide... -
Page 42: Sided Copying
Use this option if your originals are printed on one side and you want two-sided copies. 2-2 Sided Use this option if you want to make two sided copies from two-sided originals. 2-1 Sided This option will make one-sided copies from two-sided originals. Xerox Color J75 Press ® User Guide... -
Page 43: Original Type
Text Use this option if your original contains only text or line art. The result is sharper edges for the text and line art. Select if the text is Normal or Light Text. Xerox Color J75 Press ® User Guide... -
Page 44: Lighten/Darken
Select the Down scroll button to darken the scanned image from light originals such as pencil images. Select the Up scroll button to lighten the scanned image from dark originals such as half tones or originals with colored backgrounds. Xerox Color J75 Press ® User Guide... -
Page 45: Image Enhancement
This option uses the highest color saturation to produce rich, vivid output colors. The option increases the color saturation of the most vivid setting in order to produce fresher images. Bright This option produces images that have a brighter appearance and enhanced contrast. Xerox Color J75 Press ® User Guide... -
Page 46: Color Balance
Again, all colors between these original colors also shift in the same direction. Layout Adjustment tab The Layout Adjustment tab includes the following features: Book Copying 2 Sided Book Copying 5-10 Xerox Color J75 Press ® User Guide... -
Page 47: Book Copying
Right Page Only Copies the right page only. Binding Edge Erase This option erases or deletes the shadow from your copies that is caused by the center binding of the bound original. Xerox Color J75 Press 5-11 ® User Guide... -
Page 48: Sided Book Copying
The default is 0.1 in. (2.54 mm) and each edge can be adjusted in 0.1 in. (2.54 mm) increments up to 2.0 in (50.8 mm). 5-12 Xerox Color J75 Press ® User Guide... -
Page 49: Image Shift
Always On This option causes copies to be made with the document image automatically rotated so that the orientation of the document matches that of the paper in the selected paper tray. Xerox Color J75 Press 5-13 ® User Guide... -
Page 50: Invert Image
This option reverses the original image creating a mirror of the original. This feature can be used when you want to change the apparent direction of an image or where the original is inked on the reverse of the paper (for example engineering drawings). 5-14 Xerox Color J75 Press ® User Guide... -
Page 51: Original Orientation
Select this option when placing the top edge of the document against the top side of the document glass or document feeder. Sideways Images Select this option when placing the top edge of the document against the left side of the document glass or document feeder. Xerox Color J75 Press 5-15 ® User Guide... -
Page 52: Output Format Tab
Ensure that the Original Orientation setting reflects the same orientation as that of the original documents. When On is selected, the following Booklet Creation options are available: Original Input 1 Sided Originals 2 Sided Originals 2 Sided Rotated Originals 5-16 Xerox Color J75 Press ® User Guide... - Page 53 Image Positioning is available for selection if you have already selected Create Left/Top Bound Booklet or Create Right Bound Booklet. Offset Stacking This option is available only when specific optional finishers are attached, such as the Standard Finisher or Booklet Maker Finisher. Xerox Color J75 Press 5-17 ® User Guide...
-
Page 54: Covers
Covers is selected, enter the number of blank sheets that will be used for the covers. Note If Blank Covers is used for BOTH the front and back covers, verify that the correct quantity is selected for both the covers. 5-18 Xerox Color J75 Press ® User Guide... - Page 55 For both front and back covers: The first page of the document is copied onto the front side of the front cover, and the second page is copied onto the front side of the back cover. Xerox Color J75 Press 5-19 ® User Guide...
- Page 56 For both front and back covers: The first page of the document is copied onto the back side of the front cover, and the second page is copied onto the back side of the back cover. 5-20 Xerox Color J75 Press ® User Guide...
- Page 57 For both front and back covers: The first and second pages of the document are copied onto the front and back sides of the front cover, and the third and fourth (last two) pages are copied onto the front and back sides of the back cover. Xerox Color J75 Press 5-21 ® User Guide...
-
Page 58: Transparency Options
Handouts can be 1- or 2-sided and stapled (if available). Page Layout The Page Layout options are ideal for handouts, storyboards, or for archival purposes. You can select between the Pages Per Side feature or the Repeat Image feature. 5-22 Xerox Color J75 Press ® User Guide... - Page 59 23 repeats along the short side (Y) and from 1 to 33 repeats along the long side (X). The examples shown are a typical output that can be produced when using the Repeat Image feature. Xerox Color J75 Press 5-23 ® User Guide...
-
Page 60: Poster
Position and Font Size buttons. Upright Images Select this option when placing the top edge of the document against the top side of the document glass or document feeder. 5-24 Xerox Color J75 Press ® User Guide... -
Page 61: Watermark
This option prints the edge of the original document image onto the tab of the tabbed stock. You can change the amount of shift required by using the Shift Value buttons on the touch screen. Xerox Color J75 Press 5-25 ® User Guide... -
Page 62: Face Up/Down Output
UI or from the print driver on your workstation. If your machine is connected to a print server, the feature can also be selected at the print server for the selected job. 5-26 Xerox Color J75 Press ® User Guide... - Page 63 Select this option to fold the output copies in thirds. Z-Fold Select this option to fold the output copies with two folds that are folded in opposite directions, resulting in a type of fan fold. Xerox Color J75 Press 5-27 ® User Guide...
-
Page 64: Id Card Copy
By default, pressing the Services button will cause the Copy screen to appear. 4. From the Copy screen, select Output Format > ID Card Copying. 5. Select On. 6. Select Save. 7. Enter the quantity. 8. Press Start to begin scanning side 1. 5-28 Xerox Color J75 Press ® User Guide... -
Page 65: Job Assembly Tab
15. Repeat the previous steps until all segments of your job have been programmed and scanned. 16. After the last segment has been scanned, select Last Original. The machine will complete the quantity selected. Xerox Color J75 Press 5-29 ® User Guide... -
Page 66: Sample Job
1. Press the Services button on the control panel. By default, pressing the Services button will cause the Copy screen to appear. 2. From the Job Assembly tab, select Combine Original Sets. 3. Select either On or Off. 5-30 Xerox Color J75 Press ® User Guide... -
Page 67: Delete Outside/Delete Inside
4. Select either Delete Outside or Delete Inside. 5. If the originals are 2-sided, select the applicable option: Both Sides Side 1 Only Side 2 Only 6. Select the Area 1 button. Xerox Color J75 Press 5-31 ® User Guide... - Page 68 Clear a deletion area by selecting the Clear Area X (1, 2, or 3) button. 8. Select Save. 9. Select Save again. 10. Select any other desired copy features/options. 11. Enter the quantity. 12. Press Start. 13. Retrieve the copies from the output area. 5-32 Xerox Color J75 Press ® User Guide...
-
Page 69: Scan
1. From the machine UI, press the Clear All button. This clears all previous settings from the machine. 2. Load your original documents either in the document feeder or on the document glass. Xerox Color J75 Press ® User Guide... -
Page 70: Scan Options
Original Type. Grayscale: Scans a document in grayscale. Adds shades to monochrome, creating intermediate tones that change gradually. Suited to documents containing gradations that cannot be reproduced with monochrome (2-color tone). Xerox Color J75 Press ® User Guide... -
Page 71: Additional Scan Options
Additional scan options Additional scanning options allow precise control of the scanning process. Many of these optional settings override the automatic settings. Instructions on the machine UI describe the use of these options. Xerox Color J75 Press ® User Guide... -
Page 72: Advanced Settings
Lower contrast settings reproduce more detail in light and dark areas of the original. Higher contrast settings produce vivid blacks and whites for sharper text and lines, but produce less detail in pictures. Xerox Color J75 Press ® User Guide... -
Page 73: Layout Adjustment
The options for Layout Adjustment are shown on the third tab of the selected scan method; these options include the following: Original Orientation Select the direction that your original lays either in the document feeder or on the document glass. Select either Upright Images or Sideways Images. Xerox Color J75 Press ® User Guide... - Page 74 Binding Edge Erase: This option erases or deletes the shadow that is caused by the center binding of the bound original. Reduce/Enlarge Use this option to select a reduction or enlargement value for the scanned document. Xerox Color J75 Press ® User Guide...
-
Page 75: Filing Options
Add Thumbnail: Allows you to attach thumbnails to XPS files when XPS is selected. A thumbnail is a reduced, small file size image that helps you check the file contents. Single File for Each Page: Saves each page as a single file in the specified format. Xerox Color J75 Press ® User Guide... -
Page 76: E-Mail Options
Add Date Stamp to File Name: Adds the current date to the name of the new file. E-mail Options E-mail Options is the fourth tab of the E-mail scan method, and options include the following: Xerox Color J75 Press ® User Guide... - Page 77 Add Thumbnail: Allows you to attach thumbnails to XPS files when XPS is selected. A thumbnail is a reduced, small file size image that helps you check the file contents. Single File for Each Page: Saves each page as a single file in the specified format. Xerox Color J75 Press ® User Guide...
- Page 78 Permissions: This option adds restrictions to the PDF file which prevents unauthorized printing or editing of the file. The recipient of the PDF must know the permissions password in order to remove these restrictions. 6-10 Xerox Color J75 Press ® User Guide...
-
Page 79: E-Mail
Add Me. A maximum of 128 characters may be entered for the sender’s address in the From field. Recipient(s) field From this field, an e-mail address can be edited or removed by selecting a specific recipient. Xerox Color J75 Press 6-11 ® User Guide... -
Page 80: Scanning To An E-Mail Address
If sending to multiple recipients, repeat the previous sub-steps until finished. f) Select Close. The main E-mail tab is displayed. 8. If applicable, perform the following: Select From and add the sender’s e-mail address. 6-12 Xerox Color J75 Press ® User Guide... -
Page 81: Network Scanning
DEFAULT: This is the default job template. When a new template is created from CentreWare Internet Services, it is based on the default template. This template cannot be deleted. It can be edited and returned to the factory-default template only by the system administrator. Xerox Color J75 Press 6-13 ® User Guide... -
Page 82: Network Scanning Procedure
7. Select 2 Sided Scanning from the current scanning edit window. 8. Select an option. 1 Sided: Select this option to scan only one side of the document. 6-14 Xerox Color J75 Press ® User Guide... - Page 83 Simple Scan: This setting is best used for faster processing but may result in excessively large file sizes. Use this setting to apply the minimal amount of image processing and compression. Xerox Color J75 Press 6-15 ® User Guide...
-
Page 84: Scan To Pc
Search Network: Searches recipients in the remote address list. 6. Specify the To, Cc, or Bcc. 7. Use the scroll-bar to navigate the Name list. 8. If needed, select Details to display the Details screen. 6-16 Xerox Color J75 Press ® User Guide... -
Page 85: Store To Folder
Folder Select a folder to save the scanned data in. Select the up arrow to return to the previous screen, or the down arrow to move to the next screen. Xerox Color J75 Press 6-17 ® User Guide... -
Page 86: Web Services For Devices (Wsd)
3. Computer names and 5 processing methods are displayed in the List of Computers. 4. Press the Start button. 5. The scanned date will be forwarded to the specified destination. 6. Check the forwarded data on the destination computer. 6-18 Xerox Color J75 Press ® User Guide... -
Page 87: Job Status
Promote: This option moves a job to the top of list and runs it after the job that is currently printing/copying. Details: This option shows the details of the selected document. Close Menu: This option closes the pop-up menu. Completed Jobs tab 1. Press the Job Status button. Xerox Color J75 Press ® User Guide... - Page 88 3. From the View pull-down menu, select the desired job. 4. Use the scroll bar to navigate the list. 5. To check the details of a job, select the job from the displayed list. 6. After checking the job details, select Close. Xerox Color J75 Press ® User Guide...
-
Page 89: Machine Status
Paper Tray Status Select the Paper Tray Status button to view the current status information for each paper tray. Xerox Color J75 Press ® User Guide... - Page 90 Machine Serial Number The Machine Serial Number is displayed in the General Information area on the Machine Information tab. Use this number when calling Xerox for technical information or assistance. Current System Software The version of the system software that is currently installed on the machine is displayed under the Current System Software title.
-
Page 91: Faults Tab
Supplies tab from the Machine Status screen. Each Customer Replaceable Unit and status is displayed. Billing Information tab Accessing Billing Information 1. Press the Machine Status button on the control panel. 2. Select the Billing Information tab. Xerox Color J75 Press ® User Guide... -
Page 92: Billing Meters/Usage Counters
Each sheet counts as one click on the counter (regardless of whether it is a one-sided or two-sided copy/print job). Images Sent Counters This view provides information on the total amounts for fax images, internet fax images, email images, and network scanned images. Xerox Color J75 Press ® User Guide... -
Page 93: User Account Billing Information
For example, Stored Programming can record the following actions: press the Machine Status button, and display the Print Reports screen to print reports. Note This feature is available only if the system administrator has created and saved stored programs. Xerox Color J75 Press ® User Guide... -
Page 94: Changing The Paper Tray Attributes
When selected (enabled), this feature produces an output with a glossy luster. Note This feature is not available on the Tools tab until the system administrator enables it. Refer to the System Administration Guide for detailed information. Xerox Color J75 Press ® User Guide... -
Page 95: Maintenance
The document glass is the glass on which you place your document in order to copy it. The glass strip is an approximately one-inch wide strip of glass located to the left the document glass. Xerox Color J75 Press ® User Guide... -
Page 96: Cleaning The Exterior
2. Wipe off any excess water from the exterior with a soft cloth. Cleaning the document cover and glass 1. Cleaning the document cover a) Raise the document feeder. Xerox Color J75 Press ® User Guide... - Page 97 The assembly consists of the mirrored-glass strip, a metal strip, a white-plastic strip, and rollers. All parts of the assembly must be cleaned to ensure the best image quality when making copies. Xerox Color J75 Press ® User Guide...
- Page 98 To remove dirt, wipe the mirrored glass, metal strip, both sides of the white-plastic strip, and the rollers with a soft cloth moistened with water, and then wipe it dry with a soft cloth. Xerox Color J75 Press ® User Guide...
-
Page 99: Cleaning The Document Feeder Rollers
5. Gently close the document feeder. Cleaning the document feeder rollers 1. Gently lift the latch of the document feeder top cover until it is open completely in a fixed position. Xerox Color J75 Press ® User Guide... -
Page 100: Replacing Consumable Supplies
4. Close the left cover of the document feeder until you hear it click into place. Replacing consumable supplies Ordering supplies Xerox supplies, paper, and throughput material can be ordered from Xerox by going to www.xerox.com and clicking on either the Contact Us link for specific contact information/telephone numbers in your area or by clicking on the Supplies and entering/selecting your specific machine information (product family and model type). -
Page 101: Checking The Status Of Crus
CRU. Note If image quality (IQ) issues are on the output, refer to the problem solving chapter of the user guide for specific IQ problems and their related corrective actions. Xerox Color J75 Press ® User Guide... -
Page 102: Replacing A Toner Cartridge
1. Open the toner cover, located just above the machine front door/cover. 2. Lay paper on the floor before removing the cartridge. This will allow any excess toner to fall on the paper. 3. Grasp the handle of the color indicated in the message. Xerox Color J75 Press ® User Guide... - Page 103 Never use a vacuum cleaner when cleaning up spilled toner. It can cause a small explosion as the toner fills the vacuum cleaner and creates sparks. Use a broom, brush, or a cloth moistened with a neutral detergent. Xerox Color J75 Press ® User Guide...
-
Page 104: Replacing The Toner Waste Bottle
2. Open the toner waste bottle cover, located to the right of the Area 2 lever. 3. Grip the handle of the toner waste bottle and pull it halfway out of the machine. 9-10 Xerox Color J75 Press ® User Guide... -
Page 105: Replacing A Drum Cartridge
Do not expose the drum cartridges to direct sunlight or strong light from indoor fluorescent lighting for more than two minutes. Image quality may deteriorate when the drum cartridges are exposed to light. Xerox Color J75 Press 9-11 ® User Guide... - Page 106 1. Ensure that the machine power is ON and proceed to the next step. 2. Ensure that the machine is stopped (not running any jobs), and open the front door/cover. 9-12 Xerox Color J75 Press ® User Guide...
- Page 107 5. Open the bag containing the new drum cartridge. Place the new drum cartridge near the machine. Caution Do not touch or scratch the surface of the drum when you take it out from the bag. Xerox Color J75 Press 9-13 ® User Guide...
- Page 108 6. Unwrap the sheet covering the new drum cartridge and place it under the cartridge. Some drum cartridges may include a protective film. Remove the film on the drum cartridge, if the film is present. 9-14 Xerox Color J75 Press ® User Guide...
- Page 109 Maintenance 7. Pull out the drum cartridge drawer. 8. Remove the old drum cartridge by holding the finger rings provided at the both ends of the drum cartridge and gently lifting up. Xerox Color J75 Press 9-15 ® User Guide...
- Page 110 12. Return the Release Handle to its original position. 13. Return the R1-R4 handle to the original position and close the front door/cover. 14. Insert the used drum cartridge into an empty container for recycling. 9-16 Xerox Color J75 Press ® User Guide...
-
Page 111: Replacing The Fuser
Power off the machine and allow 5-10 minutes for the fuser to cool down before performing this procedure. Always observe the warning labels inside the machine. 1. Open the front door/cover. 2. Grasp Handle 2 and turn it to the unlocked position. Xerox Color J75 Press 9-17 ® User Guide... - Page 112 Maintenance 3. Carefully pull out the transfer module. 4. Pull out the fuser handle. 9-18 Xerox Color J75 Press ® User Guide...
- Page 113 5. Grab and lift the amber-gold colored handle only, lift, and pull up and out of the transfer module. 6. Dispose of the old fuser as normal office waste or recycle the fuser. 7. Remove the new fuser from its packaging. Xerox Color J75 Press 9-19 ® User Guide...
- Page 114 A3 SEF A4/Letter LEF, 12 in. (304.8 mm) A5, Post Card SRA3, 13 in. (330.2 mm) Custom set by the Xerox Service Representative Note For detailed information, refer to the Fuser hints and tips section of the Problem Solving chapter.
- Page 115 Maintenance 10. Close the transfer module. 11. Turn Handle 2 to the locked position. 12. Close the front door/cover of the printer. Xerox Color J75 Press 9-21 ® User Guide...
- Page 116 Maintenance 9-22 Xerox Color J75 Press ® User Guide...
-
Page 117: Problem Solving
Follow the instructions provided for clearing the jam and resuming machine operation. Document feeder jams 1. Gently lift the latch of the document feeder top cover until it is completely open. Xerox Color J75 Press 10-1 ® User Guide... - Page 118 4. If instructed to open the inner cover, lift up the lever, and open the inner cover. Remove the jammed document. Note If the document is stuck, do not pull on it forcefully, as this could damage the document. 10-2 Xerox Color J75 Press ® User Guide...
- Page 119 Inner cover Top cover Left cover 7. If a document jam cannot be found, slowly raise the document feeder, and if the document is there, remove it. 8. Close the document feeder. Xerox Color J75 Press 10-3 ® User Guide...
-
Page 120: Document Jams Under The Document Feeder Belt
Document jams under the document feeder belt 1. Open the document feeder. 10-4 Xerox Color J75 Press ® User Guide... - Page 121 To scan torn, wrinkled or folded documents, use the Document Glass, only. The already scanned document sheets are automatically skipped and scanning resumes from the document sheet last scanned prior to the jam. Xerox Color J75 Press 10-5 ® User Guide...
-
Page 122: Lower Left Cover Jams
Problem solving Lower left cover jams 1. Open the lower left cover 2. Remove the jammed paper. 3. Close the lower left cover. 10-6 Xerox Color J75 Press ® User Guide... -
Page 123: Main Unit Jams
2. Rotate Handle 2 to the right until it is in the horizontal position, and then pull out the transfer module. 3. Remove the visible jammed paper. Warning To avoid burns to the skin, never touch the fuser-labeled area where it indicates High Temperature and Caution. Xerox Color J75 Press 10-7 ® User Guide... - Page 124 5. Move Handle 2a to the right and remove any jammed paper. 6. Pull down Handle 2d and remove the jammed paper. 7. Return Handle 2a and Handle 2d to their original position. 10-8 Xerox Color J75 Press ® User Guide...
-
Page 125: Paper Jams In Trays 1-3
Paper is sometimes torn and remains inside the machine if you open a tray without checking the paper jam position. This may cause machine malfunction. Check where the paper jam occurred before clearing the problem. 1. Open the tray where the paper jam occurred. Xerox Color J75 Press 10-9 ® User Guide... - Page 126 Problem solving 2. Remove the jammed paper. 3. Push the tray in gently until it comes to a stop. 10-10 Xerox Color J75 Press ® User Guide...
-
Page 127: Paper Jams In The Bypass (Tray 5)
1. Remove the jammed paper and any paper that is loaded from the Bypass tray. Note If paper is torn, check inside the machine and remove it. 2. Open the tray cover and remove jammed paper. Xerox Color J75 Press 10-11 ® User Guide... -
Page 128: Envelope Jams In The Bypass Tray
Inverter jams (bottom right cover) 1. If a finisher is installed, follow the instructions on the UI for opening the front door of the finisher and accessing the Inverter bottom right cover. 10-12 Xerox Color J75 Press ® User Guide... - Page 129 When clearing this jam, the sheet should be pulled straight down toward the floor. Pulling the sheet at an angle toward the front of the machine can cause damage to the fuser roll. Xerox Color J75 Press 10-13 ® User Guide...
-
Page 130: Fault Codes
If an error code appears that is not listed in the table below, or if an error persists after following the listed solution, then contact your Xerox Customer Support Center. If an error code is displayed, all print data of the machine as well as print data stored in the machine built-in memory is discarded. - Page 131 Remedy: Take one of the following actions: Manually enter a reduction/enlargement ratio Change the paper size. 005-274 Cause: An error occurred in the document feeder. Remedy: Power-cycle the machine. Contact your Xerox Customer Support Center. Xerox Color J75 Press 10-15 ®...
- Page 132 Problem solving 005-275 Cause: An error occurred in the document feeder. Remedy: Power-cycle the machine. Contact your Xerox Customer Support Center. 005-280 Cause: An error occurred in the document feeder. Remedy: Power-cycle the machine. Contact your Xerox Customer Support Center.
- Page 133 Problem solving 016-219 Cause: The machine does not have the software license. Remedy: Power-cycle the machine. Contact your Xerox Customer Support Center. 016-220 Cause: An error occurred in the document scanner. Remedy: Power-cycle the machine. Contact your Xerox Customer Support Center.
- Page 134 Cause: Delayed print documents cannot be registered. Remedy: Check print options and specify the print data again. If the hard disk is malfunctioning, contact your Xerox Customer Support Center. 016-712 Cause: The machine is unable to process size, because the specified document area is too small.
- Page 135 Cause: Image conversion is not possible due to insufficient hard disk space. Remedy: Remove unnecessary data from the hard disk to increase free disk space. 016-777 Cause: A hard disk error occurred during image processing. Xerox Color J75 Press 10-19 ® User Guide...
- Page 136 Problem solving Remedy: The hard disk might be defective. When replacing a hard disk, contact your Xerox Customer Support Center. 016-778 Cause: Conversion processing of scanned image was interrupted, because of insufficient disk space. Remedy: Remove unnecessary data from the hard disk to increase free disk space.
- Page 137 Xerox Customer Support Center could not be contacted. Remedy: Check that the phone lines are connected, and try sending an inspection or maintenance request again after a short time. If the error persists, contact your Xerox Customer Support Center.
- Page 138 Remedy: Check DNS server address. Or check whether an application interface (CentreWare Flow Service) installed on the computer is registered by DNS server or not. 027-721 Cause: An application interface destination does not exist. 10-22 Xerox Color J75 Press ® User Guide...
- Page 139 Cause: The address of the DNS server is not registered on the machine. Remedy: Either register the address of the DNS server on the machine or set the address of the job template server by an IP address. Xerox Color J75 Press 10-23 ® User Guide...
- Page 140 Remedy: Power-cycle the machine. If the machine is not improved by performing the relevant remedy, contact your Xerox Customer Support Center. 047-320 Cause: A communication error has occurred with the Finisher. Remedy: Power off/on the machine. If the error continues, contact your Xerox Customer Support Center. 062-210 Cause: The document feeder malfunctioned.
- Page 141 Cause: Tray 1 malfunctioned. Remedy: Check paper loaded in Tray 1, and power-cycle the machine. If the machine is not improved by performing the relevant remedy, contact your Xerox Customer Support Center. Trays other than Tray 1 can be used.
- Page 142 Problem solving Remedy: Check paper loaded in Tray 2, and power-cycle the machine. If the machine is not improved by performing the relevant remedy, contact your Xerox Customer Support Center. Trays other than Tray 2 can be used. 073-210 Cause: Tray 3 malfunctioned.
- Page 143 Cause: An error occurred with the media reader. Remedy: Power-cycle the machine. If the machine is not improved by performing the relevant remedy, contact your Xerox Customer Support Center. 116-701 Cause: 2 sided print could not be made due to insufficient memory.
- Page 144 Cause: A malfunction occurred in the machine. Remedy: Power-cycle the machine. If the machine is not improved by performing the relevant remedy, contact your Xerox Customer Support Center. 124-709 Cause: The number of pages exceeds the number of pages that can be stapled.
-
Page 145: General Problems
Reboot your machine by powering OFF and ON using the On/Off button at the front of your machine. Xerox Color J75 Press 10-29 ® User Guide... - Page 146 Alternatively you can place the documents on the document glass. With an external control device connected the machine displays Ready to Copy, but users cannot log in Remedy: Check the external device to ensure that it is properly connected and powered 10-30 Xerox Color J75 Press ® User Guide...
-
Page 147: Other Faults
Network Scanning is not installed on your machine. Scanning options are available from your Xerox Sales Representative. Your machine may not be configured on the network. Contact your System Administrator to connect the machine to the network. - Page 148 Clean the Document Glass and the white underside of the Document Feeder. Use a lint-free cloth, lightly dampened with Xerox Anti-Static or General Cleaning Fluid or another suitable non-abrasive glass cleaner. Ensure that the Document Feeder guides are against the edges of the loaded originals.
- Page 149 Ensure that the paper tray guides are against the edges of the loaded paper. Completely Black Cause: Unknown until further investigation is completed. Remedy: The fault requires further investigation. Contact the Xerox Customer Support Center, or go to www.xerox.com and click on the Contact Us link for specific contact information/telephone numbers in your area.
- Page 150 DO NOT use the Auto Paper option. Blurred or Distorted Image Cause: The Document Feeder may need cleaning. Remedy: Using a lint-free cloth, lightly dampened with Xerox Anti-Static or General Cleaning Fluid or another suitable non-abrasive glass cleaner, clean the: Document Glass and Document Feeder white underside.
- Page 151 If your original is too thin place it face down and to the rear left of the document glass. Skewed or Crooked Cause: Paper guides are adjusted properly against the paper in the tray. Remedy: Ensure that the paper tray guides are against the edges of the loaded paper. Xerox Color J75 Press 10-35 ® User Guide...
- Page 152 If you are copying your original from the Document Glass, ensure that your original is loaded face down and to the rear left of the document glass. 10-36 Xerox Color J75 Press ® User Guide...
-
Page 153: Hints And Tips
Fuser hints and tips Extending fuser life To extend the life of your fuser, Xerox recommends the usage of multiple fusers. Multiple fusers provide maximum copy/print output for longer periods of time and ensure image defects on output are avoided. Depending on the types of jobs run and their frequency,... -
Page 154: Preventing Fuser Damage
2. Image quality defects such as marks or spots will occur every 110 mm/4.3 in. on the prints if the fuser roll is damaged. Defects which occur every 98 mm/3.89 in. indicate a damaged fuser belt. 10-38 Xerox Color J75 Press ® User Guide... -
Page 155: Fuser Width Switch Information
This switch must be set by the customer before the fuser's first use. It is expected to stay in that position for the life of the fuser. A label sheet is included in every fuser box. Xerox Color J75 Press 10-39 ® User Guide... - Page 156 Note Positions 5, 6, and 7 are blank and reserved for custom media ranges. These positions must be set by the Xerox Service Representative. Contact the Customer Support Center for more information and assistance. Important Before installing the new fuser assembly, the width switch must be set to the specific width range.
-
Page 157: Miscellaneous Hints And Tips
Custom 100.0 - 330.2 mm (3.937 - 13.0 in.) Note Positions 5, 6, and 7 must be set by the Xerox Service Representative. Contact the Customer Support Center for more information and assistance. Miscellaneous hints and tips System requirements messages (for example, "Order Waste Toner Container," "Hole Punch Waste Container Full") may occasionally be blocked by the current UI screen. - Page 158 Problem solving 10-42 Xerox Color J75 Press ® User Guide...
-
Page 159: Specifications
7.5 seconds or less for Black/White (when the machine is in Ready mode) Duplex Automatic Document Feeder (DADF) 250 sheet capacity (based on 24 lb./90 gsm plain paper) Original document sizes: 5.5 x 8.5 in./A5 to 11 x 17 in./A3 Xerox Color J75 Press 11-1 ® User Guide... -
Page 160: Additional Optional Accessories
Use this 5-port hub to connect the print engine to the internet for Remote Services, Extensible Interface Platform (EIP), and if using a third-party PC for the Simple Image Quality Adjustment (SIQA) procedures. 11-2 Xerox Color J75 Press ® User Guide... -
Page 161: Oversized High Capacity Feeder (Ohcf), 1 Or 2 Trays (Trays 6/7)
The Oversized High Capacity Feeder (OHCF) is available in a 1-tray or 2-tray option. The OHCF feeds a variety of stock sizes, including standard and oversized stock up to 13 x 19.2 in./330.2 x 488 mm. Each tray holds 2,000 sheets. Xerox Color J75 Press 12-1 ® User Guide... -
Page 162: Loading Media In The 1 Or 2-Tray Ohcf
AdvancedPunch customer documentation for instructions on loading tab stock in the trays. 1. Select the appropriate paper stock for your print job. 2. Pull out the tray slowly until it stops. 3. Fan the tab paper before loading into the tray. 12-2 Xerox Color J75 Press ® User Guide... -
Page 163: Loading Transparencies In The Ohcf (1 Or 2 Trays)
1. Select the appropriate paper stock for your print job. 2. Pull out the tray slowly until it stops. 3. Fan the transparencies to stop them from sticking together before loading into the tray. Xerox Color J75 Press 12-3 ® User Guide... -
Page 164: Print Jobs
1. Select the appropriate paper stock for your print job. 2. Pull out the tray slowly until it stops. 3. Open the ream of paper with the seam side facing up. 4. Fan the sheets before loading them into the tray. 12-4 Xerox Color J75 Press ® User Guide... -
Page 165: Print Jobs
1. Select the appropriate paper stock for your print job. 2. Pull out the tray slowly until it stops. 3. Open the ream of paper with the seam side facing up. 4. Fan the sheets before loading them into the tray. Xerox Color J75 Press 12-5 ® User Guide... - Page 166 Refer to the System Administration Guide for detailed information on the paper curl and alignment adjustment options. c) Select Save until you are returned to the tray settings window. 11. Select Confirm to close the window. 12-6 Xerox Color J75 Press ® User Guide...
-
Page 167: Skew Adjustment Levers
The paper is fed accurately without skew and the printed output is satisfactory; your task is complete. The paper is skewed and the printed output is unsatisfactory; proceed to the next step. 7. Pull out the tray slowly until it stops. Xerox Color J75 Press 12-7 ® User Guide... -
Page 168: Maintenance
The OHCF feed rolls should be replaced when experiencing frequent multifeeds, single feeds, or blank prints in the stack of the output prints. Use this procedure to replace the OHCF feed rolls, which includes the following rolls: Feed Roll Nudger Roll Retard Roll 12-8 Xerox Color J75 Press ® User Guide... - Page 169 2. Replace the nudger roll by pushing the black tab with one hand and then squeezing the metal shaft with your other hand. 3. Replace the feed roll using the same technique. 4. Remove the three thumb screws on the side of the feeder assembly. Xerox Color J75 Press 12-9 ® User Guide...
- Page 170 5. Slide the retard roll assembly to the right and pull it out of the tray. 6. Replace the retard roll by pressing the metal shafts. 7. Reinstall the assembly into the tray using the pin as a guideline, and ensure the device is connected correctly. 12-10 Xerox Color J75 Press ® User Guide...
-
Page 171: Replacing The (Ohcf) Bypass Tray Feed Rolls
Use this procedure to replace the (OHCF) bypass tray feed rolls, which includes the following rolls: Nudger Roll Retard Roll Feed Roll Perform the following to replace the OHCF feed rolls: 1. Access the OCHF Bypass Tray. Xerox Color J75 Press 12-11 ® User Guide... - Page 172 Oversized High Capacity Feeder (OHCF), 1 or 2 trays (Trays 6/7) 2. Open the Bypass Tray cover to access the feed components. 3. Replace the feed roll by squeezing the metal shaft. 4. Replace the nudger roll using the same technique. 12-12 Xerox Color J75 Press ® User Guide...
-
Page 173: Ohcf Problem Solving
Always ensure that all paper jams, including any small ripped pieces of paper, are cleared before proceeding with your print jobs. Note Remedies differ according to the paper jam location. Follow the instructions displayed to remove the jammed paper. Xerox Color J75 Press 12-13 ® User Guide... -
Page 174: Paper Jams Inside The Ohcf Trays
1. Pull out the tray where the paper jam occurred. 2. Remove the jammed paper. Note If paper is torn, check inside the machine and remove it. 3. Gently push in the tray until it comes to a stop. 12-14 Xerox Color J75 Press ® User Guide... -
Page 175: Ohcf Paper Jams At Lever 1A And Knob 1C
2. Move the lever 1a to the right and turn the knob 1c to the right. Remove the jammed paper. Note If paper is torn, check inside the machine and remove it. 3. Return the lever 1a to the original position. Xerox Color J75 Press 12-15 ® User Guide... -
Page 176: Ohcf Paper Jams At Lever 1B And Knob 1C
2. Move the lever 1b to the right and turn the knob 1c to the right. Remove the jammed paper. Note If paper is torn, check inside the machine and remove it. 12-16 Xerox Color J75 Press ® User Guide... -
Page 177: Ohcf Paper Jams At Lever 1D And Knob 1C
If the front cover of the OHCF is not completely closed, a message will appear and the machine will not operate. OHCF paper jams at lever 1d and knob 1c 1. Open the front cover of the OHCF. Xerox Color J75 Press 12-17 ® User Guide... - Page 178 If paper is torn, check inside the machine and remove it. 3. If the paper cannot be removed, turn the knob 1c clockwise, and then remove the jammed paper. Note If paper is torn, check inside the machine and remove it. 12-18 Xerox Color J75 Press ® User Guide...
-
Page 179: Ohcf Fault Codes
Trays other than the OHCF trays may be used in the interim. 078-100 Cause: An OHCF tray has malfunctioned. Remedy: Perform the following: Check the paper in the malfunctioning tray. Power Off/On the machine. Xerox Color J75 Press 12-19 ® User Guide... - Page 180 Check the paper setting of the paper trays and power Off/On the machine. If problems persist, contact the Customer Support Center. Note Trays other than the OHCF trays may be used in the interim. 12-20 Xerox Color J75 Press ® User Guide...
- Page 181 2. Power Off/On the machine. 3. If problems persist, contact the Customer Support Center. Note Trays other than the OHCF trays may be used in the interim. 078-264 Cause: An OHCF tray has malfunctioned. Xerox Color J75 Press 12-21 ® User Guide...
- Page 182 Note Trays other than the OHCF trays may be used in the interim. 078-268 Cause: An OHCF tray has malfunctioned. Remedy: Perform the following: 1. Check the paper loaded in the trays. 12-22 Xerox Color J75 Press ® User Guide...
- Page 183 Cause: An OHCF tray has malfunctioned. Remedy: Perform the following: 1. Check the paper loaded in the trays. 2. Power Off/On the machine. 3. If problems persist, contact the Customer Support Center. Xerox Color J75 Press 12-23 ® User Guide...
- Page 184 1. Check the paper loaded in the trays. 2. Power Off/On the machine. 3. If problems persist, contact the Customer Support Center. Note Trays other than the OHCF trays may be used in the interim. 12-24 Xerox Color J75 Press ® User Guide...
- Page 185 2. Power Off/On the machine. 3. If problems persist, contact the Customer Support Center. Note Trays other than the OHCF trays may be used in the interim. 078-300 Cause: An OHCF tray has malfunctioned. Xerox Color J75 Press 12-25 ® User Guide...
- Page 186 Note Trays other than the OHCF trays may be used in the interim. 078-941 Cause: An OHCF tray has malfunctioned. Remedy: Perform the following: 1. Check the paper loaded in the trays. 12-26 Xerox Color J75 Press ® User Guide...
-
Page 187: Ohcf (Trays 6/7) Specifications
Custom sizes: 182-330 mm (7.2-13 in.) width and 182-488 mm (7.2-19.2 in.) length Paper weight 18 lb. bond to 110 lb. cover/64-300 gsm Paper capacity 2000 sheets/drawer Important When using up to Xerox 24 lb./90 gsm paper. Xerox Color J75 Press 12-27 ® User Guide... - Page 188 Oversized High Capacity Feeder (OHCF), 1 or 2 trays (Trays 6/7) 12-28 Xerox Color J75 Press ® User Guide...
-
Page 189: Interface Module
Interface Module Overview The Interface Module is an optional finishing device that is used in conjunction with other optional finishing devices. It is shown here with the optional High Capacity Stacker. Xerox Color J75 Press 13-1 ® User Guide... -
Page 190: Control Panel
Administration Guide for information on adjusting the paper curl by using the Paper Curl Correction feature (Advanced Stock Setup). The Interface Module paper curl buttons are discussed in more detail later in this section. 13-2 Xerox Color J75 Press ® User Guide... -
Page 191: Paper Path
LEDs on the Interface Module Control Panel. If you require more curl correction, you can manually select curl correction from the Interface Module Control Panel. Xerox Color J75 Press 13-3 ® User Guide... -
Page 192: Manual Decurler Buttons
Class 1 Laser Product. It does not emit hazardous light, as the beams are totally enclosed during all phases of customer operation and maintenance. 13-4 Xerox Color J75 Press ® User Guide... -
Page 193: Problem Solving
Remedies differ according to the paper jam location. Follow the instructions displayed to remove the jammed paper. Paper jams at lever 1a 1. Open the front cover of the Interface Module. 2. Move the lever 1a downward and remove the jammed paper. Xerox Color J75 Press 13-5 ® User Guide... -
Page 194: Paper Jams At Lever 2A
4. Close the front cover of the Interface Module. 5. Follow the instructions on the UI to clear other areas or to resume your print job. Paper jams at lever 2a 1. Open the front cover of the Interface Module. 13-6 Xerox Color J75 Press ® User Guide... - Page 195 3. Return the lever 2a to the original position. 4. Close the front cover of the Interface Module. 5. Follow the instructions on the UI to clear other areas or to resume your print job. Xerox Color J75 Press 13-7 ® User Guide...
-
Page 196: Paper Jams At Lever 2B
1. Open the front cover of the Interface Module. 2. Move the lever downward, turn the knob 2c counterclockwise, and remove the jammed paper. 3. Return the lever 2b to the original position. 13-8 Xerox Color J75 Press ® User Guide... -
Page 197: Fault Codes
5. Follow the instructions on the UI to clear other areas or to resume your print job. Fault codes The fault code table lists problems and suggested solutions that apply to the Interface Module. If the problem persists after following all instructions, call your Xerox Customer Support Center. 048-100 Cause: Paper jam: A jam notification is displayed on the UI. - Page 198 Cause: Interface Module decurler sensor or belt problem Remedy: Power off the machine (print engine), then power on. If problem continues, contact the Customer Support Center. 048-314 Cause: Interface Module decurler sensor or belt problem 13-10 Xerox Color J75 Press ® User Guide...
- Page 199 After clearing all jams, remove any ejected paper from the finishing output area. Power Off/On the machine. 048-321 Cause: Interface Module communication failure or connection failure Remedy: Perform the following: Check the connection between the Interface Module and the connected finishing device or devices. Xerox Color J75 Press 13-11 ® User Guide...
- Page 200 Ensure all jam clearance handles/levers are returned to their closed positions. After clearing all jams, remove any ejected paper from the finishing output area. Power Off/On the machine. 048-326 Cause: Interface Module communication failure or connection failure 13-12 Xerox Color J75 Press ® User Guide...
- Page 201 Carefully remove all sheets and paper scraps from the jam clearance areas. Close the front door. Verify the paper used is within the approved paper specifications. Open the Interface Module front door. Xerox Color J75 Press 13-13 ® User Guide...
- Page 202 Carefully remove all sheets and paper scraps from the jam clearance areas. Close the front door. Verify the paper used is within the approved paper specifications. Open the Interface Module front door. 13-14 Xerox Color J75 Press ® User Guide...
-
Page 203: High Capacity Stacker (Hcs)
Note The HCS requires the Interface Module. The Interface Module acts as a communication device and paper path between the machine and the HCS. 1. Interface Module 2. High Capacity Stacker (HCS) Xerox Color J75 Press 14-1 ® User Guide... -
Page 204: Identifying The Components
Stacker Tray, which is located on a movable Stacker Cart. Note The Stacker Tray/Cart capacity may be less than 5000 sheets if the media being used is heavyweight or thicker sheets. 14-2 Xerox Color J75 Press ® User Guide... -
Page 205: Control Panel
Copies/prints are aligned easily without folds or wrinkles in the output. To enable easier pick-up of the output, the HCS can be stopped by selecting the Stop button on the machine’s UI. Xerox Color J75 Press 14-3 ® User Guide... -
Page 206: Unloading The Stacker Tray
7. Push the empty Stacker Cart straight into the HCS. 8. Position the securing bar on the fixed area inside the HCS. 9. Close the front door; the tray will rise to the operate position. 14-4 Xerox Color J75 Press ® User Guide... -
Page 207: Problem Solving
Perform the following steps to clear the jam and resume printing: 1. Open the HCS Front Cover. 2. Lift the green handle(s) and/or rotate the green knob and remove all paper in the entrance area. Xerox Color J75 Press 14-5 ® User Guide... -
Page 208: Hcs Transport Jams (E4, E5, And E6)
1. Open the HCS Front Cover. 2. Lift the green handle(s) and/or rotate the green knob and remove all paper in the entrance area. 3. Close the green handle(s). 4. Close the HCS Front Cover. 14-6 Xerox Color J75 Press ® User Guide... - Page 209 10. If the UI indicates there is a jam in the print engine, follow the instructions on the screen to remove any paper in the area indicates. 11. Follow the instructions displayed on the UI to resume printing. Xerox Color J75 Press 14-7 ® User Guide...
-
Page 210: Hcs Top Tray Jam (E7)
1. Remove any output delivered to the Top Tray. 2. Open the HCS Front Cover. 3. Lift the green handle(s) and/or rotate the green knob and remove all paper in the entrance area. 4. Close the green handle(s). 14-8 Xerox Color J75 Press ® User Guide... -
Page 211: Hcs Exit Jam (E8)
Perform the following steps to clear the jam and resume printing: 1. Open the HCS Front Cover. 2. Lift the green handle and/or rotate the green knob and remove all paper in the entrance area. Xerox Color J75 Press 14-9 ® User Guide... -
Page 212: Hints And Tips For Using The Hcs
Ensure that the machine power is switched “On” Ensure that the Ground Fault Indicator is in the “On” position If the power has not been restored by checking the above items, then call for service 14-10 Xerox Color J75 Press ® User Guide... -
Page 213: Fault Codes
Cause: HCS bypass exit sensor fault Remedy: Perform the following: Power Off/On the machine If the problem still exists, contact the Customer Support Center. Carefully remove all sheets and paper scraps from jam clearance areas. Xerox Color J75 Press 14-11 ® User Guide... - Page 214 Remedy: Perform the following: Power Off/On the machine If the problem still exists, contact the Customer Support Center. Carefully remove all sheets and paper scraps from jam clearance areas. 049-116 Cause: Stacker sensor fault 14-12 Xerox Color J75 Press ® User Guide...
- Page 215 Open the HCS front door. Carefully remove all sheets and paper scraps from jam clearance areas. Close the HCS front door. 049-211 Cause: HCS front door sensor fault Remedy: Perform the following: Xerox Color J75 Press 14-13 ® User Guide...
- Page 216 If the problem still exists, contact the Customer Support Center. 049-216 Cause: Stacker cart sensor fault Remedy: Perform the following: Power Off/On the machine If the problem still exists, contact the Customer Support Center. 049-217 Cause: Stacker full sensor fault 14-14 Xerox Color J75 Press ® User Guide...
- Page 217 Power Off/On the machine If the problem still exists, contact the Customer Support Center. Carefully remove all sheets and paper scraps from jam clearance areas. 049-225 Cause: Paper in/out sensor failure Remedy: Perform the following: Xerox Color J75 Press 14-15 ® User Guide...
- Page 218 Carefully remove all sheets and paper scraps from jam clearance areas. 049-234 Cause: HCS sensor failure Remedy: Perform the following: Power Off/On the machine If the problem still exists, contact the Customer Support Center. 14-16 Xerox Color J75 Press ® User Guide...
- Page 219 Cause: HCS sensor failure Remedy: Perform the following: Power Off/On the machine If the problem still exists, contact the Customer Support Center. Carefully remove all sheets and paper scraps from jam clearance areas. Xerox Color J75 Press 14-17 ® User Guide...
- Page 220 Remedy: Perform the following: Power Off/On the machine If the problem still exists, contact the Customer Support Center. Carefully remove all sheets and paper scraps from jam clearance areas. 049-251 Cause: HCS sensor failure 14-18 Xerox Color J75 Press ® User Guide...
- Page 221 If the problem still exists, contact the Customer Support Center. Carefully remove all sheets and paper scraps from jam clearance areas. 049-282 Cause: HCS sensor failure Remedy: Perform the following: Power Off/On the machine Xerox Color J75 Press 14-19 ® User Guide...
- Page 222 Cause: HCS communication or software fault Remedy: Perform the following: Power Off/On the machine If the problem still exists, contact the Customer Support Center. Check the connection between the Interface Module and the HCS. 14-20 Xerox Color J75 Press ® User Guide...
- Page 223 Check the connection between the Interface Module and the HCS. 049-900 Cause: The HCS detects paper at the HCS top tray, HCS bypass, or at the HCS stacker tray. However, no paper is present; HCS sensor fault Xerox Color J75 Press 14-21 ® User Guide...
- Page 224 However, no paper is present; HCS sensor fault Remedy: Perform the following: Power Off/On the machine If the problem still exists, contact the Customer Support Center. Carefully remove all sheets and paper scraps from jam clearance areas. 14-22 Xerox Color J75 Press ® User Guide...
- Page 225 Power Off/On the machine If the problem still exists, contact the Customer Support Center. Carefully remove all sheets and paper scraps from jam clearance areas. 049-960 Cause: HCS sensor failure Remedy: Perform the following: Xerox Color J75 Press 14-23 ® User Guide...
- Page 226 Cause: Mix size, stacker full detection fault Remedy: Perform the following: Power Off/On the machine If the problem still exists, contact the Customer Support Center. Open the HCS front door. Remove any paper from the stacker cart. 14-24 Xerox Color J75 Press ® User Guide...
- Page 227 Remedy: Perform the following: Power Off/On the machine If the problem still exists, contact the Customer Support Center. Open the HCS front door. Remove any paper from the stacker cart. Close the HCS front door. Xerox Color J75 Press 14-25 ® User Guide...
-
Page 228: Specifications
(8.3 in.) minimum measurement across the feed direction. Non-standard papers shorter than 254 mm (10 in.) in the cross-feed direction require 330 mm (13 in.) minimum measurement in the feed direction. 14-26 Xerox Color J75 Press ® User Guide... -
Page 229: Standard/Booklet Maker Finisher
2. Standard or Booklet Maker Finisher: These finishers provide a wide range of finishing and folding options. The Booklet Maker Finisher is shown in the above illustration. Note The Standard Finisher or Booklet Maker Finisher may be referred to simply as the finisher. Xerox Color J75 Press 15-1 ® User Guide... - Page 230 Remove this cart- ridge to replace staples and clear staple jams. Punch scrap container Collects the scraps from the puncher. Open to remove the scraps. 15-2 Xerox Color J75 Press ® User Guide...
-
Page 231: Folding Feature
Fold types Important The Single Fold (Bi-Fold) option is available only with the Booklet Maker Finisher. The C-Fold and Z-Fold options are available only with the C/Z Folder. These fold types are available: Xerox Color J75 Press 15-3 ® User Guide... - Page 232 A Bi-Fold has one fold which creates two panels to the output. C-Fold A C-Fold has two folds which creates a three-panel output. Z-Fold A Z-Fold has two folds that are folded in opposite directions, resulting in a type of fan fold. 15-4 Xerox Color J75 Press ® User Guide...
-
Page 233: Loading Paper/Tabs In Tray 8/T1 (Post-Process Inserter)
(Post-Process Inserter) 1. If necessary, remove any remaining media that is currently loaded in Tray 8/T1. 2. Hold the center of the paper guides and slide them to their desired paper size. Xerox Color J75 Press 15-5 ® User Guide... -
Page 234: Maintenance
Always refer to www.xerox.com for the latest Customer Replaceable Units (CRUs) part numbers. Store supply items and Xerox parts in their original packages in a convenient location. Supply Item Supply Unit Shipped with finisher/Reorder Quantity Staple cartridge/staple waste contain- 4 staple cartridges (5000 staples per cartridge) and 1... -
Page 235: Replace The Standard Staple Cartridge
3. Grasp the Staple Cartridge handle located at R1, and pull out the staple cartridge from the finisher. 4. Hold the positions as indicated by the arrow and remove the staple cartridge from the unit. Xerox Color J75 Press 15-7 ® User Guide... -
Page 236: Replace The Booklet Staple Cartridge
When this booklet stapler needs to be replaced, a message appears on the UI. 1. Make sure that the machine has stopped printing. 2. Open the Right Cover on the finisher. 15-8 Xerox Color J75 Press ® User Guide... - Page 237 6. Push the staple cartridge unit to its original position in the machine. 7. Close the Right Cover on the finisher. Note A message will display and the machine will not operate if the right cover is open even slightly. Xerox Color J75 Press 15-9 ® User Guide...
-
Page 238: Replacing The Staple Waste Container On The Finisher
3. Locate the Staple Waste Container ( R5) in the finisher, and move the lock lever to the unlock position. 4. Hold R5 as shown in the figure and remove the staple waste container from the machine. 15-10 Xerox Color J75 Press ® User Guide... - Page 239 6. Hold the new staple waste container by the R5 handle area and push it into the machine. Note To prevent injury, do not put your fingers on top of the container. 7. Push R5 until the lock lever moves to the locked position. Xerox Color J75 Press 15-11 ® User Guide...
-
Page 240: Empty The Punch Waste Container
1. Make sure that the machine has stopped printing. 2. Open the Right Cover on the finisher. 3. Pull the container out of the finisher ( R4). 15-12 Xerox Color J75 Press ® User Guide... -
Page 241: Finisher Problem Solving
Always ensure that all paper jams, including any small ripped pieces of paper, are cleared before proceeding with your print jobs. Note Remedies differ according to the paper jam location. Follow the instructions displayed to remove the jammed paper. Xerox Color J75 Press 15-13 ® User Guide... -
Page 242: Paper Jams In Tray 8/T1 (Post-Process Inserter)
If paper is torn, check inside the machine and remove it. 3. Fan the paper you removed, making sure that all four corners are neatly aligned, and then load them again. 4. Push cover 1e until you hear it click into place. 15-14 Xerox Color J75 Press ® User Guide... -
Page 243: Paper Jams At Lever 1A And Knob 1C
2. Open the finisher left cover. 3. Move lever 1a downward and turn knob 1c left. Remove the jammed paper. Note If paper is torn, check inside the machine and remove it. Xerox Color J75 Press 15-15 ® User Guide... -
Page 244: Paper Jams At Lever 1D
The machine will not operate if the cover is open even slightly. Paper jams at lever 1d 1. Make sure that the machine has stopped printing. 2. Open the finisher left cover. 3. Move lever 1d upwards and remove the jammed paper. 15-16 Xerox Color J75 Press ® User Guide... -
Page 245: Paper Jams At Lever 1B
The machine will not operate if the cover is open even slightly. Paper jams at lever 1b 1. Make sure that the machine has stopped printing. 2. Open the finisher left cover. Xerox Color J75 Press 15-17 ® User Guide... -
Page 246: Paper Jams At Lever 3B And 3D
5. Close the finisher left cover completely. Note The machine will not operate if the cover is open even slightly. Paper jams at lever 3b and 3d 1. Make sure that the machine has stopped printing. 15-18 Xerox Color J75 Press ® User Guide... - Page 247 4. Return the levers 3b and 3d to their original positions. 5. Close the Right Cover on the finisher. Note A message will display and the machine will not operate if the right cover is open even slightly. Xerox Color J75 Press 15-19 ® User Guide...
-
Page 248: Paper Jams At Lever 3E And Knob 3C
3. Move the lever 3e and turn the knob 3c; remove the jammed paper. Note If paper is torn, check inside the machine and remove it. 4. Return the lever 3e its original position. 15-20 Xerox Color J75 Press ® User Guide... -
Page 249: Paper Jams At Lever 3G And Knob 3F
2. Open the Right Cover on the finisher. 3. Move the lever 3g and turn the knob 3f and remove the jammed paper. Note If paper is torn, check inside the machine and remove it. Xerox Color J75 Press 15-21 ® User Guide... -
Page 250: Paper Jams At Lever 4B And Knob 3A
Paper jams at lever 4b and knob 3a 1. Make sure that the machine has stopped printing. 2. Open the Right Cover on the finisher. 3. Move the lever 4b and turn the knob 3a; remove the jammed paper. 15-22 Xerox Color J75 Press ® User Guide... -
Page 251: Paper Jams At Lever 2A And Knob 3A
A message will display and the machine will not operate if the right cover is open even slightly. Paper jams at lever 2a and knob 3a 1. Make sure that the machine has stopped printing. 2. Open the Right Cover on the finisher. Xerox Color J75 Press 15-23 ® User Guide... -
Page 252: Paper Jams At Lever 2B And Knob 2C
A message will display and the machine will not operate if the right cover is open even slightly. Paper jams at lever 2b and knob 2c 1. Make sure that the machine has stopped printing. 15-24 Xerox Color J75 Press ® User Guide... - Page 253 4. Return the lever 2b to its original position. 5. Close the Right Cover on the finisher. Note A message will display and the machine will not operate if the right cover is open even slightly. Xerox Color J75 Press 15-25 ® User Guide...
-
Page 254: Paper Jams At 2C, 2E, 2F, And 2D
If paper is torn, check inside the machine and remove it. 4. If you cannot remove the paper, return the lever 2e/2f to its original position. Swing the lever 2e/2f, turn the knob 2c to the right, and remove the jammed paper. 15-26 Xerox Color J75 Press ® User Guide... -
Page 255: Paper Jams At 2D And Lever 2G
A message will display and the machine will not operate if the right cover is open even slightly. Paper jams at 2d and lever 2g 1. Make sure that the machine has stopped printing. 2. Open the Right Cover on the finisher. Xerox Color J75 Press 15-27 ® User Guide... -
Page 256: Paper Jams At Unit 4 And Knob 4A
A message will display and the machine will not operate if the right cover is open even slightly. Paper jams at unit 4 and knob 4a 1. Make sure that the machine has stopped printing. 15-28 Xerox Color J75 Press ® User Guide... - Page 257 3. Pull out unit 4. 4. Turn the knob 4a to remove the jammed paper from the left side of unit 4. Note If paper is torn, check inside the machine and remove it. Xerox Color J75 Press 15-29 ® User Guide...
-
Page 258: Paper Jams At Finisher Top Tray
Paper jams at finisher top tray 1. Make sure that the machine has stopped printing. 2. Remove jammed paper from the finisher top tray. Note If paper is torn, check inside the machine and remove it. 15-30 Xerox Color J75 Press ® User Guide... -
Page 259: Paper Jams At Finisher Stacker Tray
Paper jams at finisher stacker tray 1. Make sure that the machine has stopped printing. 2. Remove jammed paper from the finisher stacker tray. Note If paper is torn, check inside the machine and remove it. Xerox Color J75 Press 15-31 ® User Guide... -
Page 260: Paper Jams At The Optional Booklet Maker Tray
1. Make sure that the machine has stopped printing. 2. Open the Right Cover on the finisher. 3. Turn knob 4a and remove any jammed paper from the optional booklet maker tray. 15-32 Xerox Color J75 Press ® User Guide... -
Page 261: Stapler Faults
Remove the bent staple when opening the staple cartridge cover. If you do not remove the bent staple, a staple jam may occur as a result. Use the staple cartridge cover only when removing the bent staple. Xerox Color J75 Press 15-33 ® User Guide... -
Page 262: Staple Jams In The Standard Staple Cartridge
4. Check the inside of the finisher for any remaining staples, and if necessary, remove them. 5. Open the staple cartridge unit as shown and remove the jammed staple. Warning To avoid injury to your fingers, carefully remove the jammed staples from the cartridge. 15-34 Xerox Color J75 Press ® User Guide... -
Page 263: Staple Jams In The Booklet Maker Cartridge
Staple jams in the booklet maker cartridge Note Always check inside the finisher for any individual staples or staple remnants. 1. Make sure that the machine has stopped printing. 2. Open the Right Cover on the finisher. Xerox Color J75 Press 15-35 ® User Guide... - Page 264 5. Remove the jammed staples from the cartridge. Warning To avoid injury to your fingers, carefully remove the jammed staples from the cartridge. 6. While holding the tabs of a new staple cartridge, push it into the unit. 15-36 Xerox Color J75 Press ® User Guide...
-
Page 265: Reinserting The Standard Staple Cartridge
Use this procedure if the standard staple cartridge is inserted incorrectly into the machine. Note Always check inside the finisher for any individual staples or staple remnants. 1. Make sure that the machine has stopped printing. 2. Open the Right Cover on the finisher. Xerox Color J75 Press 15-37 ® User Guide... - Page 266 5. Move the lever on the rear of the staple cartridge unit in the downward direction. 6. While holding the lever down, turn over the unit and remove the staple cartridge from the unit. 15-38 Xerox Color J75 Press ® User Guide...
-
Page 267: Fault Codes
If an error code appears that is not listed in the table below, or if an error persists after following the listed solution, then contact your Xerox Customer Support Center. If an error code is displayed, all print data of the machine as well as print data stored in the machine’s built-in memory is discarded. - Page 268 If the error persists, contact the Customer Support Center. Check for any obstructions in the paper path and clear them. 012-214 Cause: The finisher malfunctioned. Remedy: Perform the following: Power off/on the machine, and if necessary, resend/restart your print job. 15-40 Xerox Color J75 Press ® User Guide...
- Page 269 Remedy: Perform the following: Power off/on the machine, and if necessary, resend/restart your print job. If the error persists, contact the Customer Support Center. Check for any obstructions in the paper path and clear them. Xerox Color J75 Press 15-41 ® User Guide...
- Page 270 Power off/on the machine, and if necessary, resend/restart your print job. If the error persists, contact the Customer Support Center. Check for any obstructions in the paper path and clear them. 012-228 Cause: The finisher malfunctioned. 15-42 Xerox Color J75 Press ® User Guide...
- Page 271 If the error persists, contact the Customer Support Center. Check for any obstructions in the paper path and clear them. 012-237 Cause: The finisher malfunctioned. Remedy: Perform the following: Power off/on the machine, and if necessary, resend/restart your print job. Xerox Color J75 Press 15-43 ® User Guide...
- Page 272 Remedy: Perform the following: Power off/on the machine, and if necessary, resend/restart your print job. If the error persists, contact the Customer Support Center. Check for any obstructions in the paper path and clear them. 15-44 Xerox Color J75 Press ® User Guide...
- Page 273 Power off/on the machine, and if necessary, resend/restart your print job. If the error persists, contact the Customer Support Center. Check for any obstructions in the paper path and clear them. 012-252 Cause: The finisher malfunctioned. Xerox Color J75 Press 15-45 ® User Guide...
- Page 274 If the error persists, contact the Customer Support Center. Check for any obstructions in the paper path and clear them. 012-263 Cause: The finisher malfunctioned. Remedy: Perform the following: Power off/on the machine, and if necessary, resend/restart your print job. 15-46 Xerox Color J75 Press ® User Guide...
- Page 275 Remedy: Perform the following: Power off/on the machine, and if necessary, resend/restart your print job. If the error persists, contact the Customer Support Center. Check for any obstructions in the paper path and clear them. Xerox Color J75 Press 15-47 ® User Guide...
- Page 276 024-974 Cause: When feeding paper from the Post-Process Inserter Tray, the designated paper size and the actual size of paper in the tray differ. Remedy: Reset/change the paper or cancel the job. 15-48 Xerox Color J75 Press ® User Guide...
- Page 277 Cause: The booklet stapler low staple signal is on Remedy: Remove all paper from the booklet tray. 024-987 Cause: The booklet folder tray is full Remedy: Remove all paper from the tray. Set the output tray for three fold. Xerox Color J75 Press 15-49 ® User Guide...
- Page 278 Remedy: Confirm the folding settings and try to print again. 124-709 Cause: The number of pages exceeds the number of pages that can be stapled Remedy: Decrease the number of pages, or cancel the stapling settings, then try to print again. 15-50 Xerox Color J75 Press ® User Guide...
-
Page 279: Specifications
*When using A4 LEF, B5 LEF, 8.5 x 11 in. LEF, 8 x 10 in. LEF, 7.5 x 10.5 in. LEF only. When using paper of other sizes, tray capacity is 1,500 sheets and 100 sets. **Tray may not support some paper types. Xerox Color J75 Press 15-51 ® User Guide... - Page 280 *: Angled stapling for A3 and A4 Hole Punching Supported paper size: Maximum: A3/11 x 17 in. Minimum: B5 LEF (2 holes), A4 LEF (4 holes) Number of holes: 2, 4, 3 (optional) Paper type: 55-220 gsm 15-52 Xerox Color J75 Press ® User Guide...
- Page 281 Maximum number of sheets: Fold Fold and Staple: 25 sheets Fold only: 5 sheets When using Xerox 20 lb./75 gsm paper, only 14 sheets can be stapled if adding a cover. Paper size: Maximum: A3, 13 x 18 in. Minimum: A4 SEF, 8.5 x 11 in. SEF...
-
Page 282: Optional C/Z Folder
Z-Fold Half Sheet Z-paper size: 11 x 17 in./A3, 10 x 14 in./B4, 8K Capacity: Maximum: 80 sheets (A3/11 x 17 in. Xerox 20 lb./75 gsm paper Z folding) 20 sheets for 8K and 10 x 14 in./B4 Paper type: 16-24 lb./64-90 gsm... -
Page 283: Squarefold Trimmer Module
Flattens the booklet spine, thereby reducing the booklet’s thickness and giving it the appearance of a perfect-bound book Trims/cuts away the face (edge) of the booklet, resulting in a neat finished edge Xerox Color J75 Press 16-1 ® User Guide... -
Page 284: Identifying The Components
4. Control Panel: The Control Panel consists of a mimic display, buttons, and various indicator lights. 5. Trimmer Waste Container: Collects scrap/waste from the trimmer. Pull open to remove and dispose of trimmer waste scraps. 16-2 Xerox Color J75 Press ® User Guide... -
Page 285: Paper Path
The trail edge is trimmed/cut (based on the finished booklet size entered for the Trimmer Mode Setting). 6. The booklet then moves to the exit area where it is transported to the Booklet Output Tray. Xerox Color J75 Press 16-3 ® User Guide... -
Page 286: Control Panel
Settings button: Press this button to adjust the Square Fold setting; refer to the next item. Square Fold options: Select the desired setting; these settings are discussed in more detail in the section entitled “Square Fold options.” 16-4 Xerox Color J75 Press ® User Guide... -
Page 287: Square Fold Feature
1. Square Fold/Book Pressing options on the machine UI; the illustration shown is a representation only. The actual images on the machine UI may vary depending on the machine to which it is connected. 2. SquareFold Trimmer Module control panel Xerox Color J75 Press 16-5 ® User Guide... - Page 288 1. This booklet was not square-folded. It has a more rounded, thicker appearance to the spine of the booklet. 2. This booklet was square-folded. The booklet spine is flattened and squared, giving it the appearance of a perfect-bound book. 16-6 Xerox Color J75 Press ® User Guide...
-
Page 289: Accessing The Square Fold Options
To access the Square Fold feature, select the Booklet Trimming/Pressing button. 4. From the Folding screen, select Single Fold. a) Select Fold as a Set. b) Select Booklet Trimming/Pressing button to access the Square Fold (Book Pressing) feature. Xerox Color J75 Press 16-7 ® User Guide... -
Page 290: Trimmer Feature
The descriptions given for each of the Trimmer options are applicable for network print jobs, and apply to any print server/print driver connected to the machine. 16-8 Xerox Color J75 Press ® User Guide... -
Page 291: Trim Guidelines
Note The settings shown in the following table are provided as examples and are not meant to represent every possible job scenario; again, use this table as a guideline only. Xerox Color J75 Press 16-9 ® User Guide... - Page 292 12 x 18 in./305 x 6 x 9 in./152 x 28 lbs./105 458 mm 229 mm 12 x 18 in./305 x 6 x 9 in./152 x 80 lbs./120 458 mm 229 mm 16-10 Xerox Color J75 Press ® User Guide...
-
Page 293: Accessing The Trimmer Options
To access the Trimmer feature, select the Booklet Trimming/Pressing button. 4. From the Folding screen, select Single Fold. a) Select Fold as a Set. b) Select Booklet Trimming/Pressing button to access the Trimming feature. Xerox Color J75 Press 16-11 ® User Guide... -
Page 294: Hints And Tips
Do you need to shift any full-page images in order to ensure they fit on the finished booklet? These are important questions which can affect the output of your booklet jobs, especially if you are using full-page images and trimming the booklet edges. 16-12 Xerox Color J75 Press ® User Guide... -
Page 295: Follow These Tips
User Interface (UI). Note To determine if the jam/fault is within the finisher or with the SquareFold Trimmer Module, always begin your troubleshooting with the SquareFold Trimmer Module. Xerox Color J75 Press 16-13 ® User Guide... -
Page 296: Clearing Jams
Use the following procedure to clear jams when the E1 and/or E2 LED is lit on the SquareFold Trimmer Module control panel. 1. Make sure that the machine is not in operation, and press the button on the left cover of the Trimmer unit to open the cover. 16-14 Xerox Color J75 Press ® User Guide... - Page 297 2. Remove the jammed paper. 3. If you cannot remove the paper in Step 2, open the right cover of the finisher. 4. Turn the knob 4a to the right, and then remove the jammed paper. Xerox Color J75 Press 16-15 ® User Guide...
-
Page 298: Clearing E3 Jams
Use the following procedure to clear jams when the E3 LED is lit on the SquareFold Trimmer Module control panel. 1. Make sure that the machine is not in operation, and press the button on the right cover of the Trimmer unit to open the cover. 16-16 Xerox Color J75 Press ® User Guide... -
Page 299: Fault Codes
012-115 Cause: Finisher jam or fault Remedy: Perform the following: 1. If machine UI continues to reflect a fault/jam, go to the finisher: Open the finisher. Remove any jams Xerox Color J75 Press 16-17 ® User Guide... - Page 300 If full, empty the container and reinsert it into the SquareFold Trimmer Module. If the container is partially pulled out, push it completely in. 5. If necessary, follow any remaining instructions on the machine’s UI. 16-18 Xerox Color J75 Press ® User Guide...
- Page 301 If the container is partially pulled out, push it completely in. 5. If necessary, follow any remaining instructions on the machine’s UI. 6. If fault persists, repeat the previous steps; if fault persists after that, call for service. Xerox Color J75 Press 16-19 ® User Guide...
- Page 302 5. If necessary, follow any remaining instructions on the machine’s UI. 6. If fault persists, repeat the previous steps; if fault persists after that, call for service. 013-208 Cause: The Trimmer Waste Container is full or has a fault 16-20 Xerox Color J75 Press ® User Guide...
- Page 303 Cause: Jam or communication error with the SquareFold Trimmer Module Remedy: Perform the following: 1. Power off/on the machine. 2. If fault persists, call for service. 013-226 Cause: Jam or communication error with the SquareFold Trimmer Module Remedy: Perform the following: Xerox Color J75 Press 16-21 ® User Guide...
- Page 304 Cause: Jam or communication error with the SquareFold Trimmer Module Remedy: Perform the following: 1. Power off/on the machine. 2. If fault persists, call for service. 013-233 Cause: Jam or communication error with the SquareFold Trimmer Module 16-22 Xerox Color J75 Press ® User Guide...
- Page 305 2. If fault persists, call for service. 013-239 Cause: Jam or communication error with the SquareFold Trimmer Module Remedy: Perform the following: 1. Power off/on the machine. 2. If fault persists, call for service. Xerox Color J75 Press 16-23 ® User Guide...
- Page 306 3. Close the SquareFold Trimmer Module Top Left and Right Covers. 4. Check the Trimmer Waste Container: If full, empty the container and reinsert it into the SquareFold Trimmer Module. If the container is partially pulled out, push it completely in. 16-24 Xerox Color J75 Press ® User Guide...
- Page 307 5. If necessary, follow any remaining instructions on the machine’s UI. 6. If fault persists, repeat the previous steps; if fault persists after that, call for service. 013-917 Cause: Jam/fault with the SquareFold Trimmer Module Xerox Color J75 Press 16-25 ® User Guide...
- Page 308 6. If fault persists, repeat the previous steps; if fault persists after that, call for service. 013-940 Cause: The Trimmer Waste Container is full or has a fault Remedy: Perform the following: 1. Pull open the container and empty any trimmer scraps from it. 16-26 Xerox Color J75 Press ® User Guide...
-
Page 309: Technical Data
5-20 sheet booklet (up to 80 imaged sides) at 24 lb./90 gsm 5-25 sheet booklet (up to 100 imaged sides) at 200 lb./80 gsm Cut amount: 2-20 mm, adjustable in 0.1 mm increments Xerox Color J75 Press 16-27 ® User Guide... - Page 310 SquareFold Trimmer Module Item Specifications Paper weights 16 lb. bond-90 lb. cover (60-220 gsm) 16-28 Xerox Color J75 Press ® User Guide...
- Page 311 Copy tab 5-3 Fault History 8-3 Image Quality tab 5-8 Feeding devices 1-7 Layout Adjustment tab 5-10 Finishing devices 1-7 Output Color 5-5 Folding 5-26 Output Format tab 5-16 Paper Supply 5-4 Reduce/Enlarge 5-3 Xerox Color J75 Press ® User Guide...
- Page 312 Overwrite Hard Disk 8-2 manual decurler buttons on the Interface Paper Tray Status 8-1 Module 13-4 Print Reports 8-2 paper curl settings on the Interface Module Software Version 8-2 13-3 paper jams at lever 1a 13-5 Xerox Color J75 Press ® User Guide...
- Page 313 E1/E2 16-14 OHCF problem solving 12-13 E3 16-16 OHCF specifications Standard Finisher Plus Oversized High Capacity Feeder (OHCF) 1-7, 1-, finisher stacker tray 15-31 12-1, 12- finisher top tray 15-30 Overwrite Hard Disk 8-2 Xerox Color J75 Press ® User Guide...
- Page 314 Interface Module paper jams 16-13 13-3 E1/E2 16-14 Printing 3-1 E3 16-16 from the Xerox EX Print Server 3-2 paper path 16-3 from the Xerox FreeFlow Print Server 3-1 problem solving 16-13 from your computer 3-1 square fold feature 16-5...
- Page 315 Tray 5 (Bypass) 4-6 Submitting a print job 3-1 loading tab stock in Trays 1, 2, and 3 4-2 from the Xerox EX Print Server 3-2 loading transparencies in the OHCF (Trays from the Xerox FreeFlow Print Server 3-1...
- Page 316 Index Xerox Color J75 Press ® User Guide...