Table of Contents
Advertisement
Advertisement
Table of Contents

Related Manuals for Kodak 2200


Summary of Contents for Kodak 2200
- Page 1 KODAK 2200 Intraoral X-ray System User’s Manual...
- Page 2 This document is originally written in English. Manual Name: KODAK 2200 Intraoral X-ray System, User Guide Document code: SM731 Revision Number: Rev 01 Printed Date: 6/2009 The brand names and logos reproduced in this guide are copyright. KODAK is a trademark of KODAK used under License.
-
Page 3: Table Of Contents
Table of Contents 1. Safety and Regulatory Information ...................1-1 Conventions Used in This Manual ....................1-1 General Safety Guidelines......................1-1 Warnings and Safety Instructions ....................1-2 Marking and Labelling Symbols.....................1-4 EEC Regulations ...........................1-5 U.S. Regulations..........................1-5 2. System Overview ........................2-1 Components ..........................2-1 Wall-Mounted Unit for Irix Replacement ..................2-3 Label Locations..........................2-4 Ceiling-mounted Unit ........................2-5 Mounted on Mobile Stand (Optional) .....................2-6... - Page 4 List of Figures Figure 1: KODAK 2200 Intraoral X-ray System....................2-1 Figure 2: Side view of KODAK 2200 Intraoral X-ray System ................2-2 Figure 3: KODAK 2200 Intraoral X-ray System:....................2-3 Figure 4: Identification labels on standard mount ....................2-4 Figure 5: Identification labels on Irix replacement mount..................
-
Page 5: Safety And Regulatory Information
Personnel operating and maintaining this system should receive training and be familiar with all aspects of operation and maintenance. • KODAK 2200 Intraoral x-ray system is intended to be used at the direction of dentists, oral surgeons and orthodontists for x-ray imaging of the dento-maxillo-facial area. -
Page 6: Warnings And Safety Instructions
• To ensure safety, read all user manuals carefully before using the system and observe all Caution, Important, and Note callouts located throughout the manual. • Keep this manual with the equipment. • Reading this manual does not qualify you to operate, test, or calibrate this system. - Page 7 WARNING The user is responsible for the operation and maintenance of this unit. This unit must only be operated by legally qualified persons. The cover of the unit must not be opened by the user. Inspection and maintenance operations should only be carried out by an approved technician.
-
Page 8: Marking And Labelling Symbols
Marking and Labelling Symbols ATTENTION: CONSULT ACCOMPANYING DOCUMENTS WARNING & IONIZING RADIATION: IONIZING RADIATION CHASSIS GROUND STUD. PROTECTIVE EARTH POWER ON POWER OFF SM731_K2200_01_en 06/2009... -
Page 9: Eec Regulations
EEC Regulations The Kodak intraoral x-ray system is a Class II b medical device, which bears the following mark of conformity: U.S. Regulations CAUTION: U.S. federal law restricts this device to sale by or on the order of a dentist. - Page 10 SM731_K2200_01_en 06/2009...
-
Page 11: System Overview
2. System Overview Components Figure 1: KODAK 2200 Intraoral X-ray System 1. High-frequency x-ray generator • Transformer and associated electronics, and an oil-bathed x-ray tube • Beam-limiting device • Radiation diameter – 6 cm (2 3/8 in.) • Distance from x-ray tube focal spot to skin – 20 cm (7 7/8 in.) •... -
Page 12: Figure 2: Side View Of Kodak 2200 Intraoral X-Ray System
4. Scissor arm • Wall-mounted with a choice of extensions Figure 2: Side view of KODAK 2200 Intraoral X-ray System Extension Span A CG 645 47,0 cm 170.0 cm (18.5 in.) (66 15/16 in.) CG 646 64.8 cm 188.0 cm (25.5 in.) -
Page 13: Wall-Mounted Unit For Irix Replacement
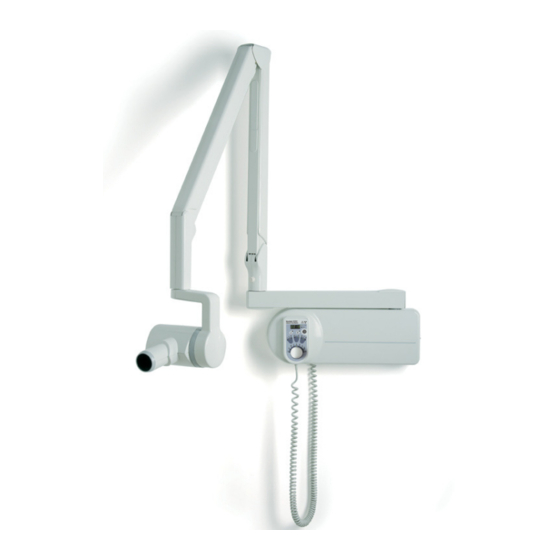
Wall-Mounted Unit for Irix Replacement Figure 3: KODAK 2200 Intraoral X-ray System: Replacement of Irix System 1. High-frequency x-ray generator 2. Wall framework 3. Control timer unit 4. Separate exposure switch 5. Scissor arm 6. Rectangular collimator 7. On/off switch with built-in light... -
Page 14: Label Locations
Label Locations Figure 4: Identification labels on standard mount Figure 5: Identification labels on Irix replacement mount SM731_K2200_01_en 06/2009... -
Page 15: Ceiling-Mounted Unit
Ceiling-mounted Unit Figure 6: KODAK 2200 Intraoral X-ray System ceiling-mounted unit 1. High-frequency x-ray generator 2. Ceiling-mounted unit containing the high-frequency x-ray generator’s control electronics 3. Separate timer/control unit for the x-ray generator 4. Scissor arm 5. On/off switch with built-in light 6. -
Page 16: Mounted On Mobile Stand (Optional)
Mounted on Mobile Stand (Optional) Figure 7: KODAK 2200 Intraoral X-ray System mounted on mobile stand 1. High-frequency x-ray generator 2. Mobile stand containing the high-frequency x-ray generator’s control electronics 3. Timer/control unit for the x-ray generator 4. Scissor arm 5. -
Page 17: Floor-Mounted Unit (Optional)
Floor-mounted Unit (Optional) Figure 8: KODAK 2200 Intraoral X-ray System floor-mounted unit 1. High-frequency x-ray generator 2. Floor column containing the high-frequency x-ray generator’s control electronics 3. Timer/control unit for the x-ray generator 4. Scissor arm 5. On/off switch with built-in light 6. -
Page 18: Control Timer Unit
Control Timer Unit Figure 9: KODAK 2200 Intraoral X-ray System control timer unit 1. Display 2. Exposure time - emitted dose selection 3. X-ray exposure button 4. X-ray emission control light 5. Cooling indicator 6. Child/Adult/Large selector 7. kV selector 8. -
Page 19: Using The System
3. Using the System Every dental specialist would like to produce high-quality intraoral radiographs that reveal maximum detail with the minimum dose to the patient, show teeth and anatomic structures accurately with a minimum of distortion or magnification, and have optimal density and contrast to maximize their use for the detection of dental diseases. -
Page 20: Positioning The Imaging Receptor
Figure 11: Paralleling technique (left) and Bisecting technique (right) Positioning the imaging receptor Using the KODAK 2200 Intraoral X-ray System, you may create an x-ray image on one of three different types of imaging receptors: • Conventional silver halide films, such as KODAK INSIGHT or KODAK ULTRA-SPEED dental films. -
Page 21: Exposure
Like film, different digital sensors have varying sensitivities, so you need to adjust exposure for sensors as well. This KODAK 2200 system allows you to use 2 different modes with pre-set exposure times. These modes are programmed when installing the equipment based on your local imaging systems, as indicated in Tables 9 to 11. -
Page 22: Processing
6. Acquire the image. • Press the x-ray exposure button on the control timer unit (or on the remote exposure switch). The x-ray emission indicator lights up and an audible signal is emitted. • Keep pressing until the x-ray emission light goes out and the audible signal stops. -
Page 23: Additional Features
Shorter exposure times, reducing the risk of blur due to movement of the patient or film during exposure. • Reduction in x-ray dose to patients because the KODAK 2200 System emits fewer soft rays absorbed by patients that do not contribute to the radiological picture. - Page 24 SM731_K2200_01_en 06/2009...
-
Page 25: User Mode
4. User Mode The User Mode allows you to select the settings to be used for the different pre-set modes. It also allows you to validate specific local requirements for some countries. Entering the User Mode 1. Turn on the system. The self-test is activated. - Page 26 SM731_K2200_01_en 06/2009...
-
Page 27: Care And Maintenance
5. Care and Maintenance General Maintenance To make sure that the system functions correctly, you must have it serviced annually by an authorized technician. In addition, every three months inspect the equipment and make sure of the following: Generator • The certification label is legible. -
Page 28: Cleaning
Cleaning Clean the outside of the system with a damp paper towel or soft cloth using an alcohol-based, non-corrosive cleaner. Disinfecting If necessary, wipe off surfaces with disinfectant. CAUTION: • Do not allow liquids to drip into the system. • Do not spray cleaner or disinfectant directly onto the machine. -
Page 29: Troubleshooting
Troubleshooting Problem Cause Solution Nothing lights up Unit is disconnected. Connect the unit. Fuse F1 is burned out or defective. Replace the fuse. Circuit breaker is off. Turn on the circuit breaker. Control unit doesn’t light Control unit is disconnected. Connect the control unit. -
Page 31: Technical Specifications
Carestrem Health, Inc. 150 Veronal Street Rochester, New York – USA 14608 Models KODAK 2200 Compliance with International Regulations • Medical Device directives 93/42/European Economic Community (EEC), Class II b • ElectroMagnetic Compatibility (EMC) directive 89/336/EEC • FDA Center for Devices & Radiological Health (CDRH-21-CFr title 21 sub- chapter J) (USA) •... - Page 32 Rated high voltage and maximum corresponding current • 70 kV, 7 mA Current/voltage combinations for a maximum output power of: • 490 W, 70 kV / 7 mA Rated power for exposure time of 0.1 sec. • 490 W Rate of use •...
- Page 33 Classification in Accordance with EN/IEC 60601-1-2 Group I, class B Ambient Operating Conditions • Temperatures: 5 to 35° C • Relative humidity: 30 to 85% • Atmospheric pressure: 700 to 1060 hpa Storage Conditions • Temperatures: -10 to 60° C •...
-
Page 34: X-Ray Generator
X-ray Generator TROPHY type TRX 708 CEI type OCX/65-G Rated high voltage 70 kV 70 kV Rated anodic power 490 W 490 W Maximum heat 8,700 J 10.000 J accumulated in the anode Rated value of focal spot 0,7 mm (0.027 in.) 0.7 mm (0.027 in.) (IEC 60336/1993) Target materials... -
Page 35: Equipped X-Ray Generator
Equipped X-ray Generator Parameters Features IEC standard 60601-2-28 (1993) Conform Type of protection against electric shocks Class 1 Degree of protection against electric shocks Type B Rated value of inherent filtration 1.5 mm (0.059 in.) eq. Al Rated value of additional filtration 1.0 mm (0.039 in.) eq. -
Page 36: Figure 15: Heating And Cooling Curves
Figure 15: Heating and cooling curves of the KODAK 2200 system tube head SM731_K2200_01_en 06/2009... -
Page 37: Tables Of Exposure Times
Tables of Exposure Times The following exposure timetables were established with a unit equipped with a standard cone with a focus-to-skin distance of 20 cm (8 inches). 70kV – 7mA Cone 20 cm (8 in.) 60kV – 7mA Cone 20 cm (8 in.) Maxillary Child Adult... -
Page 38: Table 9: Choice Of Film Type
Kodak Kodak 5100 S 08 Kodak RVG 5000 S 08 Trophy RVG Access S 08 Kodak Kodak 6100 size 1 & 2 S 07 Kodak RVG 6000 S 07 Trophy RVG Ultimate S 07 Trophy RVG Reference Hi Resol mode... -
Page 39: Emitted Doses
Emitted Doses To obtain the dose in mGy.cm , multiply values in the tables by the exposed surface. The exposed surface depends on the collimator that is used and is indicated in Table 13. 70kV – 7mA 60kV – 7mA t(s) t(s) t(s) -
Page 40: Table 13: Exposure Surface Versus Type Of Collimator Used
Used with Exposure Used Collimator Format digital surface type (mm) with film sensor 19 x 24 Size 0 23 x 35 Size 1 Size 0 22 x 35 Size 1 24 x 40 31 x 39 Size 2 12.1 Size 2 31 x 41 Size 3 27 x 54 Standard 60 mm... - Page 41 6-11 06/2009 SM731_K2200_01_en...
- Page 42 © Carestream Health, Inc., 2009 The Kodak trade mark and trade dress are used under license from Eastman Kodak Company SM731-1 06/09 Trophy A subsidiary of Carestream Health, Inc. 4 rue F. Pelloutier Croissy-Beaubourg 77435 Marne la Vallée Cedex 2 (France)