Kodak 2100 User Manual
Intraoral x-ray system
Hide thumbs
Also See for 2100:
- Extended user manual (137 pages) ,
- User manual (41 pages) ,
- Start here (2 pages)
Table of Contents
Advertisement
Quick Links
Advertisement
Table of Contents

Related Manuals for Kodak 2100


Summary of Contents for Kodak 2100
- Page 1 2100 Intraoral X-Ray System User’s Guide...
- Page 2 Notice Congratulations on your purchase of the KODAK 2100 Intraoral X-ray System. Thank you for your confidence in our products and we will do all in our power to ensure your complete satisfaction. The User Guide for the KODAK 2100 Intraoral X-ray System includes information on the usage of the equipment.
-
Page 3: Table Of Contents
KODAK 2100 Intraoral X-Ray Unit Configurations ........ - Page 4 Cleaning and Disinfecting the KODAK 2100 Intraoral X-ray System ....... .
-
Page 5: 1-About This Guide
Alerts you to a condition that might cause serious damage. IMPORTANT Alerts you to a condition that might cause problems. NOTE Emphasizes important information. Provides extra information and hints. WARNING Exposure to ionizing radiation KODAK 2100 Intraoral X-Ray System User Guide (SM700)_Ed04 1–1... - Page 6 Conventions in this Guide 1–2 About This Guide...
-
Page 7: 2-Kodak 2100 System Overview
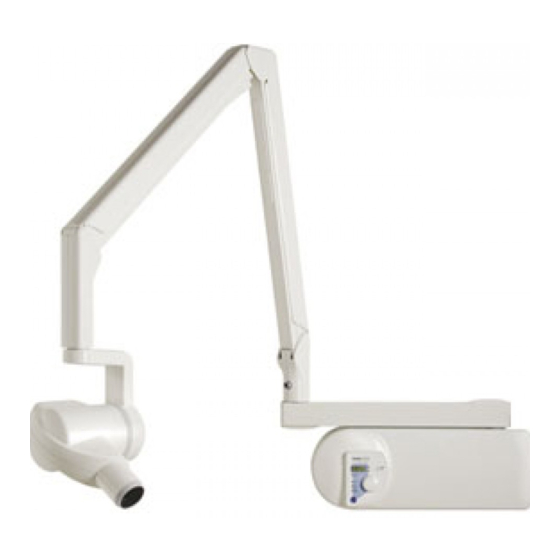
Chapter 2 KODAK 2100 SYSTEM OVERVIEW The KODAK 2100 Intraoral X-ray system is compliant with the requirements of the EEC and international medical standards. The KODAK 2100 unit has been designed to produce high-quality intraoral radiographies that: • Reveal maximum details with the minimum dose to the patient. - Page 8 An extension arm and a scissor arm which is equipped with springs that ensure arm stability. The following figure illustrates the extension arm and the scissor arm. Figure 2–1 KODAK 2100 Intraoral X-ray System - Side View Table 2–1 Extension arm types Extension...
- Page 9 General Overview The KODAK 2100 Intraoral X-ray unit is also composed of a remote exposure switch which is an optional accessory. The following KODAK 2100 unit configurations are provided: • Standard wall-mounted unit • Ceiling-mounted unit. The following mounting options are provided: •...
-
Page 10: Kodak 2100 Intraoral X-Ray Unit Configurations
KODAK 2100 Intraoral X-Ray Unit Configurations KODAK 2100 Intraoral X-Ray Unit Configurations Figure 2–2 Standard Wall-Mounted Unit High frequency X-ray generator Wall framework Separate control timer unit X-ray exposure button Scissor arm Rectangular collimator ON/OFF switch with built-in LED Extension arm 2–4... - Page 11 This configuration is an optional configuration High frequency X-ray generator Wall framework Control timer unit X-ray exposure switch with X-ray exposure button Scissor arm Rectangular collimator ON/OFF switch with built-in LED Extension arm KODAK 2100 Intraoral X-Ray System User Guide (SM700)_Ed04 2–5...
- Page 12 KODAK 2100 Intraoral X-Ray Unit Configurations Figure 2–4 Ceiling-Mounted Unit High frequency X-ray generator Ceiling mounted unit containing the main powerboard Control timer unit X-ray exposure switch Scissor arm Rectangular collimator ON/OFF switch with built-in LED Extension arm 2–6 KODAK 2100 SYSTEM OVERVIEW...
- Page 13 High frequency X-ray generator Floor column containing the main powerboard Control timer unit X-ray exposure switch with X-ray exposure button Scissor arm Rectangular collimator ON/OFF switch with built-in LED Extension arm Raiser KODAK 2100 Intraoral X-Ray System User Guide (SM700)_Ed04 2–7...
- Page 14 KODAK 2100 Intraoral X-Ray Unit Configurations Figure 2–6 Unit Mounted on Mobile Base High frequency X-ray generator Mobile stand containing the main powerboard Control timer unit X-ray exposure switch with X-ray exposure button Scissor arm Rectangular collimator ON/OFF switch with LED...
-
Page 15: Control Timer Unit
- OFF: longest exposure times for films and phosphor plates Warning Selection knob: - Press and hold the knob to activate the exposure time selector. - Rotate the knob to select the exposure time. KODAK 2100 Intraoral X-Ray System User Guide (SM700)_Ed04 2–9... - Page 16 KODAK 2100 Intraoral X-Ray Unit Configurations 2–10 KODAK 2100 SYSTEM OVERVIEW...
-
Page 17: 3-Kodak 2100 Radiology Process
Paralleling technique The positioning tool used in the paralleling technique allows you to align the beam and the imaging receptor. An appropriate collimator reduces the dosage by limiting the surface exposure. KODAK 2100 Intraoral X-Ray System User Guide (SM700)_Ed04 3–1... -
Page 18: Bisecting Technique
X-ray beam and image receptor misalignment. 90° Positioning the Imaging Receptor Using the KODAK 2100 Intraoral X-ray System, you may create an X-ray image on one of the following imaging receptors: • Conventional silver halide films, such as KODAK INSIGHT or KODAK ULTRA-SPEED dental films. -
Page 19: Exposure Times
Exposure The KODAK 2100 Intraoral X-ray system allows you to select the exposure times. The exposure times indicated in Tables 3-1 to 3-4 meet the manufacturer’s recommendations. Depending on the used sensor type, you can change the mode by pressing and holding the selection knob for at least three seconds. -
Page 20: Exposure Times For Digital Sensors
Adult 0.063 0.080 0.100 0.050 0.063 0.063 0.050 0.063 0.100 KODAK Child 0.040 0.050 0.063 0.032 0.040 0.040 0.032 0.040 0.080 RVG 6100 Adult 0.063 0.080 0.100 0.050 0.063 0.063 0.050 0.063 0.100 size 0 3–4 KODAK 2100 RADIOLOGY PROCESS... -
Page 21: Emitted Doses
0.24 0.800 4.87 0.050 0.30 1.000 6.09 0.063 0.38 1.250 7.61 0.080 0.49 1.600 9.74 0.100 0.61 2.000 12.18 0.125 0.76 2.500 15.23 0.160 0.97 NOTE Dose accuracy: +/- 30% (mGy) KODAK 2100 Intraoral X-Ray System User Guide (SM700)_Ed04 3–5... -
Page 22: Film Processing
Before archiving, do not forget to wash the film correctly and to dry it in a clean place. 3–6 KODAK 2100 RADIOLOGY PROCESS... -
Page 23: 4-Acquiring An Image
This chapter describes the various tasks that you must perform for image acquisition. To acquire an image, you can use conventional films or digital receptors. If necessary, for example after a long inactivity period of the KODAK 2100 system, we recommend to start with the tube seasoning procedure. For more information, see the Tube Seasoning Procedure. -
Page 24: Launching The X-Ray
Launching the X-Ray Launching the X-Ray To launch the X-ray, follow these steps: WARNING Be careful not to be exposed to ionizing radiation 1. Press from the control timer unit or from the X-ray exposure switch. The X-ray emission indicator lights up and a beep is heard. 2. -
Page 25: 5-User Mode
To modify parameters, follow these steps: 1. Turn to select the parameter to modify. 2. Press on until "EDIT" is displayed and a beep is heard. The parameter value starts blinking. KODAK 2100 Intraoral X-Ray System User Guide (SM700)_Ed04 5–1... -
Page 26: Exiting The User Mode
Exiting the User Mode 3. Turn to change the parameter value. 4. To validate, press and hold for at least 3 seconds until "COPY" is displayed and a beep is heard. 5. To keep the initial value, press on shortly. "ABOR" is displayed. The system returns to the parameter/program mode. - Page 27 Performing a Tube Seasoning Repeat steps 3 and 4 until the end of the sequence. Your system is ready. KODAK 2100 Intraoral X-Ray System User Guide (SM700)_Ed04 5–3...
- Page 28 Performing a Tube Seasoning 5–4 USER MODE...
-
Page 29: Quick Troubleshooting
Adjust the generator position positioned correctly. completely white. The exposure time is too Increase the exposure time. short. The development time is Increase the development time (See the too short. manufacturer’s instructions). KODAK 2100 Intraoral X-Ray System User Guide (SM700)_Ed04 6–1... - Page 30 Quick Troubleshooting Malfunction Possible Cause Action The developer is too cold. Heat the developer The developer is too old or Replace with a new developer diluted. The exposure time mode is Check your exposure settings (See the not correctly selected exposure procedure).
-
Page 31: Information Messages
If you switch OFF the system, the microprocessor does not calculate the cooling time. For safety reasons, it considers that the system has not gone through the cooling cycle. I 02 Request for X-ray tube seasoning. See the User Mode section. KODAK 2100 Intraoral X-Ray System User Guide (SM700)_Ed04 6–3... -
Page 32: Error Messages
Error Messages Error Messages The following table lists the error messages and the actions to take. Table 2 Error Messages Error Possible Cause Action Message The radiography control button was released E01 + audible Quickly press on the selection knob before the exposure end. -
Page 33: Quarterly
Chapter 7 MAINTENANCE This chapter describes the maintenance tasks you must perform for your KODAK 2100 Intraoral X-ray system Quarterly Generator Check that: • The certification label is legible. • No oil leaks. Mechanical support Check that: • The wall framework is securely attached to the wall. -
Page 34: Annually
Annually We recommend that a general inspection of the unit be carried out by an authorized service technician provided by your representative. Cleaning and Disinfecting the KODAK 2100 Intraoral X-ray System IMPORTANT You must first clean the system before disinfection. - Page 35 4 rue F. Pelloutier – Croissy-Beaubourg 77435 Marne la Vallée Cedex 2 (France) + 33 1 64 80 85 00 www.kodakdental.com For more inFormation, visit: ©Carestream Health, Inc., 2010. The Kodak trademark and trade dress are used under license from Kodak. SM700 Ed04 06/2010...