Kodak RVG 6500 IPS System User's Installation Manual
Wireless digital intra-oral x-ray system
Hide thumbs
Also See for RVG 6500 IPS System:
Table of Contents
Advertisement
Advertisement
Table of Contents

Related Manuals for Kodak RVG 6500 IPS System


Summary of Contents for Kodak RVG 6500 IPS System
- Page 1 KODAK RVG 6500 System and KODAK RVG 6500 IPS System User & Installation Guide...
- Page 2 The KODAK RVG 6500 IPS System, in addition, provides the Intelligent Positioning System (IPS) to enable the dentist prior to acquisition to correctly align the X-ray beam to the RVG sensor.
-
Page 3: Table Of Contents
Overview KODAK Dental Imaging Software ....10 The RVG Acquisition Interface ....11 The IPS Aiming Ring Interface Overview . - Page 4 Launching the X-Ray ....37 Chapter 7 The RVG Mobile Application Overview ... . 39 RVG Mobile Downloading the RVG Mobile Application .
-
Page 5: Conventions In This Guide
CAUTION: Alerts you to a condition that might cause serious damage. Important: Alerts you to a condition that might cause problems. Note: Emphasizes important information. Tip: Provides extra information and hints. KODAK RVG 6500 System_User & Installation Guide (SM728)_Ed01... - Page 6 Chapter 1 Conventions in This Guide...
-
Page 7: Kodak Rvg 6500 Systems Description
The KODAK RVG 6500 Systems information applies to both KODAK RVG 6500 System as well as the KODAK RVG 6500 IPS System. The KODAK RVG 6500 IPS System information applies only to information relevant to the IPS system. Packaging of KODAK RVG 6500 System The KODAK RVG 6500 System packaging is composed of the following boxes: •... - Page 8 Chapter 2 KODAK RVG 6500 Systems Packaging...
-
Page 9: Kodak Rvg 6500 Systems Overview
The medical power supply for the RVG system The KODAK RVG 6500 IPS System is composed of all the KODAK RVG 6500 system components and the IPS aiming ring. The IPS aiming ring enables you prior to acquisition to dynamically and visually center and align the X-ray beam to the RVG sensor. -
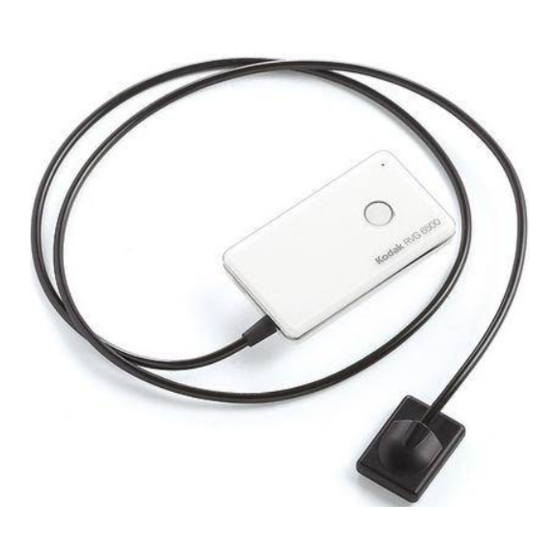
Page 10: Rvg Functional Components Overview
〈 Connected to WiFi AP 〈 Standby mode Ready for acquisition Error mode Sensor USB connector for battery charging • (A) Medical charger • (B) USB cable to charge with the computer Battery Chapter 3 KODAK RVG 6500 Systems Overview... -
Page 11: Wifi Access Point Functional Components Overview
The WiFi access point is the wireless equivalent of the wired internal Local Area Network (LAN). The WiFi access point provides connectivity between the computer and the RVG sensor(s) enabling you to use the KODAK RVG 6500 within your practice area. See the manufacturer guide for any detailed information on the WiFi access point. - Page 12 Chapter 3 KODAK RVG 6500 Systems Overview...
-
Page 13: Computer System Requirements
The KODAK RVG 6500 systems must run on a computer with a keyboard. The KODAK RVG 6500 systems must run on a computer with a mouse equipped with a right and left button and a mouse wheel. -
Page 14: General Software Overview
RVG Mobile Application for iPhone®/iPod® touch (optional) (see the relevant section) KODAK Dental Imaging Software The KODAK dental imaging software is a user-friendly working interface that was designed and developed specifically for radiological diagnosis. It is the common imaging platform for all our digital systems for dentistry. -
Page 15: The Rvg Acquisition Interface
The RVG Acquisition Interface The RVG Acquisition interface module is a user-friendly working interface that was designed and developed specifically for the KODAK RVG 6500 intraoral imaging system. Figure 6 RVG Acquisition Main Interface Sensor orientation: Pre-orients how the x-ray image is displayed in the Imaging Window. - Page 16 Figure 7 List of Available Sensors The sensor name and battery status: Battery status. The WiFi status: Wifi transmission is available. Wifi transmission is available but not good. WiFi transmission is not available. The Sensor availability: Sensor is connected to your computer and ready for use. Click to disconnect.
-
Page 17: The Ips Aiming Ring Interface Overview
The IPS aiming ring interface is a user-friendly working interfaces that was designed and developed specifically for the KODAK RVG 6500 IPS System intraoral imaging system. It enables you prior to acquisition to dynamically and visually center the x-ray beam to the RVG sensor using the centering indicator. -
Page 18: Ips Aiming Ring Interface And Rvg Sensor Centering
IPS Aiming Ring Interface and RVG Sensor Centering The IPS aiming ring interface enables you to correctly position the X-ray generator to the RVG sensor. The IPS interface enables you to manage the X-ray centering and the proper paralleling technique achievement. -
Page 19: The Rvg Mobile Application Overview
The RVG Mobile Application Overview For the RVG Mobile Application overview, see the relevant Chapter. KODAK RVG 6500 System_User & Installation Guide (SM728)_Ed01... - Page 20 16 Chapter 4 Imaging Software Overview...
-
Page 21: Wifi Access Point Setup Configurations
Setting Up the KODAK RVG 6500 Systems Important: Your computer must have an Ethernet board and be WiFi equipped before installing the KODAK RVG 6500 systems. WiFi Access Point Setup Configurations There are 2 WiFi access point setup configuration options: •... -
Page 22: Wifi Ap Wireless Configuring Setup
The computer is up to 10 meters. max. 10m max. 10m max. 10m max. 10m N ET G E A R max. 10m max. 10m max. 10m max. 10m N ET G E A R 18 Chapter 5 Setting Up the KODAK RVG 6500 Systems... -
Page 23: Installing The Kodak Dental Imaging Software
The Choose Setup Language dialog box is displayed. Select the installation language and click The Kodak Dental Imaging Software welcome page and the InstallShield wizard are displayed. The Welcome to KODAK Dental Imaging Software Installation dialog box is displayed. Click Next to launch the installation. - Page 24 (c:\program files\Kodak\Kodak Dental Imaging Software) or browse to choose another destination folder. The KODAK Dental Imaging Software dialog box is displayed. The Patient file is selected by default but you must select the device. To select the desired device, do the following:...
- Page 25 Click on the drop-down list of No Intraoral Radiography Installation. 〈 Select RVG 5x00/6x00. 〈 Click Next to begin the installation. The InstallShield Wizard is displayed. Let the installation process run automatically. KODAK RVG 6500 System_User & Installation Guide (SM728)_Ed01...
- Page 26 The Kodak Patient file - InstallShield Wizard is displayed while the patient files are installed on the hard drive. The Software Installation dialog box is displayed while the installation process continues. Click Continue Anyway until the dialog box disappears. The Installation Complete dialog box is displayed when the installation is finished. Click Finish.
- Page 27 PC when the installation is completed. Installing the Setup Installation Software Click on your desktop. The Calibration and Quality Control Software window is displayed. Click . The Calibration Tools window is displayed. KODAK RVG 6500 System_User & Installation Guide (SM728)_Ed01...
- Page 28 In the central pane, click RVG Wireless System Configuration, to access the “Setting Up the WiFi AP” window (see and follow step 10). Before the setting up of the KODAK RVG 6500 System procedures, have with you the: SSID Password...
-
Page 29: Registering The Kdis Licence
The Enter the licence number dialog box is displayed. Enter the licence number and click Validate if you have the licence number or click Cancel to continue. icon appears on the toolbar of the Imaging Window. For the RVG Mobile Application installation (optional), see Chapter 7. KODAK RVG 6500 System_User & Installation Guide (SM728)_Ed01... -
Page 30: Mounting The Rvg Holders
The RVG control box holder can also be mounted on the wall with screws (not supplied). Clip the RVG sensor holder on the control box. Insert the RVG sensor in its holder. 26 Chapter 5 Setting Up the KODAK RVG 6500 Systems... -
Page 31: Mounting The Ips Aiming Ring On The X-Ray Generator
Remove the attachment brackets (A). Remove the back cover. Insert the 4 batteries on the board respecting the polarities. Measure the X-ray tube head diameter to select the appropriate aiming ring holding brackets. KODAK RVG 6500 System_User & Installation Guide (SM728)_Ed01... - Page 32 Stick the stickers on the back cover in the appropriate locations (C). Remove the protection on the stickers. Using the 30mm marks, position the back cover on the x-ray tube head. Tighten the 4 screws. 30 mm 28 Chapter 5 Setting Up the KODAK RVG 6500 Systems...
- Page 33 Press quickly the ON/OFF button to turn ON the back upper LED to check that it is lit. Press and hold the ON/OFF button until all the LEDs are ON, then let go the ON/OFF button to turn OFF the IPS. The IPS aiming ring installation is finished. KODAK RVG 6500 System_User & Installation Guide (SM728)_Ed01...
- Page 34 30 Chapter 5 Setting Up the KODAK RVG 6500 Systems...
-
Page 35: Locking The Rvg Sensor To The Computer
You can also access the RVG Acquisition interface, doing the following: • Press the remote control button of the selected RVG control box, or • Press F2 on the computer key board. KODAK RVG 6500 System_User & Installation Guide (SM728)_Ed01... -
Page 36: Locking Several Shared Rvg Sensors To The Computer
In the RVG Acquisition interface, click to access the RVG sensor list. Find the RVG sensor in the sensor list. The sensor is identified with Click to connect the sensor to your computer, becomes Locking Several Shared RVG Sensors to the Computer If you have several shared RVG sensors, you need to lock the selected RVG sensor to the computer where the acquired image must appear. - Page 37 (A). If the unlocking was not executed you must redo the unlocking process. Click to lock the sensor to your computer, becomes Click to return to the RVG Acquisition interface. KODAK RVG 6500 System_User & Installation Guide (SM728)_Ed01...
-
Page 38: Acquiring An Image With The Rvg Sensor
Acquiring an Image with the RVG Sensor To acquire an image with the RVG sensor, follow the instructions in the presented order. Preparing the RVG Sensor To prepare the selected RVG sensor, follow these steps: Select an appropriate positioner for the region of interest and the sensor size. Cover with a disposable hygienic sleeves specifically designed for each sensor size. -
Page 39: Preparing The X-Ray Generator
Acquisition interface. The selected tooth number is displayed on the RVG Acquisition interface. Select the x-ray timing according to the region of interest and the patient type (follow the user instructions of your x-ray generator). KODAK RVG 6500 System_User & Installation Guide (SM728)_Ed01... - Page 40 Insert the sensor holding it horizontally in the patient’s mouth. Positioning in the patient’s mouth depends on the region of interest. Approach the x-ray generator tube head to the patient. (Optional) If you are using the IPS aiming ring system, press the ON button. If you are in front of the aiming ring, make sure that the front LED is ON.
-
Page 41: Launching The X-Ray
If satisfactory, remove the generator tube head. Remove the RVG sensor from the patient’s mouth. Remove the hygienic sensor protection. Important: DO NOT pull the sensor by its cable when you remove the hygienic protection. KODAK RVG 6500 System_User & Installation Guide (SM728)_Ed01... - Page 42 38 Chapter 6 Acquiring an Image...
-
Page 43: The Rvg Mobile Application Overview
The RVG mobile interface is a user-friendly working interface that is designed and developed specifically for the KODAK RVG 6500 intraoral imaging system. The RVG mobile interface module, to be used on your Apple iPhone®/iPod® touch, is downloadable from the Apple Store. It enables you to acquire X-ray images without the presence of a computer in the patient’s vicinity. - Page 44 Touch the different fields to access the different options. Figure 10 Editing Patient Window Cancel button: Cancels all the new modifications Patient file field: Displays patient information External ID field: Displays patient ID number generated by the third party patient management software Key board: Edits the patient information Upper/Lower case button: Edits lower or upper case letters...
- Page 45 Figure 14 IPS Aiming Ring Interface and Alignment Indicator (optional) The IPS aiming ring enables you prior to acquisition to dynamically and visually center and align the X-ray beam to the RVG sensor. KODAK RVG 6500 System_User & Installation Guide (SM728)_Ed01...
-
Page 46: Downloading The Rvg Mobile Application
Downloading the RVG Mobile Application If iPhone/iPod Touch is Connected to the Internet If your iPhone®/iPod® touch device is connected to the Internet, follow these steps: On the main window, tap . A window is displayed with different applications. . In the search field, enter RVG mobile and tap . -
Page 47: If Iphone/Ipod Touch Is Not Connected To The Internet
Wait until the download ends. In the lateral bar, select Devices > iPod or iPhone to upload the RVG mobile application on your device. Click on the tab Application. KODAK RVG 6500 System_User & Installation Guide (SM728)_Ed01... -
Page 48: Connecting The Device To The Wifi Access Point
Check Sysnc Applications and the check box of the RVG Mobile Application. Click to send the RVG Mobile Application to your device. Click when the upload process ends. You must now connect your device to the WiFi access point. Connecting The Device to the WiFi Access Point To connect your device to the WiFi access point, follow these steps: On your device, tap the Settings window is displayed. -
Page 49: Configuring The Preference Settings
If you want to rename your RVG sensor, tap in the Device Identification field and enter the new name. In the RVG Mobile window, tap the Acquisition field. The Mode window is displayed. KODAK RVG 6500 System_User & Installation Guide (SM728)_Ed01... - Page 50 In the Mode window, tap X-Ray field, a check sign appears in the X-Ray field. to return to the RVG Mobile window. In the RVG Mobile window, tap Image Processing field.The Processing window is displayed. In the Processing window, Endo ( is selected by optimizes the contrast values over the entire range) default.
- Page 51 RVG Mobile window. The Settings window is displayed with the new selections. These selection are automatically saved. If the settings are correct, tap the Home button to return to the main window. The configuration of the settings is saved and finished. KODAK RVG 6500 System_User & Installation Guide (SM728)_Ed01...
-
Page 52: Locking The Rvg Sensor To The Apple Device
Locking the RVG Sensor to the Apple Device To lock the RVG sensor on your Apple device, you need to have the RVG mobile application on your iPhone®/iPod® touch device. To ensure best use, follow the instructions in the following order. Important: Make sure that you have connected your device to the WiFi access point before starting. -
Page 53: Locking Several Shared Rvg Sensors To The Apple Device
To lock the selected RVG sensor to your device, follow these steps: In the Sensor list window identify the selected sensor. : Sensor is locked on your device and ready for acquisition. You can continue to section “Finding or Creating a Patient File”. KODAK RVG 6500 System_User & Installation Guide (SM728)_Ed01... - Page 54 : Sensor is available you must lock it on your device. In the Sensor list window, tap the selected sensor. Then, tap . Tap to validate. : Sensor is not available (locked on another device). You must unlock and then lock the sensor on your device.
-
Page 55: Finding Or Creating A Patient File
If you need to create or edit a patient’s information, tap to access the Edit Patient window. Tap the different fields to access the different options. Edit or modify the patient’s information. Tap to save the patient information. KODAK RVG 6500 System_User & Installation Guide (SM728)_Ed01... -
Page 56: Acquiring An Image With The Rvg Mobile Application
Tap on the selected name, the displayed window presents the patient information and the sensor status. Acquiring an Image with the RVG Mobile Application Preparing the RVG Sensor To prepare the selected RVG sensor, follow these steps: Select an appropriate positioner for the region of interest and the sensor size. Cover with a disposable hygienic sleeves specifically designed for each sensor size. -
Page 57: Preparing The X-Ray Generator
RVG sensor. When the RVG sensor is correctly centered in the ring the centring indicator becomes a green cross. Important: The IPS aiming ring turns off after 90 seconds. KODAK RVG 6500 System_User & Installation Guide (SM728)_Ed01... -
Page 58: Launching The X-Ray
Correctly align the tube head with the sensor. Make sure that the tube head is not shacking. Launching the X-Ray To launch the x-ray, follow these steps: Ask the patient to remain still. Position yourself either 2 meters behind the x-ray generator or outside the door. Keep visual contact with the patient during the x-ray. - Page 59 Remove the RVG sensor from the patient’s mouth. Remove the hygienic sensor protection. Important: DO NOT pull the sensor by its cable when you remove the hygienic protection. Tap on the acquired image to access the contrast tools. The acquired images is saved automatically. KODAK RVG 6500 System_User & Installation Guide (SM728)_Ed01...
- Page 60 Touch to access the summary of the last acquired image. You can enter any comments in the yellow comment’s field. to access the dental arch window. Tap and touch the selected tooth or teeth number. to return to the previous window . to view all the acquired images of the patient.
- Page 61 When you want to transfer all the acquired images of the patients to your computer, in the Patient window, touch the transfer window is displayed. Launch the KDIS, click , and follow the on-screen instructions. KODAK RVG 6500 System_User & Installation Guide (SM728)_Ed01...
- Page 62 58 Chapter 7 RVG Mobile Application...
-
Page 63: Quick Trouble Shooting
Check that the WiFi access point is sensor, it blinks blue then after a not ON. long time it becomes solid red. • • Configuration If it is ON and the problem persists problem. contact your representative KODAK RVG 6500 System_User & Installation Guide (SM728)_Ed01... - Page 64 Table 2 Quick Trouble Shooting (Continued) Malfunction Possible Cause Action When you turn ON your RVG • • WiFi access point is Check that the WiFi access point is sensor, it blinks blue then not ON. becomes solid blue but the sensor •...
-
Page 65: Information Messages
Reading transmission error. Turn off then on your I 10 wireless sensor and restart the process. If the Redo the process problem persists, contact your representative. If the problem persists, contact your representative. KODAK RVG 6500 System_User & Installation Guide (SM728)_Ed01... - Page 66 Table 3 Information Messages (Continued) Information Information Message Action Error Code Memory allocation problem. Restart your 〈 Reboot your computer. I 12 computer. If the problem persists, contact your 〈 If the problem persists, contact your representative. representative. Error during the image transfer. Turn OFF then I 13 Turn Off then ON the RVG sensor.
-
Page 67: Daily
Maintenance This chapter describes the maintenance task that you need to perform regularly for your KODAK RVG 6500 system and the accessories. Daily The RVG Sensor The RVG sensor is supplied in a non-sterile state. Single-use disposable protective hygienic sleeves must cover the RVG sensor before placing it in the patient’s mouth. -
Page 68: Cleaning The Rvg Sensor Control Box
Cleaning the RVG Sensor Control Box The RVG sensor control box must be cleaned with disposable cleaning wipes similar to those used for the computer screens. WARNING: Never immerse the RVG sensor control box in any solution. Cleaning the Positioning Accessories WARNING: Do not use chemical autoclave for the toothbrush holders and avoid direct contact with the metallic part of the autoclave. -
Page 69: Replacing The Rvg Battery
Insert the connector (B) of the appropriate battery. WARNING: Make sure that the battery is inserted correctly in its connector. Slide and close the trap door (A) protecting the battery. RVG Control Box KODAK RVG 6500 System_User & Installation Guide (SM728)_Ed01... - Page 70 RVG Control Box with IPS board Important: For the RVG with IPS board, make sure that you insert the battery gently avoiding any damage to the IPS board. Plug one end of the medical charger in the USB port of the RVG control box. Plug the other end to the mains outlet.
- Page 71 WARNING: NEVER use the RVG sensor to acquire an image while charging with the USB cable. Important: Remove the battery from the control box if you will not use it for a long period of time. KODAK RVG 6500 System_User & Installation Guide (SM728)_Ed01...
-
Page 72: Replacing The Ips Aiming Ring Battery
Replacing the IPS Aiming Ring Battery Important: When the battery is low the LEDs light becomes orange. You need to replace the IPS battery. To replace the IPS aiming ring battery, follow these steps: Remove the attachment brackets (A). Remover the front cover. Remove the used 4 batteries.