Table of Contents
Advertisement
Advertisement
Table of Contents

Related Manuals for ClearSounds WCSC600


Summary of Contents for ClearSounds WCSC600
- Page 1 WCSC600 Amplified Freedom Telephone User’s Guide...
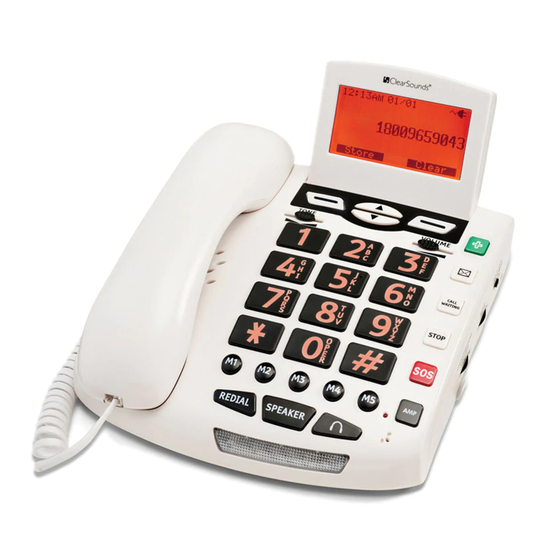
- Page 3 Welcome! Thank you for purchasing the ClearSounds WCSC600 Amplified Freedom telephone. We hope that you enjoy using these friendly features of your new phone. • Large, backlit keys • Large, backlit display of date, time, total number of stored inbound calls, messages, and the name and number being called •...
-
Page 4: Contact Information
Voicemail (one-touch entry, message waiting) Caller ID Call waiting Contact information Please contact us with any questions that you might have. We are happy to assist you! ClearSounds Communications, Inc. 1743 Quincy Avenue, Suite 155 Naperville, IL 60540 USA 800-965-9043 (toll-free) www.clearsounds.com... - Page 5 Safety precautions Carefully read and observe the warnings and cautions in this manual and on the equipment. Warnings Warnings must be observed to prevent bodily injury. WARNING: Use the phone only in the described manner to avoid bodily injury or damage to the equipment.
- Page 6 Safety precautions WARNING: Do not push any type of object into the telephone. Contact with dangerous voltage points can occur, resulting in fire, electric shock or parts damage. WARNING: Do not disassemble the phone. Dangerous voltages or other risks can occur. Use after incorrect reassembly can lead to electric shock.
- Page 7 • The phone does not operate according to descriptions in this manual, or performance of the phone distinctly changes. • The phone is dropped or the casing is damaged.
-
Page 8: Table Of Contents
Contents Setup ..............9 Unpack ............9 Install batteries (optional) ......10 Connect ............12 Connect the phone from a flat surface ..12 Hang and connect the phone ...... 12 If you subscribe to DSL phone service ..15 Let’s begin ............ - Page 9 Flashing strobe light ........38 Vibrating pad (add-on purchase) ....38 Set one-touch numbers ........40 One-touch keys ...........40 Record names for the memory keys ...40 Store a one-touch number ......41 Delete a one-touch number......41 Keypad tips ............42 Using the keypad ........42 Insert a pause ...........
- Page 10 Contents Answer a call ............ 59 Caller ID display .......... 59 Answer a call ..........59 Check messages ..........60 Messages light ..........60 Check messages......... 60 Check missed calls ........... 62 Maintain the calls list ........63 Delete entries from the inbound calls list ..63 Troubleshooting ..........
-
Page 11: Setup
Setup Unpack Ensure that all of these parts are included in your packing box. If any parts are missing or damaged, please contact your vendor or ClearSounds. Telephone base Handset Coiled handset cord Phone line cord Short phone line cord... -
Page 12: Install Batteries (Optional)
Setup Install batteries (optional) If a power outage occurs, charged batteries ensure that amplification and tone control continue to function. on the screen indicates that the phone is not connected to AC power and the battery is low. Battery safety Follow these warnings to avoid explosive or caustic reactions. - Page 13 To install the batteries Battery compartment on the bottom of the phone Disconnect the phone line and power cords from the phone base. On the bottom of the phone base, unscrew the battery compartment cover. Push on the battery cover, and slide back and remove the cover. Insert 4 AAA rechargeable NiMH batteries according to the marked polarity symbols.
-
Page 14: Connect
Connect Connect the phone from a flat surface To place your phone on a flat surface, follow the steps in this section. Note: For optimal speakerphone sound, do not place the phone in noisy or recessed areas or on surfaces affected by vibration. Connect on the , and then... - Page 15 To hang the phone over a phone jack If a phone jack wall plate with mounts is installed on your wall, you can use the ClearSounds wall mount bracket to hang the phone over the jack on the wall. Connect on the back of the phone base.
- Page 16 Connect Hold the ClearSounds wall mount bracket ( with the raised mounting pins facing you. Orient the bracket so that the opening is at the bottom. through the opening on and push excess cord behind the plate. Attach to the phone: a. Line up the keyholes on back of the phone...
-
Page 17: If You Subscribe To Dsl Phone Service
the screws, and slide the phone downward until it is securely seated. Connect on the back of the phone base, and then connect it to in the wall. To connect to AC power Connect on the back of the phone base, and then connect it to an AC power outlet in the wall. -
Page 18: Let's Begin
Let’s begin Place a call Enter a phone number by pressing keys on the keypad. If you make a mistake, press Take one of these steps: • To use the handset, lift the handset • To use the speakerphone, press End the call in one of these ways: •... -
Page 19: Screen
Screen Home screen Time 12-hour or 24-hour format Date MM-DD or DD-MM format Power status Using AC power: Using only battery: Full battery Low battery # TOTAL Total inbound calls in Caller ID memory # New New calls in Caller ID that have not been reviewed... -
Page 20: Keys
Keys Medical number: Store a hospital or doctor number, and then call it with one touch. Voicemail: Store your voice- mail access number, and then call it with one touch. C a l l w a i t i n g : W h i l e conversing, switch to an incoming call, and then switch between parties (Call... - Page 21 Memory keys: Dial stored numbers with one press. A m p l i f y : A m p l i f y t h e h a n d s e t e a r p i e c e v o l u m e a n d tone.
-
Page 22: Menus On The Screen
Menus on the screen Menu navigation From the Home screen... beneath Menu Open the menus Press on the screen. Scroll through menus to high- Press light selections S e l e c t t h e Press beneath Select. highlighted item Return to the Press beneath Back. -
Page 23: Area Settings
Area settings Language You can change the displayed language of the phone. Select from English, French, German and Spanish. To change the displayed language Press beneath Menu on the screen. Press to select the first list item. Set Display is selected. Press to select the first list item. -
Page 24: Dialing Mode (Tone Or Pulse)
Area settings Dialing mode (tone or pulse) When you place a call, the phone generates numbers by tone or by pulse. By default, your phone is set to the tone dialing mode. Should you need to change this setting based on your telephone service, use Tone for touch-tone service or use Pulse for rotary dialing. -
Page 25: Adjust The Display
Adjust the display Display backlight The orange backlight on your screen automatically turns off after 15 seconds of inactivity. If you prefer the light on continuously, on the back of the display, move the BACKLIGHT switch into the ON position. Screen contrast You can adjust the screen contrast to optimize visibility in different environmental conditions. -
Page 26: Time, Day And Date
Adjust the display Time, day and date You can manually set the time, day and date that appear on the screen. However, if you subscribe to caller ID service with your telephone service provider, your phone automatically sets the date and time when the first call arrives after phone setup or after the time change. - Page 27 To set the hour format You can select 12-hour format or 24-hour format. Press beneath Menu on the screen. Press Set Display is selected. and scroll down to Hour Format, Press and then press and scroll to 12 hour clock or Press 24 hour clock, and then press Press...
-
Page 28: Digit Size
Adjust the display Digit size By default, if you dial more than eight digits, the digit size decreases so that more digits show on the screen. If you prefer to always see the largest sized digits, you can turn off the DIM:X setting. To adjust digit size beneath Menu on the screen. -
Page 29: Adjust Audio
Adjust audio WARNING: Excessive volume and amplification can cause hearing loss. Handset tone and volume To adjust handset earpiece tone and volume • Near the top of the phone base, adjust To amplify tone and volume By default, this adjustment remains until you end the call. •... -
Page 30: Speakerphone Volume
Adjust audio Speakerphone volume Note: For optimal speakerphone sound, do not place the phone in noisy or recessed areas or on surfaces affected by vibration. To adjust speakerphone volume Press The speakerphone is on. Along the right side of the phone, press Keypad tones When you press a key, a tone sounds. -
Page 31: Talk Features
and scroll to ON or OFF, and then Press press Press until you arrive at the home screen. Talk features You can turn on these talk features in English, French, German or Spanish: • Talking keypad • Personal identifier • Talking caller ID •... - Page 32 Adjust audio To turn on or off the talking keypad feature By default, when you press keys to place a call, the numbers appear on the screen. If you turn on the talking keypad feature, the base also “speaks” the numbers as you press the keys. beneath Menu on the screen.
- Page 33 Press beneath Phonebk on the screen. Press and scroll to the desired entry, and then press beneath View. Press beneath Options. Record, hear or erase a personal identifier. • To record an identifier: a. Press and scroll to Record Voice, and then press beneath Select.
- Page 34 Adjust audio To turn on or off the talking caller ID feature If you subscribe to caller ID service, you can set the base to “announce” the phone numbers of incom- ing calls, between rings. beneath Menu on the screen. Press Press and scroll to Set Talk, and then press...
- Page 35 To turn on or off the talking list review feature You can set the base to “speak” phone numbers as you review them in these lists: • Phonebook list • Inbound calls list (if you subscribe to caller ID) beneath Menu on the screen. Press Press and scroll to Set Talk, and then press...
-
Page 36: Assisted Listening
Assisted listening The ClearSounds WCSC600 is compatible with these assistive listening devices: • Hearing aids that are equipped with telecoil (T-coil) • Audio neckloops, with or without built-in microphones. Neckloops amplify phone sound in T-coil- equipped hearing aids. To use the phone with T-coil-equipped hearing aids Move your hearing aid T-switch to the T position. - Page 37 To use the phone with a neckloop that includes a built-in microphone Before or during a call, connect the neckloop to the 2.5 mm jack on the left side of the phone base. Position the neckloop around your neck. Press .
-
Page 38: Adjust Call Notification
Adjust call notification Your phone can notify you of incoming calls in several ways. • Ringer (selectable on/off, tones and volume) • Bright flashing strobe light (selectable on/off) • Caller ID displays (if you subscribe to Caller ID service). • Vibrating pad (purchased separately) Ringtones You can select two ringtones: •... -
Page 39: Ringer Volume
Take one of these steps: • To return to the home screen without setting an additional VIP ringtone, press until you arrive at the home screen. • To set a VIP ringtone: a. Press and scroll down to VIP tone, and then press b. Press and scroll to each tone, and then press... -
Page 40: Flashing Strobe Light
Note: If the add-on vibrating pad is connected to the base, this setting turns on pad vibration. Vibrating pad (add-on purchase) If you purchased the vibrating pad that is compatible with your ClearSounds WCSC600 phone, you can enable vibration notification of incoming calls. - Page 41 To turn on vibration notification Place the pad between your mattress and box spring or beneath a cushion. Connect the pad cable to on the back side of the phone base. On the back side of the phone base, move the switch to one of these positions: •...
-
Page 42: Set One-Touch Numbers
Set one-touch numbers One-touch keys You can store frequently called or important numbers and associate them with one-touch keys. When you press a one-touch key, the phone calls the number. Here are the one-touch keys: • – Five memory keys •... -
Page 43: Store A One-Touch Number
Store a one-touch number Tip: When storing your voicemail access number, you can insert pauses. For further information, see page With the handset placed on the base, press numeric keys to enter the telephone number that you wish to store. Include a long distance code, area code or pauses, if necessary). -
Page 44: Keypad Tips
Keypad tips Using the keypad When you press an alphanumeric key on the keypad, the number is selected (for tasks where numbers are appropriate) or a letter is selected (for tasks where letters are appropriate). Each key has more than one letter available, and you find a letter by continuing to press the key until you see it. - Page 45 • Corrections: a. Press to erase the last character that you entered. b. Press the replacement number or letter. • Special characters: Press one of these keys repeatedly until you find the special character that you want. Special characters _ * , (space)
-
Page 46: Insert A Pause
After pauses, you enter the additional numbers that the prompt requires. In the WCSC600 phone, a pause is three seconds long. To insert a pause while storing a number, you press... -
Page 47: Insert Pauses While Storing A Number
• to enter the voicemail menu (as required by the voicemail prompt) • One pause ( ) to wait for the voicemail passcode prompt • Your passcode and (as required by the voicemail prompt) Insert pauses while storing a number A pause is 3 seconds long. -
Page 48: Phonebook
Phonebook You can build a personal phonebook so that you can easily make calls with a few key presses. You can store up to 30 entries. You can store phonebook entries in these ways: • Manually, by using the keyboard to type the entries •... -
Page 49: Quickly Store Phonebook Entries
Personal identifier: • To return to the home screen without recording a personal identifier: a. Press beneath NO on the screen. b. Press until you arrive at the home screen. • To record a personal identifier: a. Press beneath YES on the screen,. b. Speak clearly into base microphone ( c. Press beneath End. - Page 50 Phonebook Press beneath Options. Press and scroll to Store, and then press Name: appears. Confirm, change or add the name: • If the name appears as you like it, press beneath Save. • To add or change the name: a. Press to clear letters, and press alphanumeric keys to enter letters.
-
Page 51: Edit A Phonebook Entry
c. Press beneath End. Your recording plays back, and you can re- record if you wish. d. Press until you arrive at the home screen. The phonebook entry appears with beside the name. Note: For the personal identifier function to work, you must also turn on talk functions. Instructions for turning on these talk functions are on page 32 page... - Page 52 Phonebook Press and scroll to Edit, and then press Name: appears. Save or correct the name. • To save the name, press • To correct the name: a. Press to clear letters, and then press the correct alphanumeric key(s). b. Press 6. Press and scroll to the number.
- Page 53 Personal identifier: • To return to the home screen without recording a personal identifier: a. Press beneath NO on the screen. b. Press until you arrive at the home screen. • To record a personal identifier: a. Press beneath YES on the screen,. b. Speak clearly into base microphone ( c. Press beneath End.
-
Page 54: Delete A Phonebook Entry
Phonebook Delete a phonebook entry Press beneath PhoneBk on the screen. Press and scroll to the number that you wish to delete. beneath View. Press beneath Options. Press Press and scroll to Erase. Press until you arrive at the home screen. -
Page 55: Call
Call Place a call To use the handset Press the alphanumeric keys. If you make a mistake, press Lift the handset. To use the speakerphone Press the alphanumeric keys. If you make a mistake, press Press To use a headset Connect the headset to the 2.5 mm jack on the left side of the phone base. -
Page 56: Place A One-Touch Call
Call Place a one-touch call If you have stored numbers for the one-touch keys, you can call these numbers with one touch. If you need instructions for storing one-touch numbers, see page To place a one-touch call Press any of the –... -
Page 57: Redial The Last-Dialed Number
Redial the last-dialed number Lift the handset or press Press Call from the inbound calls list If you subscribe to Caller ID service with your telephone service provider, your phone stores the last 30 calls made to your telephone. Press and scroll to the number of your choice. -
Page 58: During A Call
During a call Mute the microphone You can mute a call so that the other party cannot hear any noise or conversation on your end of the line. You can still hear the other party. Muting also works when you use a speakerphone or headset. - Page 59 To turn on the speakerphone during a call Press Place the handset on the base. appears on the screen. To adjust the volume, along the right side of the phone, press Note: To switch back from speakerphone to handset, pick up the handset. To switch to a headset during a call Connect the headset to the jack on the left...
-
Page 60: Answer A Second Call (Call Waiting)
During a call Answer a second call (Call waiting) If you subscribe to call waiting service with your telephone service provider, and a new call comes in during a phone conversation, the phone notifies you with a tone. If you have Caller ID on Call waiting service, you also see the incoming caller’s information on the screen. -
Page 61: Answer A Call
Answer a call Caller ID display If you subscribe to Caller ID service with your telephone service provider, incoming call information displays on the screen. If a caller chooses to withhold information from call recipients, or if the caller’s service does not provide Caller ID service in your area, the caller’s name or number might not appear on your screen. -
Page 62: Check Messages
Check messages Messages light If you subscribe to Voicemail services, a bright red strobe light flashes if you have unchecked messages. After you scroll through the unchecked messages, the light turns off. If you prefer to permanently turn off the light, on the bottom of the phone base, move the switch to the Off position. - Page 63 To check who left a message Each message screen is numbered to indicate the order in which the call arrived. Press to scroll through missed calls, until you reach a MSG WAITING screen. Press to scroll to the screen that precedes the message screen.
-
Page 64: Check Missed Calls
Check missed calls If you subscribe to Caller ID services, NEW appears on the screen when one or more calls are received by the phone. The XX represents the number of unreviewed calls and messages. To check missed calls Each screen is numbered to indicate the order in which the call or message arrived. -
Page 65: Maintain The Calls List
Maintain the calls list Delete entries from the inbound calls list If you subscribe to Caller ID service, an inbound calls list contains a record of the last 30 callers who called your phone. When the 31st call comes in, the oldest call drops from the list. -
Page 66: Troubleshooting
Troubleshooting General operation Symptom Solutions The phone is • Secure the power adapter non-operational. connection in the wall outlet. • Secure the cords and cables. • Set the correct dialing mode (page 22). • Plug in another phone to the same wall jack to ensure that the phone service is operational. - Page 67 Voicemail and call waiting services Symptom Solutions Call waiting does • Confirm that you subscribe not work. to Call waiting service. No Caller ID • Confirm that you subscribe information to Caller ID service and top appears on the Caller ID on Call Waiting screen.
-
Page 68: Call Notification
Troubleshooting Call notification • There Turn on the ringer and turn audible ringer up the ringer volume (page 37). • Plug in the power adapter to a working wall outlet and securely connect it to the phone. • Unplug one or more devices that share the phone line. - Page 69 Dialing Symptom Solutions • Pick up the handset or press d o e s n ’ t first. redial last- dialed number. • An area code or Some services add them and the long distance some do not. Always check code is missing the numbers that you enter from lists.
- Page 70 Troubleshooting Audio Symptom Solutions Volume • Plug in the power adapter to a amplification working wall outlet and securely low for the earpiece, connect it to the phone. speakerphone • Turn up the volume and mouthpiece amplification (page 27). headset •...
- Page 71 Display Symptom Solutions The display is faint • Plug in the power adapter to or not functioning the wall outlet and securely properly connect it to the phone. • Adjust the screen contrast (page 23). • During power outage, install fresh batteries (page 10).
-
Page 72: Specifications
Specifications Design and specifications are subject to change without notice. Amplification Up to 50 dB incoming Power supply Base input: 7.5 V, 300 mA Weight Phone: 2.24 lb Pendant: 0.06 lb Base dimensions 7.75 x 7.5 x 1.75 (in) Jacks AUDIO NECKLOOP (Output): 3.5 mm (Headset) 2.5 mm Vibrating pad: 3.5 mm... -
Page 73: Warranty
Be sure to save your sales receipt as the proof of purchase date should you need warranty service. Your WCSC600 Phone comes with a (1) year limited warranty from the date of purchase. This product is warranted by ClearSounds against manufacturing defect in material and workmanship under normal use. - Page 74 God or failure in your phone service carrier’s line service. The product must not be tampered with or taken apart by anyone who is not an authorized ClearSounds Communications® representative. Tampering with the phone will void any written or implied warranties.
-
Page 75: Accessories And Service
Accessories and service Accessories Please visit the ClearSounds website or call ClearSounds for additional accessories. CS-CLA7V2 neckloop connects to your phone’s 2.5 mm jack for hands-free conversation. Requires hearing aid(s) or cochlear implant(s) with t-coil(s). CS-SHK vibrating pad slides nicely beneath a mattress or cushion and notifies you of incoming calls. -
Page 76: Compliance
[US: CLSTE12BWCSC600]. If requested, this number must be provided to the phone company. If the ClearSounds® WCSC600 Amplified Freedom Phone with Full Digital Power causes harm to the phone network, the phone company will notify you in advance that temporary discontinuance of service may be required. - Page 77 Please follow instructions for repairing if any (e.g. battery replacement section); otherwise do not alternate or repair any parts of device except as specified. Connection to party line service is subject to state tariffs. Contact the state public utility commission, public service commission or corporation commission for information.
- Page 78 Company or to one of our authorized agents. Service can be facilitated through our office at: ClearSounds Communications, Inc. 1743 Quincy Avenue, Suite 155 Naperville, IL 60540 Industry Canada CS03 Statement This product meets the applicable Industry Canada technical specification.
- Page 79 conditions may not prevent degradation of service in some situations. Repairs to certified equipment should be made by an authorized Canadian maintenance facility designated by the supplier. Any repairs or alterations made by the user of this equipment, or equipment malfunctions, may give the telecommunication company cause to request the user to disconnect the equipment.
- Page 80 If your home has specially wired alarm equipment connected to the phone line, ensure the installation of the WCSC600 does not disable alarm equipment. If you have questions about what will disable alarm equipment, consult your phone provider or a qualified installer.
- Page 82 © 2011 ClearSounds WCSC600MAN Ver 1...