Table of Contents
Advertisement
Quick Links
Advertisement
Table of Contents

Related Manuals for ClearSounds CL1100


Summary of Contents for ClearSounds CL1100
- Page 1 CL1100 Amplified Telephone Installation Guide & User Manual...
-
Page 2: Introduction
fire, electric shock and injury to person, including the following. WARNING: The CL1100 Phone is capable of amplifying sounds to a loud volume. It is important to instruct all potential users of its proper operation. It is advised to adjust the volume control to its minimum level (Low) when not in use and alert other users that hearing damage can potentially result from misuse. -
Page 3: Table Of Contents
Setting the dialing mode Phone mounting – desk & wall use Programming memory dial buttons Programming ringer – volume & style CL1100 Phone Operation Making & receiving a call Using the amplification function Volume, tone & amplification Volume reset override... -
Page 4: Features & Functions Pages
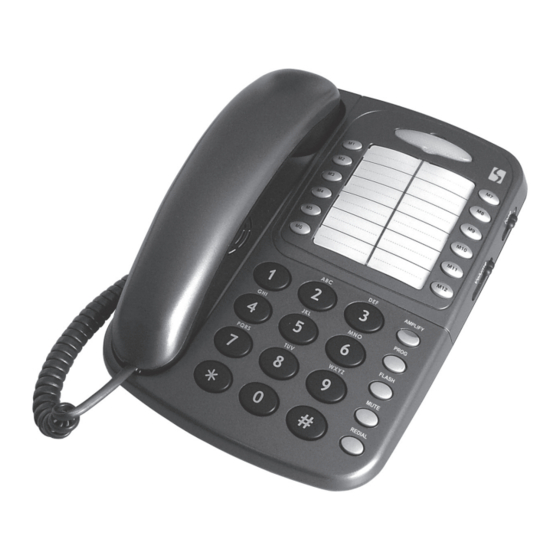
Features & Functions 1. M1 – M12 One-Touch Memory Dial Buttons M1– M12 One-Touch Memory Dial Buttons Visual Ring Indicator Phonebook Insert Card Tone Control Volume Control 2. Visual Ring Indicator Figure #2 Amplify Button (ON/OFF) Program (save) Button Flash Button Mute Button 10. -
Page 6: Installation Steps Pages
Installation of your ClearSounds™ CL1100 Phone is easy. There are some basic steps you need to take when you set-up your CL1100 for the first time. Check Parts list. • Install (4) AAA Alkaline batteries (not included). Batteries are required if you wish to increase the ringer level an additional 10 dB. -
Page 7: Setting The Dialing Mode
1. Connect one end of the 6ft telephone cord to the line jack on the back of your CL1100 Phone and connect the other end to a modular phone jack (RJ11C). 2. Connect the handset coil cord (curly cord) to the handset and to the telephone. -
Page 8: Programming Memory Dial Buttons
3. With the Wall Plate adapter installed, plug the 8in short phone cord into the telephone jack on the CL1100 and then into the jack on the wall. 4. Holding the phone slightly above the mounting screws on the wall jack, push the phone against the mounting screws so they are hooked into upper and lower key- hole slots on the back of the phone. -
Page 9: Programming Ringer - Volume & Style
: Hi DIAGRAM #10 – Ringer volume switch Ringer Style: Your CL1100 Phone’s default setting for the ringer is set at 6. If you don’t like the ringer style, you can choose a new one by changing the settings as follows:... -
Page 10: Cl1100 Phone Operation Pages
5. The new ringer setting will be activated with the next incoming call. Your CL1100 is also equipped with a visual ringer, which flashes when the phone rings. NOTE: You may temporarily turn OFF the audible ringer by selecting the “0” key in the instructions above. -
Page 11: Using The Amplification Function
TONE to fit the levels to your own hearing requirements. The CL1100 Phone has an AMPLIFY button that controls the loudness & tone of the receiver. Press the AMPLIFY button to turn the extra amplification ON or OFF. With the AMPLIFY feature OFF , the phone volume control provides up to 15 dB of gain. -
Page 12: Volume Reset Override
You can adjust the sending volume (outgoing volume up to 12 dB) by using the Speech Volume Control located on the back of the CL1100 phone. If your voice is faint or weak, adjust the volume to “HI”. You can also decrease the volume as well. There are three levels available “LO, NORMAL &... -
Page 13: Last Number Redial
Calling. Please contact your local telephone company for information on these services. 1. During a call press the “FLASH” Note: If you do not have any special telephone service , such as Call Waiting. Pressing the “FLASH” button during a call may disconnect your current conversation. -
Page 14: Troubleshooting Guide
No dial tone 1. Check that all phone cord connections (including the curly cord) are securely plugged into the telephone & wall jack. 2. Check that the phone is in the correct dialing mode, Tone (touch) or pulse (rotary). 3. Plug another phone into the wall jack to make sure your phone service is functioning properly. -
Page 15: Maintenance And Care
Maintenance and Care The CL1100 phone has been designed to give you years of dependable service. To ensure the utmost in performance, follow these guidelines in caring for your phone: 1. Avoid dropping or knocking the unit. 2. Dust the unit regularly. Unplug your phone and wipe with a soft slightly damp cloth to remove any dirt from it. -
Page 16: Fcc Regulatory Compliance Pages
Should you experience trouble with the equipment, please contact: ClearSounds Communications Attn: Repair Center, 8160 S Madison St, Burr Ridge, IL 60527, 800-965-9043 V/TTY, 888-654-9219 FAX, e-mail: repairs@clearsounds.com for... - Page 17 NOTICE: If your home has specially wired alarm equipment connected to the telephone line, ensure the installation of the CL1100 does not disable your alarm equipment. If you have questions about what will disable alarm equipment, consult your telephone company or a qualified installer.