Table of Contents
Advertisement
Advertisement
Table of Contents

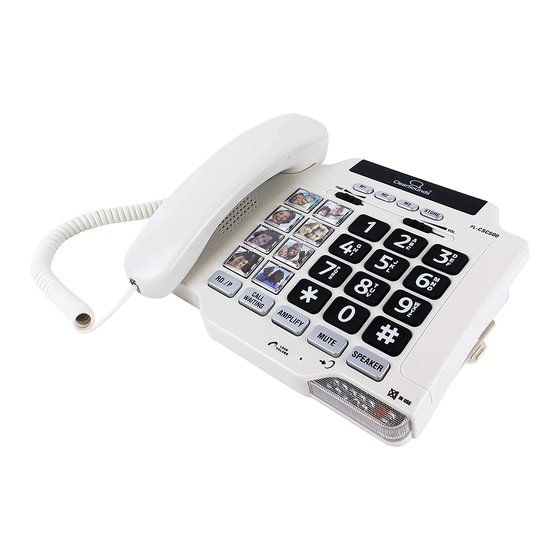
Summary of Contents for ClearSounds CSC500
- Page 1 Operating Manual ® ClearSounds CSC500 ™ Amplified Spirit Phone 1 – ENGLISH...
- Page 2 TABLE OF CONTENTS PRIOR TO USE 3 Congratulations 3 Important Safety Instructions 5-6 Location of Controls 7-8 Installation Steps BASIC TELEPHONE FUNCTIONS Pg. 9-10 Amplification 10 Ringer Setting 11 Hearing Aid and Cochlear Implant Users 11 Speakerphone 11 Answer a Call 12 Make a Call TELEPHONE SETTINGS 13 Dialing Mode...
-
Page 3: Prior To Use
WARNING: The CSC500 Phone is capable of amplifying sounds to a loud volume. It is important to instruct all potential users of its proper operation. - Page 4 attempt to retrieve it until after you have unplugged the line cord from the modular wall jack. Do not plug the phone back in until it has dried completely. WARNING: Avoid using the telephone during electrical storms. There may be a remote risk of electric shock from lightning. If the electrical storm is present in your immediate area, possibility of electrical shock exists.
-
Page 5: Location Of Controls
█ LOCATION OF CONTROLS CALL WAITING 01. Handset Hanger Tab 02. Hook Switch 03. Handset Tone Control 04. (3) 1-Touch Memory Dial Keys 05. Store Key 06. Handset Volume Control 07. Large Keypad 08. Visual Phone Ringer 09. In Use LED Indicator 10. -
Page 6: Right Side
LOCATION OF CONTROLS (continued) BACK SIDE LEFT SIDE RIGHT SIDE BACK SIDE 20. Ringer Volume Switch 21. Amplification Reset Override Switch (ON/OFF) 22. Phone Line Cord Jack LEFT SIDE 23. Handset Cord Jack RIGHT SIDE 24. Flash Time Switch 25. Speakerphone Volume Control 26. -
Page 7: Installation Steps
® Customer Service Department at 1-800-965-9043. 1. PARTS CHECKLIST Check the contents of the box - The CSC500 should contain: 1. Handset and handset cord 2. Phone base 3. Telephone line cords (one 6 inch and one 6 ft cord) 4. - Page 8 Desk / Table Mounting 1. Connect one end of the 6 ft telephone cord to the line jack on the back of the phone and connect the other end to a modular phone jack. 2. Connect one end of the coiled handset cord to the handset and the other end to the phone base.
-
Page 9: Basic Telephone Functions
BASIC TELEPHONE FUNCTIONS █ Using the Amplification Function Your ClearSounds CSC500 is equipped with a specialized ® amplification function designed to adjust to your needs. You may press the Amplify key to temporarily increase the volume of the handset during a call. To return to normal, press the key again. -
Page 10: Ringer Setting
█ Amplification Function (continued) Using the Amplification Reset Override Switch (location #21) The ClearSounds CSC500 is designed with unique features ® to protect users from being exposed to dangerous sound levels. You are able to switch between automatic or manual amplification, and you should select the setting that best suits your needs. -
Page 11: Using Your Speakerphone
█ Using your Phone with Hearing Aids and Cochlear Implants Your phone can be used with hearing aids and cochlear implants equipped with a telecoil (T-coil). Adjust your hearing aid “T- switch” to the “T” position. Make sure to hold the handset close to your T-coil. -
Page 12: Making A Call
█ Making a Call Using the Handset 1. To make a call, lift the handset and listen for a dial tone. You will see the In Use LED indicator light up. 2. You can dial a number manually or press one of the memory dial keys once programmed. -
Page 13: Telephone Settings
TELEPHONE SETTINGS █ Dialing Mode Your ClearSounds CSC500 comes from the factory with ® touch-tone service only. █ One-Touch Memory Setting & Dialing Your phone allows you to program 11 frequently dialed numbers: 8 photo dials and 3 standard memory dials. Each memory key can store up to 32 digits. -
Page 14: Mute Setting
Dialing from Memory Numbers 1. Lift the handset or press the speakerphone key. 2. Press one of the memory dial keys and the phone will begin to dial. NOTE: Entering a new number in the same location will automatically erase the previous number. To “erase” a current memory key number, store “1”... -
Page 15: Troubleshooting
█ Call Waiting Button (Flash) Your ClearSounds CSC500 comes from the factory preset for ® Flash Time to 650ms. The Flash setting can be adjusted by sliding the switch on the right side of the phone. Flash Time options include 100 ms, 300 ms or 650 ms. -
Page 16: Technical Specifications
Amplification: Up to 30 dB incoming Features and Specifications subject to change without notice. To learn more, call ClearSounds at 1-800-965-9043 or visit www.clearsounds.com FCC WANTS YOU TO KNOW 1. This equipment complies with Part 68 of the FCC rules and the requirements adopted by the ACTA. -
Page 17: Industry Canada Cs03 Statement
Company or to one of our authorized agents. Service can be facilitated through our office at: ClearSounds Communications, Inc. 1743 Quincy Avenue, Suite 155 Naperville, IL 60540 U.S.A INDUSTRY CANADA CS03 STATEMENT This product meets the applicable Industry Canada technical specification. -
Page 18: Limited One-Year Warranty
If your home has specially wired alarm equipment connected to the telephone line, ensure the installation of the CSC500 does not disable alarm equipment. If you have questions about what will disable alarm equipment, consult your telephone provider or a qualified installer. - Page 19 Your CSC500 Phone comes with a (1) year limited warranty from the date of purchase. This product is warranted by ClearSounds against manufacturing defect in material and workmanship under normal use. In the event that this product fails to function properly within one year of the original purchase...
- Page 20 20 – ENGLISH...


