Advertisement
Model No. PETL17021
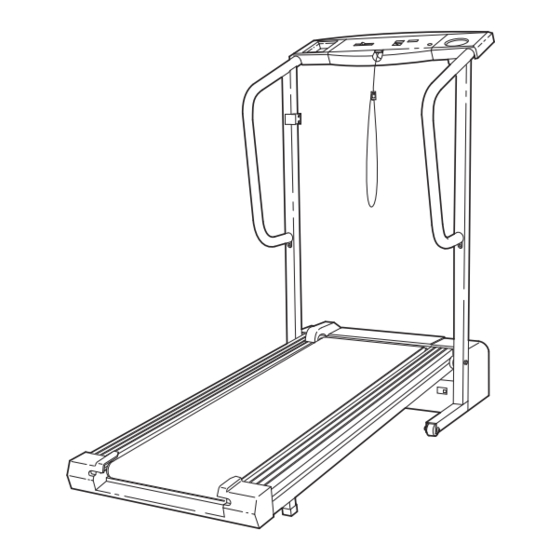
USER'S MANUAL
Serial No.
Serial Number
Decal
QUESTIONS?
As a manufacturer, we are com-
mitted to providing complete
customer satisfaction. If you
have questions, or if there are
missing or damaged parts,
please call:
08457 089 009
Or write:
ICON Health & Fitness, Ltd.
Customer Service Department
Unit 4
Revie Road Industrial Estate
Revie Road, Beeston
Leeds, LS118JG
UK
email: csuk@iconeurope.com
CAUTION
Read all precautions and instruc-
tions in this manual before using
Visit our website at
this equipment. Save this manual
for future reference.
www.iconeurope.com
Advertisement
Table of Contents

Related Manuals for ProForm 525


Summary of Contents for ProForm 525
- Page 1 Model No. PETL17021 USER'S MANUAL Serial No. Serial Number Decal QUESTIONS? As a manufacturer, we are com- mitted to providing complete customer satisfaction. If you have questions, or if there are missing or damaged parts, please call: 08457 089 009 Or write: ICON Health &...
-
Page 2: Table Of Contents
TABLE OF CONTENTS IMPORTANT PRECAUTIONS ..............2 BEFORE YOU BEGIN . - Page 3 14. Never start the treadmill whilst you are stand- 19. When folding or moving the treadmill, make ing on the walking belt. Always hold the sure that the storage latch is fully closed. handrails whilst using the treadmill. 20. Inspect and properly tighten all parts of the 15.
-
Page 4: Before You Begin
And when you’re not The serial number can be found on a decal attached to exercising, the unique 525 can be folded up, requiring the treadmill (see the front cover of this manual for the less than half the floor space of other treadmills. -
Page 5: Assembly
ASSEMBLY Assembly requires two people. Set the treadmill in a cleared area and remove all packing materials. Do not dispose of the packing materials until assembly is completed. Refer to the drawings below to identify the parts used in assembly. Assembly requires the included allen wrench , a Phillips screwdriver and an adjustable spanner Note: The underside of the treadmill walking belt is coated with high-performance lubricant. - Page 6 3. Slide a Rubber Ring (87) onto the handrail post on each Upright (11). Post Post 4. Slide the upper end of one of the Handrails (1) onto the post on one of the Uprights (11). Push the Handrail as far forward as possible.
-
Page 7: Operation And Adjustment
OPERATION AND ADJUSTMENT THE PERFORMANT LUBE WALKING BELT , a high-performance lubricant. IMPOR- Your treadmill features a walking belt coated with PERFORMANT LUBE TANT: Never apply silicone spray or other substances to the walking belt or the walking platform. Such substances will deteriorate the walking belt and cause excessive wear. - Page 8 Monitor Pulse Speed Control Display Display On/Reset Display Button Button Pulse Sensor Clip STEP-BY-STEP CONSOLE OPERATION CAUTION: Before operating the If there is a thin sheet of clear plastic on the console, console, read the following precautions. remove it. In addition, make sure that the power cord is properly plugged in (see page 7).
- Page 9 be restricted, and your pulse will not be de- After you have moved the speed control to the RESET position, slowly slide it to the right until the tected. Next, raise your thumb slightly until the walking belt begins to move at slow speed. heart-shaped indicator in the pulse display flashes Carefully step onto the walking belt and begin ex- steadily.
-
Page 10: How To Fold And Move The Treadmill
HOW TO CHANGE THE INCLINE OF THE TREADMILL To change the incline, remove the incline pins from the incline legs as shown below. Adjust the incline legs to To vary the intensity of your exercise, the incline of the the desired height and fully reinsert the incline pins. treadmill can be changed. -
Page 11: To Move/Lower
HOW TO MOVE THE TREADMILL Before moving the treadmill, convert the treadmill to the storage position as described on page 10. Make sure that the storage latch is fully closed over the catch. 1. Hold the upper ends of the handrails. Place one foot on the base as shown. -
Page 12: Troubleshooting
TROUBLESHOOTING Most treadmill problems can be solved by following the steps below. Find the symptom that applies, and follow the steps listed. If further assistance is needed, please call our Customer Service Department. PROBLEM: The power does not turn on SOLUTION: a. - Page 13 PROBLEM: The walking belt slows when walked on SOLUTION: a. If an extension cord is needed, use only a 3-conductor, 1 mm (14-gauge) cord that is no longer than 1.5 m (5 ft.). b. If the walking belt is overtightened, treadmill perfor- mance may decrease and the walking belt may be- 5–7 cm come damaged.
-
Page 14: Conditioning Guidelines
CONDITIONING GUIDELINES stored fat calories for energy. If your goal is to burn fat, adjust the speed and incline of the treadmill until your WARNING: Before beginning heart rate is near the lower numbers in your training this or any exercise program, consult your zone. - Page 15 SUGGESTED STRETCHES The correct form for several basic stretches is shown at the right. Move slowly as you stretch—never bounce. 1. Toe Touch Stretch Stand with your knees bent slightly and slowly bend forward from your hips. Allow your back and shoulders to relax as you reach down toward your toes as far as possible.
-
Page 16: Ordering Replacement Parts
• the KEY NUMBER and the DESCRIPTION of the part(s) (see the PART LIST and the EXPLODED DRAWING attached in the centre of this manual) PROFORM is a registered trademark of ICON Health & Fitness, Inc. Part No.185106 R0702A Printed in Canada © 2002 ICON Health & Fitness, Inc. - Page 17 REMOVE THIS EXPLODED DRAWING AND PART LIST FROM THE MANUAL Save this EXPLODED DRAWING and PART LIST for future reference. Note: Specifications are subject to change without notice. For information about ordering replacement parts, see the back cover of the User’s Manual.
- Page 18 PART LIST—Model No. PETL17021 R0702A Key No. Qty. Description Key No. Qty. Description Handrail Incline Leg Cap Key/Clip Extension Leg Screw Upright Grommet Power Cord Set Battery Cover Plastic Washer Foot Rail Circuit Breaker Receptacle Frame Pivot Washer Isolator Spacer Frame Pivot Bolt Speed Potentiometer Electronic Bracket...
- Page 19 EXPLODED DRAWING—Model No. PETL17021 R0702A...