Table of Contents
Advertisement
•
OWNER'S MANUAL
Please read before using this equipment.
•
MODE D'EMPLOI
Veuillez lire avant d'utiliser cet appareil.
•
MANUAL DE OPERACIÓN
Léalo antes de utilizar este equipo.
ALPINE ELECTRONICS MARKETING, INC.
1-1-8 Nishi Gotanda
Shinagawa-ku
Tokyo 141-0031, Japan
Phone 03-5496-8231
ALPINE ELECTRONICS OF AMERICA, INC.
19145 Gramercy Place
Torrance, California 90501 U.S.A.
Phone 1-800-ALPINE-1 (1-800-257-4631)
ALPINE ELECTRONICS OF CANADA, INC.
777 Supertest Road
Toronto, Ontario M3J 2M9 Canada
Phone 1-800-ALPINE-1 (1-800-257-4631)
DVD Entertainment System
PKG-2000P
DIGITAL VIDEO
ALPINE ELECTRONICS OF AUSTRALIA PTY, LTD.
161-165 Princess Highway, Hallam
Victoria 3803, Australia
Phone 03-8787-1200
ALPINE ELECTRONICS GmbH
Frankfurter Ring 117, 80807 München, Germany
Phone 089-32 42 640
ALPINE ELECTRONICS OF U.K., LTD.
ALPINE House
Fletchamstead Highway, Coventry CCV4 9TW, U.K.
Phone 0870-33 33 763
ALPINE ELECTRONICS (BENELUX) GmbH
Leuvensesteenweg 510-B6,
1930 Zaventem, Belgium
Tel.: 02-725 1315
•
BEDIENUNGSANLEITUNG
Bitte vor Gebrauch des Gerätes lesen.
•
MANUALE DI ISTRUZIONI
Si prega di leggere il manuale prima di
usare il sistema.
•
HANDBOK
Läs denna handbok innan du använder
utrustningen.
ALPINE ELECTRONICS FRANCE S.A.R.L.
(RCS PONTOISE B 338 101 280)
98, Rue de la Belle Etoile, Z.I. paris Nord II,
B.P. 50016, 95945 Roissy Charles de Gaulle
Viale C. Colombo 8, 20090 Trezzano
ALPINE ELECTRONICS DE ESPAÑA, S.A.
Portal de Gamarra 36, Pabellón, 32
01013 Vitoria (Alava)-APDO 133, Spain
Designed by Alpine Electronics of America, Inc.
R R
Cedex, France
Phone 01-48638989
ALPINE ITALIA S.p.A.
Sul Naviglio (MI), Italy
Phone 02-484781
Phone 945-283588
Printed In China
EN
FR
ES
DE
IT
SV
Advertisement
Table of Contents

Related Manuals for Alpine PKG-2000P


Summary of Contents for Alpine PKG-2000P
- Page 1 Toronto, Ontario M3J 2M9 Canada Portal de Gamarra 36, Pabellón, 32 ALPINE ELECTRONICS (BENELUX) GmbH 01013 Vitoria (Alava)-APDO 133, Spain Phone 1-800-ALPINE-1 (1-800-257-4631) Leuvensesteenweg 510-B6, Phone 945-283588 1930 Zaventem, Belgium Tel.: 02-725 1315 Designed by Alpine Electronics of America, Inc. Printed In China...
-
Page 2: Table Of Contents
ENGLISH Contents Switching the Audio Tracks ......14 Operating Instructions Switching the Angle (DVD only) ....14 Switching the Subtitles (subtitle language) WARNING (DVD only) ..........14 WARNING ..........3 Displaying the Disc Status (DVD only) ..15 CAUTION ........... 3 Displaying the Disc Status (Video CD only) ... - Page 3 DVD Setup DVD Setup Operation ........21 Setting the Language ........21 Setting the TV Screen ........21 Setting the Country Code ......22 Setting the Rating Level (Parental Lock) ..22 Setting the Digital Output ......22 Custom Setup Operation Custom Setup Operation ......
-
Page 4: Operating Instructions
Failure to do so may cause personal injury or damage to the KEEP THE VOLUME AT A LEVEL WHERE YOU CAN STILL product. Return it to your authorized Alpine dealer or the nearest Alpine Service Center for repairing. HEAR OUTSIDE NOISE WHILE DRIVING. -
Page 5: Precautions
Installation Location • Under cold temperature conditions, the screen may lose Make sure the PKG-2000P will not be installed in a location contrast temporarily. After a short warm-up period, it will subjected to: return to normal. -
Page 6: Discs Playable On This Unit
However, most of them will infl uence the thickness and/or One-sided diameter of the disc. Using such accessories can cause disc operational problems. We recommend not using these accessories Approx. on discs played in Alpine DVD players. 8 cm 80 Minutes Two-sided disc Approx. - Page 7 Discs that cannot be played On handling compact discs (CD/CD-R/CD-RW) DVD-ROMs, DVD-RAMs, DVD + Rs, DVD + RWs, CD-ROMs, • Do not touch the surface. photo CDs, etc. • Do not expose the disc to direct sunlight. • Do not affi x stickers or labels. DVD region number (playable region number) All discs have a region number.
-
Page 8: Getting Started
Getting Started Closing the cover Slide the cover as illustrated until a click is heard. When Using the Remote Control • Point the remote control at the remote sensor within about 2 meters. • It may not be possible to operate the remote control if the remote control sensor is exposed to direct sunlight. -
Page 9: Overhead Monitor
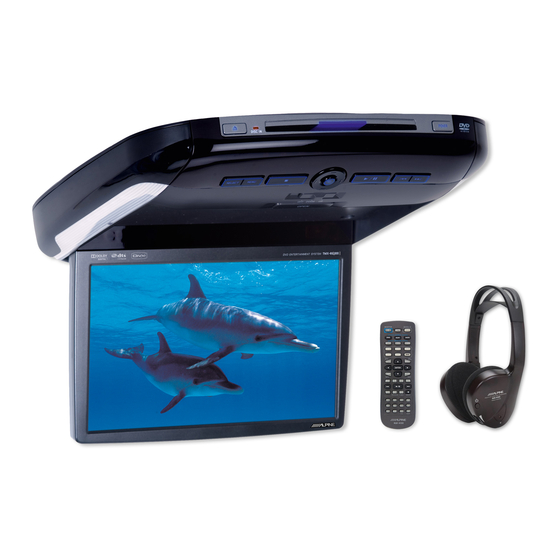
IR Transmitter and Receiver Overhead Monitor IR transmitter sends the sound to the Headphone. IR receiver receives the signal from the remote control. Eject Button Eject Button Pressing Eject button unloads Disc. If the ignition key is set to ACC or ON, a disc can be removed even when the power is OFF. -
Page 10: Key Map Of Remote Control Function
Key Map of Remote Control Function RUE-4159 Remote Control Key Assignment KEY FUNCTION DVD/ DVD-HU ISDB-T DVB-T TV Tuner EXE-DVD (Japan only) (Europe only) MONITOR POWER DEVICE POWER MUTE DIMMER VISUAL EQ AUX1 AUX2 DEVICE MODE: EXT-DVD DEVICE MODE: DVD-HU DEVICE MODE: TV TUNER DEVICE MODE: DVB-T DEVICE MODE: ISDB-T... -
Page 11: Basic Operations
Basic Operations Loading and Unloading Discs Turn on the power before loading and unloading discs. EJECT POWER Loading discs Insert the disc with the label side facing upwards. Once the disc is partially inserted, it is drawn in automatically. Playback starts. Top Front Side SELECT Front Control Keys... -
Page 12: Adjusting The Volume
Device Control Adjusting the Volume Volume can be controlled from the headphone or your own radio Device modes (TV, DVB-T, ISDB-T, DVD-HU and EXT-DVD) are volume function. available on the remote control by pressing the device control. Turn on POWER on the headphone. Adjust the volume level by turning clockwise for louder and counter-clockwise for lower on the headphone. -
Page 13: Dvd
DVD Auto Play The main movie will play automatically without pressing Play or Enter button, when DVD is inserted, if AUTO or SKIP mode is selected on DVD Auto Play under System menu. See page 20 for The instruction includes Built-In DVD, EXT-DVD, detail. -
Page 14: Fast-Forwarding/Fast-Reversing
Fast-forwarding/Fast-reversing Slow Motion Playback During playback, press and hold (fast-reverse) Press and hold while in the pause (fast-forward). mode to set 1/8 normal speed slow motion When pressed for more than 1 second, the disc is playback mode/reverse slow motion playback forwarded/reversed at double speed. -
Page 15: Chapter/Track/Title Repeat Playback
Chapter/Track/Title Repeat Playback Switching the Angle (DVD only) Use this function to play the disc’s titles, chapters or tracks repeatedly. On DVDs in which scenes have been fi lmed from multiple angles, the angle can be switched during playback. During playback, press REPEAT. The repeat mode switches each time the button is pressed. -
Page 16: Displaying The Disc Status (Dvd Only)
TV in the System Setup. Or refer to Device Control. (page 11) During playback, press DISPLAY. The playback status is displayed. • Refer to ALPINE TV Tuner Operation Manual for details. SCAN PRESET PRESET The playback status display closes when DISPLAY is pressed again. -
Page 17: Dvb-T Control
DVB-T Control ISDB-T Control This function is available only for Japan. To control ISDB-T from the This function is available only for Europe. To control DVB-T from Front Control Keys, set source name to ISDB-T in the System Setup. the Front Control Keys, set source name to DVB-T in the System To set up ISDB-T on the remote control, refer to Device Control. -
Page 18: Monitor Setup
Monitor Setup • “OFF” will change to “CUSTOM”, when any of the picture mode (Brightness, Color, Tint, Contrast and Sharpness) has been adjusted Adjusting Picture • NIGHT MOVIE, SOFT, SHARP and HIGH CONT. are fi xed values. They cannot be set manually. If the picture mode is changed, they automatically change to CUSTOM mode. -
Page 19: Adjusting The Tint
Resetting the Picture Adjustment Adjusting the Tint Press and select RESET. Press and select TINT. Press to adjust the tint. Tint tone can be adjusted from G15 (G MAX) to R15 (R MAX). Press t o reset the picture adjustments. •... -
Page 20: Setting The Source Name
Setting the Source Name Setting the Screen Modes Display mode on the screen can be adjusted to Wide, Press and select SOURCE NAME. Cinema and Normal. (Default: WIDE) The currently selected source name The currently selected source displays on Source Name menu Video Signal menu is for AUX1 only DVD:... -
Page 21: Setting System Control
• To activate SKIP mode, a disc must be ejected and reloaded Press SETUP button on Remote Control. after setting. (Note: SKIP mode can not be activated, when a disc is inserted or reloaded while Alpine logo is shown on Press SELECT/SETUP to switch to SYSTEM the screen monitor.) setting menu from AUDIO&SCREEN setting menu. -
Page 22: Dvd Setup
DVD Setup Setting the language The audio language, subtitle language and menu language can be set according to your preferences. Once set, this becomes the default language. This function is convenient when you always want to listen in English. (Not all discs allow changing the default language. -
Page 23: Setting The Country Code
“PARENTAL,” then press ENTER. The password input mode is activated. Setting the Digital Output Digital output is not available on this Built-in DVD 10.2 inch overhead monitor, PKG-2000P. It will not affect the playback, if you change the setting. -
Page 24: Custom Setup Operation
Setting contents: CD-DA / COMPRESSED AUDIO CD-DA: Only CD data can be played back. The initial setting at the factory is CD DA. • Compressed audio is not supported on this Built-in DVD 10.2 inch overhead monitor, PKG-2000P. Please do not change this setting. -
Page 25: Wireless Headphone
Wireless Headphone Headphone Receivers 1) Infrared Sensors; Receive signal from the transmitter. 2) Battery Cover 3) Volume Control 4) Power Switch 5) Power Indicator LED Operation Read carefully to prevent damage to the headphone or your ears: WARNING: Before turning on the power, remove headphones and turn the volume down as low as possible. -
Page 26: Installation And Connections
When connecting the PKG-2000P to the fuse box, make for installations or ground connections. Using such parts could sure the fuse for the intended circuit of the PKG-2000P has the disable control of the vehicle and cause fi re, etc. -
Page 27: Connections
TV Tuner with audio output connectors. POWER +12V • Power Control Connect this lead to any ALPINE video source product's ACC line, which is red. It controls turning the power ON/OFF for the ALPINE video products correspond to PKG-2000P power. -
Page 28: Mount Side
Vehicle Door polarity depends on the vehicle type. The polarity can be changed by the “Door SW polarity” switch. (Default: Negative Switched System) Polarity +: When door open, door signal is 12V Polarity -: When door open, door signal is GND PKG-2000P PKG-2000P... -
Page 29: System Connections
System Connections PKG-2000P DVD Built-In Overhead Monitor When the game port and AUX2 are connected at the same time, the game port has a priority. -
Page 30: Information
Information List of Language Codes (For details, see page 21.) Abbreviation Code Language Abbreviation Code Language Abbreviation Code Language 6565 Afar 7369 Interlingue 8278 Kirundi 6566 Abkhazian 7375 Inupiak 8279 Romanian 6570 Afrikaans 7378 Indonesian 8285 Russian 6577 Amharic 7383 Icelandic 8287 Kinyarwanda... -
Page 31: List Of Country Codes
List of Country Codes (For details, see page 22.) Abbreviation Code Country Abbreviation Code Country Abbreviation Code Country 6568 Andorra 6877 Dominica 7573 Kiribati 6569 United Arab Emirates 6879 Dominican Republic 7577 Comoros 6570 Afghanistan 6890 Algeria 7578 Saint Kitts and Nevis 6571 Antigua and Barbuda 6967... - Page 32 Abbreviation Code Country Abbreviation Code Country Abbreviation Code Country 8069 Peru 8374 Svalbard and Jan Mayen 8487 Taiwan, Province of China 8070 French Polynesia 8375 Slovakia 8490 Tanzania, United Republic of Ukraine 8071 Papua New Guinea 8376 Sierra Leone 8565 8072 Philippines 8377...
-
Page 33: In Case Of Diffi Culty
Otherwise, make sure the rest of your Monitor's parking brake is not set. • system is properly connected or consult your authorized Alpine - Connect the monitor's parking brake cord and set the parking dealer. -
Page 34: System Indication
If the disc does not eject, press and hold for at least 3 seconds and eject the disc. If the disc still does not eject, consult your Alpine dealer. Mechanism error. • 2) When the error indication remains after ejecting, press 1) Press and eject the disc. -
Page 35: Accessories
Installation of Bracket and Trim Ring *1 Installation Bracket is used to stabilize the monitor at the time ceiling shape at the time of installing the monitor. Ask ALPINE of installing the monitor. Ask ALPINE dealer for detail. dealer for detail.
Need help?
Do you have a question about the PKG-2000P and is the answer not in the manual?
Questions and answers