Table of Contents
Advertisement
Advertisement
Chapters
Table of Contents

Related Manuals for Clarion CZ100A


Summary of Contents for Clarion CZ100A
- Page 1 CD/MP3/WMA RECEIVER CD/MP3/WMA CD/MP3/WMA...
-
Page 2: Table Of Contents
Contents Thank you for purchasing this Clarion product. • Please fully read this owner’s manual before operating this equipment. 1. FEATURES ........................3 2. PRECAUTIONS ......................... 4 Front Panel / Generalities ....................4 Remove the DCP ......................5 Re-attach the DCP ......................5 3. -
Page 3: Features
1. FEATURES Front Panel 3.5mm Auxiliary Input 4ch/2V RCA Output "BEAT-EQ" with 3 Band Parametric Equalizer & "MAGNA BASS EX" dynamic bass enhancement Expanding Systems Expanding audio features 4 Channel Amplifier Note: Portable Player The items listed outside of the frames are the (Connect by AUX IN Jack) commercial products generally sold. -
Page 4: Precautions
2. PRECAUTIONS WARNING For your safety, the driver should not operate the controls while driving. Also, while driving, keep the volume to a level at which external sounds can be heard. 1. When the inside of the car is very cold and Front Panel / Generalities the player is used soon after switching on the heater, moisture may form on the... -
Page 5: Remove The Dcp
Remove the DCP The control panel can be detached to prevent theft. When detaching the control panel, keep it in the safety place and prevent scratches. We recommend taking the DCP with you when leaving the car. 1. Press the [ ] button (2 sec.) to turn off the power. -
Page 6: Controls
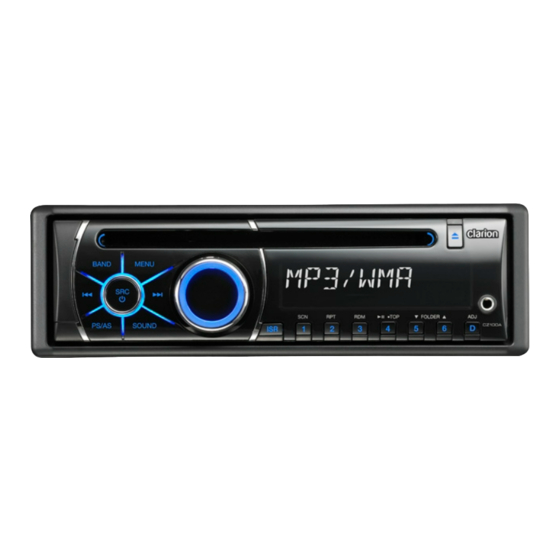
3. CONTROLS Operational Panel [BAND] [MENU] Disc Slot [PS/AS] [SOUND] [ISR] [1~6] AUX Jack [OPEN] [POWER/SRC] [VOLUME] [ADJ] Names of Buttons / SRC] Key [VOLUME] Key • Power / Toggle the audio source • Adjust volume level / Confirm [BAND] Key [ISR] Key •... -
Page 7: Remote Control (Sold By Separately)
Remote Control (Sold by separately) [POWER/SRC] Key • Toggle the audio source / Power on [RPT] Key / Power off (long press) • Repeat play ] Key • Preset station up/down / Previous/ next track / Search(long press) [SCN/PS/AS] Key [POWER/ [BND/TOP] •... -
Page 8: Cautions On Handling
4. CAUTIONS ON HANDLING Handling Discs Handling Storage • New discs may have some roughness • Do not expose discs to direct sunlight or around the edges. If such discs are used, any heat source. the player may not work or the sound may •... -
Page 9: Operations
5. OPERATIONS Basic Operations Note: Volume adjustment • Be sure to read this chapter referring to the Turn the volume knob on the front panel or chapter “3. CONTROLS” press the [ ] key on the remote control. The adjustable range of volume is 0 to 40. CAUTION When the unit is turned on, starting and CAUTION... -
Page 10: Radio Operations
2. The unit has 4 bands, such as FM1, FM2, FM3 and AM. FM3 and AM can store by AS function. Each bands can store 6 stations, CZ100A can store 24 stations in total. -
Page 11: Cd/Mp3/Wma Operations
CD/MP3/WMA Operations This unit can play back MP3/WMA byte alphabetical letters and numerals files (including an extension). 3. Do not affix a name to a file inside a folder Notes: having the same name. • If you play a file with DRM (Digital Rights Management) for WMA remaining ON, no Folder structure audio is output (The WMA indicator blinks). -
Page 12: Pausing Play
CD/MP3/WMA Operations Fast-forward/Fast-reverse • Discs not bearing the mark TEXT TEXT and CD-ROMs cannot be played by this Fast-forward unit. Press and hold the [ ] button . • Some CDs recorded in CD-R/CD-RW Fast-reverse mode may not be usable. Press and hold the [ ] button . -
Page 13: Aux Operations
CD/MP3/WMA Operations playback, “RPT OFF” appears on the 2. Press [RPT] button again to cancel repeat display, and “RPT” segment goes off. playback, “RPT OFF” appears on the LCD. MP3/WMA: 1. Press the [RPT] button to perform repeat Random play play, “TRACK RPT”... -
Page 14: Audio Setup
Audio Setup Press the [SOUND] key to enter sound effect BALANCE -> FADER -> M-B EX -> LPF(low setting mode. First Press shows current EQ. pass filter) -> SUBW VOL, rotate the volume Rotate the volume knob to changes BEAT knob to select a value. -
Page 15: Trouble Shooting
6. TROUBLE SHOOTING GENERAL Problem Cause Measure Unit fuse blown. Install new fuse with correct rating. Unit can not power on Car battery fuse blown. Install new fuse with correct rating. Turn off the power and open the operation panel. Unit can not Press the reset button with a thin rod. -
Page 16: Error Display
DISC Player Problem Cause Measure Eject the disc before loading the new Another disc is already loaded. one. Disc cannot be loaded. There is a foreign matter already Eject the foreign matter forcibly. in place. Compact disc is dirty. Clean the compact disc with a soft cloth. Sound skips or is Compact disc is heavily scratched Replace with a compact disc with no... -
Page 17: Specifications
8. SPECIFICATIONS FM Tuner Dimensions of the Main Unit: 188mm Width × 58mm Height × 190mm Depth Frequency range: 87.5-108.0MHz Weight of the Main Unit: 1.30kg Usable sensitivity: 8dBμ Frequency response: 30Hz-15kHz Stereo separation: 30dB(1kHz) 178mm 50mm Signal/noise ratio: >55dB AM Tuner Frequency range: 531-1629kHz Usable sensitivity (S/N=20dB): 30dBμ... -
Page 18: Installation / Wire Connection Guide
For tough dirt, installation, consult your dealer or an apply a little cold or warm water to a authorized Clarion service center. soft cloth and wipe off the dirt gently. -
Page 19: Cautions On Installation
Notes: 1. Some car models require special mounting kits for proper installation. Consult your Clarion dealer for details. 2. Fasten the front stopper securely to prevent the source unit from coming loose. • Console opening dimensions 7-3/16"... -
Page 20: Unit Installation
Notes of installation positive pole first and then the negative pole. 1. Before installation, please make sure 7. DO NOT block the cooling fan exit to proper connections are conducted and ensure sufficient heating dissipation of this the unit operates normally. Improper unit, or it may result in damage to this unit. -
Page 21: Removing The Source Unit
6) Removing the Source Unit Method B Disassemble trim ring 1. Push the trim ring to right and pull out the right part. 2. Push the trim ring to left and pull out the left part. 1. Insert this unit directly to the opening of the dashboard. -
Page 22: Wiring And Connections
7) Wiring and Connections White Black Rear audio output (Left) Subwoofer output 1 Black Rear audio output (Right) Subwoofer output 2 White Left Front audio output terminal Right Gray Black Black Steering wheel control terminal 4 Channel Amplifier Fuse 15A ANTENNA (Black) Refer to the right. -
Page 23: Connecting The Accessories
16-Pin Connector Extension Lead (attached to the source unit) + Gray Front Right Brown wire (Phone mute lead) - Gray/Black Connect to cellular phone mute lead. + White Front Left - White/Black Yellow wire (Memory back-up lead) + Purple Connect directly to battery Rear Right - Purple/Black + Green... - Page 24 Clarion Co., Ltd. All Rights Reserved. Copyright © 2010: Clarion Co., Ltd. Printed in China PN: 12707500XXXX...