Table of Contents
Advertisement
Available languages
Available languages
Advertisement
Chapters
Table of Contents

Related Manuals for KitchenAid KFP1642CA


Summary of Contents for KitchenAid KFP1642CA
- Page 1 KFP1642 INSTRUCTIONS INSTRUCTIONS INSTRUCCIONES...
- Page 2 #1 goal. Remember to register your product online at www.kitchenaid.com, or by mail using the attached Product Registration Card. Join us in the kitchen at www.proline.kitchenaid.com. Scan with your mobile device for recipes, tips, and more. USA: 1.800.832.7173 KitchenAid.com Canada: 1.800.807.6777...
-
Page 3: Table Of Contents
Processor, please fill out and mail your product registration card packed with the unit, or register on-line at www.kitchenaid.com. This card will enable us to contact you in the unlikely event of a product safety notification and assist us in complying with the provisions of the Consumer Product Safety Act. -
Page 4: Food Processor Safety
Return appliance to the nearest Authorized Service Facility for examination, repair, or electrical or mechanical adjustment. 7. The use of attachments not recommended or sold by KitchenAid may cause fire, electric shock, or injury. -
Page 5: Electrical Requirements
FOOd PROCESSOR SAFETY 17. Do not use appliance other than intended use. 18. Disconnect from supply circuit before cleaning or servicing. 19. CAUTION: Do not open until blade stops. 20. CAUTION: To ensure continued protection against risk of electric shock, connect to properly grounded outlets only. -
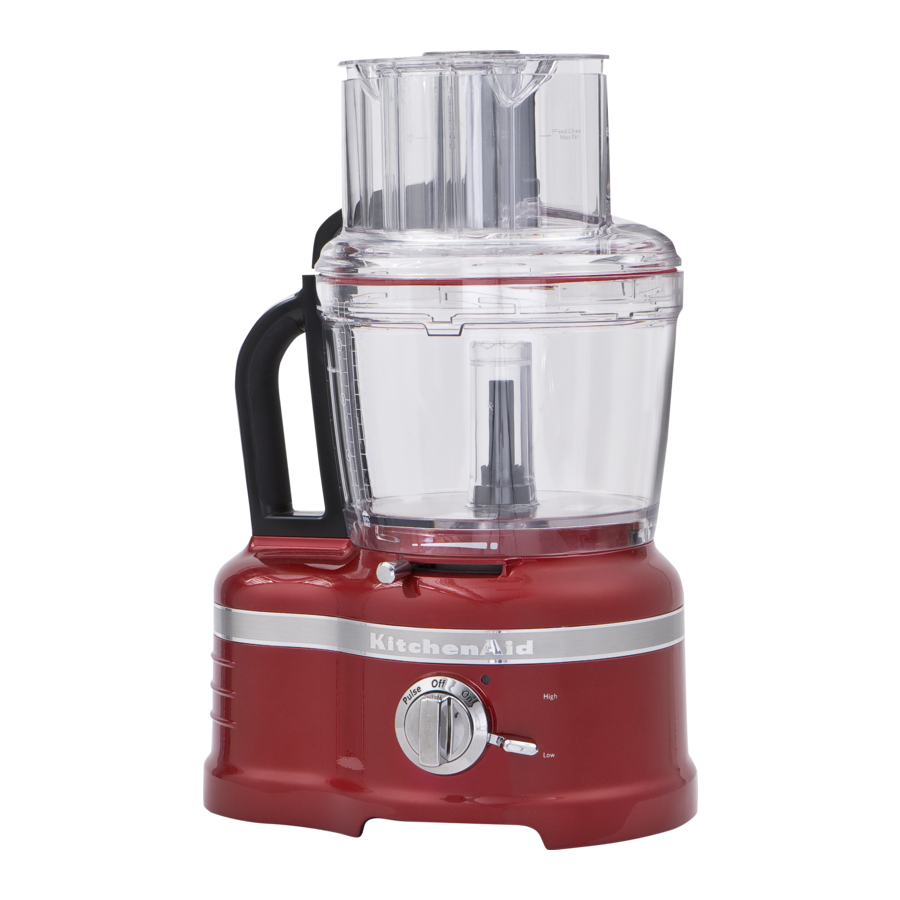
Page 6: Parts And Features
PARTS ANd FEATURES Parts and accessories 3-piece food Work bowl pusher cover with 3-in-1 feed tube Ultratight seal 16-Cup (4 L) work bowl Externally adjustable blade control die-cast base Accessory case Stainless steel dough blade 4-Cup (1 L) multipurpose blade mini-bowl and mini-blade Spatula Egg whip... - Page 7 PARTS ANd FEATURES Parts and accessories dICINg KIT ➄ 8mm grid cleanout tool Externally adjustable slicing disc (thin to thick) Reversible (2 mm and 4 mm) shredding disc* ➃ dicing kit lid 10-Cup (2.4 L) prep bowl ➂ 8mm dicing kit blade* Parmesan/Ice shaving disc* (select models only) ➁...
-
Page 8: Selecting The Right Tools
PARTS ANd FEATURES Selecting the right tools Optional dicing kit with disc adapter used with work bowl and an optional prep bowl Dice high Potatoes, Tomatoes, Onions, Cucumbers, Fruit, Vegetables Mini-bowl used with mini multipurpose stainless steel blade Chop Mince Puree high high... - Page 9 PARTS ANd FEATURES Selecting the right tools Plastic dough blade used with work bowl Egg whip* used with work bowl Knead Whip high high Yeast dough Eggs Multipurpose stainless steel blade used with work bowl Chop Mince Puree high high high Vegetables, Fruit, Vegetables, Fruit...
- Page 10 PARTS ANd FEATURES Selecting the right tools Use other settings than suggested below to adjust results to your personal preferences. Optional Adjustable slicing disc used with work bowl and an optional prep bowl Slice Slice thin thick high high Potatoes, Tomatoes, Fruit (soft), Vegetables (soft), Fruit (hard), Vegetables (hard) Optional Reversible shredding disc used with work bowl and optional prep bowl Shred...
- Page 11 PARTS ANd FEATURES Selecting the right tools Optional Parmesan/ice shaving disc* used with work bowl and optional prep bowl Grate Shave high Hard cheese, Ice, Chocolate Optional Julienne disc* used with work bowl and optional prep bowl Julienne high Carrots, Zucchini, Potatoes, Vegetables * Available with select models only.
-
Page 12: Using Your Food Processor
USINg YOUR FOOd PROCESSOR Attaching the work bowl WARNING Before first use Before using your Food Processor for the first time, wash the bowls and accessories as described in the “Care and Cleaning” section. Electrical Shock Hazard Plug into a grounded 3 prong outlet. -
Page 13: Using The 3-In-1 Feed Tube
USINg YOUR FOOd PROCESSOR Using the 3-in-1 feed tube before use Before operating the Food Processor, be sure the work bowl, blades and work bowl cover are properly assembled on the Food Processor base. Large food pusher Max Fill line Use entire feed tube and the large food pusher to process large items. -
Page 14: Using The Speed Controls
USINg YOUR FOOd PROCESSOR Using the speed controls NOTE: If the Food Processor fails to operate, make sure the work bowl and cover are properly locked on the base, and the large food pusher is fully in place. high high To turn on, flip the speed lever to High To stop, turn the dial to OFF. -
Page 15: Using Your Accessories
USINg YOUR ACCESSORIES Preparing the dicing kit for first use IMPORTANT: Follow these directions in order to properly wash all parts of the dicing kit before using it for the first time. Using the handle, place the assembled dicing kit into the work bowl. When placing kit in the work bowl, line Rotate the dicing kit lid, using the finger up the kit’s tab with the groove in the... -
Page 16: Installing/Using The Dicing Disc
USINg YOUR ACCESSORIES Installing/using the dicing kit Place the disc adapter onto the Place the dicing kit grid ➁, with the grid power shaft. facing front, and line up the kit’s tab with the groove in the work bowl. Place the dicing kit blade ➂, making sure Place the dicing kid lid ➃... -
Page 17: Installing/Removing The Multipurpose Blade
USINg YOUR ACCESSORIES Installing/removing the multipurpose blade NOTE: The multipurpose blade has a spill resistant seal and can be left in work bowl, or removed before the contents are emptied. Place the blade on the power shaft. Press down firmly on the blade. You will hear a click when the accessory locks into place. -
Page 18: Installing/Removing The Prep Bowl
USINg YOUR ACCESSORIES Installing/removing the prep bowl NOTE: The prep bowl can be used only with the discs and the dicing kit. To use the prep bowl, place into the Place the adapter on the power shaft. work bowl, using the two finger grips. Place the desired disc on the power Install the work bowl lid, aligning shaft. -
Page 19: Installing/Removing The Shredding, Julienne, And Parmesan Discs
USINg YOUR ACCESSORIES Installing/removing the shredding, julienne*, and parmesan* discs Place the adapter on the power shaft. Slightly rotate the disc until it drops into place onto the adapter. Finger grip hole Finger grip hole To remove shredding disc and julienne Install the work bowl lid, aligning disc, remove work bowl lid and the tabs and locking it into place. -
Page 20: Installing/Removing The Slicing Disc
USINg YOUR ACCESSORIES Installing/removing the slicing disc Place the disc on the power shaft. Slightly rotate the disc until it drops into place. Finger grip hole Finger grip hole To remove slicing disc, remove work Install the work bowl lid, aligning bowl lid and using the 2 finger grip the tabs and locking it into place. -
Page 21: Installing/Removing The Mini-Bowl And Mini-Blade
USINg YOUR ACCESSORIES Installing/removing the mini-bowl and mini-blade Mini-blade Power shaft Place the mini-bowl inside the work Press down firmly on the mini-blade. bowl, making sure the tab on the You will hear a click when it locks mini-bowl lines up with the notch into place. -
Page 22: Installing/Removing The Egg Whip Or Dough Blade
USINg YOUR ACCESSORIES Installing/removing the egg whip* or dough blade Place the egg whip or dough blade onto Press down firmly on the egg whip or power shaft. dough blade. You will hear a click when the accessory locks into place. After processing, firmly grasp egg whip or dough blade and lift straight up. -
Page 23: Installing/Removing The Citrus Press
USINg YOUR ACCESSORIES Installing/removing the citrus press* Place the citrus press adapter onto the Place the strainer basket in the work power shaft. bowl with the locking clip positioned to the left of the work bowl handle. Turn the basket counter-clockwise until Place the cone inside the strainer the clip locks into the handle. -
Page 24: Removing Accessories And Work Bowl
USINg YOUR ACCESSORIES Removing accessories and work bowl IMPORTANT: Be sure the Food Processor is off and unplugged before disassembling. To remove work bowl from Food Processor before removing accessories: Turn the work bowl and lift to remove, and then turn and lift the lid. To remove accessories before removing work bowl from Food Processor: Turn the work bowl cover to unlock, as shown, and lift the lid to remove, continuing next steps with bowl still attached to Food Processor. -
Page 25: Care And Cleaning
CARE ANd CLEANINg IMPORTANT: Never use abrasive cleansers or scouring pads on the Food Processor. They may scratch or cloud the work bowl and cover. Be sure the Food Processor is off and Clean the base and cord with a warm, unplugged before disassembling. -
Page 26: Tips For Great Results
TIPS FOR gREAT RESULTS Using the Multipurpose blade To finely chop citrus peel: With sharp knife, peel colored portion (without white membrane) from citrus. Cut peel in small strips. Process until finely chopped. To mince garlic or to chop fresh herbs or small quantities of vegetables: With processor running, add food through the feed tube. - Page 27 TIPS FOR gREAT RESULTS Using a Slicing or Shredding disc To slice uncooked meat or poultry, To slice or shred fruits or such as stir-fry meats: vegetables that are long Cut or roll food to fit feed tube. Wrap and relatively small in and freeze food until hard to the touch, diameter, such as celery, 30 minutes to 2 hours, depending on...
- Page 28 TIPS FOR gREAT RESULTS helpful hints • When preparing a cake or cookie batter, • To avoid damage to the blade or motor, use the multipurpose blade to cream do not process food that is so hard or fat and sugar first. Add dry ingredients firmly frozen that it cannot be pierced last.
-
Page 29: Troubleshooting
TROUbLEShOOTINg If your Food Processor should malfunction or fail to operate, check the following: Food Processor doesn’t run: • For easy lid rotation, it is possible to remove the seal, or just apply vegetable • Make sure that the bowl and lid are properly oil to the seal. -
Page 30: Warranty And Service
50 United States, the district of Columbia, Puerto Rico, and Canada This warranty extends to the purchaser and any succeeding owner for KitchenAid Pro-Line products operated in the 50 United States, the District of Columbia, Puerto Rico, and Canada. -
Page 31: Arranging For Service After The Warranty Expires
Outside the United States and Puerto Rico: Consult your local KitchenAid dealer or the store where you purchased your Pro-Line product for information on how to obtain service. ®/™ © 2013 KitchenAid. All rights reserved. Used under license in Canada. - Page 32 Kitchenaid ® Nous nous engageons à vous aider à créer de délicieux repas pour votre famille et vos amis, et ce durant tout le cycle de vie de l’appareil. Pour contribuer à la durabilité et à une bonne performance de votre appareil, conserver ce guide à...
- Page 33 La preuve d’achat vous garantit le bénéfice du service d’assistance sous garantie. Avant d’utiliser le robot culinaire, veuillez remplir et poster la carte d’enregistrement du produit emballée avec l’appareil, ou enregistrer celui-ci en ligne sur www.kitchenaid.com. Grâce à cette carte, nous pourrons vous contacter dans l’éventualité improbable d’un avis de sécurité...
-
Page 34: Sécurité Du Robot Culinaire
SÉCURITÉ DU ROBOT CULINAIRE Votre sécurité et celle des autres est très importante. Nous donnons de nombreux messages de sécurité importants dans ce manuel et sur votre appareil ménager. Assurez-vous de toujours lire tous les messages de sécurité et de vous y conformer. Voici le symbole d’alerte de sécurité. -
Page 35: Spécifications Électriques
SÉCURITÉ DU ROBOT CULINAIRE 13. S’assurer que le couvercle est bien verrouillé avant de faire fonctionner l’appareil. 14. Ne jamais introduire les aliments à la main. Toujours utiliser le poussoir pour introduire les aliments. 15. Ne pas tenter d’outrepasser le dispositif de verrouillage du couvercle. 16. -
Page 36: Pièces Et Caractéristiques
PIÈCES ET CARACTÉRISTIQUES Pièces et accessoires Couvercle du bol Poussoir de travail avec alimentaire goulotte en 3 parties d’alimentation 3-en-1 Fermeture Ultratight Bol de travail de 16 tasses (4 L) Commande de lame externe réglable Socle coulé sous Coffret pression d’accessoires Lame en acier Lame... - Page 37 PIÈCES ET CARACTÉRISTIQUES Pièces et accessoires ENSEMBLE DE TRANCHAGE EN DÉS Outil de nettoyage ➄ Disque à trancher de grille (8 mm) avec système de réglage externe (tranchage Disque à broyer réversible fin à épais) (2 mm et 4 mm)* Couvercle de l’ensemble ➃...
-
Page 38: Sélectionner Les Bons Outils
PIÈCES ET CARACTÉRISTIQUES Sélectionner les bons outils Facultatif Ensemble de tranchage en dés avec adaptateur de disque, bol de travail et bol de préparation facultatif Trancher en dés High Pommes de terre, tomates, oignons, concombres, fruits, légumes Mini-bol utilisé avec lame en acier inoxydable multifonction Mélanger Émincer Hacher... - Page 39 PIÈCES ET CARACTÉRISTIQUES Sélectionner les bons outils Lame pétrisseuse en plastique utilisée Fouet à œufs* utilisé avec bol de travail avec le bol de travail Pétrir Fouetter High High Pâte au levain Œufs Lame en acier inoxydable multifonction utilisée avec bol de travail Mélanger Hacher Émincer...
- Page 40 PIÈCES ET CARACTÉRISTIQUES Sélectionner les bons outils Selon vos préférences, vous pouvez utiliser d’autres réglages que les réglages suggérés ci-dessous. Facultatif Disque de tranchage réglable utilisé avec bol de travail et bol de préparation facultatif Trancher - fin Trancher - épais High High Pommes de terre, tomates, fruits (à...
- Page 41 PIÈCES ET CARACTÉRISTIQUES Sélectionner les bons outils Facultatif Râpe à parmesan/glace utilisée* avec bol de travail et bol de préparation facultatif Râper Réduire en copeaux High Fromage à pâte dure, glace, chocolat Facultatif Disque à julienne* utilisé avec bol de travail et bol de préparation facultatif Julienne High Carottes, courgettes, pommes de terre, légumes...
-
Page 42: Utilisation Du Robot Culinaire
UTILISATION DU ROBOT CULINAIRE Montage du bol de travail Avant la première utilisation AVERTISSEMENT Avant d’utiliser le robot culinaire pour la première fois, laver les bols et accessoires à la main tel que décrit dans la section “Nettoyage et entretien”. Risque de choc électrique Brancher sur une prise à... -
Page 43: Fixation Du Couvercle Et Dispositif De Verrouillage De Sécurité
UTILISATION DU ROBOT CULINAIRE Fixation du couvercle et dispositif de verrouillage de sécurité Installer le couvercle du bol de travail La goulotte d’alimentation de grande en alignant les onglets et le verrouiller. taille doit être insérée dans le couvercle La fermeture Ultratight est résistante pour que le robot puisse fonctionner. -
Page 44: Utilisation De La Goulotte D'alimentation 3-En-1
UTILISATION DU ROBOT CULINAIRE Utilisation de la goulotte d’alimentation 3-en-1 Avant utilisation Avant d’utiliser le robot culinaire, s’assurer que le bol de travail, les lames et le couvercle du bol de travail sont correctement assemblés sur le socle du robot culinaire. Ligne de remplissage Poussoir... -
Page 45: Utilisation Des Commandes De Vitesse
UTILISATION DU ROBOT CULINAIRE Utilisation des commandes de vitesse REMARQUE : Si le robot culinaire ne fonctionne pas, vérifier que le bol de travail et son couvercle sont bien verrouillés sur le socle et que le poussoir alimentaire de grande taille est bien en place. High High Pour mettre en marche le robot, placer... -
Page 46: Utilisation Des Accessoires
UTILISATION DES ACCESSOIRES Préparation de l’ensemble de tranchage en dés pour la première utilisation IMPORTANT : Suivre ces instructions pour laver correctement toutes les pièces de l’ensemble de tranchage en dés avant de l’utiliser pour la première fois. À l’aide de la poignée, placer l’ensemble de tranchage en dés assemblé... -
Page 47: Installation/Utilisation De L'ensemble Du Disque À Trancher
UTILISATION DES ACCESSOIRES Installation/utilisation de l’ensemble du disque à trancher Placer l’adaptateur de disque sur l’axe Placer la grille de l’ensemble de du socle. tranchage en dés – orienter la grille vers l’avant et aligner l’onglet de l’ensemble avec la fente dans le bol de travail. Placer le couvercle de l’ensemble Placer la lame de l’ensemble de tranchage en dés en s’assurant qu’elle... -
Page 48: Installation/Retrait De La Lame Multifonction
UTILISATION DES ACCESSOIRES Installation/retrait de la lame multifonction REMARQUE : La lame multifonction comporte un dispositif de fermeture résistant aux renversements. On peut la laisser dans le bol de travail ou la retirer pour pouvoir vider le contenu du bol. Placer la lame sur l’axe du socle. -
Page 49: Installation/Retrait Du Bol De Préparation
UTILISATION DES ACCESSOIRES Installation/retrait du bol de préparation REMARQUE : Le bol de préparation peut être utilisé uniquement avec les disques/râpes et l’ensemble de tranchage en dés. Pour utiliser le bol de préparation, le Placer l’adaptateur sur l’axe du socle. placer dans le bol de travail en le tenant par les deux encoches de saisie. -
Page 50: Installation/Retrait Des Disques À Broyer, À Julienne Et Râpe À Parmesan
UTILISATION DES ACCESSOIRES Installation/retrait des disques à broyer, à julienne* et râpe à parmesan* Placer l’adaptateur sur l’axe du socle. Faire pivoter légèrement le disque/ la râpe jusqu’à ce qu’il/elle s’insère sur l’adaptateur. Encoche de saisie Encoche de saisie pour les doigts pour les doigts Pour retirer le disque à... -
Page 51: Installation/Retrait Du Disque À Trancher
UTILISATION DES ACCESSOIRES Installation/retrait du disque à trancher Placer l’adaptateur sur l’axe du socle. Faire pivoter légèrement le disque/la râpe jusqu’à ce qu’il/elle s’insère. Encoche de saisie Encoche de saisie pour les doigts pour les doigts Pour retirer le disque à trancher, retirer Installer le couvercle du bol de travail le couvercle du bol de travail et soulever en alignant les onglets et le verrouiller. -
Page 52: Installation/Retrait Du Mini-Bol Et De La Mini-Lame
UTILISATION DES ACCESSOIRES Installation/retrait du mini-bol et de la mini-lame Mini-lame Axe du socle Faire tourner le mini-bol à l’intérieur du Enfoncer fermement la mini-lame. bol de travail en veillant à ce que l’onglet Un déclic retentit lorsque la mini-lame du mini-bol soit aligné... -
Page 53: Installation/Retrait Du Fouet À Œufs Et De La Lame Pétrisseuse
UTILISATION DES ACCESSOIRES Installation/retrait du fouet à œufs* et de la lame pétrisseuse Placer le fouet à oeufs ou la lame Enfoncer fermement le fouet à œufs pétrisseuse sur l’axe du socle. ou la lame prétrisseuse. Un déclic retentit au moment du verrouillage de l’accessoire. -
Page 54: Installation/Retrait Du Presse-Agrumes
UTILISATION DES ACCESSOIRES Installation/retrait du presse-agrumes* Placer l’adaptateur de presse-agrumes Placer le panier-passoire dans le bol sur l’axe du socle. de travail en orientant l’agrafe de verrouillage à gauche de la poignée du bol de travail. Tourner le panier dans le sens Placer le cône à... -
Page 55: Retrait Des Accessoires Et Du Bol De Travail
UTILISATION DES ACCESSOIRES Retrait des accessoires et du bol de travail IMPORTANT : S’assurer que le robot culinaire est éteint et débranché avant de le démonter. Pour retirer le bol de travail du robot culinaire avant de retirer les accessoires : Faire pivoter le bol de travail et le soulever pour le dégager. -
Page 56: Entretien Et Nettoyage
ENTRETIEN ET NETTOYAGE IMPORTANT : Ne jamais utiliser de nettoyants abrasifs ou de tampons à récurer sur le robot culinaire. Ils pourraient rayer ou ternir le bol de préparation et son couvercle. S’assurer que le robot culinaire Nettoyer le socle et le cordon avec est éteint et débranché... -
Page 57: Conseils Pour De Bons Résultats
ENTRETIEN ET NETTOYAGE Pour remiser le robot culinaire, ranger Ranger les disques/râpes, l’axe du le cordon à l’intérieur du socle du robot socle et les lames dans le coffret de culinaire. rangement fourni et placer celui-ci dans un endroit hors de portée des enfants. CONSEILS POUR DE BONS RÉSULTATS Utilisation de la lame multifonction Pour hacher les fruits... - Page 58 CONSEILS POUR DE BONS RÉSULTATS Pour hacher les fruits secs (ou collants) : Pour hacher la viande, la volaille et les fruits de mer crus ou cuits : Les aliments Les aliments doivent être froids. Pour chaque doivent être très froids. Les couper en ½...
- Page 59 CONSEILS POUR DE BONS RÉSULTATS Utilisation des disques à trancher ou à râper Pour trancher ou broyer selon son épaisseur. Inspecter l’aliment pour les fruits et les légumes assurer qu’on peut le percer avec la pointe de forme allongée et de d’un couteau aiguisé.
- Page 60 CONSEILS POUR DE BONS RÉSULTATS Conseils utils • Pour éviter d’endommager la lame ou • Les aliments plus fins comme les carottes le moteur du robot, ne pas mixer des ou le céleri peuvent parfois passer trop aliments très durs ou complètement rapidement au travers de la goulotte congelés qui ne peuvent être percés d’alimentation, ce qui peut entraîner un...
-
Page 61: Dépannage
CONSEILS POUR DE BONS RÉSULTATS • Pour supprimer facilement les ingrédients • Votre robot culinaire n’est pas conçu restés sur la lame multifonction, il suffit de pour effectuer les tâches suivantes : vider le bol de préparation, remettre le - Moudre les grains de café, les céréales couvercle en place et mixer par impulsions les épices dures pendant 1 à... -
Page 62: Garantie Et Dépannage
énoncées dans la présente garantie. Si vous souhaitez une garantie plus étendue ou plus complète que la garantie limitée fournie avec cet appareil ménager, adressez-vous à KitchenAid ou à votre détaillant pour obtenir les modalités d’achat d’un contrat de services. - Page 63 En dehors des États-Unis et de Porto 200 - 6750 Century Ave. Rico : Mississauga, ON L5N 0B7 Consulter le revendeur KitchenAid local ou le détaillant auprès duquel le produit ®/™ © 2013 KitchenAid. Tous droits réservés. Utilisé sous licence au Canada.
- Page 64 Tarjeta de registro del producto adjunta. Únase a nosotros en la cocina, visite www.proline.kitchenaid.com. Escanee con su aparato móvil para ver recetas, consejos y demás. USA: 1.800.832.7173 KitchenAid.com Canada: 1.800.807.6777...
- Page 65 Antes de usar el procesador de alimentos, llene y envíe por correo la tarjeta de registro del producto, que fue empacada con la unidad, o regístrelo en línea, en www.kitchenaid.com. Esta tarjeta nos permitirá contactarle en el caso improbable de que haya una notificación de seguridad relacionada con el producto, y nos ayudará...
-
Page 66: Seguridad Del Procesador De Alimentos
SEgURIDAD DEL PROCESADOR DE ALIMENTOS Su seguridad y la seguridad de los demás es muy importante. Hemos incluido muchos mensajes importantes de seguridad en este manual y en su electrodoméstico. Lea y obedezca siempre todos los mensajes de seguridad. Este es el símbolo de advertencia de seguridad. Este símbolo le llama la atención sobre peligros potenciales que pueden ocasionar la muerte o una lesión a usted y a los demás. -
Page 67: Requisitos Eléctricos
SEgURIDAD DEL PROCESADOR DE ALIMENTOS 15. No intente quitar el mecanismo de enclavamiento de la cubierta. 16. Este producto ha sido diseñado únicamente para uso dentro del hogar. 17. No dé al aparato un uso diferente de aquél para el cual fue diseñado. 18. -
Page 68: Piezas Y Características Piezas Y Accesorios
PIEZAS Y CARACTERÍSTICAS Piezas y accesorios Empujador Cubierta para de alimentos tazón de trabajo de 3 partes con tubo de alimentación 3 en 1 Sello ultrahermético Tazón de trabajo de 16 tazas (4 L) Control de cuchilla regulable desde el exterior Base de metal Estuche para... - Page 69 PIEZAS Y CARACTERÍSTICAS Piezas y accesorios JUEgO PARA CORTAR EN CUBOS herramienta de 8 mm ➄ Disco rebanador regulable para la limpieza con rejillas desde el exterior (de fino a grueso) Disco reversible para rallar en tiras (de 2 mm y 4 mm)* Tapa del juego para ➃...
-
Page 70: Cómo Seleccionar Las Herramientas Adecuadas
PIEZAS Y CARACTERÍSTICAS Cómo seleccionar las herramientas adecuadas Opcional El juego para cortar en cubos con adaptador de discos se usa con el tazón de trabajo y un tazón de preparación optativo Cortar en cubos high Papas, tomates, cebollas, pepinos, frutas y vegetales El minitazón se usa con la cuchilla de acero inoxidable multiuso Mezclar Moler... - Page 71 PIEZAS Y CARACTERÍSTICAS Cómo seleccionar las herramientas adecuadas La cuchilla de plástico para masa se usa con el El batidor de huevos* se usa con el tazón de trabajo tazón de trabajo Amasar Batir high high Masa de levadura Huevos La cuchilla de acero inoxidable multiuso se usa con el tazón de trabajo Mezclar Picar...
- Page 72 PIEZAS Y CARACTERÍSTICAS Cómo seleccionar las herramientas adecuadas Use otros ajustes diferentes de los sugeridos a continuación para regular los resultados según sus preferencias personales. Opcional El disco rebanador regulable se usa con el tazón de trabajo y un tazón de preparación optativo Rebanadas Rebanadas delgadas...
- Page 73 PIEZAS Y CARACTERÍSTICAS Cómo seleccionar las herramientas adecuadas Opcional El disco para rallar parmesano y hielo en copos* se usa con el tazón de trabajo y un tazón de preparación optativo Rallar en Hacer copos trozos pequeños high Queso duro, hielo, chocolate Opcional El disco para cortar en juliana* se usa con el tazón de trabajo y un tazón de preparación optativo Juliana...
-
Page 74: Cómo Usar El Procesador De Alimentos
CÓMO USAR EL PROCESADOR DE ALIMENTOS Cómo sujetar el tazón de trabajo Antes del primer uso ADVERTENCIA Antes de usar el procesador de alimentos por primera vez, lave los tazones y los accesorios como se describe en la sección “Cuidado y limpieza”. Peligro de Choque Eléctrico Conecte a un contacto de pared de conexión a tierra de 3... -
Page 75: Cómo Sujetar La Tapa Y El Mecanismo De Seguridad
CÓMO USAR EL PROCESADOR DE ALIMENTOS Cómo sujetar la tapa y el mecanismo de seguridad Instale la tapa del tazón de trabajo, El tubo de alimentación grande debe alineando las lengüetas y trabándola insertarse dentro de la tapa para que en su lugar. -
Page 76: Cómo Usar El Tubo De Alimentación 3 En 1
CÓMO USAR EL PROCESADOR DE ALIMENTOS Cómo usar el tubo de alimentación 3 en 1 Antes del uso Antes de poner a funcionar el procesador de alimentos, cerciórese de que el tazón de trabajo, las cuchillas y la cubierta del tazón de trabajo estén ensambladas correctamente en la base del procesador de alimentos. -
Page 77: Cómo Usar Los Controles De Velocidad
CÓMO EL PROCESADOR DE ALIMENTOS Cómo usar los controles de velocidad NOTA: Si el procesador de alimentos no funciona, asegúrese de que el tazón de trabajo y la tapa estén bien asegurados en la base, y que el empujador de alimentos grande esté por completo en su lugar. -
Page 78: Cómo Preparar El Juego Para Cortar En Cubos Por Primera Vez
CÓMO USAR LOS ACCESORIOS Cómo preparar el juego para cortar en cubos por primera vez IMPORTANTE: Siga estas instrucciones para lavar debidamente todas las piezas del juego para cortar en cubos, antes de usarlo por primera vez. Usando la manija, coloque el juego para cortar en cubos ensamblado dentro del tazón de trabajo. -
Page 79: Cómo Instalar Y Usar El Disco Para Cortar En Cubos
CÓMO USAR LOS ACCESORIOS Cómo instalar y usar el disco para cortar en cubos Coloque el adaptador del disco sobre Coloque la rejilla del juego para cortar el eje eléctrico. en cubos, mirando hacia el frente, y alinee la lengüeta del juego con la ranura en el tazón de trabajo. -
Page 80: Cómo Instalar Y Quitar La Cuchilla Multiuso
CÓMO USAR LOS ACCESORIOS Cómo instalar y quitar la cuchilla multiuso NOTA: La cuchilla multiuso tiene un sello resistente a salpicaduras, y puede dejarse en el tazón de trabajo o quitarse antes de quitar el contenido. Coloque la cuchilla/paleta en el eje Presione con firmeza sobre la cuchilla. -
Page 81: Cómo Instalar Y Quitar El Tazón De Preparación
CÓMO USAR LOS ACCESORIOS Cómo instalar y quitar el tazón de preparación NOTA: El tazón de preparación puede usarse solamente con los discos y el juego para cortar en cubos. Para usar el tazón de preparación, Coloque el adaptador sobre colóquelo en el tazón de trabajo el eje eléctrico. -
Page 82: Cómo Instalar Y Quitar Los Discos Ralladores En Tiras, Para Cortar En Juliana Y Para Parmesano
CÓMO USAR LOS ACCESORIOS Cómo instalar y quitar los discos ralladores en tiras, para cortar en juliana* y para parmesano* Coloque el adaptador sobre Gire lentamente el disco hasta que caiga el eje eléctrico. en su lugar, sobre el adaptador. Orificio para Orificio para los dedos... -
Page 83: Cómo Instalar Y Quitar El Disco Rebanador
CÓMO USAR LOS ACCESORIOS Cómo instalar y quitar el disco rebanador Coloque el disco sobre el eje eléctrico. Gire lentamente el disco hasta que caiga en su lugar. Orificio para Orificio para los dedos los dedos Para quitar el disco rebanador, quite la Instale la tapa del tazón de trabajo, tapa del tazón de trabajo y levante el alineando las lengüetas y trabándola... -
Page 84: Cómo Instalar Y Quitar El Minitazón Y La Minicuchilla
CÓMO USAR LOS ACCESORIOS Cómo instalar y quitar el minitazón y la minicuchilla Minicuchilla Eje eléctrico Coloque el minitazón dentro del tazón Presione con firmeza hacia abajo sobre de trabajo, cerciorándose de que la la minicuchilla. Escuchará un chasquido lengüeta en el minitazón esté alineada cuando la misma encaja y se traba en con la muesca en el tazón de trabajo. -
Page 85: Cómo Instalar Y Quitar El Batidor De Huevos O La Paleta Para Masa
CÓMO USAR LOS ACCESORIOS Cómo instalar y quitar el batidor de huevos* o la paleta para masa Coloque el batidor de huevos o la paleta Presione con firmeza el batidor de para masa sobre el eje eléctrico. huevos o la paleta para masa. Escuchará un chasquido cuando el accesorio encaja y se traba en su lugar. -
Page 86: Cómo Instalar Y Quitar La Prensa Para Cítricos
CÓMO USAR LOS ACCESORIOS Cómo instalar y quitar la prensa para cítricos* Coloque el adaptador de la prensa para Coloque la canasta coladora en el tazón cítricos sobre el eje eléctrico. de trabajo con el sujetador de bloqueo colocado a la izquierda de la manija del tazón de trabajo. -
Page 87: Cómo Quitar Los Accesorios Y El Tazón De Trabajo
CÓMO USAR LOS ACCESORIOS Cómo quitar los accesorios y el tazón de trabajo IMPORTANTE: Cerciórese de que el procesador de alimentos esté apagado y desenchufado antes de desensamblarlo. Para quitar el tazón de trabajo del procesador de alimentos antes de quitar los accesorios: Gire el tazón de trabajo y levántelo para quitarlo;... -
Page 88: Cuidado Y Limpieza
CUIDADO Y LIMPIEZA IMPORTANTE: Nunca use limpiadores abrasivos ni estropajos de metal con el procesador de alimentos. Estos pueden rayar o deslustrar tazón de trabajo y la tapa. Cerciórese de que el procesador de Limpie la base y el cable con un paño alimentos esté... -
Page 89: Consejos Para Obtener Resultados Ideales
CUIDADO Y LIMPIEZA Para guardar, empuje el cable dentro Guarde los discos, el eje y las cuchillas de la base del procesador de alimentos. en el estuche provisto, en un lugar fuera del alcance de los niños. CONSEJOS PARA OBTENER RESULTADOS IDEALES Cómo usar la cuchilla multiuso Para picar frutas o vegetales frescos: Pele,... - Page 90 CONSEJOS PARA OBTENER RESULTADOS IDEALES Para picar finamente la cáscara de cítricos: Para hacer migas de pan, galletas Con un cuchillo afilado, pele la porción de color o galletas saladas: Corte en trozos de (sin la membrana blanca) de los cítricos. Corte 11/2 a 2 pulgadas (3,5 a 5 cm).
- Page 91 CONSEJOS PARA OBTENER RESULTADOS IDEALES Cómo usar el disco rebanadoro rallador Para rebanar la carne de res o de ave Para rebanar o rallar en cruda como las carnes para freír con tiras frutas o vegetales poco aceite: Corte o haga rollos con largos y con un diámetro la carne para que pase a través del tubo relativamente pequeño,...
- Page 92 CONSEJOS PARA OBTENER RESULTADOS IDEALES Consejos útiles • Para evitar daños a la cuchilla o al motor, no • Algunas veces los alimentos finos, tales procese alimentos que se hayan congelado como las zanahorias o el apio, se caen en hasta estar tan duros o firmes que no se el tubo de alimentación, lo que resulta en puedan pinchar con la punta de un cuchillo...
-
Page 93: Solución De Problemas
CONSEJOS PARA OBTENER RESULTADOS IDEALES • Después de quitar la tapa del tazón - Licuar frutas o vegetales frescos de trabajo, colóquela al revés sobre el - Rebanar huevos cocidos o carnes mostrador. Esto ayuda·a mantener el a temperatura ambiente. mostrador limpio. -
Page 94: Garantía Y Servicio
Distrito de Columbia, Puerto Rico y Canadá Esta garantía se extiende al comprador y a cualquier propietario subsiguiente para los productos KitchenAid Pro-Line usados en los 50 estados de Estados Unidos, el Distrito de Columbia, Puerto Rico y Canadá. - Page 95 KitchenAid Canada y Puerto Rico: 200 - 6750 Century Ave. Mississauga, ON L5N 0B7 Consulte a su distribuidor local de KitchenAid o a la tienda donde compró ®/™ © 2013 KitchenAid. Todos los derechos reservados. Usada en Canadá bajo licencia.
- Page 96 ®/™ © 2013 KitchenAid. All rights reserved. Used under license in Canada. ®/™ © 2013 KitchenAid. Tous droits réservés. Emploi sous licence au Canada. ®/™ © 2013 KitchenAid. Todos los derechos reservados. Usada en Canadá bajo licencia. W10545030B 01/13...