Nvidia NFORCE 680i LT SLI User Manual
Supports intel socket 775 processors
Hide thumbs
Also See for NFORCE 680i LT SLI:
- Hardware user manual (80 pages) ,
- Overview (2 pages) ,
- User manual (168 pages)
Table of Contents
Advertisement
Advertisement
Table of Contents

Related Manuals for Nvidia NFORCE 680i LT SLI


Summary of Contents for Nvidia NFORCE 680i LT SLI
-
Page 2: Table Of Contents
Guaranteed FSB speeds ................1 High-speed Memory ..................1 Comprehensive Overclocking Tools..............2 NVIDIA nTune Utility ................2 NV BIOS....................2 Designed for NVIDIA SLI Technology ..............2 ® True 2 x16 PCI Express SLI Support ..............2 NVIDIA SLI-Ready Memory................2 NVIDIA SLI Certified Components ..............3 Dual DDR2 Memory Architecture ..............3 NVIDIA MediaShield Storage ................3... - Page 3 Installing and Configuring the BFG NVIDIA nForce 680i LT SLI Motherboard NVIDIA Native Gigabit Ethernet ................4 NVIDIA FirstPacket technology ..............4 TCP/IP Acceleration..................4 High Definition Audio (HDA) ................4 USB 2.0 ......................4 Motherboard Specifications ..................5 Unpacking and Parts Descriptions Unpacking......................7 Equipment ......................7 BFG NVIDIA nForce 680i LT SLI Motherboard ............8...
- Page 4 Front Panel Header ..................18 IEEE 1394a (FireWire) ..................19 USB Headers (Universal Serial Bus) ..............20 Front Panel Audio ....................21 Fan Connections ....................22 Serial (COM) ......................23 FDD Connector ....................23 IDE Connector ....................23 Serial ATA II Connectors..................23 Expansion Slots....................24 PCI Slots......................25 PCI Express x1 Slot ..................25 PCI Express x16 Slots ..................25 Clear CMOS Jumper: CLR_CMOS ..............25 Configuring the BIOS...
- Page 5 Installing and Configuring the BFG NVIDIA nForce 680i LT SLI Motherboard Network Boot Priority..................37 CPU Internal Cache ..................37 Quick Power On Self Test................38 First/Second/Third Boot Device ..............38 Boot Other Device ..................38 Boot Up NumLock Status................38 Security Option ....................39 APIC Mode ....................39 MPS Version Control For OS................39...
- Page 6 HD Audio ....................56 IDE HDD Block Mode..................56 Onboard FDC Controller................56 Onboard Serial Port 1 ..................56 Power Management Setup Menu ................57 ACPI Function ....................57 ACPI Suspend Type ..................57 Soft-Off by PBNT..................58 WOL(PME#) From Soft-Off ................58 Power On by Alarm ..................58 POWER ON Function ..................58 PnP/PCI Configuration Menu ................59 Init Display First ..................60 Reset Configuration Data ................60...
- Page 7 Installing and Configuring the BFG NVIDIA nForce 680i LT SLI Motherboard List of Figures Figure 1. BFG NVIDIA nForce 680i SLI Motherboard Layout..........9 Figure 2. Chassis Backpanel Connectors ..............10 Figure 3. PWR1 Motherboard Connector ..............16 Figure 4. Expansion Slots ..................25 Figure 5.
-
Page 8: Before You Begin
PCI Express card. The kit does contain the SLI connector used to connect the two graphics cards. See Installing Graphics Cards in an SLI Configuration located on the CD in the .pdf entitled “Using the NVIDIA Software”. • PCI Express Compliant Power Supply: The power supply requirement is dependent upon the power and the number of the GPUs you install. -
Page 9: Intentions Of The Kit
Intentions of the Kit This kit provides you with the motherboard and all connecting cables necessary to install the motherboard into a PC chassis. If you are building a PC, you will use most of the cables provided in the kit. If however, you are replacing a motherboard, you will not need many of the cables. -
Page 10: Introduction To The Bfg Nvidia Nforce 680I Lt Sli Motherboard
Extreme Overclocking Unleash the underlying hardware. With comprehensive overclocking tools to push the limits on front side bus (FSB) speed and support for higher memory speeds, the NVIDIA nForce 680i LT SLI MCPs were designed for overclocking. Guaranteed FSB Speeds Reach FSB speeds of 1333MHz with a CPU that supports this specification. -
Page 11: Comprehensive Overclocking Tools
Installing and Configuring the BFG NVIDIA nForce 680i LT SLI Motherboard Comprehensive Overclocking Tools Award-winning NVIDIA overclocking tools provide a complete kit of tools giving everyone, from the most veteran enthusiast to the novice overclocker, the ability to unleash the hardware in their PC. -
Page 12: Nvidia Sli Certified Components
NVIDIA SLI Certified Components Look for other components including NVIDIA GeForce GPUs and system memory that have been certified by NVIDIA to deliver unmatched performance with the BFG NVIDIA nForce 680i LT SLI motherboard. For more information on SLI Certified components, visit www.slizone.com\nForce. -
Page 13: Bootable Multidisk Array
NVIDIA networking delivers the highest network throughput at the lowest CPU utilization. The manageable and stable NVIDIA networking solution results in better networking management and a lower total cost of ownership. Only NVIDIA integrates this level of networking features to allow you to take your online experience to the next level. -
Page 14: Motherboard Specifications
➢ 300MBps data transfer rate ➢ Six Serial ATA II connectors ➢ NVIDIA MediaShield RAID with support for RAID 0, RAID 1, RAID 0+1, RAID 5, and JBOD ➢ Supports hot plug and NCQ (Native Command Queuing) • Onboard LAN ➢... - Page 15 Installing and Configuring the BFG NVIDIA nForce 680i LT SLI Motherboard • Onboard 1394a ➢ Supports hot plug ➢ Two 1394a ports (one rear panel port, one onboard header) with rate of transmission at 400 Mbps • Onboard Audio ➢...
-
Page 16: Unpacking And Parts Descriptions Unpacking
Unpacking and Parts Descriptions Unpacking The BFG NVIDIA nForce 680i LT SLI motherboard comes with all the necessary cables for adding a motherboard to a new chassis. If you are replacing a motherboard, you may not need many of these cables. -
Page 17: Bfg Nvidia Nforce 680I Lt Sli Motherboard
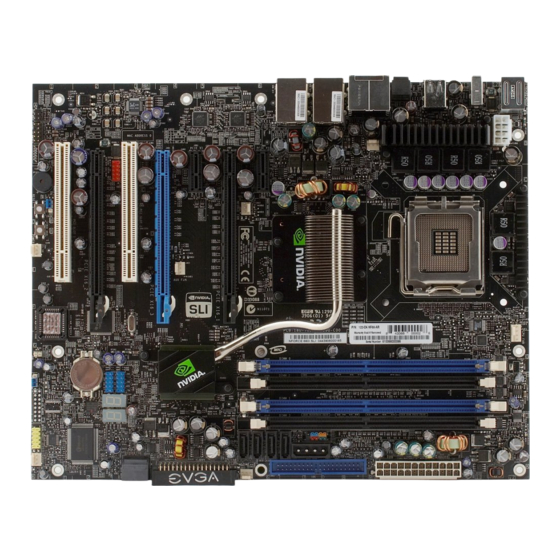
(1) BFG Tech Case Badge BFG NVIDIA nForce 680i LT SLI Motherboard The BFG NVIDIA nForce 680i LT SLI motherboard with the NVIDIA nForce 680i LT SLI SPP and MCP processors is a PCI Express, SLI-ready motherboard. Figure 1 shows the... - Page 18 Unpacking and Parts Description Figure 1. BFG NVIDIA nForce 680i LT SLI Motherboard Layout 1. CPU Socket 11. NVIDIA MCP with active fan 22. PCI Express x16 slots (SLI) 2. NVIDIA SPP with active fan 12. Floppy drive connector 23. 1394a (FireWire) header 3.
-
Page 19: Figure 2. Chassis Backpanel Connectors
Installing and Configuring the BFG NVIDIA nForce 680i LT SLI Motherboard Figure 2. Chassis Backpanel Connectors 1. PS/2 Mouse Port 2. PS/2 Keyboard Port 3. 1394a (Firewire) port 4. (2) USB 2.0 ports 5. SPDIF output 6. Port 2-Channel 4-Channel... -
Page 20: Hardware Installation
Hardware Installation This section will guide you through the installation of the motherboard. The topics covered in this section are: • Preparing the motherboard ➢ Installing the CPU ➢ Installing the CPU fan ➢ Installing the memory DIMMs • Installing the motherboard •... -
Page 21: Preparing The Motherboard
Installing and Configuring the BFG NVIDIA nForce 680i LT SLI Motherboard Preparing the Motherboard The motherboard shipped in the box does not contain a CPU or memory. You need to purchase a CPU, a CPU fan assembly, and memory to complete this installation. -
Page 22: Installing The Cpu Fan
Hardware Installation Installing the CPU Fan There are many different fan types that can be used with this motherboard. Follow the instructions that came with your fan assembly. Be sure that the fan orientation is correct for your chassis type and your fan assembly. Installing Memory DIMMs Your new motherboard has four 1.8V 240-pin slots for DDR2 memory. -
Page 23: Installing The Motherboard
Installing and Configuring the BFG NVIDIA nForce 680i LT SLI Motherboard Installing the Motherboard The sequence of installing the motherboard into the chassis depends on the chassis you are using and if you are replacing an existing motherboard or working with an empty chassis. -
Page 24: Connecting Cables And Setting Switches
Hardware Installation Connecting Cables and Setting Switches This section takes you through all the connections and switch settings necessary on the motherboard. This will include: • Power Connections ➢ 24-pin ATX Power (PWR1) ➢ 8-pin ATX 12V power (PWR2) ➢ Auxiliary power for graphics (PWR3) •... -
Page 25: Power Connections
This motherboard requires an ATX power supply. To support a PCI Express motherboard with the addition of dual graphics cards using NVIDIA SLI technology, you are going to need a minimum of a 500W power supply. Make sure you have enough power to cover all the expansion cards you will be installing. -
Page 26: 8-Pin Atx 12V Power (Pwr2)
Hardware Installation 8-pin ATX 12V Power (PWR2) PWR2 is the 8-pin ATX 12V power connector used to provide power to the CPU. Align the pins to the connector and press firmly until seated. Back Panel connector edge Connect a four-pin It is strongly recommended that you use an 8-pin ATX power plug to pins 12V power supply;... -
Page 27: Connecting Internal Headers
Installing and Configuring the BFG NVIDIA nForce 680i LT SLI Motherboard Connecting Internal Headers Front Panel Header The front panel header on this motherboard is one connector used to connect the following four cables: • PWRLED Attach the front panel power LED cable to these two pins. -
Page 28: Ieee 1394A (Firewire)
Hardware Installation Table 2. Front Panel Header Pins Pin Signal In/Out Description HD_PWR Hard disk LED pull-up to +5V HD_LED HDA# Hard disk active LED HDR_BLNK_GRN Front panel green light PWRLED HDR_BLNK_YEL Front panel yellow light — Ground RESET FP_RESET# Reset switch SWITCH_ON# Power switch... -
Page 29: Usb Headers (Universal Serial Bus)
Installing and Configuring the BFG NVIDIA nForce 680i LT SLI Motherboard USB Headers (Universal Serial Bus) This motherboard contains four USB 2.0 ports that are exposed on the rear panel of the chassis. The motherboard also contains two 10-pin internal... -
Page 30: Front Panel Audio
Hardware Installation Front Panel Audio The audio connector supports HD audio standard and provides two kinds of audio output choices: The front panel audio and the rear panel audio. The front panel audio supports re-tasking function. Table 5. Front Audio Connector Connector Signal PORT1_L... -
Page 31: Fan Connections
Installing and Configuring the BFG NVIDIA nForce 680i LT SLI Motherboard Fan Connections There are two types of fan connections, the 3-pin system fan and the 4-pin CPU fan. The fan speed can be detected and viewed in the PC Health Status section of the CMOS Setup. -
Page 32: Serial (Com)
Hardware Installation Serial (COM) The motherboard provides an additional serial header for your machine. FDD Connector The motherboard supports a standard 360K, 720K, 1.2M, 1.44m, and a 2.88M floppy disk drive (FDD). IDE Connector The IDE connector supports Ultra ATA 133/100/66 IDE hard disk drives. 1. -
Page 33: Expansion Slots
Installing and Configuring the BFG NVIDIA nForce 680i LT SLI Motherboard Expansion Slots The BFG NVIDIA nForce 680i LT SLI motherboard contains six expansion slots: Two PCI Express x16 slots, two PCI Express x1 slots and two PCI slots. 1 - PCI Slots... -
Page 34: Pci Express X1 Slot
4GB/sec (8GB/sec concurrent). The design of this motherboard supports dual PCI-Express graphics cards using NVIDIA’s SLI technology. When installing a PCI Express x16 card, be sure the retention clip snaps and locks the card into place. -
Page 35: Configuring The Bios
Configuring the BIOS This section discusses how to change the system settings through the BIOS Setup menus. Detailed descriptions of the BIOS parameters are also provided. This section includes the following information: • Enter BIOS Setup • Main Menu • Standard CMOS Features •... -
Page 36: Enter Bios Setup
Installing and Configuring the BFG NVIDIA nForce 680i LT SLI Motherboard Enter BIOS Setup The BIOS is the communication bridge between hardware and software. Correctly setting the BIOS parameters is critical to maintain optimal system performance and stability. Use the following procedure to verify/change BIOS settings. -
Page 37: Figure 5. Bios Cmos Setup Utility Main Menu
Configuring the BIOS Figure 5. BIOS CMOS Setup Utility Main Menu • Standard CMOS Features Use this menu to set up the basic system configuration. • Advanced BIOS Features Use this menu to set up the advanced system features and boot sequence. •... - Page 38 Installing and Configuring the BFG NVIDIA nForce 680i LT SLI Motherboard • System Monitor Use this menu to monitor the real-time system status of your PC, including temperature, voltages, and fan speed. The following items on the CMOS Setup Utility main menu are commands rather than submenus: •...
-
Page 39: Standard Cmos Features Menu
Configuring the BIOS Standard CMOS Features Menu The Standard CMOS Features menu is used to configure the standard CMOS information, such as the date, time, HDD model, and so on. Use the Page Up and Page Down keys to scroll through the options or press Enter to display the sub-menu. Use arrow keys to position the selector in the option you choose. -
Page 40: Date And Time
Installing and Configuring the BFG NVIDIA nForce 680i LT SLI Motherboard Date and Time Using the arrow keys, position the cursor over the month, day, and year. Use the Page Up and Page Down keys to scroll through dates and times. Note that the weekday (Sun through Sat) cannot be changed. - Page 41 Configuring the BIOS Press Enter to auto-detect IDE and SATA channels in the system. Once the channel is detected, the values for Capacity, Cylinder, Heads, Precomp, Landing Zone, and Sector are automatically filled in. • None There is no HDD installed or set. •...
-
Page 42: Drive A
Installing and Configuring the BFG NVIDIA nForce 680i LT SLI Motherboard Drive A The Drive A option allows you to select the kind of FDD to install. Options are: Press ENTER to display sub-menu • None • 360K, 5.25 in. -
Page 43: Memory
Configuring the BIOS • All, But Diskette The system boot does not stop for a diskette error but will stop for all other errors. • All, But Disk/Key The system boot does not stop for a keyboard or disk error, but will stop for all other errors. -
Page 44: Advanced Bios Features
Installing and Configuring the BFG NVIDIA nForce 680i LT SLI Motherboard Advanced BIOS Features Access the Advanced BIOS Features menu from the CMOS Utility Setup screen. Use the Page Up and Page Down keys to scroll through the options or press Enter to display the sub-menu. -
Page 45: Removable Device Priority
Configuring the BIOS Removable Device Priority Use this option to select the priority for removable device startup. Press Enter to see the list of removable devices in your system. Use the arrow keys to go to the various devices. Then use the + or – keys to move the device priority up or down in the list. To go back to the previous menu, press Esc. -
Page 46: Quick Power On Self Test
Installing and Configuring the BFG NVIDIA nForce 680i LT SLI Motherboard Quick Power On Self Test Enabling this option allows the system to skip certain test while booting, which reduces the time needed to boot the system. Use the Page Up and Page Down keys to toggle between Enable and Disable. -
Page 47: Security Option
Configuring the BIOS Security Option The Security Options allows you to require a password every time the system boots or only when you enter setup. Select Setup to require a password to gain access to the CMOS Setup screen. Select System to require a password to access the CMOS Setup screen and when the system boots. -
Page 48: Advanced Chipset Features
Installing and Configuring the BFG NVIDIA nForce 680i LT SLI Motherboard Advanced Chipset Features Select Advanced Chipset Features from the CMOS Setup Utility menu and press Enter to display the functions of the Advanced Chipset Functions menu. Figure 8. Advanced Chipset Features... -
Page 49: System Clocks
Configuring the BIOS System Clocks Select System Clocks from the Advanced Chipset Features menu and press Enter to display the System Clocks menu. From this menu, you are able to specify frequency settings, HT multipliers, and Spread Spectrum settings. Note that in Figure 9, all of the options are listed. -
Page 50: Frequency Settings
Installing and Configuring the BFG NVIDIA nForce 680i LT SLI Motherboard Frequency Settings • CPU Freq, MHz This value is set by the CPU Multiplier (value cannot be changed by the user). • FSB Reference Clock, MHz This value is set by the system (value cannot be changed by the user). To change the SLI-Ready memory, FSB memory, and memory timing, go to the FSB &... -
Page 51: Ht Multiplier
Configuring the BIOS HT Multiplier • nForce SPP — —> nForce MCP Use the Page Up and Page Down keys to scroll through the HT multiplier options and set the link speed from the SPP chip to the MCP chip. Values are [1 x] through [5 x]. •... -
Page 52: Fsb & Memory Config
Installing and Configuring the BFG NVIDIA nForce 680i LT SLI Motherboard FSB & Memory Config Select FSB & Memory Config from the Advanced Chipset Features menu and press Enter to display the FSB & Memory Config menu. This menu provides the means to set SLI-Ready memory, FSB memory, and memory timing. - Page 53 Configuring the BIOS When you select one of the CPUOC x% options, the FSB - Memory Clock Mode is set to Unlinked and cannot be changed until SLI-Ready Memory is set to Disable. • FSB and Memory Clock Mode Use the Page Up and Page Down keys to scroll through the FSB and Memory Clock Mode options.
- Page 54 Installing and Configuring the BFG NVIDIA nForce 680i LT SLI Motherboard • Memory Timing Setting Press Enter to display the Memory Timing Setting menu. Use this menu to set optimal timings or to manually enter timings. ➢ Optimal Use the Page Up and Page Down keys to select Optimal. Optimal prohibits you...
- Page 55 Configuring the BIOS ➢ Expert Use the Page Up and Page Down keys to select Expert. When Expert is selected, all timing categories are enabled for manual input. Note that you should set the value to Optimal to use the manufacturers’ recommended values. ➢...
-
Page 56: Cpu Configuration
Installing and Configuring the BFG NVIDIA nForce 680i LT SLI Motherboard CPU Configuration Select CPU Configuration from the Advanced Chipset Features menu and press Enter to display the CPU Configuration menu. Figure 11. CPU Configuration Menu • Limit CPUID MaxVal Use this function to enable the set limit of the CPUID MaxVal to 3. -
Page 57: System Voltages
Configuring the BIOS • C1E Enhanced Halt State Enabled, this function reduces the CPU power consumption when the CPU is idle. Idle occurs when the operating system issues a halt instruction. • Execute Disable Bit When this function is disabled, it forces the XD feature flag to always return to zero (0). •... - Page 58 Down keys to select a voltage or select [Auto] to automatically set the voltage. • nForce SPP This function defines the core voltage level for the NVIDIA nForce SPP chip. Use the Page Up and Page DownDown keys to select a voltage (1.20V, 1.30V, 1.40V, 1.50V)
-
Page 59: Nvmem Memory Test
Configuring the BIOS NVMEM Memory Test This function defines whether you run the NVIDIA memory testing module during POST. The options are Fast, Medium, Slow, and Disable. Load Timing/Voltage Set This function loads the system voltages and timing settings that were defined in the System Voltages menu. -
Page 60: Save Timing/Voltage Set
When HPET is Disabled, the APIC timer is used. NVIDIA GPU Ex To enable or disable this function you need to have the NVIDIA ForceWare ® graphics driver with NVIDIA EX support. When enabled, the system uses the optimized NVIDIA EX graphics driver. -
Page 61: Integrated Peripherals Menu
Configuring the BIOS Integrated Peripherals Menu Select Integrated Peripherals from the CMOS Setup Utility menu and press Enter to display the Integrated Peripherals menu. Figure 13. Integrated Peripherals Menu... -
Page 62: Ide Function Setup
Installing and Configuring the BFG NVIDIA nForce 680i LT SLI Motherboard IDE Function Setup Press Enter to display the IDE Function Setup menu. • OnChip IDE Channel0 Use this function to enable or disable the onchip IDE Channel0. When disabled, the Primary... -
Page 63: Raid Config
Configuring the BIOS RAID Config Press Enter to display the RAID Config menu. • RAID Enable Use this function to enable or disable RAID. When RAID is set to [Disabled], all SATA functions are changed to Disabled and cannot be changed. •... -
Page 64: Mac Config
Installing and Configuring the BFG NVIDIA nForce 680i LT SLI Motherboard MAC Config Press Enter to display the MAC Config menu. • MACO LAN Use this function to set the MAC0 LAN to Auto or disable its function. IEEE1394 controller This function on the Integrated Peripherals menu allows you to enable or disable the IEEE 1394a (FireWire) interface. -
Page 65: Power Management Setup Menu
Configuring the BIOS Power Management Setup Menu Select Power Management Setup from the CMOS Setup Utility menu and press Enter to display the Power Management Setup menu. Figure 14. Power Management Setup Menu ACPI Function This function on the Power Management Setup menu allows you to enable or disable the ACPI function. -
Page 66: Soft-Off By Pbnt
Installing and Configuring the BFG NVIDIA nForce 680i LT SLI Motherboard Soft-Off by PBNT This function on the Power Management Setup menu allows you to set Soft-Off by PBNT to [Instant-Off] or [Delay 4 Sec]. WOL(PME#) From Soft-Off This function on the Power Management Setup menu allows you to enable or disable WOL(PME#) from soft-off. -
Page 67: Pnp/Pci Configuration Menu
Configuring the BIOS • Hot Key Power On When [Hot Key] is selected, the Hot key Power On function is enabled so that you must select a keyboard key as the hot key. To select a hot key use Ctrl+F1 though Ctrl+F12. -
Page 68: Init Display First
Installing and Configuring the BFG NVIDIA nForce 680i LT SLI Motherboard Init Display First This function on the PnP/PCI Configuration menu allows you to define if the initial display is in the PCI slot or in the PCI Express slot. Options are [PCI Slot] and [PCIEx]. -
Page 69: Irq Resources
Configuring the BIOS IRQ Resources To enable this field for input, set Resources Controlled By to [Manual]. With this field enabled, press Enter to see options. Use Legacy ISA for devices compliant with the original PC AT Bus specification. Use PCI/ISA PnP for devices compliant with the plug-and-play standard, whether designed for PCI or ISA Bus architecture. -
Page 70: System Monitor Menu
Installing and Configuring the BFG NVIDIA nForce 680i LT SLI Motherboard System Monitor Menu Select System Monitor from the CMOS Setup Utility menu and press Enter to display the System Monitor menu. Figure 16. System Monitor Menu All of the values shown in Blue are dynamic and change as the speed and voltages of... -
Page 71: Dynamic Fan Control
Configuring the BIOS Dynamic Fan Control Press Enter to display the Dynamic Fan Control menu. Use this menu to control the speed of the various fans on the motherboard. Set CPU and Chassis fan speed to [SmartFan] when you want the speed of the fans automatically controlled based on temperature. -
Page 72: Software Installation
The motherboard supports Windows XP 32bit and 64bit and is Vista-capable. The kit comes with a CD that contains utility drivers and additional NVIDIA software. The CD that has been shipped with your NVIDIA motherboard contains the following software and drivers: •... -
Page 73: Windows Xp Drivers Install
2. Follow the on-screen prompts and make the appropriate selections. For a typical installation, you will only need to click Next or Yes when prompted. 3. When prompted to install NVIDIA Network Access Manager, select Yes if you intend to use the advanced and robust networking features of this motherboard. For more information about NVIDIA Network Access Manager, check the Appendix in the back of this manual. - Page 74 Software Installation 4. If you chose to install NVIDIA Network Access Manager, follow the on-screen prompts and make the appropriate selections. For a typical installation, you will only need to click Next when prompted.
- Page 75 Installing and Configuring the BFG NVIDIA nForce 680i LT SLI Motherboard 5. When prompted to restart your computer select Yes, I want to restart my computer now and click Finish.
-
Page 76: Support
FITNESS FOR A PARTICULAR PURPOSE. Information furnished is believed to be accurate and reliable. However, NVIDIA Corporation assumes no responsibility for the consequences of use of such information or for any infringement of patents or other rights of third parties that may result from its use. No license is granted by implication or otherwise under any patent or patent rights of NVIDIA Corporation. - Page 77 NOTES...
- Page 78 This manual is the intellectual property of BFG Technologies, Inc and NVIDIA Corporation. Although the information in this manual may be changed or modified at any time, BFG Tech and NVIDIA do not obligate themselves to inform the user of these changes.