Table of Contents
Advertisement
Quick Links
Advertisement
Table of Contents

Related Manuals for Nvidia TF680i SLI Deluxe


Summary of Contents for Nvidia TF680i SLI Deluxe
- Page 1 User Guide TF680i SLI Deluxe Motherboard Installation and Configuration...
- Page 2 Installing and Configuring the TF680i S LI Deluxe M otherboard...
-
Page 3: Table Of Contents
Table of Contents Before You Begin… ..................xii Parts NOT in the Kit..................xii Intentions of the Kit..................xiii Introduction to the TF680i SLI Deluxe Motherboard ........1 Features ......................1 Engineered for Enthusiasts ................1 Extreme Ov erclock ing ..................2 Extreme FSB speeds...................2 Extreme DDR2 Speeds ................2 Comprehensiv e Ov erclock ing Tools .............2... - Page 4 High Definition A udio (HDA )................6 USB 2.0......................6 Motherboard Specifications ................7 Unpacking and Parts Descriptions ..............9 Equipment......................9 TF680i SLI Deluxe Motherboard ............... 10 Hardware Installation..................13 Safety Instructions ..................13 Preparing the Motherboard ................14 Installing the CPU..................14 Installing the CPU Fan.................. 15 Installing Memory DIMMs................
- Page 5 IEEE 1394a (Optional)................22 USB Headers.................... 23 A udio......................24 Fan Connections..................25 COM1 (Optional)..................25 COM1 (Optional)..................26 FDD Connector.................... 26 Speak er....................... 26 Expansion Slots ................... 27 PCI Slots....................27 PCI Express x1 Slot .................. 28 PCI Express x16 Slots ................28 Jumper Settings ....................
- Page 6 Load Timing/Voltage Set ................53 Sav e Timing/Voltage Set ................54 Sy stem BIOS Cacheable................54 HPET Function..................... 54 NVIDIA GPU Ex.................... 54 Link Boost....................54 Integrated Peripherals Menu ................55 IDE Function Setup..................56 RA ID Config ....................57...
- Page 7 Resources Controlled By................62 IRQ Resources..................... 63 PCI/VGA Palette Snoop ................63 Maximum Pay load Size................. 63 Sy stem Monitor Menu..................64 Dynamic Fan Control..................65 Software Installation ..................67 Windows XP Driv ers Install................68 Using the NVIDIA Software................69 NVIDIA Monitor....................70...
- Page 8 Installing and Configuring the TF680i S LI Deluxe M otherboard NVIDIA nTune 5.0................... 71 Manual Tuning..................... 72 A djust Motherboard Settings..............72 Sy stem Voltages ..................74 Sy stem Fans.................... 74 Memory Timing..................75 A djust GPU Settings ................. 77 Dynamic BIOS A ccess ..................
- Page 9 Determine Component and Operating Sy stem Needs ........98 Install Your NVIDIA SLI-Ready Parts............100 Install NVIDIA SLI Software ................103 Enable NVIDIA SLI..................104 A ppendix A . On-board LED Codes ...............106 Index......................114...
- Page 10 Installing and Configuring the TF680i S LI Deluxe M otherboard List of Figures Figure 1. TF680i SLI Deluxe Motherboard Lay out..........11 Figure 2. Chassis Back panel Connectors............12 Figure 3. PWR1 Motherboard Connector............18 Figure 4. Expansion Slots ................27 Figure 5.
- Page 11 Figure 24. A djust Custom Rules (nTune) ............85 Figure 25. Perform Stability Test..............86 Figure 26. Storage Control Panel Categories (MediaShield) ......87 Figure 27. View Storage Configuration (MediaShield) ........88...
-
Page 12: Before You Begin
Parts NOT in the Kit This kit contains all the hardware necessary to install and connect your new TF680i SLI Deluxe motherboard. However, it does not contain the following items that must be purchased separately to make the motherboard functional. -
Page 13: Intentions Of The Kit
Introduction Intentions of the Kit This kit provides you with the motherboard and all connecting cables necessary to install the motherboard into a PC cabinet. If you are building a PC, you will use most of the cables provided in the kit. If however, you are replacing a motherboard, you will not need many of the cables. -
Page 15: Introduction To The Tf680I Sli Deluxe Motherboard
Introduction to the TF680i SLI Deluxe Motherboard Thank you for buying the TF680i SLI Deluxe Motherboard. This motherboard offers the tools and performance PC enthusiasts demand. When combined with two SLI-Ready NVIDIA GeForce graphics cards, you get innovative NVIDIA SLI Technology for enhanced system performance. -
Page 16: Extreme Overclocking
NVIDIA nForce 680i SLI MCPs were designed for overclocking. Extreme FSB speeds The front side bus (FSB) in the NVIDIA nForce 680i SLI MCP is specified to run at 1333MHz to support existing and future FSB speeds. Through overclocking, however, the NVIDIA nForce 680i SLI MCP can deliver FSB speeds well beyond specification*. -
Page 17: Designed For Nvidia Sli Technology
Designed for NVIDIA SLI Technology NVIDIA® SLI™ technology is a revolutionary platform innovation that allows users to intelligently scale graphics performance by combining multiple NVIDIA graphics solutions in a single system with an NVIDIA nForce SLI MCP. True 2 x16 PCI Express SLI Support Two full-bandwidth 16-lane PCI Express links ensure maximum graphics performance for next-generation GPUs and games. -
Page 18: Nvidia Mediashield Storage
Installing and Configuring the TF680i S LI Deluxe M otherboard NVIDIA MediaShield Storage NVIDIA MediaShield™ Storage offers a suite of features that safeguards your most important digital media assets; always reliable, scalable, and accessible which includes RAID and SATA drive support. -
Page 19: Networking With Nvidia Nforce
CPU utilization. The manageable and stable NVIDIA networking solution results in better networking management and a lower total cost of ownership. Only NVIDIA integrates this level of networking features to allow you to take your online experience to the next level. -
Page 20: High Definition Audio (Hda)
192 kHz/32-bit quality for eight channels, supporting new audio formats. USB 2.0 A standard plug-and-play interface that provides easy-to-use connectivity for USB devices. Note: While NVIDIA technology will provide FSB speeds bey ond spec, the processor must be capable of this speed. -
Page 21: Motherboard Specifications
Intel Core 2 Extreme (dual and quad core), Intel Core 2 Quad, Intel Core 2 Duo, Pentium EE, Pentium Operating systems Supports Windows XP 32bit and Windows XP 64bit. Contains NVIDIA nForce 680i SLI MCP System Memory Dual-channel DDR2 800/667/533 SLI-Ready Memory up to 1200 MHz Supports up to 8 GB DDR2 memory USB 2.0 Ports... - Page 22 Installing and Configuring the TF680i S LI Deluxe M otherboard Onboard Audio Supports 8-channel audio Supports S/PDIF output Supports Jack-Sensing function Dual PCI Express x16 Support Supports 4 GB/sec (8 GB/sec concurrent) bandwidth Low power consumption and power management features Green Function Supports ACPI (Advanced Configuration and Power Interface) Supports S0 (normal), S1 (power on suspend), S3 (suspend to RAM), S4...
-
Page 23: Unpacking And Parts Descriptions
Unpacking and Parts Descriptions The TF680i SLI Deluxe Motherboard comes with all the necessary cables for adding a motherboard to a new chassis. If you are replacing a motherboard, you may not need many of these cables. Be sure to inspect each piece of equipment shipped in the packing box. If anything is missing or damaged, contact your reseller. -
Page 24: Tf680I Sli Deluxe Motherboard
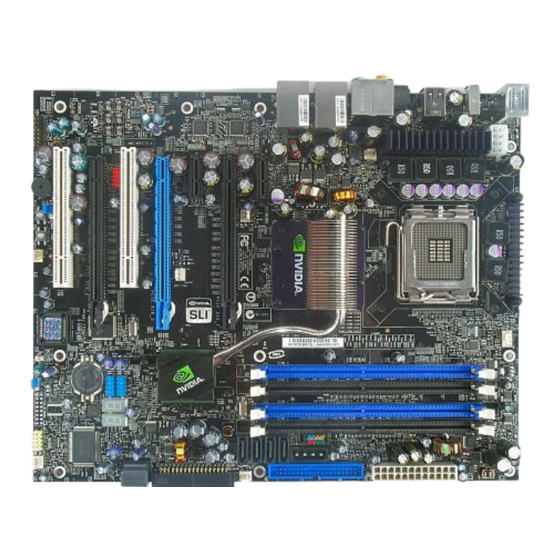
U ser’s Manual S etup CD TF680i SLI Deluxe Motherboard The TF680i SLI Deluxe Motherboard with the nForce 680i SLI chipset is a PCI Express, SLI-ready motherboard. Figure 1 shows the motherboard and Figures 2 shows the back panel connectors. -
Page 25: Figure 1. Tf680I Sli Deluxe Motherboard Lay Out
U npacking and Parts Description 1. CPU Socket 10. NVIDIA MCP 19. Power o/off switch 2. NVIDIA SPP with passive heat sink 11. Floppy drive connector 20. Reset switch 3. CPU fan connector 12. Two Serial-ATA connectors 21. On-board speaker 4. -
Page 26: Figure 2. Chassis Backpanel Connectors
Installing and Configuring the TF680i S LI Deluxe M otherboard 1. PS /2 M ouse Port 2. PS /2 Key board P ort 3. 1394a (F irew ire) port 4. USB 2.0 ports 5. SPDIF output 6. P ort 2-C hannel 4-C hannel 6-C hannel/8-C hannel Blue... -
Page 27: Hardware Installation
Hardware Installation This section will guide you through the installation of the motherboard. The topics covered in this section are: Preparing the motherboard Installing the CPU Installing the CPU fan Installing the memory Installing the motherboard Connecting cables and setting switches Safety Instructions To reduce the risk of fire, electric shock, and injury, always follow basic safety precautions. -
Page 28: Preparing The Motherboard
Installing and Configuring the TF680i S LI Deluxe M otherboard Preparing the Motherboard The motherboard shipped in the box does contain a CPU or memory. You need to purchase a CPU, a CPU fan assembly, and memory to complete this installation. -
Page 29: Installing The Cpu Fan
H ardware Installation Installing the CPU Fan There are many different fan types that can be used with this motherboard. Follow the instruction that came with you fan assembly. Be sure that the fan orientation is correct for your chassis type and your fan assembly. Installing Memory DIMMs Your new motherboard has four 1.8V 240-pin slots for DDR2 memory. -
Page 30: Installing The Motherboard
Installing and Configuring the TF680i S LI Deluxe M otherboard Installing the Motherboard The sequence of installing the motherboard into the chassis depends on the chassis you are using and if you are replacing an existing motherboard or working with an empty chassis. Determine if it would be easier to make all the connections prior to this step or to secure the motherboard and then make all the connections. -
Page 31: Connecting Cables And Setting Switches
H ardware Installation 4. Ensure that the fan assembly is aligned with the chassis vents according to the fan assembly instruction. 5. Secure the motherboard with a minimum of eight-to-ten screws. Connecting Cables and Setting Switches This section takes you through all the connections and switch settings necessary on the motherboard. -
Page 32: Power Connections
Power Connections This motherboard requires an ATX power supply. To support a PCI Express motherboard with the addition of dual graphics cards using NVIDIA SLI technology, you are going to need a minimum of a 500W power supply. Make sure you have enough power to cover all the expansion cards you will be installing. -
Page 33: 8-Pin Atx 12V Power (Pwr2)
H ardware Installation 8-pin ATX 12V Power ( PWR2 , the 8-pin ATX 12V power connection, is used to provide power to the P WR2 CPU. Align the pins to the connector and press firmly until seated. Connect a four-pin power plug to pins 1, 2, 5, a nd 6. -
Page 34: Connecting Ide Hard Disk Drives
Installing and Configuring the TF680i S LI Deluxe M otherboard Connecting IDE Hard Disk Drives The IDE connector supports Ultra ATA 133/100/66 IDE hard disk drives. 1. Connect the blue connector (the cable end with a single connector) to the motherboard. -
Page 35: Connecting Internal Headers
H ardware Installation Connecting Internal Headers Front Panel Header The front panel header on this motherboard is one connector used to connect the following four cables: P WRLED Attach the front panel power LED HD_LED Connect cable to these two pins of the connector. RESET The Power LED indicates the system’s status. -
Page 36: Ieee 1394A (Optional)
Installing and Configuring the TF680i S LI Deluxe M otherboard Table 2. Front Panel Header Pins P in Signal In/O ut Description HD_PWR Hard disk LED pull-up to +5V H D_LED HDA# Hard disk active LED HDR_BLNK_GRN Front panel green light P WRLED HDR_BLNK_YEL Front panel yellow light... -
Page 37: Usb Headers
H ardware Installation USB Headers This motherboard contains four (4) USB 2.0 ports that are exposed on the rear panel of the chassis. The motherboard also contains two 10-pin internal header connectors onboard that can be used to connect an optional external bracket containing four (4) more USB 2.0 ports. -
Page 38: Audio
Installing and Configuring the TF680i S LI Deluxe M otherboard Audio The audio connector supports HD audio standard and provides two kinds of audio output choices: the Front Audio, the Rear Audio. The front Audio supports re-tasking function. Table 5. Front Audio Connector C onnector P in... -
Page 39: Fan Connections
H ardware Installation Fan Connections There are two fan connections, the system fan and the CPU fan. The fan speed can be detected and viewed in the section of the CMOS Setup. PC H ealth S tatus Both fans are automatically turned off after the system enters S3, S4 and S5 mode. -
Page 40: Com1 (Optional)
Installing and Configuring the TF680i S LI Deluxe M otherboard COM1 (Optional) The motherboard kit provides an additional serial COM header for your machine. Connect one side of a switching cable to the header and then attach the serial COM device to the other side of the cable. FDD Connector The motherboard supports a standard 360K, 720K, 1.2M, 1.44m, and a 2.88M floppy disk drive (FDD). -
Page 41: Expansion Slots
H ardware Installation Expansion Slots The TF680i SLI Deluxe Motherboard contains six expansion slots, four PCI Express slots and two PCI slots. For a full list of PCI Express x16 graphics card supported by this motherboard, go to www.ncvidia.com/estore. 1 - PCI Express... -
Page 42: Pci Express X1 Slot
These two PCI Express x16 slots are reserved for graphics or video cards. The bandwidth of the x16 slot is up to 4GB/sec (8GB/sec concurrent). The design of this motherboard supports dual PCI-Express graphics cards using NVIDIA’s SLI technology with multiple displays. -
Page 43: Configuring The Bios
Configuring the BIOS This section discusses how to change the system settings through the BIOS Setup menus. Detailed descriptions of the BIOS parameters are also provided. This section includes the following information: Enter BIOS Setup Main Menu Standard CMOS Features Advanced BIOS Features Advanced Chipset Features Integrated Peripherals... -
Page 44: Enter Bios Setup
Installing and Configuring the TF680i S LI Deluxe M otherboard Enter BIOS Setup The BIOS is the communication bridge between hardware and software. Correctly setting the BIOS parameters is critical to maintain optimal system performance. Use the following procedure to verify/change BIOS settings. 1. -
Page 45: Figure 5. Bios Cmos Setup Utility Main Menu
Configuring the BIOS Phoenix – AwardBIOS CMOS Setup Utility Standard CMOS Features System Monitor Advanced BIOS Features Load Defaults Advanced Chipset Features Set Password Integrated Peripherals Save & Exit Setup Power Management Setup Exit Without Saving PnP/PCI Configurations Esc : Quit : Select Item F10 : Save &... - Page 46 The following items on the CMOS Setup Utility main menu are commands rather than submenus: Load Defaults Use this command to load the NVIDIA LinkBoost technology settings for LinkBoost-enabled systems. Load default system settings for standard systems. Set Password Use this command to set, change, and disable the password used to access the BIOS menu.
-
Page 47: Standard Cmos Features Menu
Configuring the BIOS Standard CMOS Features Menu The Standard CMOS Features menu is used to configure the standard CMOS information, such as the date, time, HDD model, and so on. Use the Page Up P age Down keys to scroll through the options or press Enter to display the sub-menu. -
Page 48: Date And Time
Installing and Configuring the TF680i S LI Deluxe M otherboard Date and Time Using the arrow keys, position the cursor over the month, day, and year. Use keys to scroll through dates and times. Note that Page Up P age Down the weekday (Sun through Sat) cannot be changed. - Page 49 Configuring the BIOS Press Enter to auto-detect IDE and SATA channels in the system. Once the channel is detected, the values for Capacity, Cylinder, Heads, Precomp, Landing Zone, and Sector are automatically filled in. None There is no HDD installed or set. Auto The system can auto-detect the hard disk when booting up.
-
Page 50: Drive A
Installing and Configuring the TF680i S LI Deluxe M otherboard Drive A option allows you to select the kind of FDD to install. Drive A Options are: Press ENTER to display sub-menu Drive A [1.44, 3.5 in.] Halt On [All , But Keyboard] None Drive A 360K, 5.25 in. -
Page 51: Memory
Configuring the BIOS All, But Diskette The system boot does not stop for a diskette error but will stop for all other errors. All, But Disk/Key The system boot does not stop for a keyboard or disk error, but will stop for all other errors. -
Page 52: Advanced Bios Features
Installing and Configuring the TF680i S LI Deluxe M otherboard Advanced BIOS Features Access the Advanced BIOS Features menu from the CMOS Utility Setup screen. Use the keys to scroll through the options or P age Up Page Down press to display the sub-menu. -
Page 53: Removable Device Priority
Configuring the BIOS Removable Device Priority Use this option to select the priority for removable device startup. Press Enter to see the list of removable devices in your system. Use the arrow keys to go to the various devices. Then use the keys to move the device priority up –... -
Page 54: Quick Power On Self Test
Installing and Configuring the TF680i S LI Deluxe M otherboard Quick Power On Self Test Enabling this option allows the system to skip certain test while booting, which reduces the time needed to boot the system. Use the Page Up Page Down keys to toggle between Enable... -
Page 55: Security Option
Configuring the BIOS Security Option The Security Options allows you to require a password every time the system boots or only when you enter setup. Select to require a password to gain Setup access to the CMOS Setup screen. Select to require a password to System access the CMOS Setup screen and when the system boots. -
Page 56: Advanced Chipset Features
[Press Enter] Save timing/voltage set [Press Enter] System BIOS Cacheable [Disabled] HPET Function [Enable] NVIDIA GPY Ex [Enable] LinkBoost [Enable] :Move Enter :Selec t +/ -/PU/P D:Val ue F1 0:Sav e ESC :Exit F1:G enera l Help F5: Prev ious Values F7 :Defa ults Figure 8. -
Page 57: System Clocks
Configuring the BIOS System Clocks Select from the Advanced Chipset Features menu and press System Clocks to display the System Clocks menu. From this menu, you are able to Enter specify frequency settings, HT multipliers, and Spread Spectrum settings. Note that in Figure 9, all of the options are listed. -
Page 58: Frequency Settings
Installing and Configuring the TF680i S LI Deluxe M otherboard Frequency Settings CPU Freq, MHz This value is set by the CPU Multiplier (value cannot be changed by the user). FSB Reference Clock. MHz This value is set by the system (value cannot be changed by the user). To change the SLI-Ready memory, FSB memory, and memory timing, go to the FSB &... -
Page 59: Ht Multiplier
Configuring the BIOS HT Multiplier nForce SPP > nForce MCP — — Use the keys to scroll through the HT multiplier P age Up Page Down options and set the link speed from the SPP chip to the MCP chip. Values through [1 x] [5 x]. -
Page 60: Fsb & Memory Config
Installing and Configuring the TF680i S LI Deluxe M otherboard FSB & Memory Config Select from the Advanced Chipset Features menu and FSB & Memory Config press to display the FSB & Memory Config menu. This menu provides Enter the means to set SLI-Ready memory, FSB memory, and memory timing. Phoenix –... - Page 61 Configuring the BIOS When you select one of the options, the CPUOC x% FSB - Memory is set to and cannot be changed until Clock Mode Unlinked SLI- is set to Ready Memory Disable FSB and Memory Clock Mode Use the keys to scroll through the FSB and P age Up Page Down...
- Page 62 Installing and Configuring the TF680i S LI Deluxe M otherboard or type in a new value. Note that the reflects the Actual MEM (DDR) actual frequency that takes effect when the system reboots. Memory Timing Setting Press Enter to display the Memory Timing Setting menu. Use this menu to set optimal timings or to manually enter timings.
- Page 63 Configuring the BIOS Expert Use the keys to select . When Expert P age Up Page Down Expert is selected, all timing categories are enabled for manual input. Note that you should set the value to Optimal to use the manufacturers’ recommended values.
-
Page 64: Cpu Configuration
Installing and Configuring the TF680i S LI Deluxe M otherboard CPU Configuration Select from the Advanced Chipset Features menu and CPU Configuration press to display the CPU Configuration menu. Enter Phoenix – Awa rdBIOS CMOS Setup Util ity CPU Conf igura tion Limit CPUID MaxVal [Disabled] Item Help... -
Page 65: System Voltages
Configuring the BIOS TM1 & TM2 Enables support for both TM1 and TM2. C1E Enhanced Halt State Enabled, this function reduces the CPU power consumption when the CPU is idle. Idle occurs when the operating system issues a halt instruction. Execute Disable Bit When this function is disabled, it forces the XD feature flag to always return to zero (0). - Page 66 Page Down [Auto] voltage. nForce SPP This function defines the core voltage level for the NVIDIA nForce SPP chip. Use the Page Up Page Down keys to select a voltage (1.25V, 1.30V, 1.35V, 1.40V, 1.45V, 1.50V, or 1.55V) or select [Auto] automatically set the voltage.
-
Page 67: Nvmem Memory Test
Configuring the BIOS NVMEM Memory Test This function defines whether you run the NVIDIA memory testing module during POST. The options are Fast, Medium, Slow, and Disable. PCI Clocks This function allows you to enable the PCI clocks or select... -
Page 68: Save Timing/Voltage Set
, the APIC Disabled timer is used. NVIDIA GPU Ex To enable or disable this function you need to have the NVIDIA® ForceWare® graphics driver with NVIDIA EX support. When enabled, the system uses the optimized NVIDIA EX graphics driver. LinkBoost The LinkBoost®... -
Page 69: Integrated Peripherals Menu
Configuring the BIOS Integrated Peripherals Menu Select from the CMOS Setup Utility menu and Integrated Peripherals press to display the Integrated Peripherals menu. Enter Phoenix – Awa rdBIOS CMOS Setup Util ity Integrat ed Pe ripher als IDE Function Setup [Press Enter] Item Help... -
Page 70: Ide Function Setup
Installing and Configuring the TF680i S LI Deluxe M otherboard IDE Function Setup Press to display the IDE Function Setup menu. Enter OnChip IDE Channel0 [Enabled] Primary Master [Auto] Primary Slave [Auto] Primary Master UDMA [Auto] Primary Slave UDMA [Auto] IDE DMA transfer access [Enabled] Serial-ATA Controller... -
Page 71: Raid Config
Configuring the BIOS RAID Config Press to display the RAID Config menu. Enter RAID Enable [Enabled] SATA 0 Primary RAID [Disabled] SATA 0 Secondary RAID [Disabled] SATA 1 Primary RAID [Disabled] SATA 1 Secondary RAID [Disabled] SATA 2 Primary RAID [Disabled] SATA 2 Secondary RAID... -
Page 72: Mac Config
Installing and Configuring the TF680i S LI Deluxe M otherboard MAC Config Press to display the MAC Config menu. Enter MAC0 LAN [Enabled] MAC1 LAN [Disabled] MACx LAN Use these functions to set the MAC0 and/or MAC1 LANs to Auto disable their functions. -
Page 73: Power Management Setup Menu
Configuring the BIOS Power Management Setup Menu Select from the CMOS Setup Utility menu and Power Management Setup press to display the Power Management Setup menu. Enter Phoenix – Awa rdBIOS CMOS Setup Util ity Power Ma nagem ent Se tup ACPI function [Enabled] Item Help... -
Page 74: Soft-Off By Pbnt
Installing and Configuring the TF680i S LI Deluxe M otherboard Soft-Off by PBNT This function on the Power Management Setup menu allows you to set Soft- Off by PBNT to [Instant-Off] [Delay 4 Sec] WOL(PME#) From Soft-Off This function on the Power Management Setup menu allows you to enable or disable WOL(PMW#) from soft-off. -
Page 75: Pnp/Pci Configuration Menu
Configuring the BIOS Hot Key Power On When is selected, the function is [Hot Key] Hot key Power On enabled so that you must select a keyboard key as the hot key. To select a hot key use though C trl+F1 Ctr l+F12 POWER ON Function [Hot key]... -
Page 76: Init Display First
Installing and Configuring the TF680i S LI Deluxe M otherboard Init Display First This function on the PnP/PCI Configuration menu allows you to define if the initial display is in the PCI slot or in the PCI Express slot. Options are [PCI Slot] [PCIEx]. -
Page 77: Irq Resources
Configuring the BIOS IRQ Resources To enable this field for input, set Resources Controlled By . With this field enabled, press Enter to see options. [Manual] IRQ-5 assigned to [PCI Device] IRQ-9 assigned to [Reserved] IRQ-10 assigned to [PCI Device] IRQ-11 assigned to [PCI Device] IRQ-14 assigned to... -
Page 78: System Monitor Menu
Installing and Configuring the TF680i S LI Deluxe M otherboard System Monitor Menu Select from the CMOS Setup Utility menu and press Enter System Monitor display the System Monitor menu. Phoenix – Awa rdBIOS CMOS Setup Util ity System M onito r Dynamic Fan Control [Press Enter]... -
Page 79: Dynamic Fan Control
Configuring the BIOS Dynamic Fan Control Press to display the Dynamic Fan Control menu. Enter CPU Fan Speed Control [SmartFan] If temp > 70ºC, Set Fan Speed 100% If temp < 30ºC, Set Fan Speed Manual Fan Speed, % Chassis Fan Speed Control [Manual] If temp >... - Page 80 Installing and Configuring the TF680i S LI Deluxe M otherboard This page is blank.
-
Page 81: Software Installation
The motherboard supports Windows XP 32bit and 64bit and is Vista-capable. The kit comes with a CD that contains utility drivers and additional NVIDIA software. The CD that has been shipped with your NVIDIA motherboard contains the... -
Page 82: Windows Xp Drivers Install
Installing and Configuring the TF680i S LI Deluxe M otherboard Windows XP Drivers Install Note: When installing the graphics driv ers, the resolution defaults to the lowest setting (typically 800 x 600), making your display v ery large. Adjust accordingly. 1. -
Page 83: Using The Nvidia Software
Using the NVIDIA Software This section describes how to configure the following NVIDIA software that is included on the CD in the kit from the NVIDIA Control Panel: NVIDIA Monitor Performance (NVIDIA nTune) Storage (NVIDIA MediaShield RAID Manager) Figure 17. -
Page 84: Nvidia Monitor
Installing and Configuring the TF680i S LI Deluxe M otherboard NVIDIA Monitor The NVIDIA Monitor application can be used at any time with any applications to view the real-time status of various system components. To display the NVIDIA Monitor, select Start All Programs NVIDIA Corporation NVIDIA . -
Page 85: Nvidia Ntune 5.0
U sing NVIDIA S oftware NVIDIA nTune 5.0 The Performance category is used to configure and manage NVIDIA nTune. The NVIDIA nTune program is a full-featured application for accessing, monitoring, and adjusting your system components (including bus speeds and voltages) with clear, user-friendly control panels. -
Page 86: Manual Tuning
Installing and Configuring the TF680i S LI Deluxe M otherboard Management View system information Adjust custom rules Manual Tuning The Manual Tuning option provides the ability to adjust motherboard settings, adjust CPU settings, and make changes to the BIOS. Adjust Motherboard Settings The controls in the screen let you adjust the Adjust M otherboar d Settings... -
Page 87: Figure 19. Adjust Motherboard Settings (Ntune)
CAUTIO N: Increasing the voltage or the clock speed of a component may void its warranty due to exceeding r ecommended specifications. NVIDIA and the board manufactur er are not responsible for damage that may occur when component tolerances are exceeded. -
Page 88: System Voltages
Installing and Configuring the TF680i S LI Deluxe M otherboard System Voltages CAUTIO N: Overvoltaging any component can result in damage. In this section of the Adjust Motherboard Settings you must understand what you are changing. Overvoltaging any of the components can result in damage to the components. -
Page 89: Memory Timing
U sing NVIDIA S oftware Memory Timing This section of the Adjust Motherboard Settings allows you to adjust various memory timings and cycles. When you select an option, information explaining the selection is displayed in the area below the Memory Timing box. - Page 90 Installing and Configuring the TF680i S LI Deluxe M otherboard RAS to RAS Delay The RAS-to-RAS delay (tRRD) is the is the amount of cycles it takes to activate the next bank of memory (this is the opposite of tRAS). The lower the timing the better the system performance.
-
Page 91: Adjust Gpu Settings
U sing NVIDIA S oftware Clock Drive Strength This value is filled in by the system and can not be changed by the user. Command Per Clock The Command Per Clock (tCPC) sets the Command Rate for the memory controller. The value shown cannot be changed Async Latency This value is filled in by the system and can not be changed by the user. -
Page 92: Dynamic Bios Access
Installing and Configuring the TF680i S LI Deluxe M otherboard Dynamic BIOS Access Dynamic BIOS Access allows you to change some of your system BIOS settings. The changes do not go into effect until you reboot your system. Since these changes are made to actual BIOS settings in the CMOS, the settings remain active until you change them again or restore the CMOS to the default settings. -
Page 93: Available Bios Pages
U sing NVIDIA S oftware Available BIOS Pages In the Dynamic BIOS Access page, select a BIOS page that you want to edit from the Available BIOS Pages drop-down menu The BIOS page you select determines which items on the Dynamic BIOS Access menu are available for changing. To edit an item, select an option from the drop-down menus associated with each item. -
Page 94: Boot Up Setting
Installing and Configuring the TF680i S LI Deluxe M otherboard Boot up Setting This section of the Dynamic BIOS Access menu allows you to set the following options: First/Second/Third Boot Device Removable Hard Disk CDROM Legacy LAN Disable Swap Floppy Drive Enable Disable Boot Up Floppy Seek... -
Page 95: Automatic Tuning
U sing NVIDIA S oftware Automatic Tuning The NVIDIA nTune performance manager uses a complex searching algorithm to determine the best possible and most stable performance for you system. The nTune tuning engine pushes your system to the limits to test the highest possible performance settings. -
Page 96: Figure 22. Tune System Menu (Ntune)
Installing and Configuring the TF680i S LI Deluxe M otherboard Figure 22. Tune System Menu (nTune) -
Page 97: Management
U sing NVIDIA S oftware Management The Management option on the View System Information screen allows you to view hardware, software, and system information and adjust profiles. View System Information This screen is for information purposes only (you cannot make any changes to the information). - Page 98 The status of the system, including current system clock speeds, system temperatures, memory timings, and system voltages can be logged. Versions of NVIDIA software and other system software are listed under Software information. Detailed CPU and memory information is displayed when you double-click on a processor or DIMM listed under Hardware information.
-
Page 99: Adjust Custom Rules
U sing NVIDIA S oftware Adjust Custom Rules The Adjust Custom Rules selection provides you with the ability to create a rule to define when the system should use a particular profile ( files or .nsu .npe files) that was created from a manual or automatic tuning session. -
Page 100: System Stability
Installing and Configuring the TF680i S LI Deluxe M otherboard System Stability System Stability lets you view your system’s status and perform system stability testing. To access the System Stability menu, select Start All Programs NVIDIA Corporation NVIDIA Control and select Panel System Stability... -
Page 101: Storage
The Storage application uses the NVIDIA MediaShield RAID Manager technology to configure and control NVIDIA storage hardware integrated into the NVIDIA MCP. NVIDIA RAID technology can protect data from hardware failure and provide increased file system performance. To launch MediaShield, select... -
Page 102: Health
Installing and Configuring the TF680i S LI Deluxe M otherboard Health The Health option on the Storage menu provides the ability for you to view the current storage configuration. View Storage Configuration The View Storage Configuration screendisplays the current configuration of your storage devices. -
Page 103: Management
Delete Array Use the following procedure to delete an array: 1. Click on Delete Array under Management to launch the NVIDIA Delete Array Wizard. 2. Click Next to continue with the wizard and display the... - Page 104 3. Select an array you want to delete and press Next screen displays to verify that Completing the NVIDIA Delete A rray Wizard you still want to delete the array selected. CAUTIO N: Be sure you are deleting the correct array. O nce you click Finish, you no longer have access to any of the data on this array.
-
Page 105: Rebuild Array
Use the following procedure to rebuild an array: 1. Identify the affect disk in the array and replace it. 2. Click on under Management to launch the NVIDIA Rebuild Rebuild Array Array Wizard. 3. Click... - Page 106 5. Select the disk in the array that was replaced and needs to be rebuilt. 6. Click Next screen displays to verify that Completing the NVIDIA Rebuild A rray Wizard you still want to rebuild the array selected. 7. Click to begin the rebuild of the selected disk in the array. (Remember Finish that rebuilding a disk can take up to a full day.)
-
Page 107: Migrating Array
Changing a RAID array to a different array type An example would be to change a Mirroring array to a Strip Mirroring array. Use the following procedure to rebuild an array: 1. Click on under Management to launch the NVIDIA Migrate Migrate Array Array Wizard. 2. Click... - Page 108 4. Select the RAID mode you want to migrate to and click Next screen displays to verify that Completing the NVIDIA M igrate Array Wizard you still want to migrate the array selected. CAUTIO N: Note that this migration is not reversible. Be sure you want to migrate this array before continuing.
-
Page 109: Synchronize Array
U sing NVIDIA S oftware Synchronize Array This option is used to synchronize a selected array. Use the following procedure to rebuild an array: 1. Click on under Management to launch the NVIDIA Synchronize Array Synchronize Array Wizard. 2. Click Next to continue with the wizard and display the RAID Array Selection window. - Page 110 Installing and Configuring the TF680i S LI Deluxe M otherboard 3. Select the array to synchronize and click Next screen displays to verify Completing the NVIDIA Sy nchronize Array Wizard that you still want to synchronize the array selected. 4. Click to begin synchronizing the array.
- Page 111 U sing NVIDIA S oftware This page is blank.
-
Page 112: Installing Graphics Cards In An Sli Configuration
Installing Graphics Cards in an SLI Configuration NVIDIA SLI (Scalable Link Interface) is a revolutionary technology that allows two NVIDIA SLI graphics cards to work together to deliver incredible 3D graphics performance. Your new motherboard can support up to three PCI Express graphics cards, two linked using SLI and one for Graphics expansion. - Page 113 PCI Express auxiliary connector (6-pin connector), please contact your graphics board partner for an HDD-to-PCI Express power adaptor. The NVIDIA SLI power supply recommendations are based on the following test configurations: High-End NVIDIA SLI Configuration:...
-
Page 114: Install Your Nvidia Sli-Ready Parts
.slizone.com/content/slizone/build.html Install Your NVIDIA SLI-Ready Parts Now that you have obtained the necessary NVIDIA SLI-Ready parts, it is time to configure the system. This procedure assumes you have already installed the motherboard. The TF680i SLI Deluxe Motherboard has three PCI Express slots. - Page 115 Installing G raphics Cards in an S LI C onfiguration Use the following procedure to build your NVIDIA SLI-Ready PC system: 1. Install two SLI-Ready graphic cards into the two outer black PCI Express x16 slots on the motherboard. Be sure to seat the graphic cards into the connectors.
- Page 116 From Power Supply 3. Install the NVIDIA SLI connector across the two outer graphics cards as shown below. Each SLI-Ready graphics card has an SLI finger on the upper side of the card.
-
Page 117: Install Nvidia Sli Software
Your motherboard shipped with a set of drivers that you must install. Once these drivers are installed, reboot your system. As part of the NVIDIA Unified Driver Architecture, NVIDIA drivers include a full set of controls for SLI systems. Go to http://www.slizone.com/content/slizone/driv ers.html... -
Page 118: Enable Nvidia Sli
Installing and Configuring the TF680i S LI Deluxe M otherboard Enable NVIDIA SLI At this point, you need to enable NVIDIA SLI. You can do this either by clicking on the SLI capable system balloon or by going to the NVIDIA Control Panel. - Page 119 Installing G raphics Cards in an S LI C onfiguration The system reboots to apply the setting and display the following message upon reboot: Congratulations on your new NVIDIA SLI-Ready PC system.
-
Page 120: Appendix A. On-Board Led Codes
Appendix A. On-board LED Codes Table 7. On-board LED Codes C ode(hex) Name Description Reserved Jumps to E000 Execution of POST routines in E000 segment Early Superio Init Early Initialized the super IO Reserved Blank video Reset Video controller Reserved Init KBC Keyboard controller init KB test... - Page 121 On-board LED Codes C ode(hex) Name Description InitCPU CPU ID and initialize L1/L2 cache Reserved Reserved Setup Interrupt Initialize first 120 interrupt vectors Vector Table with SPURIOUS_INT_HDLR and initialize INT 00h-1Fh according to INT_TBL CMOS Battery Check Test CMOS and check Battery Fail Early PM Early PM initialization Reserved...
- Page 122 Installing and Configuring the TF680i S LI Deluxe M otherboard C ode(hex) Name Description Reserved Test DMA Page Test DMA Page Registers Registers Reserved Reserved Test Timer Test 8254 Timer 0 Counter 2. Reserved Test 8259-1 Mask Verify 8259 Channel 1 masked interrupts by alternately turning off and on the interrupt lines.
- Page 123 On-board LED Codes C ode(hex) Name Description Reserved CPU display Detect CPU speed and display CPU vendor specific version string and turn on all necessary CPU features Reserved PnP Init Display PnP logo a nd PnP early init Reserved Setup Virus Setup virus protect according to protect setup Reserved Awdflash Load...
- Page 124 Installing and Configuring the TF680i S LI Deluxe M otherboard C ode(hex) Name Description Detect HDD IDE device detection Reserved Detect serial ports Initialize serial ports Reserved Reserved Detect parallel ports Initialize parallel ports Reserved HDD Write Protect HDD check for write protection Reserved Reserved POST error check...
- Page 125 Special Display First display initialization Early Shadow Early shadow ena ble for fast boot Cache presence External cache s Boot NVIDIA Added Post Codes C ode(hex) Name Description HW Ident Identify HW in the system SLAM Table Register the slam tables...
- Page 126 Installing and Configuring the TF680i S LI Deluxe M otherboard C ode(hex) Name Description Controller Init Memory ProdD – Discrete assembly register init algorithms Controller Init Memory ProdE – ProdC + Expandable criteria Controller Init Memory Send EMRS/MR S configuration cycles Controller Init Memory Overvoltage handli ng...
- Page 127 On-board LED Codes This page is blank.
-
Page 128: Index
Installing and Configuring the TF680i S LI Deluxe M otherboard Index 1394, on-board......7 A dv anced BIOS Features menu ... 38 16-lane PCI Express link s....3 A dv anced Chipset Features ..42 2-Port SA TA Power Cable....9 CMOS Setup Utility menu .... 31 3D Settings ........104 CPU Configuration ...... - Page 129 IDE and SA TA channels, BIOS.......... 34 Dynamic BIOS A ccess ....78 configuring the BIOS...... 29 Dynamic Fan Control menu..... 65 connectors Entry -Lev el NVIDIA SLI configuration ..........99 COM1........26 equipment list ........9 CPU fan ........25 ESCD..........62 FDD...........
- Page 130 ....95 Health option......... 88 HPET..........54 High Precision Ev en Timer ....54 HT Multiplier ........45 High-End NVIDIA SLI Configuration. 99 HT Spread Spectrum ....45 hot k ey power on......61 I/O shield ........16 How to I/O Shield........9...
- Page 131 NVIDIA memory testing module..53 list of certified power supplies..100 NVIDIA Monitor application..... 70 load plate ........14 NVIDIA nForce 680i SLI Motherboard 9 MAC Config menu ......58 NVIDIA nForce 680i SLI Motherboard Lay out........11 Manual Tuning....... 72 NVPerformance Benchmark ....
- Page 132 Installing and Configuring the TF680i S LI Deluxe M otherboard Performance category ....71 Recommended Power Supplies..99 Performance Control Panel Categories Ref Clock, SPP MCP ....44 ..........71 Refresh Rate........76 PnP/PCI Configuration menu... 61 remov able dev ice startup priority ..39 power button cable......
- Page 133 Index Sy stem Clock s........ 73 tRRD..........49 Sy stem Clock s menu ...... 43 Tune Sy stem Menu ......82 sy stem fan ........25 tWR..........49 System Memory ......7 tWRD ..........76 Sy stem Monitor menu..... 64 tWRWR......... 76 Sy stem Stability menu ....