Table of Contents
Advertisement
Available languages
Available languages
Advertisement
Table of Contents

Related Manuals for Craftsman 536.797502


Summary of Contents for Craftsman 536.797502
- Page 1 i:rR FTSMRN + 32,8 cc 2=cycle 10 Inch Tines CULTIVATOPJTILLER MODEL NO. 536.797502 Caution: Read and follow all Safety Rules and Operating Instructions before first use of this product SEARS, ROEBUCK AND CO,, Hoffman Estates, IL 60179 USA. 710833 06/25/97...
- Page 2 For one year from the date of purchase, when this Craftsman cultivator/tiller is main- tained, lubricated, and tuned up according to the operating and maintenance instruc- tions in the owner's manual, Craftsman will repair, free of charge, any defect in mate- rial or workmanship.
- Page 3 the tank inside a building where fumes SAFE STORAGE ,may reach an open flame. • Always refer to the owner's manual instructions for important details if the OPERATING SAFETY cultivator/tiller is to be stored for an • Never allow children or young teenagers extended period.
- Page 4 1 - Owner's Manual (not shown) Parts Bag (not shown) CAUTION: Always wear safety Right glasses or eye shields while assembling Left Handle the Craftsman cultivator/tiller. Handle TOOLS REQUIRED FOR ASSEMBLY Knobs 1 - 5/16 inch Wrench (or adjustable wrench ora regular screwdriver)
- Page 5 TO REMOVE CULTIVATOR/TILLER FROM CARTON •" Remove the plastic parts bag from the carton. • Remove the handles from the carton. • Remove packing insert from carton° Tine Shield • Liltthe cultivator/tiller out of the carton and place on a hard level surface. - Remove packing material from around tines.
- Page 6 °. Using two 7/16 inch wrenches, tighten Before you operate and enjoy your new the locknuts on the screws in the lower CRAFTSMAN CULTIVATOR/TILLER, ensure that you receive the best perfor- ends of the lower handles just enough to mance and satisfaction from this quality hold the lower handles firmly in place.
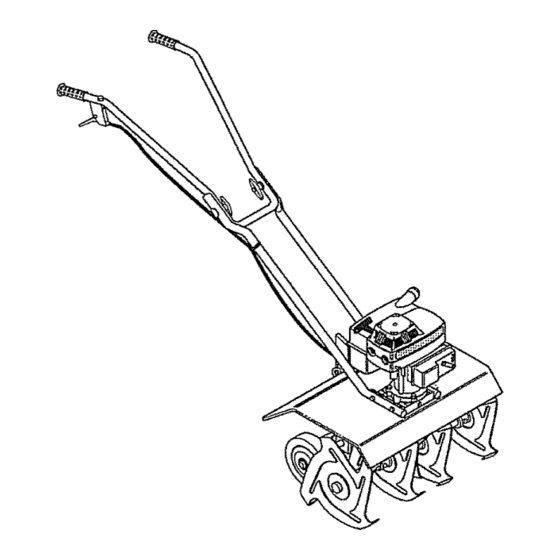
- Page 7 KNOW YOUR CULTIVATOR/TILLER READ THIS OWNER'S MANUAL AND SAFETY RULES BEFORE OPERATING YOUR CRAFTSMAN CULTIVATOR/TILLER. Compare the illustrations with your cultivator/tiller to familiarize yourself with the location of various controls and adjustments. Save this manual for future reference. Half Choke...
- Page 8 HOW TO USE YOUR CULTIVATOR/ • If the tilled depth is too deep or too TILLER shallow, turn off the engine and reset the depth stake. WARNING: "['he operation of this cul- - If depthstake is not controlling forward tivator/tiller can result in foreign objects be- action, lower the depth stake.
- Page 9 before storage for 30 days or longer. Drain TO START THE ENGINE the gas tank, start the engine and let it run Before starting the engine, be sure you until the fueltines and carburetor are empty. have read and understood all the instruc- Use fresh fuel next season.
- Page 10 ° if the engine becomes flooded, see the ° When using the cultivator/tiller to remove -Spark Plu_l Maintenance paragraph in the weeds, it is best to cultivate no deeper Maintenance section of this manual. than 1-1/2 inches. Cultivating deeper will Then pull the starter rope v_iththe choke only pull to the surface ungerminated lever in the NO CHOKE position.
- Page 11 CUSTOMER RESPONSIBILITIES SCHEDULE SERVICE SERVICE DATES RECORDS Fill in dates as you complete regular service Tighten"AII Screwsand Nuts Lubricate Tine Shaft v" Lubricate Transmission Check Spark Plug Clean and Re-OilAirCleaner FiI[er v" Drain Fuel GENERAL RECOMMENDATIONS • Reinstall the air vent screw. •...
- Page 12 (100) hours of operation. For this re-oiled after every 25 hours of use. Clean procedure we recommend that you take more often under dusty conditions. your unit to a Craftsman Service Center. IMPORTANT: The engine can be worn out CLEANING...
- Page 13 - Place the on-off switch to the OFF ever, if adjustments are required, we recom- position and disconnect the spark plug mend you contact your nearest Craftsman wire. Service Center. If you feel that you are como , While wearing gloves,...
- Page 14 If you think the engine-governed high speed needs adjusting, contact your idler M re nearest Craftsman Service Center. Screw Adjusting Screw Engine Shown With Air Cleaner Removed CAUTION: Never store engine with...
- Page 15 ENGINE Start and run the engine until it stops due to lack of fuel. IMPORTANT: It is important to prevent gum deposits from forming in essential fuel Pull the starter handle slowly until you system parts such as the carburetor, fuel fil- feel resistance due to compression ter, fuel hose or tank during storage.
- Page 16 CRAFTSMAN 10" - 1.6 H.P. CULTIVATOR 536.797502 ENGINE ASSEMBLY PART NAME 1.6 hp. 143.971670 (See Engine pages) Flatwasher, .378x1.25x.06 Rotor Washer, Regsptlk .263xA9x 07 Screw, 1/4-20x1.75 Cable, Throttle 710833 Owner's Manual 323392(3 All unnumbered items are interchangeable with opposite side...
- Page 17 CRAFTSMAN 10" - 1.6 H.P, CULTIVATOR 536.797502 TINE SHIELD ASSEMBLY 483, REF, REF. PART NAME PART NAME ..PART NO, PART NO, 309073-833 Tine Shield 56155-853 line, Assy Outer LH 273869 Screw, 114-20x5_00 56156-853 Tine, Assy Inner RH 120392 Flat'washer ,281x..63x.065 56154-853 "Fine,Assy Outer RH...
- Page 18 1.6 H.P. CULTIVATOR 536.797502 DECALS !_EF, ' ..... N_,O ..P,A,,RT,,,NO., ..PART NAME ..Reference Only 823 _20711 Decal, Caution 710189 Decal, "line Shield Craftsman 305828 Decal, Caution (Starting lnst) 320_9c DETHATCHER CULTIVATOR (REFo) HANDLE ASSEMBLY PART,,NO. PART NAME ..
- Page 19 CRAFTSMAN 2-CYCLE ENGINE MODEL NUMBER: 143.971670 Carburetor No. 632979 REF: PART ... REF. PART NAME PART NAME H,IJH 632979 Carburetor 632919 * Fuel inletScreen (IncL 18 of Engine Parts List) 632902 * Welch Plug 632947 Throttle & Lever Ass'y_. 632904...
- Page 20 CRAFTSMAN 2..CYCLE ENGINE MODEL NUMBER: 143.971670 • - -262 _.ga 6;31...
- Page 21 CRAFTSMAN 2-CYCLE ENGINE MODEL NUMBER: 143o971670 REF. I REF. PART NAME PART NO. PART NO. PART NAME '45o255 Air cleaner Filter ' " Cylinder (Incl.. 119,184,187&187A Air Cleaner Cover __50 450253 650888 Screw, Torx T_30, _-57 650867 Screw, 10-24 x 112"...
- Page 22 CRAFTSMAN 2-CYCLE ENGINE MODEL NUMBER: 143.971670 Starter No. 590690 PART PART NAME ;590690 Rewind Starter & Housing Ass'y 650987 Retainer Screw, 10-24 x 1-3/8" 650985 Pawt Screw, 12-24 x 11/64" 650147 Washer 590691 Pawl Spring 590692 Pawl 590695 Pulley 590562...
- Page 23 Partes Servicio Contratapa Operacion 28-32 Maintiemento 32-34 GARANTIA LIMITADA DE UN ANO DE LA CULTIVADORA/ZURCADORA CRAFTSMAN Durante un afio a partir de la fecha de compra, siempre y cuando esta cultivadora/ zurcadora Craftsman sea mantenida, lubricada, y afinada en conformidad...
- Page 24 - Llene el estanque de combustible afuera cerrados. Los gases de escape son con mucho cuidado. Nunca llene el peligrosos (¢ontienen MONOXIDO DE ,:- estanque de combustible en tecintos CARBONO, UN GAS SIN OLOR QUE cerrados. Vuelva a colocar ia tapa del CAUSA LA MUERTE).
- Page 25 estatales (si existen). Si se usa un inspecciones, apague el motor y amortiguador de chispas, el operador debe . aseg_rese que todas las parses en mantenerlo en condiciones de trabajo movimiento se hayan detenido. eficientes. • Nunca irate de hacer ajustes mientras En el estado de California, la ley exige un...
- Page 26 PARA INSTALAR EL CONJUNTO A/t_ PREC_,UCION: Siempre use DEL MANGO anteojos de seguridad o protecciones para los ojos al montar ta cultivadora/zurcadora, Los mangos inferiores tienen una dobladura HERRAMIENTAS NECESARIAS corta en el extremo inferior y son ptanos en PARA EL MONTAJE la parte superior, para permitir que el mango superior se coloque entre los 1 - Llave de 5/16 pulgada...
- Page 27 AVISO: Para permitir el montaje adecuado en su lugar. de la secci6n plana del mango superior IMPORT.ANTE: Si los tornillos se aprietan a'segt3rese que la secci6n plana de los demasiado como para cambiar la forma de mangos inferiores est6n mirando hacia los mangos se pueden producir daSos en el...
- Page 28 HAGA EL FAVOR DE REVtSAR LA LISTA AVISO; Un lado de la correa de ligadura A CONTINUAClON: &spero, y et otro es liso+ El tado &spero tiene que quedar en la parte interior de la _/Se han completado todas las +curvatura que se forma cuando se juntan...
- Page 29 ctavija de horquilla y el pasador Control de la Aceleracibn _Controla la horquilla. velocidad del motor y la rotaci6n de los brazos. La cultivadora/zurcadora est& Estaca de Profu equipada con un embrague centrffugo que de las engancha al sistema de impulsi6n de los Transporte Ctavi a de brazos cuando aumenta ia velocidad del...
- Page 30 g_solina nueva, limpia y sin plomo. Mezcle ia gasolina y el aceite 24:1 yea PREOAUCION: La gasolina es tabla segfin to siguiente: inflamable y se tiene que tener cuidado = Vacfe un cuarto de gasolina de cuando se maneje o almacene. No Ilene el autom6viles de los Estados Unidos estanque de combustible mientras que la nueva, limpia y sin plomo en un envase...
- Page 31 PARA HACER ARRANCAR ESTRANGULAClON (NO CHOKE) MOTOR repita las instrucciones de arranque. Antes de hater arrancar el motor, AVISO: 8i los brazos no paran cuando suelta el control de la aceleracf6n, vuelva a asegq_resede que haya lefdo y ajustar la vetocidad en vacfo del comprendido todas las instrucciones en las p&ginas antedores.
- Page 32 Ayuda a regular la profundidad del corte ° Nunca permita que las ni5os o los adultos a un nivel uniforme y tambidn sirve de que no tienen conocimiento de la h'eno para a'yudarle al operador a mdquina usen la cultivadora/zumadora. controlar la velocidad de la cultivadora/ •...
- Page 33 &reas donde se cambian los brazos., GENERALIDADES Vuelva a instatar los brazos. LP garantfa de esta cultivadoraJzurcadora Remueva los brazos del lado derecho. no cubre los articulos que hart estado Revise la arandela de fieltro para verfficar sujetos al abuso o a la negligencia del si est&...
- Page 34 (75) a cien (! 00) horas de operaciSn. Con este fin le recomendamos que ileve su unidad a un t_cnico capacitado para trabajar en motores de dos tiempos, al centro de servicio Craftsman.
- Page 35 Centro de Servicio Craftsman m&s horquitla y el pasador de horquilla. cercano. Si cree que usted es competente...
- Page 36 Craftsman autorizado mas cercano, • GJre el tornillo de ajuste de la mezcla vea la figura arriba, lentamente, en el sentido de las manillas...
- Page 37 Ilevarla una vez al aSo al compresi6n. Esta posici6n cerrar& tanto Centro de Servicio Craftsman para revisarla el agujero de admisi6n como el de o afinarla. descarga, para evitar la corrosi6n pist6n y del di&metro interior det cilindro.
- Page 38 PROBLEMA CAUSA CORRECClON Arranque dificul Mezcla de combustible rancia Drene el estranque de combustible, Udneto con mezcla nueva. Demasiado aceite en ta mezcla Revise la tabla de la mezcla del combustible y mezcle combustible El motor funciona nuevo. err_ticamente Mugre en el estanque de combustible o Limpie el estanque de combustible. sin combustible El estanque de combustible tiene que estar lleno hasta la mitad...
- Page 40 For the repair or replacement parts you _r_d delivered directly to your home Call 7 am-7 pm, 7 days a week 1-800-366-PART (1-800-366-7278) Para ordenar piezas con entrega a domicilio -1-800-659-7084 For in-house major brand repair service Call 24 hours a day, 7 days a week 1-800-4-REPAIR (1-800-473-7247) Para pedir servicio de reparacion a...