Table of Contents
Advertisement
Available languages
Available languages
Operator's
Manual
CRAFTSMH
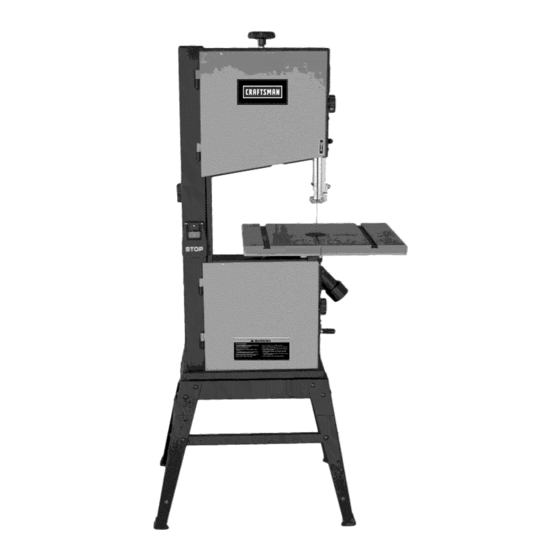
9-in. BENCH TOP
BAND SAW
1/4 HP MOTOR
Model 124.3299
CAUTION:
Before using this
product,
read this manual and
follow all its Safety Rules
and Operating
Instructions.
® Safety Instructions
® Assembly
® Operation
• Maintenance
• Troubleshooting
® Parts List
® Espanol (PG. 26)
Sears Brands
Management
Corporation,
Hoffman
Estates,
IL 60179 U.S.A
Advertisement
Table of Contents

Related Manuals for Craftsman 124.3299


Summary of Contents for Craftsman 124.3299
- Page 1 Operator's Manual CRAFTSMH 9-in. BENCH TOP BAND SAW 1/4 HP MOTOR Model 124.3299 CAUTION: Before using this ® Safety Instructions product, read this manual and ® Assembly follow all its Safety Rules ® Operation • Maintenance and Operating Instructions. • Troubleshooting ®...
- Page 2 For warranty coverage details to obtain free repair or replacement, visit the web site: www. craftsman, corn This warranty does not cover the blade, which is an expendable part that can wear out from normal use within the warranty period.
- Page 3 Always Wear Proper Apparel. Never wear loose clothing or jewelry that might get caught in moving parts. Rubber-soled footwear is recommended for the best footing. Always Use Safety Glasses and Wear Hearing Protection. Also use a face or dust mask if the cutting operation is dusty. Never Overreach.
- Page 4 1. TOOLS REQUIRED FOR ASSEMBLY LIST OF LOOSE PARTS iN BAG Item Description Qty. Item Description Qty. 2-1/2" Dust port .......... Phillips Screwdriver ........ Hex Socket head cap screw M6x12 ....2 © Washer 6 ............Adjustable Wrench ......... Square ........... Blade tension knob ..........
- Page 5 3. iNiTiAL ASSEMBLY The 124.3299 band saw is supplied partly assembled. Prior to use, the following items have to be assembled: Open Stand, 2" Dust Port, Table, Blade Tension Knob, Tool Holder, and Crank Handle. WARNING: To avoid injury, do not attempt to run or use this machine until all parts are assembled and working properly. A.
- Page 6 I. Assemble the tool holder to the column of the band saw with two E. Locate four hex bolts and four lock washers from the bag of loose parts used to mount the table. Mount the table to the upper table pan head screws.
- Page 7 Blade Tension Knob" Blade Tension Door Locking Knob Indicator Blade Tracking Upper Bandwheel Tool Holder Guide Post Adjusting Blade Guides Table Insert Switch Upper Table Trunniori Lower Bandwheel Table Motor 2-1/2" Dust Port Drive Belt Tension 1. CENTERING THE TABLE A.
- Page 8 3. SETTING TABLE SQUARE BACK OF BLADE 6. CHANGING AND ADJUSTING THE SAW BLADE Place a square against the back (non-tooth) side of the saw blade. If This band saw is factory-equipped with a general-purpose wood you find that the table runs up hill or down hill as you feed the cutting blade, the saw blade is set prior to delivery.
- Page 9 8. SETTING THE CUTTING HEIGHT The Lower Blade Guide A. To adjust the lower blade guides, first position the right and left A. The upper blade guide should be set as close as practical against roller guides relative to the blade by loosening the lock nut (FIG. 21 ) the work piece.
- Page 10 13. DRIVE BELT POSiTiONS HIGH/LOW SPEED A. For the tow speed 1620 ft/min, fit the belt to the front pulley on B. For the high speed 3340 ft/min, the belt should be fitted to the both the motor and bandwheel. (See FIG. 23) rear pulley on both the motor and bandwheel.
- Page 11 WARNING: Before starting check if any part of your band saw is FiG. 26 Blade missing, malfunctioning, has been damaged or broken, such as the motor switch, or other operation control, a safety device or the power cord, turn the band saw off and unplug it until the particular part is properly repaired or replaced.
- Page 12 WARNING: To avoid injury due to unexpected starting, before FIG. 29 cleaning or carrying out maintenance work, switch off and disconnect the band saw from the power source. Never use water or other liquids to clean the band saw. Use a dry brush, Regular maintenance of the band saw wilt prevent unnecessary problems,...
- Page 13 ProbJem Diagnosis Remedy The machine does not work when switched 1. No power supply. 1. Check the cable for breakage. 2. Defective switch. 2. Replace the lock switch. 3 Defective motor. 3. Defective motor. The saw blade does not move with the 1.
- Page 14 DESCRIPTION 1-JL21050004-001Z Front beam 1-JL21050005-001Z Side beam 1-JL21050001-001Z Le;.q 1-JL21050003-001Z Side panel 1-JL21050002-001Z Front panel 1-NUT5/16B Hex nut 1-WSH8GB97 Washer 1-NEC5/16X5/8B Hex bolt 1-WSH6GB96B Washer 1-NUT1/4B Hex nut 1-HEX1/4X1 1/2B Hex bolt 1-JL40060005 Rubber shoe Craftsman 9=inch Band Saw 124.3299...
- Page 15 4:3 42 27 '¸ "', 24: ..25 Craftsman 9-inch Band Saw 124.3299...
- Page 16 Lower guide mount seat 1-JL21043001 Lower guide support 1-M6GB889Z Lock nut M6 1-JL21010019 Dust port 2-1/2" 1-M6X10GB5781Z Hex bolt 1-JL20024001-001S Adjusting knob cap 1-JL20044001-001S Adjusting knob body 1-JL20044002 /uDe 1-JL21020003 Ruler 1-JL22040003 Spring washer 1-JL22040001 L_ear Craftsman 9-inch Band Saw 124.3299...
- Page 17 _ ¸¸i,¸¸¸¸ ..i; ...., 67 "" '@_' 6 5 Craftsman 9-inch Band Saw 124.3299...
- Page 18 Hex bolt M6X16 1-WSH6GB93Z Spring washer 1-CLP17GB894D1B Retaining ring 17 1-M6X20GB5783Z Hex Bolt M6x20 1-JL20020004 Special Hex Nut 1-M6GB6170Z Hex Nut M6 1-JL21020002B Lower bearing bolt 1-WSH8GB96Z Washer 1-M8X16GB70Z Hex Socket set screw M8X16 1-WSH8GB93Z Spring washer Craftsman 9-inch Band Saw 124.3299...
- Page 19 ..Craftsman 9-inch Band Saw 124.3299...
- Page 20 1-WSH6GB97D1Z Washer 6 1-M6X45GB70Z Socket head bolt 1-JL21031001D001G Table 1-JL20031002-001S Table insert 1-JL20032001 vUaPer table trunnion 1-WSH8GB96Z sher 8 1-M8X50GB14Z Carriage bolt M8x50 1-WSH8GB97D1Z Washer 8 1-JL20010016-001S Wing nut M8 1-M8GB6 1-M8X45(_B5783Z Bolt 1-M6XIO(_B80B Screw Craftsman 9-inch Band Saw 124.3299...
- Page 21 --....122: 105/ !07,y Craftsman 9-inch Band Saw 124.3299...
- Page 22 Blade tensioner 1-JL21021200A 1-JL20030002 Glide piece 1-WSH8GB96Z Washer Hex Socket set screw Max16 1-M8X16GB70Z 1-JL21021010A Spring 1-JL21020004-014T Pointer Tension bracket 1-JL20021100A001Z 1-J L20021001B001Z Blade tensioner 1-JL20021009 Adjusting Star IocE 1-JL20021004 1-J L20010016-001S Wing nut M8 Craftsman 9-inch Band Saw 124.3299...
- Page 23 143 142 "147 146 , _ Craftsman 9-inch Band Saw 124.3299...
- Page 24 Tapping screw ST3.5x13 1-WSH6GB862D2B Washer 6 1-WSH6GB862D2B Washer 6 1-JL21041001F Blade guide 1-JL21041002-001S Slider 1-J L20010005 Guide bracket 1-JL22042004 Micro-adiusting knob 1-WSH6GB97D1Z Washer 6 1-JL20042002 Bushing 1-M5X20GB70Z Guide adjusting screw 1-JL22042003 Micro-adjusting knob 1-BRG608-2ZGB276 Bearing Craftsman 9-inch Band Saw 124.3299...
- Page 26 Reparar los Acuerdos de Protecci6n ..............................Partes Diagramas ................................38-48 CRAFTSMAN UN ANO DE GARANTiA Durante un afio a partir de la fecha de compra, este producto esta garantizado contra defectos en los materiales o la mano. Un producto defectuoso se reciben reparaci6n gratuita o reemplazo si la reparaci6n no este disponible.
- Page 27 Siempre se debe usar vestimenta adecuada. Nunca use ropa suelta o las joyas que puedan quedar atrapados en las piezas m6viles. Puestas unas chanclas de goma esta recomendado para las mejores condiciones. Siempre utilice gafas de seguridad y Use protecci6n para los oidos.
- Page 28 1. HERRAMIENTAS NECESARIAS PARA EL MON= LISTA DE PARTES SUELTAS bolsa TAJ E Articulo Descripcibn Cantidad Articulo Descripcibn Cantidad 2-1/2" puerto de Polvo ......Destornillador Phillips ........ Cabeza hexagonal tapa rosca M6x12 ....2 Llave ajustable ........... © Arandela 6 ............en angulo recto ..........
- Page 29 3. ASAMBLEA INIClAL La banda 124.32607 se vio facititada parcialmente montado. Antes de su utitizaci6n, los siguientes etementos han de set montados: Abrir, 2-1/2" Puerto de polvo, Tabla, tensi6n de la Hoja Mando, porta herramientas, y Manivela. ADVERTENCIA: Para evitar lesiones, no intente ejecutar o utitizar esta maquina hasta que todos se arman y funciona correctamente. A.
- Page 30 I. Ensambtar la herramienta titular a ta columna de ta sierra de cinta E. Busque cuatro pernos hexagonales y cuatro arandetas de la bolsa de piezas sueltas usada para montar et cuadro. Montar ta con dos tomitlos de cabeza pan. Busque dos tomitlos pan de la tabla en ta tabla superior charneta e instalar un perno con lavadora bolsa de piezas suettas.
- Page 31 Tensi6n de la Hoja Tensi6n de la BIoqueo de la Puerta a Indicador Lamina Perilla de Rastreo BandwheeIPuerta Herramienta Titular Guia Ajuste Posterior Guias Cuchilla Insertar Tabla Intercambiar Tabla Su MenorBandwheel Tabla Charnela inferior Motor Puerta 2-1/2" Puerto de Polvo 4"...
- Page 32 3. LA MESA CUADRADA DE VUELTA DE HOJA 6. MODIFICAR y ADECUAR LA CUCHILLA Esta banda se vio de fabrica equipada con un prop6sito general Colocar un cuadrado en ta parte trasera (no-diente) tado de la cuchitla para cortar madera, ta cuchitta esta establecido antes de la cuchitta.
- Page 33 8. AJUSTE DE LA altura de corte La hoya inferior Guia A. Para ajustar la hoya inferior guias, primera posici6n derecha e A. La hoya superior guia deberia establecerse 1omas pr6xima po- izquierda de roditlos guia retativa a la cuchitla aflojando la tuerca de sible en ta pieza de trabajo.
- Page 34 13. CORREA posiciones alta/baja velocidad A. La baja vetocidad 1620 ft/min y colocar et cintur6n de la polea B. Para ta atta vetocidad 3341 ft/min, et uso del cintur6n deberia ser frontal tanto en et motor y bandwheel. (Ver Fig. 23) montados en ta parte trasera polea tanto en et motor y bandwheel.
- Page 35 ADVERTENClA: Antes de comenzar verifiquen si alguna parte de FIG. 26 Aspa tu banda vio falta, mal funcionamiento, ha sido dafiado o rota, como en el interruptor motor u otra operaci6n, control, un dispositivo de seguridad o el cable de alimentaci6n, apague la banda vio apagado y desconectelo hasta la parte en concreto esta correctamente...
- Page 36 ADVERTENClA: Para evitar lesiones debido a tas inesperadas empezando, antes de ta timpieza o llevar a cabo trabajos de man- tenimiento, apague y desconecte la sierra de cinta de la fuente de energia. Nunca utitice agua u otros liquidos para limpiar la sierra de cinta. Uti- lizar un pincet seco.
- Page 37 Problema Diagn6stico Remedio La maquina no funciona cuando son acti- 1. Ninguna fuente de alimentaci6n. 1. Compruebe el cable de rotura. vados. 2. Interruptor Defectuoso. 2. Reemplazar et interruptor de bloqueo. 3 Motor Defectuoso. 3. Motor Defectuoso. La cuchitla no se mueve con et motor en 1.
- Page 38 1-JL21050004-001Z Haz Frente 1-JL21050005-001Z Haz Lado 1-JL21050001-001Z Pierna 1-JL21050003-001Z Panel Lateral 1-JL21050002-001Z Panel Frontal 1-NUT5/16B Tuerca Hexagonal 1-WSH8GB97 Arandela 1-NEC5/16X5/8B Tornillo Hexagonal 1-WSH6GB96B Arandela 1-NUT1/4B Tuerca Hexagonal 1-HEX1/4X1 1/2B Tornillo Hexaqonal 1-JL40060005 Calzado de G-oma Craftsman 14-Inch Banda Vio 124.32607...
- Page 39 4;3 42 "', 24 27 '¸ Craftsman 14-Inch Banda Vio 124.32607...
- Page 40 Guia menor apoyo Tuerca M6 1-M6GB889Z Puerto de Polvo 2-1/2" 1-JL21010019 1-M6X10GB5781Z Tornillo Hexagonal 1-J L20024001-001S .Ajuste mando pac 1-J L20044001-001S _A]uste mando cuerpo Tubo 1-JL20044002 1-JL21020003 Regla 1-JL22040003 Arandela de tipo resorte 1-JL22040001 Engranar Craftsman 14-Inch Banda Vio 124.32607...
- Page 41 _ ,,,_= _ ¸¸i,¸¸¸¸ ..,D ..Craftsman 14-Inch Banda Vio 124.32607...
- Page 42 6 Anillo de retenci6n 1-CLP17GB894 D 1B 1-M6X20GB5783Z Tornillo Hexagonal M6x20 1-JL20020004 Especial tuerca hexaclonal 1-M6GB6170Z Tornillo Hexagonal 1-JL21020002B Baja teniendo perno Arandela 1-WSH8GB96Z 1-M8X16GB70Z Tornillo Hexaclonal M8X16 1-WSH8GB93Z Arandela de tfpo resorte Craftsman 14-Inch Banda Vio 124.32607...
- Page 43 ..Craftsman 14-Inch Banda Vio 124.32607...
- Page 44 1-WSH8GB96Z Arandela 1-WSH6GB97D1Z Arandela 1-M6X45GB70Z Socket tornillo de cabeza 1-JL21031001D001G Tabla 1-JL20031002-001S Insertar tabla 1-JL20032001 Tabla Superior charnela 1-WSH8GB96Z Arandela 1-M8X50GB14Z Transporte perno M8x50 1-WSH8GB97D1Z Arandela 1-JL20010016-001S Tuerca M8 1-M8GB6 Nuez 1-M8X45(_B5783Z Perno 1-M6X10(_B80B Tornillo Craftsman 14-Inch Banda Vio 124.32607...
- Page 45 --....122: 105/ !07,y Craftsman 14-Inch Banda Vio 124.32607...
- Page 46 Tensi6n de la Hoja mando Cuchilla tensor 1-JL21021200A 1-JL20030002 Glide pieza 1-WSH8GB96Z Arandela 1-M8X16GB70Z Tornillo Hexagonal M8X16 1-JL21021010A Brotar 1-JL21020004-014T Puntero 1-JL20021100A001Z Tensi6n soporte 1-J L20021001B001Z Cuchilla tensor 1-JL20021009 Tuerca de ajuste Star cerraaura 1-JL20021004 1-J L20010016-001S Tuerca M8 Craftsman 14-Inch Banda Vio 124.32607...
- Page 47 143 142 "147 146 , _ Craftsman 14-Inch Banda Vio 124.32607...
- Page 48 1-ST3 D5X 13G B846Z Tornillos ST3.5x13 1-WSH6GB862D2B Arandela 1-WSH6GB862D2B Arandela 1-JL21041001F Cuchilla quia 1-JL21041002-001S Control d-eslizante 1-J L20010005 Guia soporte 1-JL22042004 Micro-aiuste mando 1-WSH6GB97D1Z Arande[a 6 1-JL20042002 Buie 1-M5X20GB70Z El tornillo de ajuste 1-JL22042003 Micro-ajuste manao 1-BRG608-2ZGB276 Soportar Craftsman 14-Inch Banda Vio 124.32607...
- Page 50 Your Home For troubleshootiing, proud manuals and _ advice: For repair- in your home - of aii major brand applian_s, _avmand garden equipment, or _a_ng and cooli_ systems, no ma_er who made _, no ma_er who sold it! For _e replacement parts° accessodes a_ _r's manuals t_t you need to do,i_t,your_if.
- Page 51 Operator's Manual CRAFTSMH 9-in. BENCH TOP BAND SAW 1/4 HP MOTOR Model 124.3299 CAUTION: Before using this ® Safety Instructions product, read this manual and ® Assembly follow all its Safety Rules ® Operation • Maintenance and Operating Instructions. • Troubleshooting ®...
- Page 52 For warranty coverage details to obtain free repair or replacement, visit the web site: www. craftsman, corn This warranty does not cover the blade, which is an expendable part that can wear out from normal use within the warranty period.
- Page 53 Always Wear Proper Apparel. Never wear loose clothing or jewelry that might get caught in moving parts. Rubber-soled footwear is recommended for the best footing. Always Use Safety Glasses and Wear Hearing Protection. Also use a face or dust mask if the cutting operation is dusty. Never Overreach.
- Page 54 1. TOOLS REQUIRED FOR ASSEMBLY LIST OF LOOSE PARTS iN BAG Item Description Qty. Item Description Qty. 2-1/2" Dust port .......... Phillips Screwdriver ........ Hex Socket head cap screw M6x12 ....2 © Washer 6 ............Adjustable Wrench ......... Square ........... Blade tension knob ..........
- Page 55 3. iNiTiAL ASSEMBLY The 124.3299 band saw is supplied partly assembled. Prior to use, the following items have to be assembled: Open Stand, 2" Dust Port, Table, Blade Tension Knob, Tool Holder, and Crank Handle. WARNING: To avoid injury, do not attempt to run or use this machine until all parts are assembled and working properly. A.
- Page 56 I. Assemble the tool holder to the column of the band saw with two E. Locate four hex bolts and four lock washers from the bag of loose parts used to mount the table. Mount the table to the upper table pan head screws.
- Page 57 Blade Tension Knob" Blade Tension Door Locking Knob Indicator Blade Tracking Upper Bandwheel Tool Holder Guide Post Adjusting Blade Guides Table Insert Switch Upper Table Trunniori Lower Bandwheel Table Motor 2-1/2" Dust Port Drive Belt Tension 1. CENTERING THE TABLE A.
- Page 58 3. SETTING TABLE SQUARE BACK OF BLADE 6. CHANGING AND ADJUSTING THE SAW BLADE Place a square against the back (non-tooth) side of the saw blade. If This band saw is factory-equipped with a general-purpose wood you find that the table runs up hill or down hill as you feed the cutting blade, the saw blade is set prior to delivery.
- Page 59 8. SETTING THE CUTTING HEIGHT The Lower Blade Guide A. To adjust the lower blade guides, first position the right and left A. The upper blade guide should be set as close as practical against roller guides relative to the blade by loosening the lock nut (FIG. 21 ) the work piece.
- Page 60 13. DRIVE BELT POSiTiONS HIGH/LOW SPEED A. For the tow speed 1620 ft/min, fit the belt to the front pulley on B. For the high speed 3340 ft/min, the belt should be fitted to the both the motor and bandwheel. (See FIG. 23) rear pulley on both the motor and bandwheel.
- Page 61 WARNING: Before starting check if any part of your band saw is FiG. 26 Blade missing, malfunctioning, has been damaged or broken, such as the motor switch, or other operation control, a safety device or the power cord, turn the band saw off and unplug it until the particular part is properly repaired or replaced.
- Page 62 WARNING: To avoid injury due to unexpected starting, before FIG. 29 cleaning or carrying out maintenance work, switch off and disconnect the band saw from the power source. Never use water or other liquids to clean the band saw. Use a dry brush, Regular maintenance of the band saw wilt prevent unnecessary problems,...
- Page 63 ProbJem Diagnosis Remedy The machine does not work when switched 1. No power supply. 1. Check the cable for breakage. 2. Defective switch. 2. Replace the lock switch. 3 Defective motor. 3. Defective motor. The saw blade does not move with the 1.
- Page 64 DESCRIPTION 1-JL21050004-001Z Front beam 1-JL21050005-001Z Side beam 1-JL21050001-001Z Le;.q 1-JL21050003-001Z Side panel 1-JL21050002-001Z Front panel 1-NUT5/16B Hex nut 1-WSH8GB97 Washer 1-NEC5/16X5/8B Hex bolt 1-WSH6GB96B Washer 1-NUT1/4B Hex nut 1-HEX1/4X1 1/2B Hex bolt 1-JL40060005 Rubber shoe Craftsman 9=inch Band Saw 124.3299...
- Page 65 4:3 42 27 '¸ "', 24: ..25 Craftsman 9-inch Band Saw 124.3299...
- Page 66 Lower guide mount seat 1-JL21043001 Lower guide support 1-M6GB889Z Lock nut M6 1-JL21010019 Dust port 2-1/2" 1-M6X10GB5781Z Hex bolt 1-JL20024001-001S Adjusting knob cap 1-JL20044001-001S Adjusting knob body 1-JL20044002 /uDe 1-JL21020003 Ruler 1-JL22040003 Spring washer 1-JL22040001 L_ear Craftsman 9-inch Band Saw 124.3299...
- Page 67 _ ¸¸i,¸¸¸¸ ..i; ...., 67 "" '@_' 6 5 Craftsman 9-inch Band Saw 124.3299...
- Page 68 Hex bolt M6X16 1-WSH6GB93Z Spring washer 1-CLP17GB894D1B Retaining ring 17 1-M6X20GB5783Z Hex Bolt M6x20 1-JL20020004 Special Hex Nut 1-M6GB6170Z Hex Nut M6 1-JL21020002B Lower bearing bolt 1-WSH8GB96Z Washer 1-M8X16GB70Z Hex Socket set screw M8X16 1-WSH8GB93Z Spring washer Craftsman 9-inch Band Saw 124.3299...
- Page 69 ..Craftsman 9-inch Band Saw 124.3299...
- Page 70 1-WSH6GB97D1Z Washer 6 1-M6X45GB70Z Socket head bolt 1-JL21031001D001G Table 1-JL20031002-001S Table insert 1-JL20032001 vUaPer table trunnion 1-WSH8GB96Z sher 8 1-M8X50GB14Z Carriage bolt M8x50 1-WSH8GB97D1Z Washer 8 1-JL20010016-001S Wing nut M8 1-M8GB6 1-M8X45(_B5783Z Bolt 1-M6XIO(_B80B Screw Craftsman 9-inch Band Saw 124.3299...
- Page 71 --....122: 105/ !07,y Craftsman 9-inch Band Saw 124.3299...
- Page 72 Blade tensioner 1-JL21021200A 1-JL20030002 Glide piece 1-WSH8GB96Z Washer Hex Socket set screw Max16 1-M8X16GB70Z 1-JL21021010A Spring 1-JL21020004-014T Pointer Tension bracket 1-JL20021100A001Z 1-J L20021001B001Z Blade tensioner 1-JL20021009 Adjusting Star IocE 1-JL20021004 1-J L20010016-001S Wing nut M8 Craftsman 9-inch Band Saw 124.3299...
- Page 73 143 142 "147 146 , _ Craftsman 9-inch Band Saw 124.3299...
- Page 74 Tapping screw ST3.5x13 1-WSH6GB862D2B Washer 6 1-WSH6GB862D2B Washer 6 1-JL21041001F Blade guide 1-JL21041002-001S Slider 1-J L20010005 Guide bracket 1-JL22042004 Micro-adiusting knob 1-WSH6GB97D1Z Washer 6 1-JL20042002 Bushing 1-M5X20GB70Z Guide adjusting screw 1-JL22042003 Micro-adjusting knob 1-BRG608-2ZGB276 Bearing Craftsman 9-inch Band Saw 124.3299...
- Page 76 Reparar los Acuerdos de Protecci6n ..............................Partes Diagramas ................................38-48 CRAFTSMAN UN ANO DE GARANTiA Durante un afio a partir de la fecha de compra, este producto esta garantizado contra defectos en los materiales o la mano. Un producto defectuoso se reciben reparaci6n gratuita o reemplazo si la reparaci6n no este disponible.
- Page 77 Siempre se debe usar vestimenta adecuada. Nunca use ropa suelta o las joyas que puedan quedar atrapados en las piezas m6viles. Puestas unas chanclas de goma esta recomendado para las mejores condiciones. Siempre utilice gafas de seguridad y Use protecci6n para los oidos.
- Page 78 1. HERRAMIENTAS NECESARIAS PARA EL MON= LISTA DE PARTES SUELTAS bolsa TAJ E Articulo Descripcibn Cantidad Articulo Descripcibn Cantidad 2-1/2" puerto de Polvo ......Destornillador Phillips ........ Cabeza hexagonal tapa rosca M6x12 ....2 Llave ajustable ........... © Arandela 6 ............en angulo recto ..........
- Page 79 3. ASAMBLEA INIClAL La banda 124.32607 se vio facititada parcialmente montado. Antes de su utitizaci6n, los siguientes etementos han de set montados: Abrir, 2-1/2" Puerto de polvo, Tabla, tensi6n de la Hoja Mando, porta herramientas, y Manivela. ADVERTENCIA: Para evitar lesiones, no intente ejecutar o utitizar esta maquina hasta que todos se arman y funciona correctamente. A.
- Page 80 I. Ensambtar la herramienta titular a ta columna de ta sierra de cinta E. Busque cuatro pernos hexagonales y cuatro arandetas de la bolsa de piezas sueltas usada para montar et cuadro. Montar ta con dos tomitlos de cabeza pan. Busque dos tomitlos pan de la tabla en ta tabla superior charneta e instalar un perno con lavadora bolsa de piezas suettas.
- Page 81 Tensi6n de la Hoja Tensi6n de la BIoqueo de la Puerta a Indicador Lamina Perilla de Rastreo BandwheeIPuerta Herramienta Titular Guia Ajuste Posterior Guias Cuchilla Insertar Tabla Intercambiar Tabla Su MenorBandwheel Tabla Charnela inferior Motor Puerta 2-1/2" Puerto de Polvo 4"...
- Page 82 3. LA MESA CUADRADA DE VUELTA DE HOJA 6. MODIFICAR y ADECUAR LA CUCHILLA Esta banda se vio de fabrica equipada con un prop6sito general Colocar un cuadrado en ta parte trasera (no-diente) tado de la cuchitla para cortar madera, ta cuchitta esta establecido antes de la cuchitta.
- Page 83 8. AJUSTE DE LA altura de corte La hoya inferior Guia A. Para ajustar la hoya inferior guias, primera posici6n derecha e A. La hoya superior guia deberia establecerse 1omas pr6xima po- izquierda de roditlos guia retativa a la cuchitla aflojando la tuerca de sible en ta pieza de trabajo.
- Page 84 13. CORREA posiciones alta/baja velocidad A. La baja vetocidad 1620 ft/min y colocar et cintur6n de la polea B. Para ta atta vetocidad 3341 ft/min, et uso del cintur6n deberia ser frontal tanto en et motor y bandwheel. (Ver Fig. 23) montados en ta parte trasera polea tanto en et motor y bandwheel.
- Page 85 ADVERTENClA: Antes de comenzar verifiquen si alguna parte de FIG. 26 Aspa tu banda vio falta, mal funcionamiento, ha sido dafiado o rota, como en el interruptor motor u otra operaci6n, control, un dispositivo de seguridad o el cable de alimentaci6n, apague la banda vio apagado y desconectelo hasta la parte en concreto esta correctamente...
- Page 86 ADVERTENClA: Para evitar lesiones debido a tas inesperadas empezando, antes de ta timpieza o llevar a cabo trabajos de man- tenimiento, apague y desconecte la sierra de cinta de la fuente de energia. Nunca utitice agua u otros liquidos para limpiar la sierra de cinta. Uti- lizar un pincet seco.
- Page 87 Problema Diagn6stico Remedio La maquina no funciona cuando son acti- 1. Ninguna fuente de alimentaci6n. 1. Compruebe el cable de rotura. vados. 2. Interruptor Defectuoso. 2. Reemplazar et interruptor de bloqueo. 3 Motor Defectuoso. 3. Motor Defectuoso. La cuchitla no se mueve con et motor en 1.
- Page 88 1-JL21050004-001Z Haz Frente 1-JL21050005-001Z Haz Lado 1-JL21050001-001Z Pierna 1-JL21050003-001Z Panel Lateral 1-JL21050002-001Z Panel Frontal 1-NUT5/16B Tuerca Hexagonal 1-WSH8GB97 Arandela 1-NEC5/16X5/8B Tornillo Hexagonal 1-WSH6GB96B Arandela 1-NUT1/4B Tuerca Hexagonal 1-HEX1/4X1 1/2B Tornillo Hexaqonal 1-JL40060005 Calzado de G-oma Craftsman 14-Inch Banda Vio 124.32607...
- Page 89 4;3 42 "', 24 27 '¸ Craftsman 14-Inch Banda Vio 124.32607...
- Page 90 Guia menor apoyo Tuerca M6 1-M6GB889Z Puerto de Polvo 2-1/2" 1-JL21010019 1-M6X10GB5781Z Tornillo Hexagonal 1-J L20024001-001S .Ajuste mando pac 1-J L20044001-001S _A]uste mando cuerpo Tubo 1-JL20044002 1-JL21020003 Regla 1-JL22040003 Arandela de tipo resorte 1-JL22040001 Engranar Craftsman 14-Inch Banda Vio 124.32607...
- Page 91 _ ,,,_= _ ¸¸i,¸¸¸¸ ..,D ..Craftsman 14-Inch Banda Vio 124.32607...
- Page 92 6 Anillo de retenci6n 1-CLP17GB894 D 1B 1-M6X20GB5783Z Tornillo Hexagonal M6x20 1-JL20020004 Especial tuerca hexaclonal 1-M6GB6170Z Tornillo Hexagonal 1-JL21020002B Baja teniendo perno Arandela 1-WSH8GB96Z 1-M8X16GB70Z Tornillo Hexaclonal M8X16 1-WSH8GB93Z Arandela de tfpo resorte Craftsman 14-Inch Banda Vio 124.32607...
- Page 93 ..Craftsman 14-Inch Banda Vio 124.32607...
- Page 94 1-WSH8GB96Z Arandela 1-WSH6GB97D1Z Arandela 1-M6X45GB70Z Socket tornillo de cabeza 1-JL21031001D001G Tabla 1-JL20031002-001S Insertar tabla 1-JL20032001 Tabla Superior charnela 1-WSH8GB96Z Arandela 1-M8X50GB14Z Transporte perno M8x50 1-WSH8GB97D1Z Arandela 1-JL20010016-001S Tuerca M8 1-M8GB6 Nuez 1-M8X45(_B5783Z Perno 1-M6X10(_B80B Tornillo Craftsman 14-Inch Banda Vio 124.32607...
- Page 95 --....122: 105/ !07,y Craftsman 14-Inch Banda Vio 124.32607...
- Page 96 Tensi6n de la Hoja mando Cuchilla tensor 1-JL21021200A 1-JL20030002 Glide pieza 1-WSH8GB96Z Arandela 1-M8X16GB70Z Tornillo Hexagonal M8X16 1-JL21021010A Brotar 1-JL21020004-014T Puntero 1-JL20021100A001Z Tensi6n soporte 1-J L20021001B001Z Cuchilla tensor 1-JL20021009 Tuerca de ajuste Star cerraaura 1-JL20021004 1-J L20010016-001S Tuerca M8 Craftsman 14-Inch Banda Vio 124.32607...
- Page 97 143 142 "147 146 , _ Craftsman 14-Inch Banda Vio 124.32607...
- Page 98 1-ST3 D5X 13G B846Z Tornillos ST3.5x13 1-WSH6GB862D2B Arandela 1-WSH6GB862D2B Arandela 1-JL21041001F Cuchilla quia 1-JL21041002-001S Control d-eslizante 1-J L20010005 Guia soporte 1-JL22042004 Micro-aiuste mando 1-WSH6GB97D1Z Arande[a 6 1-JL20042002 Buie 1-M5X20GB70Z El tornillo de ajuste 1-JL22042003 Micro-ajuste manao 1-BRG608-2ZGB276 Soportar Craftsman 14-Inch Banda Vio 124.32607...
- Page 100 Your Home For troubleshootiing, proud manuals and _ advice: For repair- in your home - of aii major brand applian_s, _avmand garden equipment, or _a_ng and cooli_ systems, no ma_er who made _, no ma_er who sold it! For _e replacement parts° accessodes a_ _r's manuals t_t you need to do,i_t,your_if.