Table of Contents
Advertisement
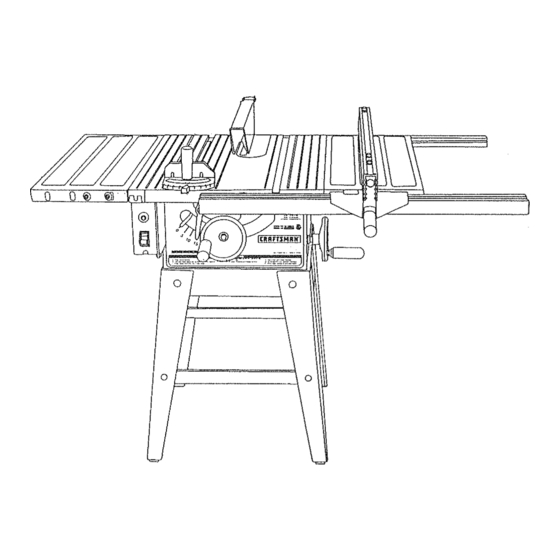
TABLE SAW
ModeJ No.
137o228210
CAUTmON:
Before using this Table Saw,
read this manual and follow all its
Safety Rules and Operating
Instructions.
,, Safety Instructions
,, installation
o Operation
• Maintenance
Parts List
Customer
He_p
Line
t =800-843-t682
Sears,
Roebuck
and Co., Hoffman
Estates,
IL 60179
USA
Part No. 137228210001
Advertisement
Table of Contents

Related Manuals for Craftsman 137.228210


Summary of Contents for Craftsman 137.228210
- Page 1 TABLE SAW ModeJ No. 137o228210 CAUTmON: ,, Safety Instructions ,, installation Before using this Table Saw, read this manual and follow all its o Operation • Maintenance Safety Rules and Operating Parts List Instructions. Customer He_p Line t =800-843-t682 Sears, Roebuck and Co., Hoffman Estates,...
- Page 2 SECTION PAGE GENERAL SAFETY INSTRUCTIONS WEAR YOUR ALWAYS WEAR EYE PROTECTION. Any table Warranty ..............BEFORE USING THE TABLE Product Specifications ............saw can throw foreign Safety Instructions ............objects into the eyes which Safety is a combination of common sense, staying alert and Accessories and Attachments ..........
- Page 3 "\ GROUNDING INSTRUCTIONS AVOID KICKBACKS (work thrown back towards you) 23. DIRECTmON OF FEED. Feed work into a blade or cutter Fig. A 3-Prong Plug by keeping the blade sharp, keeping the rip fence against the direction of rotation of the blade or cutter only.
- Page 4 OF LOOSE PARTS RECOMMENDED ACCESSORIES ITEM DESCRIPTION QUANTITY Visit your Sears Hardware Department or see the Craftsman Table Power and Hand tools Catalog to purchase recommended accessories for this power toot. Btade guard and splitter Rip fence Rip fence handle...
- Page 5 CRAFTS_AN PROFESSHONAL CROSSCUT-A cut made across the width of the Blade Guard Table Insert Rip Fence TABLE SAW TERMS workpiece. FREEHAND - Performing a cut without using a fence MITER GAUGE -A guide used For"crosscutting operations Table(Left) Extensi°n-x? re Gau, (guide), hold down or other proper device to prevent the that slides in the table top channels located on either side workpiece from twisting during the cutting operation.
- Page 6 Fig, D SAW MOUNTED TO OTHER SURFACES (FIG. D) if the leg set will not be used, the saw must be properly secured to a sturdy workbench using the four mounting holes at the base of the saw. A hole must be provided in the surface of the ASSEMBLY nNSTRUCTtONS SAW TO LEG SET (FIG.
- Page 7 TABLE EXTENSION - LEFT SiDE (FIG. F, G) BLADE HANDWHEELS (FIG. H, I) MITER GAUGE (FIG. J) Raise the blade (4) to the highest position by turning the Place a set plate bracket (1) in the corner of the table Thread the miter gauge handle (1) into the top of the blade raising hand wheel counterclockwise.
- Page 8 ADJUSTMENT INSTRUCTIONS Place two long hex screws (9) through the bracket FigoTA holes, and place a flat washer (t0), an external toothed To avoid injury from an accidental start, make sure the switch iockwasher (11 ) and hex nut (12) onto each screw. Do is in the OFF position and the plug is not connected to the not tighten.
- Page 9 BLADE TILT INDICATOR (FIG. X) Fig.Y RAmSING THE BLADE (FIG, U) Fig. V When the blade is positioned at 90 °, adjust the blade tilt To raise or lower the blade, turn the blade elevation : pointer (1) to read 0° on the scale (2). handwheel (1) on the front of the table saw until the blade Loosen the holding screw (3), position the pointer over is at the desired blade height, and then tighten the lock...
- Page 10 CROSSCUTTING (FIG. CC) RIPPING OPERATIONS (FaG.Z) Fig. AA Fig. DD Do not allow familiarity gained from the frequent use of your Do not allow familiarity gained from the frequent use of your table saw to cause careless mistakes. Remember that even table saw to cause careless mistake&...
- Page 11 DADO CUTS (FIG. GG) COMPOUND MITER CROSSCUTTING (FIG. FF) A dado table insert is not included with this saw. This sawing operation is combining a miter angle with a Purchase a dado set separately. Remove the saw blade bevel angle. and blade guard, before installing a dado and dado table Set the miter gauge (1) to the desired angle, Use only insert.
- Page 12 TROUBLESHOOTHNG GUIDE To avoid injury from an accidental start, turn the switch OFF and always remove the plug from the power source before making any adjustments. o Consult your local Sears Service Center if for any reason the motor will not run, SYMPTOM POSSIBLE CAUSES...
- Page 13 10" TABLE PARTS LIST MODEL NO. 137.228210 When servicing use only CRAFTSMAN replacement parts. Use of any other parts may create a HAZARD or cause product damage. Any attempt to repair or replace electrical parts on this Table Saw may create...