Table of Contents
Advertisement
Quick Links
Advertisement
Table of Contents

Related Manuals for Grizzly t10446


Summary of Contents for Grizzly t10446
- Page 1 1" sds hammer drill oWner's manual Copyright © JULy, 2011 By grizzLy indUstriaL, inC. Warning: no portion of this manual may be reproduced in any shape or form Without the Written approval of grizzly industrial, inc. #ts14253 printed in China...
- Page 2 This manual provides critical safety instructions on the proper setup, operation, maintenance, and service of this machine/tool. Save this document, refer to it often, and use it to instruct other operators. Failure to read, understand and follow the instructions in this manual may result in fire or serious personal injury—including amputation, electrocution, or death.
-
Page 3: Section 1: Safety
section 1: safety For Your Own Safety Read Instruction Manual Before Operating This Equipment The purpose of safety symbols is to attract your attention to possible hazard- ous conditions. This manual uses a series of symbols and signal words which are intended to convey the level of importance of the safety messages. - Page 4 forcing tools. do not force tool. it disconnecting poWer supply. will do the job safer and better at the rate always disconnect tool from power supply for which it was designed. before servicing, adjusting, or changing cutting tools (bits, blades, cutters, etc.). guards &...
-
Page 5: Additional Safety Instructions
additional safety instructions for hammer drills concealed items. drilling into con- removing bit from hole. if the cealed items can cause personal injury drill stops rotating while it is in the hole, or property damage. always make sure it could become stuck and difficult to the area of drilling is free from items other remove. -
Page 6: Section 2: Introduction
For your convenience, we post all avail- C/o technical documentation Manager able manuals and manual updates for p.o. Box 2069 free on our website at www.grizzly.com. Bellingham, Wa 98227-2069 any updates to your model of tool will be email: manuals@grizzly.com reflected in these documents as soon as they are complete. -
Page 7: Section 3: Set Up
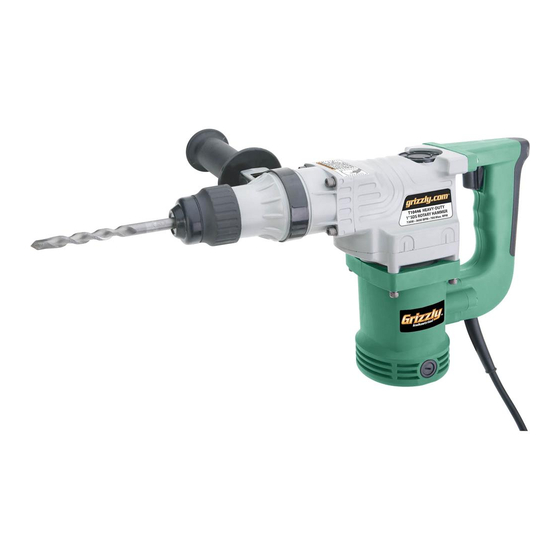
section 3: set up unpacking inventory model t10446 inventory (figure 1) your tool was carefully packaged for safe transportation. remove the packag- a. Carrying Case ........1 b. hammer drill assembly .....1 ing materials from around your tool and c. hammer drill Bit sds 12 x 150mm ...1 inspect it. -
Page 8: Section 4: Operations
section 4: operations drill bits 5. tug on the bit to make sure it will not come out. — if the bit does come out when the Model t10446 uses sds hammer drill tugged, repeat steps 3–4. bits (see figure 2 for examples). removing bit slots 1. -
Page 9: Depth Stop
depth stop operation to use the hammer drill: Use the depth stop to halt the advance of the bit at the desired drilling depth. 1. if desired, slide the dust cup onto the to attach the depth stop: bit with the cupped side facing the work surface. -
Page 10: Section 5: Accessories
section 5: accessories sds hammer drill bits h2499—small half-mask respirator h2640— ⁄ " x 4" h3631—medium half-mask respirator h2642— ⁄ " x 4" h3632—large half-mask respirator h2643— ⁄ " x 6" h3635—cartridge filter pair p100 h2646— ⁄ " x 4" Masonry dust has been linked to nasal h2647—... -
Page 11: Section 6: Maintenance
section 6: maintenance lubrication the hammer drill was lubricated with grease before it left the factory—this grease will last for approximately the first 50 hours of lubrication. after this period and every 50 hours of use thereafter, you will need to add grease. always disconnect poWer... -
Page 12: Section 7: Service
section 7: service troubleshooting symptom possible cause solution tool will not start. 1. no power to the tool. 1. Make sure power circuit is adequate and providing power. 2. Fuse blown circuit 2. Check/fix loose or worn tripped. wires and shorts; replace fuse or reset circuit break- 3. -
Page 13: Carbon Brush Replacement
#1 ......1 4. insert the new carbon brushes into the Carbon Brushes* ........2 installation holes so that the end of the *grizzly part number pt10446051 brush contacts the stator, then replace the caps. to replace the carbon brushes: 1. -
Page 14: Parts Breakdown
parts breakdown Parts breakdown provided for reference only. Not all parts shown are available for purchase. Model t10446 heavy-duty hammer drill... -
Page 15: Parts List
CAP SCREW M5-.8 X 16 PT10446107 RIGHT TOOL ID LABEL PT10446054 STATOR ASSEMBLY PT10446108 LEFT TOOL ID LABEL PT10446055 STATOR COVER PT10446109 GRIZZLY LOGO LABEL PHTEK18M TAP SCREW M3.5 X 10 PT10446110 READ MANUAL LABEL P608ZZ BALL BEARING 608 ZZ... -
Page 16: Warranty
Warranty Grizzly Industrial, Inc. warrants every product it sells for a period of 1 year to the original purchaser from the date of purchase. This warranty does not apply to defects due directly or indirectly to misuse, abuse, negligence, accidents, repairs or alterations or lack of maintenance. This is Grizzly’s sole written warranty and any and all warranties that may be implied by law, including any merchantability or fitness, for any par- ticular purpose, are hereby limited to the duration of this written warranty.