Table of Contents
Advertisement
Quick Links
Advertisement
Table of Contents
Troubleshooting

Related Manuals for Epson PhotoPC P-1000


Summary of Contents for Epson PhotoPC P-1000
- Page 1 ® User’s Guide...
- Page 2 SEIKO EPSON CORPORATION. The information contained herein is designed only for use with this EPSON product. EPSON is not responsible for any use of this information as applied to other products.
-
Page 3: Table Of Contents
Parts and Their Functions ......11 Setting Up PhotoPC P-1000......13 Charging the battery . - Page 4 Chapter 8 Maintenance and Troubleshooting Cleaning PhotoPC P-1000 ......59 Troubleshooting ....... . . 59 Status and error messages .
- Page 5 Standards and Approvals ......75 PhotoPC P-1000 ......75 AC adapter .
-
Page 7: Chapter 1 Introduction
Chapter 1 Introduction Main Features With PhotoPC P-1000, you can easily view, keep, and print images you have taken with a digital camera. The main features are described below. ❏ You can view images easily in high resolution anywhere, anytime without a computer or other special device. - Page 8 If battery acid gets into your eyes or on your skin, immediately rinse the affected area thoroughly with water and seek medical treatment. If a battery is swallowed, seek medical treatment immediately. ❏ Use only an EPSON Li-ion battery for PhotoPC P-1000 according to the directions in the user documentation.
- Page 9 ❏ Do not use the battery that comes with this product for other devices. ❏ To protect against short-circuiting, do not remove the outside sleeves of the battery. ❏ Do not handle the battery with wet hands or use them near water. ❏...
- Page 10 ❏ Do not store batteries where the temperature or humidity is very high. ❏ Store batteries out of children’s reach. ❏ Discharge the battery completely before storing it for a long time. ❏ When not using the battery for a long time, charge the battery and then discharge it completely about once a year during storage.
- Page 11 When using the AC adapter ❏ Use only the type of power source indicated on the AC adapter’s label, and always supply power directly from a standard, domestic power outlet with a power cord that meets the relevant local safety standards. ❏...
- Page 12 ❏ Avoid using outlets on the same circuit as photocopies or air control systems that regularly switch on and off. ❏ Position this product’s power cord so that it will not be stepped on or run over. ❏ Do not place any objects on the power cord and the AC adapter.
- Page 13 ❏ Only use a soft, dry cloth to clean the display. Do not use liquid or chemical cleaners. When storing, maintaining, or transporting PhotoPC P-1000 ❏ Do not store this product outdoors. ❏ Do not store this product near water.
-
Page 14: Fcc Compliance Statement For United States Users
As the colours of the wires in the mains lead of this appliance may not correspond with the coloured markings identifying the terminals in your plug, proceed as follows; The blue wire must be connected to the terminal in the plug marked with the letter N. -
Page 15: Warning
According to 47CFR, Part 2 and 15 for Class B Personal Computers and Peripherals; and/or CPU Boards and Power Supplies used with Class B Personal Computers: EPSON AMERICA, INC. Located at: MS 3-13 3840 Kilroy Airport Way Long Beach, CA 90806... -
Page 16: Chapter 2 Getting Started
Chapter 2 Getting Started Unpacking Your PhotoPC P-1000 Make sure that all of the items shown below were included in the box with your PhotoPC P-1000. PhotoPC P-1000 Carrying case Getting Started Stand USB cables (two types) * The plug type for the AC adapter may vary, depending on the... -
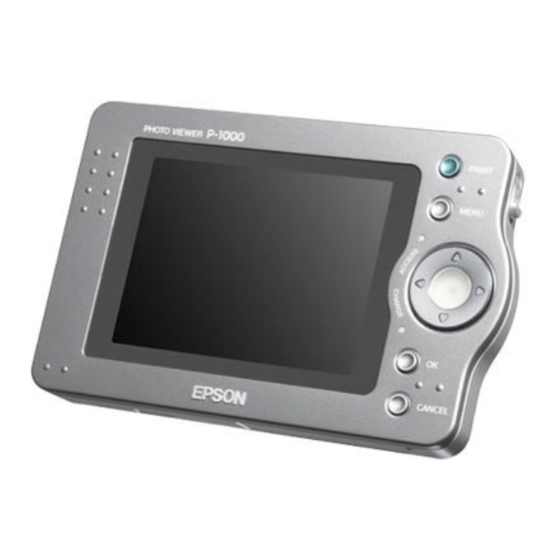
Page 17: Parts And Their Functions
Parts and Their Functions Front memory card slot control panel Back battery cover power switch battery cover release connector cover video output connector reset switch interface connector AC adapter connector Getting Started... -
Page 18: Lcd And Control Panel
LCD and control panel MENU button ACCESS light CHARGE light CANCEL button OK button PRINT button Press this button to display the Print menu. MENU button Press this button once to display the pop up menu. For details, see “Using the Pop Up Menu”... -
Page 19: Setting Up Photopc P-1000
Setting Up PhotoPC P-1000 After unpacking your PhotoPC P-1000, set it up so it is ready to use. This section describes how to charge the battery, set the memory card, and turn the power on and off. Charging the battery Your PhotoPC P-1000 comes with a lithium-ion battery. - Page 20 : Indicates sufficient battery power. : Indicates moderate battery power. : Indicates low battery power. : Indicates battery power is running out. PhotoPC P-1000 is shut down automatically. Charge the battery using the AC adapter. : Indicates the battery is charging.
-
Page 21: Setting And Removing A Memory Card
Remove the connector cover. connector cover Connect the AC adapter to PhotoPC P-1000 and a power outlet as shown below. Caution: Do not connect the AC adapter when the battery is not installed. Doing so may cause PhotoPC P-1000 to be damaged. - Page 22 CF cards. Getting Started Setting a memory card Insert the memory card into the memory card slot facing up. Note: Insert memory cards in the correct direction. Otherwise, the memory card and PhotoPC P-1000 may be damaged.
- Page 23 Push the memory card into the slot until the memory card lock clicks. Note: When inserting the memory card, the eject button does not pushed out. Removing a memory card Make sure that the ACCESS light is off. Caution: ❏ Never remove a memory card while the ACCESS light is on.
-
Page 24: Turning The Power On
Pull out the memory card. Note: When using the memory card set in the CF adapter, do not remove only the memory card. Remove the CF adapter from the PhotoPC P-1000. Getting Started Turning the power on Slide the power switch as shown below. - Page 25 Setting the language When you turn on PhotoPC P-1000 the first time, the language setting screen is displayed. Select the language you want to use with the Four-way button, and press the OK button. Language Setting Language English Fran ais...
-
Page 26: Turning The Power Off
ILLUMINTATION light turns off. Getting Started How to use the menu When turning PhotoPC P-1000 on, the Main Menu appears first. All the operations can be started from this screen. ILLUMINATION light Battery icon... -
Page 27: About The Stand
MENU button. For details, see “Using the Pop Up Menu” on page 32. About the stand You can view images on the digital photo stand. Set PhotoPC P-1000 to the stand as shown below. About the AC adapter PhotoPC P-1000 comes with the AC adapter (P62L). Warning: ❏... - Page 28 To prevent fire or electric shock, do not cover the AC adapter with a blanket or similar covering. ❏ Do not connect the AC adapter when the battery is not installed. Otherwise, PhotoPC P-1000 may be damaged. ❏ Do not remove the AC adapter from this device during operations (connecting the AC adapter during operations is possible).
-
Page 29: Chapter 3 Viewing And Managing Images
Viewing and Managing Images Viewing Images This section describes how to view, copy, and delete images in the PhotoPC P-1000’s HDD (Card Case) or the memory card. When you would like to manage images while connected to your computer, see “Using PhotoPC P-1000 With a Computer”... - Page 30 In the Main Menu, select Browse and press the OK button. Main Menu Browse Copy to the Slide Show Copy to Settings CD-R/RW Browse pictures in the HDD, on a memory card, or CD-R/RW. Press OK to continue. The Browse menu appears. To display images stored in a memory card, set the memory card.
-
Page 31: Displaying Images As A Slide Show
Note: ❏ When viewing images in the folders, select a folder and press the OK button. Images stored in the folder are displayed as thumbnails. ❏ Unsupported data is displayed as the Select an image which you want to display in full-screen format, and press the OK button. -
Page 32: Zooming An Image
Select the album and press the OK button. ¥Albums Favourites Christmas Travels Press OK to start the slide show. Press Cancel to return to the previous screen. The slide show starts. Zooming an image You can zoom in or out of an image displayed in full-screen format. -
Page 33: Copying Or Deleting The Images
This section describes how to copy or delete images stored in the HDD or memory card. Copying images from a memory card to PhotoPC P-1000 Note: When the battery is low, copying may not be completed. Use the AC adapter if this happens. -
Page 34: Copying Images From Photopc P-1000 To A Memory
Copying images from PhotoPC P-1000 to a memory card You can copy images in PhotoPC P-1000 to a memory card in two ways. One is to copy all images in a specified card folder to a memory card at once. -
Page 35: Copying Images From The Card Case To An Album
Note: Insert a blank memory card. Otherwise, the data is not copied. Select a card folder or an image that you want to copy. ¥Cards¥20021218. 003¥DCIM¥101EPSON Press OK to view this photo. Press Cancel to return to the previous screen. Press Print to print this photo. Note: You cannot select an album. -
Page 36: Deleting Images
About the Album Case There is an Album Case in PhotoPC P-1000. The Album Case manages albums which you make. You can manage multiple albums in the Album Case. To access the Album Case, select Browse in the Main Menu, then select Album Case in the Browse menu. -
Page 37: Copying All The Images In A Folder To An Album
Select Copy to Album by using the Up and Down buttons, and press the OK button. Model Name : PhotoPC 8100Z Date : 2001.12.31 22:31 : 1600 × 1200 Size Focus Length : 20.20m F Number : F2.8 Delete Shutter Speed(s) : 1/258 M Rotate Expousure Bias... -
Page 38: Using The Pop Up Menu
Select Copy All Images to Album by using the Up and Down buttons, and press the OK button. ¥Cards Delete Rotate 20021218.001 20021218.003 20021218.004 Copy to Album Copy All Images to Album Copy to Memory Card Slide Show Lock Increase Number of Copies Press OK to browse this card folder. - Page 39 Delete Delete a selected image or folder. Then, select Yes in the dialog box that confirms to delete the selected item, and press the OK button to delete. Note: When selecting items stored in the CD-R/RW, this command is not displayed. Rotate Rotate a selected image in the album 90°...
- Page 40 Increase Number of Copies Increase the number of copies by one sheet. This setting is valid until printing is executed. Note: You can increase the number of copies up to 99. Decrease Number of Copies Decrease the number of copies by one sheet. This setting is valid until printing is executed.
- Page 41 Change Album Name Change the selected album’s name. You can select the name from the displayed list. When you select a name which already exists, the new album is given a number after its name. Set as the Album Thumbnail Set the selected image as an album or card folder’s icon.
-
Page 42: Chapter 4 Direct Printing
Chapter 4 Direct Printing Before Printing You can print an image by connecting PhotoPC P-1000 directly to a printer. This section describes how to print the images on the PhotoPC P-1000. Supported printers PhotoPC P-1000 supports printers listed below. PhotoPC P-1000 comes with two USB cables. Choose either of the cables depending on your printer. -
Page 43: Connecting Photopc P-1000 To A Printer
Connecting PhotoPC P-1000 to a printer The following procedure shows how to connect the PhotoPC P-1000 to the Stylus Photo 960. For other printers, refer to your printer’s manual. Make sure that PhotoPC P-1000 and the printer are turned off. -
Page 44: Direct Printing
Install Printer Driver Stylus Photo 830 Stylus Photo 830 U Show Driver Information Stylus Photo 900 Press OK or PRINT to select this printer. Press Cancel to return to the previous screen. Note: ❏ An error message that the printer driver cannot be found is displayed, contact our Customer Support. -
Page 45: Printing Images
Select the image to print. Press the PRINT button. Note: If the printer is not selected, the Printer Settings screen appears. Select the printer to be used. In the Print menu, select the printing mode, and press the OK button. - Page 46 ❏ When you select Select Photos in step 3, the Select Photos dialog box appears. Select images to print and press the OK button. Select Photos 0001/0024 Date:2001.12.31 22:31 Resolution**:1600×1200 Total 01 Use the left or right button to select a photo. Use the up or down button to select the number of copies to print.
-
Page 47: Chapter 5 Using Photopc P-1000 With Other Devices
CD-ROM. For details, see “Installing the Software” on page 56. Note: ❏ When using PhotoPC P-1000 while it is connected to a computer, use the AC adapter. ❏ When removing the USB cable, refer to your computer’s manual and follow the instructions. -
Page 48: Using Video Output
When connected to a CD-RW drive with the USB cable ) is displayed provided with PhotoPC P-1000, you can archive images to a CD-R/RW. Note: When using PhotoPC P-1000 while it is connected to a computer, use the AC adapter. - Page 49 Make sure PhotoPC P-1000 and the CD-RW drive are turned off, and connect PhotoPC P-1000 to your CD-RW drive. Turn on the CD-RW drive, then PhotoPC P-1000. In the Main Menu, select Copy to CD-R/RW by using the Four-way button, and press the OK button.
- Page 50 Burn to CD Select to Delete Press OK to select this option. Press Cancel to finish making settings. Using PhotoPC P-1000 With Other Devices Confirm the message in the displayed dialog box, and press the OK button. Copy to CD-R/RW...
-
Page 51: Chapter 6 Customizing Settings
This section describes how to customize PhotoPC P-1000 settings. You can customize various settings for displaying and copying images, or turn on the sound setting to make your PhotoPC P-1000 more fun to use. Customizing Albums You can store your favorite images as an album. -
Page 52: Changing An Album's Name
Select New from the displayed list, and press the OK button. Copy to Album Favourites Travels Press OK to select the option. Press Cancel to return to the previous screen. Select the album’s name from the displayed list, and press the OK button. Copy to Album Select one of the following: Favorites... -
Page 53: Copying An Album To Cd-R/Rw
Select Change Album Name by using the Up and Down buttons, and press the OK button. ¥Albums Delete Copy All Images to Album Favourites Christmas Travels Slide Show Lock Return to Main Menu Hide Unsupported Files Change Album Name Select to Delete Press OK to start the slide show. -
Page 54: Changing Photopc P-1000 Settings
Press OK to start the slide show. Press Cancel to return to the previous screen. Customizing Settings Changing PhotoPC P-1000 Settings The settings described in the following sections can be changed from the Settings menu. To display the Settings menu, select Settings in the Main Menu and press the OK button. -
Page 55: Display Settings
Display settings This menu provides the settings for displaying images. Display Settings Memory card or card folder view mode: PC View Mode DSC View Mode Unsupported files setting: Show Hide Photo information setting: Show Hide Show images in current folder in PC View mode. Press OK to apply the selection. -
Page 56: Language Setting
❏ It may take a long time to display depend on a image you select. Slide show duration Set the interval to switch the images during a slide show. You can set the interval by moving the slidebar from 3 seconds to 5 minutes. The default setting is 10 seconds. -
Page 57: Sound Setting
Sound setting You can set the operating sound. Sound Setting Sound: Press OK to apply the Sound setting and return to the previous screen. Press Cancel to disregard the change. Sound When this setting is set to ON, a beep sounds when you do some operations. -
Page 58: Power Save Settings
Power save settings This menu provides the settings for the power save mode. Power Save Settings Auto backlight control duration: 1 min 5 min Auto power off duration: 1 min The LCD screen goes dark when Photo Viewer is idle for this period of time. -
Page 59: Copy Mode Settings
Copy mode settings You can change the settings for the action after images are copied to the HDD. Copy Mode Settings Clear memory card after copying: Save images in album after copying: Default album for copied images: Favorite Memory card data will be deleted without verification. Press OK to apply the setting and return to the previous screen. -
Page 60: Changing The Printer Driver Settings
Changing the Printer Driver Settings When printing images directly to the printer, you can set the print settings on PhotoPC P-1000. Print Settings Number of Copies Print Date Print Paper Premium Glossy Photo Paper 1 Picture Layout with borderless Print Quality High Copy number affects the total number of copies. -
Page 61: Chapter 7 Operating The Software
Chapter 7 Operating the Software System Requirements The system requirements for using PhotoPC P-1000 with a computer are as follows: Windows Microsoft® Windows® 98, Me, 2000 Professional, XP Home Edition, XP Professional memory: 64 MB or more hard disk: 50 MB or more free space is... -
Page 62: Installing The Software
When a message appears to inform you that the installation is complete, click Note: The CameraStarter and AutoDownloader functions, which are part of EPSON Photo!4, cannot be used with P-1000. These functions are available only with EPSON digital cameras. -
Page 63: Starting The Software
Programs), and then select EPSON PhotoQuicker. Click EPSON PhotoQuicker3.4. For Macintosh Software Menu EPSON Photo!4 Double-click the EPSON Photo!4 icon in the EPSON Photo!4 program folder. EPSON Double-click the EPSON PhotoQuicker PhotoQuicker icon in the EPSON PhotoQuicker program folder on your desktop. -
Page 64: Finding More Information
Click the Help button on the dialog box. PhotoQuicker Note: You can access the online EPSON Photo!4 or EPSON PhotoQuicker User’s Guide using the Start menu in Windows, or in Macintosh, double-click the MANUAL folder in each of the software’s program folders, and then double-click INDEX.HTM. -
Page 65: Chapter 8 Maintenance And Troubleshooting
Chapter 8 Maintenance and Troubleshooting Cleaning PhotoPC P-1000 To keep your PhotoPC P-1000 operating at its best, you should clean it thoroughly several times a year. Before you perform any maintenance on PhotoPC P-1000, be sure to read the “Safety Instructions” on page 1. Then follow these guidelines. -
Page 66: Maintenance And Troubleshooting
An unusually high Wait until PhotoPC P-1000 temperature was detected. cools down. Photo Viewer will turn off soon. A printer error has occurred. - Page 67 Please install the ink Ink cartridges have not been cartridges. installed in your printer. See your printer’s manual and install the ink cartridges. Printer does not match the See “Selecting the printer driver. Please check appropriate printer driver” on the printer driver setting.
-
Page 68: Problems And Solutions
Maintenance and Troubleshooting Problems and solutions Use the information in this section to find the source of and solution to PhotoPC P-1000 problems. Determine the type of problem that occurred, and see the appropriate section below: “Power supply problems” on page 63 “Image display problems”... -
Page 69: Power Supply Problems
Power supply problems The power does not turn on. Cause What to do The battery has run out. When the on the top right corner of the LCD, the battery has run out. See “Charging the battery” on page 14 and charge the battery. The battery is set Make sure that the battery is incorrectly. -
Page 70: Printing Problems
The printer’s power is off. Turn on the printer. The USB cable is not See “Connecting PhotoPC connected correctly. P-1000 to a printer” on page 37 and reconnect PhotoPC P-1000 to the printer. The image data is broken. Try to copy a different image. -
Page 71: Registering A New Printer Driver
Current Printer: Stylus Photo 810 Install Printer Driver Show Driver Information Press OK or Print to install or update a printer driver. After the printer driver is found, installation starts. Note: When a printer driver cannot be found, an error is displayed. -
Page 72: Using Printer Utilities
Stylus Photo 830 Stylus Photo 830 U Show Driver Information Stylus Photo 900 Press OK or PRINT to select this printer. Press Cancel to return to the previous screen. Using Printer Utilities You can confirm the printer’s status from the PhotoPC P-1000. - Page 73 Press OK to continue. Press Cancel to return to the previous screen. Head Cleaning Execute the head cleaning on the printer that is currently connected. After head cleaning, you can check the condition of the print head by printing the nozzle check pattern.
-
Page 74: Resetting Photopc P-1000
Resetting PhotoPC P-1000 This section describes how to reset PhotoPC P-1000 when a error occurs and operations cannot be done. Remove the connector cover. Press the Reset button with a thin object. Maintenance and Troubleshooting Contacting Customer Support If your EPSON product is not operating properly and... -
Page 75: For Users In North America
Service Access World Wide From the Internet, you can reach EPSON Support at http://support.epson.com. At this site, you can download drivers and other files, look at product documentation, access troubleshooting information, and receive technical advice through e-mail. -
Page 76: For Users In The United Kingdom And The Republic Of
Visit our Internet home page for a full list of support and warranty services including: ❏ Register your product on-line ❏ Free access to the latest EPSON software drivers ❏ Easy access to frequently asked questions ❏ Interactive web based support tool to help you quickly resolve support issues ❏... -
Page 77: For Users In The Middle East
Select your country from our Internet home page for a full list of support and warranty services including: ❏ Register your product on-line ❏ Free access to the latest EPSON software drivers ❏ Easy access to frequently asked questions ❏ Interactive web based support tool to help you quickly resolve support issues ❏... - Page 78 0800 523 010 Norway 800 11 828 Sweden 08 445 12 58 Pre-Sales Enquiries Literature Requests and Nearest Dealer Denmark Home Page: http://www.epson.dk Telephone: 38 48 71 37 Maintenance and Troubleshooting Finland Home Page: http://www.epson.fi Telephone: 0981 710 083 Norway Home Page: http://www.epson.no...
-
Page 79: For Users In South Africa
To obtain technical support as well as other after-sales services, users are welcome to contact EPSON Hong Kong Limited. Internet Home Page EPSON Hong Kong has established a local home page in both Chinese and English on the Internet to provide users with the following information: ❏... - Page 80 ❏ Latest versions of EPSON product drivers Users can access our World Wide Web home page at: http://www.epson.com.hk Electronic Bulletin Board System An electronic bulletin board system (BBS) is also available to obtain product information and the latest versions of product drivers. You can log on to the...
-
Page 81: Appendix A Appendix
Appendix A Appendix Standards and Approvals PhotoPC P-1000 U.S. model: FCC Part 15 Subpart B Class B CSA C108.8 Class B European model: EMC Directive 89/336/EEC AC adapter U.S. model: Safety European model: Low Voltage Directive 73/23/EEC EMC Directive 89/336/EEC... -
Page 82: Specifications
Specifications General CPU: TMS320DM310 LCD: EPSON VGA TFT LCD HDD: 1.8" HDD (10 GB) FAT 32 Dimensions Height and weight: Width Depth Weight Temperature: Operating: 5 to 35°C Non-operating: -20 to 60°C Humidity: Operating: 30 to 80% (without Non-operating: 10 to 80%... -
Page 83: Battery
Battery Type: Lithium Ion Battery Model: B6345 35.2 mm × 53 mm × 7 mm Size: (H x W x D) Ratings: 3.7 V, 1035mAh Temperature: Operating: 5 to 35°C Non-operating: -20 to 60°C* * When storing for a long period, do not keep a place in high temperature. - Page 84 A piece of hardware, a method, or a standard used to connect the computer and the camera. interface cable The cable that connects PhotoPC P-1000 to the printer or other devices. JPEG A file format for strong color and grayscale images in compressed files.
- Page 85 See “driver” on page 78. printer utilities See “utilities” on page 79. reset To return PhotoPC P-1000 to its defaults thumbnails Small representations of images. USB interface Universal Serial Bus interface. Enables the user to connect up to 127 peripheral devices (such as keyboards, mice, and printers) to the computer through a single, general-purpose port.
- Page 86 Available types of image files, 23 Available types of memory cards, 16 Available types of paper, 36 Battery charging, 13, 14 installing, 13 Changing PhotoPC P-1000 settings, 48 Changing the printer driver settings, 54 Index Charging the battery, 13, 14 Cleaning PhotoPC P-1000, 59 Connecting...
- Page 87 PhotoPC P-1000, 27 copying from PhotoPC P-1000 to a memory card, 28 copying from the card case to an album, 29 copying to an album, 30 displaying as a slide show, 25 displaying as thumbnails, 23...
- Page 88 64 Turning the power off, 20 Turning the power on, 18 Uninstalling Index software, 57 Unpacking PhotoPC Player, 10 Using albums, 30 pop up menu, 32 printer utilities, 66 video output, 42 Video out setting, 52 Zooming an image, 26...