Table of Contents
Advertisement
Quick Links
Download this manual
See also:
User Manual
Advertisement
Table of Contents

Related Manuals for Alesis SR-18


Summary of Contents for Alesis SR-18
-
Page 3: Table Of Contents
TABLE OF CONTENTS INTRODUCTION ............5 PATTERN STEP EDITING (STEP WELCOME TO THE SR18 DRUM MACHINE!..5 EDIT MODE) ............36 GROUND RULES ..........5 ADDING A NEW DRUM TO A STEP ....37 CONNECTION DIAGRAM.........8 ERASE A DRUM SOUND FROM A STEP ...37 TOP PANEL PHYSICAL LAYOUT ......9 CHANGE A DRUM SOUND'S VOLUME IN A GENERAL CONTROLS ........9 GIVEN STEP ...........37... -
Page 5: Introduction
INTRODUCTION WELCOME TO THE SR18 DRUM MACHINE! The SR18 includes high-fidelity drum, percussion and bass sounds, and is easy to operate. You can easily switch among the different instrument layers in real-time. As you strike the 12 pads (each of which can be assigned to any of the available sounds), the SR18's on-board sequencer records exactly when you triggered the sounds and the dynamics of your playing. - Page 6 The Two Types of Patterns The SR18 introduces exciting new Song construction techniques. The SR18 excels at live performance—something usually not associated with drum machines. The key to using these advanced features is to understand the different types of available Patterns.
- Page 7 What's a Voice? Each of the 12 large pads triggers a voice. A voice is a sound-generating element with several variable parameters: sound assignment, tuning, volume, output assignment (the voice's audio output can go to either one of two sets of stereo outputs, and furthermore, to anywhere within the stereo field of the chosen set of outputs), MIDI note number, etc.
-
Page 8: Connection Diagram
CONNECTION DIAGRAM As you hook up SR18, volume control on your power amp SR18 should be all the way down, and power both units should be off. Plug ¼” TS cables from the MAIN OUTPUTS to an amplifier, mixer, or speaker system. For mono sound, you can connect only one output. -
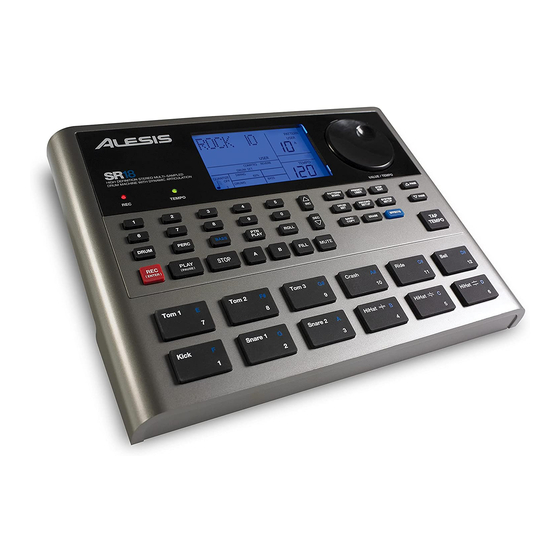
Page 9: Top Panel Physical Layout
TOP PANEL PHYSICAL LAYOUT GENERAL CONTROLS LCD – The display helps you keep track of system parameters and settings as you use the SR18. PADS – The 12 pads are used to trigger sounds on the SR18. The pads can address 3 different types of sounds: drums, percussion and bass. -
Page 10: Navigation Buttons
REC LED – This LED will light when the SR18 is recording. It will blink when you are required to confirm or cancel an action. A & B – Each Pattern consists of two Main sub-patterns – A & B. You can select each of the two sub-patterns by pressing its corresponding button. -
Page 11: Setup Buttons
SETUP BUTTONS SYSTEM SETUP – Pressing this button calls up various system settings and preferences, such as MIDI options, note assignments, clocking, as well as display brightness and others. The display will indicate SYSTEM and SETUP when you are in System Setup. You can move between the different pages of settings with the PAGE UP / DOWN buttons and change the settings on the selected page with the VALUE dial or the INC / DEC buttons. -
Page 12: Rear Panel Physical Layout
REAR PANEL PHYSICAL LAYOUT AUX L/R MAIN RIGHT MAIN LEFT PHONES INSTRUMENT OUT / THRU START COUNT/A/B/FILL STOP VOLUME OUTPUTS INPUT MIDI FOOTSWITCHES POWER DC IN – The supplied power adapter should be connected to a live outlet to power the unit. Alternatively, the unit may be powered with 6 AA batteries inserted in the bottom compartment. -
Page 13: Display Layout
DISPLAY LAYOUT The LCD is divided into several "windows." Each window contains information that helps you monitor the SR18's status, and/or indicates what type of data should be entered. 1. Name, "dialog" box, real time Song/Pattern readout, beat counter. - This is the most commonly-used area of the display. -
Page 14: Basics
BASICS HOW TO COMMUNICATE WITH THE SR18 The Cursor When the SR18 wants you to enter a number in the "Dialog" box, the display will show the previously-entered number (or the default number), and the first digit will have a small underline called the cursor. -
Page 15: Steps To Instant Gratification (Setup And Checkout)
10 STEPS TO INSTANT GRATIFICATION (SETUP AND CHECKOUT) Connect the Main outputs (either left or right for a mono monitoring system, or both for stereo) to a musical instrument amplifier, PA, or plug headphones into the headphone output on the back of the SR18. The amp and SR18 volume control (on back) should be all the way down (counter-clockwise). -
Page 16: The Instrument Layers
THE INSTRUMENT LAYERS The SR18 allows you to play three different kinds of sounds with the pads. These sounds are available in three different Play Modes or Banks. These are DRUM, PERC and BASS and are accessible by pressing the corresponding button on the top panel. DRUM –... - Page 17 Selecting the Next Pattern to be Played While a Pattern is playing, you can select to go to another pattern in several ways: Use the INC / DEC buttons or VALUE dial to select the next Pattern. The newly- selected Pattern will play back as soon as the current Pattern plays through its entire length.
- Page 18 Changing Pattern Tempo The tempo range extends from 30 to 300 beats per minute. Tempo can be changed while the SR18 is stopped or running. There are two ways to set tempo. Before playing a Pattern, tap the TAP TEMPO button several times at the desired tempo.
- Page 19 Fills cannot start on the downbeat since a Fill, by definition, starts at some point into the Main Pattern. However, anything you record on the Fill downbeat will play on the first downbeat following the Fill (i.e., the downbeat of the next Pattern).
- Page 20 The MUTE Button The MUTE button can be used to mute the different instrument layers while the SR18 is playing. To Mute Parts: Play a Pattern. Press and hold the MUTE button Press one of the Instrument buttons (DRUM, PERC or BASS.) That particular instrument sound will be muted.
-
Page 21: Recording Patterns
RECORDING PATTERNS Note: An empty Pattern defaults to an 8 beat length (2 Bars), with 16th note quantization and swing off (50%). If you need to change the length, it is best (though not essential) to do so before recording. Other parameters can be changed while you're recording. STEPS TO RECORDING A PATTERN First, begin by selecting User Patterns (the display should indicate PATTERN and USER). -
Page 22: Pattern Play Mode
PATTERN PLAY MODE Pattern Play mode allows you to play sequences of Patterns by triggering Patterns with the pads. To enter Pattern Play Mode, press the PTN PLAY button. PLAYING PATTERN SEQUENCES WITH THE PADS Press the PTN PLAY button. Press a pad and the Pattern associated with the pad will begin playing. -
Page 23: Selecting, Editing And Creating Drum Sets
SELECTING, EDITING AND CREATING DRUM SETS What is a Drum Set? The SR18 features different “sets” of sounds which you can use in your Patterns and Songs. A Drum Set is a collection of settings that affect the Drums, Percussion and Bass sounds within the set as well as the mix parameters and effects setup. - Page 24 PAGE 2: INSTRUMENT LAYER VOLUME This page allows you to adjust the volume of each instrument layer (drums, percussion, bass). Adjusting this level will affect all the sounds in the selected layer. To adjust the volume of an instrument layer: Select the instrument layer which you would like to edit by pressing DRUM, PERC or BASS.
- Page 25 PAGE 5: PANNING Each pad can also be assigned to one of seven positions within the stereo spectrum. To change a pad’s panning position: Select the sound set which you would like to edit by pressing DRUM, PERC or BASS. Please note that the Panning setting will affect all Bass sounds similarly.
- Page 26 PAGE 7: ATTACK ENVELOPE (BASS ONLY) The attack envelope (bass only) affects how the bass sound will play after you hit the pad. Attack determines the amount of time it takes for the bass sound to “fade in” after it has been triggered.
- Page 27 PAGE 10: FILTER Pad Filter allows you to make changes to the tonal characteristics of a sound by removing the higher frequencies from the sound. This allows you to make a particular drum sound darker, with more pronounced bass. The higher the value the more high frequencies will be allowed to pass through.
- Page 28 PAGE 12: OUTPUT Background The SR18 includes two independent stereo output pairs (Main and Aux). You can direct any pad to either output pair, and pan the sound within the selected output's stereo field (see page 4 of the Drum Set menus). This allows several output assignment options: Mono: Plug into one of the output pair jacks;...
-
Page 29: Effects
EFFECTS The Effects settings are stored per kit. Each Kit can have separate Reverb, Compression / EQ settings that are specific to that kit. To change Effects settings, press the EFFECTS button while you are in Pattern Mode. Effect settings can only be changed on User Patterns. In order for the Effects settings to be remembered you must save the Drum Set after you make your settings. -
Page 30: Record Setup
RECORD SETUP Several parameters, such as quantization, swing, metronome options, Pattern length, are often adjusted prior to recording a Pattern, General instructions are: Press the RECORD SETUP button. Use the PAGE buttons to select different "pages" of functions; the display's lower right window shows the page number. -
Page 31: Page 2: Gate
PAGE 2: GATE When entering Bass parts in Step Edit Mode, the Gate parameter specifies the duration of notes, as a percentage of the quantization value. For example, if you have selected a gate time of 99 (which is equivalent to 100% of the quantization value) and a quantization value of ¼... -
Page 32: Page 6: Velocity Sensitivity
PAGE 6: VELOCITY SENSITIVITY Velocity Sensitivity describes how the pads will output sound depending on the applied velocity (i.e. how hard the pads are struck). This feature allows players with a heavier or lighter touch customize response accommodate their particular playing style. To select the desired dynamic response, use the INC/DEC buttons, the VALUE dial or the number buttons (1 = Fixed 1, 2 = Fixed 2, 3 = Fixed 3, 4 = Fixed 4, 5 = Fixed 5, 6 = Fixed... -
Page 33: Page 9: Pattern Length
PAGE 9: PATTERN LENGTH This page allows you to specify the length of the selected Pattern in steps. For example, 2 steps of a 4/4 time signature equal 2 bars of 4/4. Use the INC / DEC buttons, the number buttons, or the VALUE dial to select the desired step length for the Pattern. -
Page 34: Editing Patterns - Erase Functions
EDITING PATTERNS – ERASE FUNCTIONS ERASING DRUM EVENTS WHILE RECORDING While the SR18 is recording, you can erase any individual drum event or series of events in real time to fix up errors. Erasure occurs only on those beats that coincide with the current quantization and swing values;... -
Page 35: Editing Patterns - Copy/Save Functions
EDITING PATTERNS – COPY/SAVE FUNCTIONS SAVING A PATTERN The following operation will save the selected Pattern, including all sub-patterns (A, B and FILL) to a specific location, overwriting any data which may already exist. Please note that you need to save your Patterns if you wish to access them after you power-cycle the unit. -
Page 36: Editing Patterns - Transposition
EDITING PATTERNS – TRANSPOSITION Each Pattern on the SR18 has a Pattern Transposition setting (0 by default). This setting allows you to quickly transpose the selected Pattern’s Bass content. The Pattern Transposition setting will be stored along with all other Pattern parameters once the Pattern is saved into memory (See “Editing Patterns –... -
Page 37: Adding A New Drum To A Step
First, you will need to make sure that you are in Pattern Mode (PATTERN should be displayed in the upper right corner of the screen). To enter Pattern Step Edit Mode, press the STEP EDIT button. BEAT SUB-BEAT PAD NUMBER The display now shows the beat and sub-beat. -
Page 38: Song Mode
SONG MODE After creating the Patterns that make up a Song, it's time to string those Patterns together to create a complete Song. You can use Preset Patterns, User Patterns, or a combination of both to create your Song. There are three ways to create Songs: In real time. -
Page 39: Recording A Song In Real-Time
RECORDING A SONG IN REAL-TIME To record a sequence of Patterns in real-time, follow the steps below: Switch to Pattern Mode (the display should say PATTERN) and select the first Pattern which you would like to use in your Song. Remember to specify A, B or FILL sub- pattern as well. -
Page 40: Manual Song Creation (Song Step Edit Mode)
MANUAL SONG CREATION (SONG STEP EDIT MODE) Another way to sequence your Song is to use Step Edit Mode. In this mode, you can manually enter Pattern numbers for each step of the Song. Select Song mode (the display should indicate SONG in the upper right corner) and select a desired Song number with the number keypad, INC / DEC buttons or the VALUE dial. - Page 41 Removing a Fill from Your Song While in Record mode, there are two ways to remove a Fill from a Song: When the Fill step appears, press the A button for an A Pattern or press the B button for a B Pattern and the Fill will be removed. When the Fill step appears, press and hold the FILL button and press ERASE.
-
Page 42: Setting Song Tempo
SETTING SONG TEMPO There are two ways to set tempo: Method 1 Press STOP if the Song is playing. Press the TAP TEMPO button several times at the desired tempo. The LD32 will average the time between taps and derive a tempo. Note: If a footswitch is plugged into the Count/A/B/Fill jack, tapping the footswitch at the desired rate is equivalent to pressing the TAP TEMPO button. -
Page 43: Controlling Playback Position
CONTROLLING PLAYBACK POSITION If you press STOP while a song is playing, the next time you press PLAY the Song will start from the beginning. If you press PLAY while a song is playing, the song will pause. Press PLAY again to resume playback. -
Page 44: Erasing An Entire Song
ERASING AN ENTIRE SONG The SR18 should be in Song Mode. Use the number buttons, INC / DEC buttons or the VALUE dial to select the Song to be erased. Press and hold the ERASE button. You will see the screen shown on the right. -
Page 45: System Setup
SYSTEM SETUP This Mode accesses important System functions. General instructions are: Press the SYSTEM SETUP button. Use the Page (up and down) buttons to select different "pages" of functions; the display's lower right window shows the page number. The pages are described below. Adjust values on pages, if necessary, as described for each page. -
Page 46: Transmit Midi Notes (Drum Out, Perc Out, Bass Out)
Page 3 / TRANSMIT MIDI NOTES (DRUM OUT, PERC OUT, BASS OUT) The SR18 can output MIDI data from pad hits and Pattern or Song sequences through the MIDI OUT connection on the rear panel. This allows you to send data into a sequencer for recording, or to drive other sound modules from the SR18. -
Page 47: Accept External Clock Value (Clock In)
Page 5 / ACCEPT EXTERNAL CLOCK VALUE (CLOCK IN) Playback and tempo on the SR18 can be controlled by external devices through MIDI Clock if: The external device (sequencer, drum machine, etc.) generates MIDI timing signals. These signals go from the external device's MIDI OUT to the SR18's MIDI IN. CLOCK IN is ON. -
Page 48: Merge Midi In With Midi Out (Midithru)
Page 7 / MERGE MIDI IN WITH MIDI OUT (MIDITHRU) To have the SR18 merge data appearing at the MIDI IN with the timing and/or note data transmitted through the MIDI OUT, you can enable MIDITHRU. Use the INC/DEC buttons or VALUE dial to select ON. Select OFF to have the SR18 MIDI OUT transmit SR18 timing and note data only. -
Page 49: Tempo Selection (Tempo)
Page 9 / TEMPO SELECTION (TEMPO) This function describes how the SR18 will use tempo data when playing back Patterns. If you choose GLOBAL, the SR18 will use a global tempo setting and will ignore any tempo data associated with a Pattern. If you choose PERPAT, the SR18 will use the tempo data stored with each Pattern. - Page 50 Drum note map in MULTI-DRUMSET mode. NOTE: In this chart, Pad and MIDI note number values for drumset 00 also apply to drumsets 10, 20, 30, and 40; values for drumset 01 also apply to drumsets 11, 21, 31 and 41, etc. DRUM MIDI DRUM...
-
Page 51: Manual Drumset Override (Set Mode)
PAGE 11 / MANUAL DRUMSET OVERRIDE (SET MODE) Each Pattern has an associated, assigned Drum Set. However, you can tell the SR18 to ignore these stored assignments, and retain the currently selected Drum Set regardless of whether or not you change Patterns. This is useful if you want to hear how a Pattern would sound with a different Drum Set (just set one up manually) as opposed to the one stored with the Pattern. -
Page 52: Low Battery Warning (Lo Batt)
Page 15 / LOW BATTERY WARNING (LO BATT) On this page you can specify the threshold the battery should reach before warning of low battery. This warning will let you know when it is time to replace the batteries or plug in the power adapter. Use the number buttons, INC / DEC buttons or the VALUE dial to select a percentage of the full battery charge. -
Page 53: Sending Midi Sysex Song And Pattern Data To The Sr18
SENDING MIDI SYSEX SONG AND PATTERN DATA TO THE SR18 If you wish to load Pattern and Song data back into the SR18, please follow the instructions below. Please note that this operation will erase any Song and Pattern data which exists on the SR18! Connect a 5-pin MIDI cable from your MIDI SysEx device to the SR18’s MIDI IN. -
Page 54: Applications
APPLICATIONS MIDI SYNC APPLICATIONS SR18 As MIDI Timing Master The SR18 can control several other slave MIDI drum machines or sequencers by turning on MIDI Clock Out, which sends SR18 timing information down the MIDI line. Turn on MIDI Clock Out (page 6 of the Record Setup menus). Program the slave units to not follow their internal clocks, but to accept external MIDI Clock and Start/Stop data. -
Page 55: Strategies For Assembling Patterns And Songs
STRATEGIES FOR ASSEMBLING PATTERNS AND SONGS Ideally, you should be able to translate your inspirations into tangible form with a minimum amount of effort. The following tips and techniques help speed up the process of creating Patterns and Songs. Create Fills Quickly with the Copy Function Many times a Fill will simply be a variation on another Pattern, but with a few minor differences to add variety or serve different musical purposes. -
Page 56: Understanding Rhythmic Notation
UNDERSTANDING RHYTHMIC NOTATION Measures A piece of music is divided into smaller units called measures (also called bars), and each measure is divided into beats. In the SR18, each beat is further sub-divided into 96 sub-beats. Rhythmic Values for Notes With a measure written in a 4/4 time signature, there are 4 beats per measure, and each beat represents a quarter (1/4) note. -
Page 57: Midi Implementation Chart
MIDI IMPLEMENTATION CHART Function Transmitted Recognized Remarks Basic Default 1-16 Channel Changed 1-16 0-127 Note Number: True Voice 0-127 Note On 1-127 Velocity Note Off After Touch Ch’s Pitch Bend Program 0-127 Change True # System Exclusive RESTORE MIDI Mode only MIDI out only Song Pos System... -
Page 58: Factory Reset
FACTORY RESET To restore the SR18’s factory presets, hold the SAVE / COPY button and ERASE button simultaneously while turning on the SR18. NOTE: This will erase all user data, including User Drum Sets, Patterns, Songs, etc. KEY FEATURES Professional drum machine so you can record and play back your own beats 12 natural feeling, velocity-sensitive drum pads Large 32MB sound set, with percussion bank and bass synth sounds Dynamic Articulation stereo samples with reverb and ambience for realistic playing... - Page 60 www.alesis.com...