Alesis SR18 Professional Drum Machine Quick Start Guide
- Quick start manual (76 pages) ,
- Service manual (75 pages) ,
- Reference manual (60 pages)
Advertisement
- 1 BOX CONTENTS
- 2 CONNECTION DIAGRAM
- 3 INTRODUCTION
- 4 OVERVIEW OF THE CONTROLS
- 5 PLAYING PATTERNS
- 6 PLAYING SEQUENCES OF PATTERNS
- 7 PLAYING FILLS
- 8 PLAYING PATTERNS WITH THE PADS
- 9 RECORDING YOUR OWN PATTERNS
- 10 MUTING INSTRUMENT LAYERS
- 11 LOADING AND CREATING DRUM SETS
- 12 CREATING AND ERASING SONGS
- 13 FOOTSWITCH CONTROL
- 14 FACTORY RESET
- 15 ADDITIONAL INFORMATION
- 16 TECHNICAL SPECIFICATIONS
- 17 Documents / Resources
BOX CONTENTS
Please make sure the following items can be located in the box:
- SR18
- Power Adapter (12V DC 500mA)
- Quickstart Manual
- Reference Manual
- Safety and Warranty Information
READ THE SAFETY AND WARRANTY INFORMATION BOOKLET BEFORE USING THIS PRODUCT!
CONNECTION DIAGRAM

As you hook up the SR18, the volume control on your power amp and the SR18 should be all the way down, and power to both units should be off.
- Plug ¼" TS cables from the MAIN OUTPUTS to an amplifier, mixer, or speaker system. For mono sound, you can connect only one output.
- Alternatively, you can connect a pair of ¼" TRS headphones to the PHONES OUTPUT.
- Connect your instrument to the INSTRUMENT INPUT.
- If you have ¼" TS footswitches, connect them to the START / STOP and COUNT / A / B / FILL jacks.
- Plug the included power adapter (12V DC 500mA) into the adapter jack and the adapter into a power source. Alternatively, you may choose to power the unit by inserting 6 AA batteries into the bottom compartment.
- Press the POWER switch to turn on the unit.
- Tap the pads to hear sounds. You can switch among the three different sound categories for the pads by pressing the corresponding button (DRUMS, PERC, BASS).
- Adjust the volume control on the rear panel to a suitable listening level.
INTRODUCTION
Welcome to the SR18 Professional Drum Machine. The SR18 allows you to quickly and easily program drum, percussion and bass sounds into rhythm Patterns and to turn these Patterns into Songs.
Let's begin with a quick explanation of some of the key elements:
PATTERNS VS. SONGS
- PATTERNS – When recording with a drum machine, it's often easier to divide a song into shorter individual Patterns and work on these rather than record an entire song. A typical Pattern might be 8,16, or 32 beats long, and correspond to a verse, chorus, bridge, instrumental, intro, etc. Think of Patterns as the building blocks for your Songs. The SR18 holds 100 Preset (i.e., can't be edited) Patterns and 100 user-programmable Patterns, each of which can be from 1 to 128 beats long.
- SONGS are collections of Patterns which are sequenced together. With the SR18, you can either program your patterns in the order in which they should be played, or you can select Patterns in real-time and the SR18 will remember your performance.
Tip: To hear a demo seon, hold [PATTERN / SONG] and press [PLAY].
THE 2 TYPES OF PATTERNS
The SR18 introduces exciting new Song construction techniques. The SR18 excels at live performance—something usually not associated with drum machines. The key to using these advanced features is to understand the different types of available Patterns.
- PRESET Patterns provide a variety of rock, jazz, pop, and other rhythms programmed by professional drummers.
- USER Patterns are Patterns you can program, edit, and save. The PRESET/USER button selects between these two master banks of Patterns. The only way to modify a Preset Pattern is to copy it to a User Pattern, where it can be edited.
THE 4 SUB-PATTERNS
There are 100 of each type of Pattern, numbered 00-99. However, each numbered Pattern actually contains four different "sub-Patterns":
- A pair of independent MAIN Patterns (A and B, selected by their respective buttons).
- A pair of associated FILLPatterns (A Fill and B Fill, selected by pressing the FILL button when either A or B is selected). The Fills primarily provide transitional Patterns between Main Patterns, which makes for more realistic drum parts. The associated Fill Patterns share the same length, Drum Set, and name as their Main Patterns (e.g., if A is 16 beats, A Fill is 16 beats). Otherwise, they are independent.
The reason for pairing the two different A and B Patterns together is simply so that you can switch back and forth between them rapidly in live performance or while improvising.
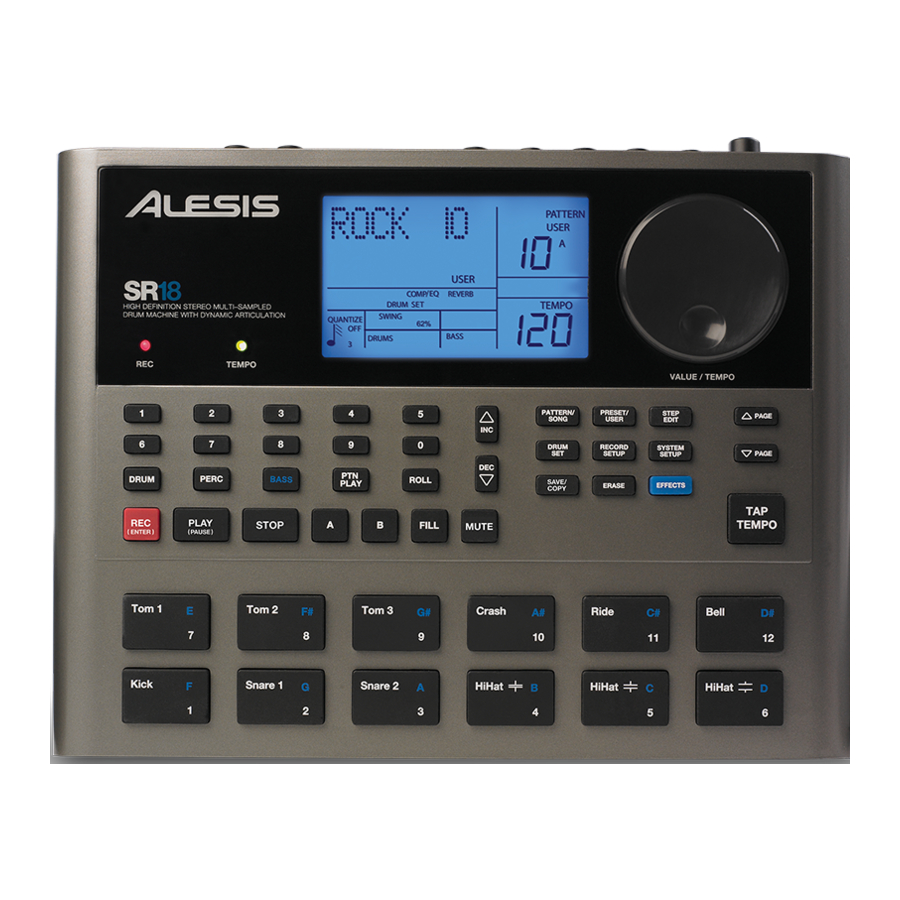
OVERVIEW OF THE CONTROLS
Now that we have introduced you to the infrastructure of the SR18, let's dive in and take a closer look at some of the controls.

GENERAL CONTROLS
- LCD – The display helps you keep track of system parameters and settings as you use the SR18.
- PADS – The 12 pads are used to trigger sounds on the SR18. The pads can address 3 different types of sounds: drums, percussion and bass. To select which sounds are controlled by the pads, press one of the three Pad Play buttons (DRUM, PERC, BASS). In addition, the pads can be used to trigger entire Patterns while in Pattern Play Mode.
- PAD PLAY BUTTONS – These 3 buttons select which sounds are triggered when you hit the pads. Press the corresponding button to control the following sounds with the pads:
BASS – Selects the Bass sounds associated with the current Drum Set. In addition, you can hold down this button and use the INC / DEC buttons or the VALUE dial to transpose the bass sounds up or down an octave.
DRUMS – Selects the Drum sounds associated with the current Drum Set.
PERC – Selects the Percussion sounds associated with the current Drum Set. - ROLL – While programming Patterns, hold down this button and press a pad to create a roll. The roll will last for as long as the pad is being held down. This lets you play a series of drum hits without having to repeatedly press the pads, and is typically used to create steady 16th note hi-hat parts, quarter note kick drum parts, snare rolls, etc. The timing of the roll is specified by the Quantization and Swing settings in the Record Setup menu.
- TAP TEMPO – You can use this button to tap in a tempo. The SR18 will average the time between successive taps and will derive a tempo. You can also change the tempo by holding down the TAP TEMPO button and using the VALUE dial, the INC / DEC buttons or entering a value with the numeric keypad.
- TEMPO LED – This LED will blink at a rate equal to the tempo displayed on the screen's bottom right corner.
- REC LED – This LED will light when the SR18 is recording. It will blink when you are required to confirm or cancel an action.
- A & B – Each Pattern consists of two Main sub-patterns – A & B. You can select each of the two sub-patterns by pressing its corresponding button. These sub-patterns allow you to program variation in your Patterns (i.e. sub-pattern A is the verse, sub-pattern B is the chorus).
- FILL – Each Pattern also includes two Fills associated with each of the two sub-patterns. The Fills are used to transition from one sub-pattern to another (i.e. transition from verse to chorus).
- ERASE – This button allows you to erase Patterns or Songs. Hold this button down and the screen will prompt you to verify that you want to erase the selected element. To erase the part, press the REC button while the ERASE button is being held down. In addition, ERASE allows you to erase specific events in real-time as you compose your patterns. Simply hold down the ERASE button as the Pattern plays and press the pad corresponding to the sound you wish to erase. Any events assigned to the pad will be erased from the moment the pad is pressed until either the pad or the ERASE button is released.
- SAVE / COPY – This button allows you to save, copy or append the selected Pattern or Song to a specific location, in addition to various other save / copy functions. The different functions can be accessed by pressing the PAGE UP button while holding down SAVE / COPY.
| PATTERN | SONG | |
| SAVE | Saves the selected Pattern, along with all subpatterns, to a specific location, overwriting any data which may already exist.
| Saves the selected Song to memory, overwriting any data which may exist.
|
| COPY | Copies only the selected sub-pattern to the destination's sub-pattern.
| |
| APPEND | Appends the current Pattern and all its subpatterns to a selected Pattern. Note that Patterns can only be appended to Patterns of the same time signature.
| Appends the current Song to another Song. Note that the combined Song length cannot exceed more than 254 steps.
|
- MUTE – This button allows you to mute a selected instrument layer. Hold down the button and press DRUM, PERC or BASS to mute the corresponding instrument layer. To un-mute the layer, press the corresponding button again while MUTE is being held down.
NAVIGATION BUTTONS
- INC / DEC – These buttons are used to increment and decrement through values and settings on the SR18.
- VALUE DIAL – This dial can also be used to increment and decrement values and settings.
- NUMBER BUTTONS – Alternatively, you may use the number buttons to input values.
- PAGE UP / DOWN – These two buttons are used to go between pages of options when browsing menus and settings.
MODE BUTTONS
- PATTERN / SONG – This button toggles between the two different modes on the SR18. In Pattern Mode, you can play, record and edit individual patterns. Patterns are short (i.e. 8-beat, 16-beat, etc) rhythm sequences which are assembled together to create Songs. A Song is a sequence of Patterns. In Song Mode, you can perform or program your Patterns to create a Song. The currently-selected mode will be indicated on the display.
- PRESET / USER – This button toggles between Preset and User Patterns. The selected mode will be indicated in the upper right corner of the display.
Preset Patterns provide a variety of rock, jazz, pop and other rhythms programmed by professional drummers and cannot be overwritten or edited (the only way a Preset Pattern can be edited is to copy it to a User Pattern).
User Patterns are Patterns you can program, edit and save as you wish. - STEP EDIT – Pressing this button enters Step Edit Mode for Pattern or Song editing, depending on which of the two modes is selected. This mode allows you to "step" through your Pattern or Song sequence to correct any mistakes. The display will indicate STEP EDIT while in Step Edit Mode, and the current step will be displayed on the top line. To move through the steps of the sequence, use the PAGE UP / DOWN buttons.
- PTN PLAY – This button enables Pattern Play Mode. In this mode, you can play pre-selected Patterns in a sequence, using the pads to trigger the Patterns in real-time. See "Playing Patterns With the Pads" section.
SETUP BUTTONS
- SYSTEM SETUP – Pressing this button calls up various system settings and preferences, such as MIDI options, note assignments, clocking, as well as display brightness and others. The display will indicate SYSTEM and SETUP when you are in System Setup. You can move between the different pages of settings with the PAGE UP / DOWN buttons and change the settings on the selected page with the VALUE dial or the INC / DEC buttons. To exit System Setup, press the System Setup button again.
- RECORD SETUP – Pressing this button calls up various recording settings, such as Quantization, Swing, Pattern Length, Time Signature, etc. The display will indicate RECORD and SETUP while you are in Record Setup Mode. You can move between the different pages of settings with the PAGE UP / DOWN buttons and change the settings on the selected page with the VALUE dial or the INC / DEC buttons. To exit Record Setup, press the Record Setup button again.
- DRUM SET – This button calls up the Drum Set Mode options, where you can select different drum/percussion sounds, bass sounds, change individual pad sounds and modify parameters such as Volume, Tuning, Panning, etc. The display will indicate DRUM SET while you are in Drum Set Mode. You can use the PAGE UP / DOWN buttons to move between the different pages of settings and you can use the VALUE dial or INC / DEC buttons to change the settings on the selected page. When you modify or customize a Drum Set, you will need to make sure that you save it (press the SAVE button, then press REC to confirm) in order to be able to access it later. To exit Drum Set Mode, press the Drum Set button again.
- EFFECTS – This button calls up the Effects menu, where you can select the effects which are stored and recalled with every Drum Set. These effects include Reverb, EQ / Compression and feature ready-to-use presets. To move between the different pages in the Effects Menu, use the PAGE UP / DOWN buttons. You can use the VALUE dial or INC / DEC buttons to enable and disable the selected effect or to change the displayed settings.
TRANSPORT CONTROL BUTTONS
- PLAY – If the SR18 is stopped, pressing PLAY will play the sequence from the current position. If the SR18 is playing, pressing PLAY will pause the sequence. To go to the beginning of the current pattern (or current step if in Song Mode) press PAGE DOWN. To go to the beginning of the next pattern (or the next step if in Song Mode) press PAGE UP.
- STOP – Press this button to stop the current sequence and go back to the start of the Pattern or Song. Quickly pressing STOP twice sends a MIDI Panic message to the internal voices of the SR18 and to external devices connected via MIDI. A Panic message effectively stops all sounds which may be playing. This is useful in situations where a certain sound may be stuck and will not turn off.
- REC – Press and hold this button before pressing PLAY to initiate recording. The REC button also functions as an ENTER command, when prompted for action by the display (for example, when erasing songs).
PLAYING PATTERNS
- If the display's upper right window shows SONG, press the PATTERN / SONG button once to select Pattern Mode.
![]()
- If the display's upper right window shows USER, press the PRESET / USER button once until USER disappears; this selects the Preset patterns.
![]()

- Press the INC / DEC buttons or use the VALUE dial to select a Pattern. You can also enter a Pattern number (00-99) with the number buttons. Use a "leading zero" (i.e. 01, 02, 03) for the first nine Patterns.
![]()
- Press PLAY to start the Pattern.
![]()
- Adjust the tempo by holding the TAP TEMPO button and pressing the INC / DEC buttons or turning the VALUE dial. You may also tap in a new tempo with the TAP TEMPO button. The SR18 will average the time between taps and derive the tempo accordingly.
![]()
- Press STOP to stop the Pattern.
![]()


PLAYING SEQUENCES OF PATTERNS
- Begin by selecting a Pattern and pressing PLAY.
![]()
- If an A Pattern is playing, press the B button (or press A if a B pattern is playing). The alternate Pattern will begin playing as soon as the currently-selected Pattern reaches its end.
![]()
- You can call up a different Pattern number while the SR18 is playing. Press the INC / DEC buttons or use the VALUE dial to select a Pattern. You may also enter a Pattern number with the number buttons.
![]()


PLAYING FILLS
- Begin by selecting a Pattern and pressing PLAY.
![]()
- Press and release the FILL button while the main A Pattern is playing. You'll hear a drum fill that leads right into the associated B Pattern.
![]()
- Press the FILL button again. A different fill will transition from the B Pattern back into the A Pattern.
![]()
- Fills do not always have to be transitional Patterns. Suppose an A Pattern is playing. If you press the FILL button, a fill will start – but this time, keep the FILL button held down until after the fill has finished playing. This cancels the transition to the alternate pattern (in this example, the A pattern would continue playing).
![]()


PLAYING PATTERNS WITH THE PADS
The SR18 allows you to play sequences of Pattern by triggering Patterns with the pads. This mode is called Pattern Play Mode.
- Press the PTN PLAY button – this will enter Pattern Play Mode. The display will indicate PATTERN PLAY.
![]()
- Try tapping a pad. The Pattern associated with the pad will begin playing. As the Pattern reaches its end, it will continue to loop from the beginning.
![]()
![]()
- Now try hitting another pad. The Pattern associated with the pad will begin playing as soon as the previously selected Pattern reaches its end.
![]()
![]()
- To change the Pattern assigned to a pad, press the PAGE UP button.
![]()
Press the pad which you would like to modify.
![]()
Now use the VALUE dial, INC / DEC, or number buttons to select the Pattern to be triggered with the pad. You may also specify A, B or Fill for the selected Pattern.
![]()
Finally, press PTN PLAY again to exit the edit screen and continue performing.
![]()
![]()


RECORDING YOUR OWN PATTERNS
- If the display's upper right window shows SONG, press the PATTERN / SONG button once to select Pattern Mode (PATTERN will be displayed).
![]()
- If the display's upper right window does not show USER, press the PRESET / USER button once to select User Patterns (USER will be displayed in the upper right corner).
![]()
![]()
- Press the INC / DEC buttons or use the VALUE dial or number buttons to select an empty Pattern. If the Pattern is empty, the display will read EMPTY PATT.
![]()
- Press the RECORD SETUP button to enter the Record Setup Menu. This menu allows you to customize recording settings, such as Quantization and Swing, which will affect the way that your patterns are recorded. Alternatively, you may choose to use the default settings in which case you should skip to Step 8.
![]()
- On Page 1 of the Record Setup (page is indicated in lower right corner of screen), you can select the Quantization interval with the INC / DEC buttons or the VALUE dial. Quantization shifts your playing to the specified beat while you play, so choose the desired value before playing out your rhythms. Choose higher quantization settings for more precise and rhythmically complex playing.
![]()
![]()
- To go to the Swing setting, press the PAGE UP button twice so PAGE 3 (SWING SELECT) is displayed on the screen. The Swing setting imparts the kind of feel found in shuffles and some jazz tunes, by shifting the timing of pairs of equal-valued notes. Select the Swing setting with the INC / DEC buttons or the VALUE dial. Possible values are OFF, 54%, 58%, 62%.
![]()
![]()
- Once you have selected your Swing and Quantization settings, exit the Record Setup menu by pressing the RECORD SETUP button again.
![]()
- Now you are ready to start recording your Pattern. Press and hold the REC button, then press PLAY to begin recording. The REC LED will illuminate to let you know that you are recording.
![]()
- You will hear a metronome sound and the top line of the screen will display the Pattern's current Beat Number. Play the pads to the beat. As the Pattern loops, you can add more layers until you are satisfied. Note that the Quantization and Swing settings will affect how your pattern is recorded.
![]()

- You can layer sounds from any of the three categories (Drums, Percussion, Bass) by pressing the corresponding button (DRUMS, PERC, BASS) and then playing out a sequence on the pads.
![]()
- If you make a mistake while recording, you can erase the sound while the Pattern is looping by holding down ERASE then holding down the pad corresponding to the sound for the duration which you would like to erase.
![]()
- Once you are satisfied with the Pattern you have recorded, press the STOP button to stop the recording.
![]()
- To hear the Pattern, press the PLAY button.
![]()
- To record more Patterns, select another Pattern with the INC / DEC buttons or VALUE dial, and repeat the procedure above.
![]()


MUTING INSTRUMENT LAYERS
The SR18 allows you to mute any of its three instrument layers (drums, percussion, bass) in real-time.
For example, you can mute the drum track by holding down MUTE and then pressing DRUM. To un-mute the drums, press the DRUM button again while MUTE is being held down.

LOADING AND CREATING DRUM SETS
The SR18 has 100 Preset and 100 Editable Drum Sets (groups of sounds). After pressing the DRUM SET button, you can use the INC / DEC buttons, the VALUE dial, or the number buttons to select a different set (each set can have its own sounds, tuning, volume, panning, etc). You may also edit individual pad sounds within each kit. In addition, you may also choose different Bass sounds for each kit.
- Press the DRUM SET button to bring up the Drum Set Menu. You will see the screen shown on the right.
![]()
- Use the INC / DEC buttons, the VALUE dial, or the number buttons to select a Drum Set (00-99).
![]()

- Try hitting the pads to audition the sounds in the kit. To change a specific pad's sound, press the PAGE UP button.
![]()
Press a pad to bring up its properties. The number of the pad will be indicated in the upper right corner of the display (8 in this example), the name of the sound assigned to the pad will be displayed on the top line (CowBell5 in this example) and the number of the sound will be displayed on the bottom line (252 in this example).
![]()

- To switch the pad to a different sound, use the INC / DEC buttons, the VALUE dial, or the number buttons to select another sound.
![]()
- To change the sounds of another pad, simply press the pad and repeat step 4.
![]()
- While in Drum Set Mode, press the PAGE UP button to view other pages of parameters, such as Volume, Tuning, Panning, etc. for the selected pad.
![]()
Again, Use the INC / DEC buttons, the VALUE dial, or the number buttons to change the setting for the selected pad.
![]()
- Note that Drums and Percussion sounds are grouped in each Drum Set. This means that changing the drum sounds to a different set on pаge 1 of the Drum Set menu will cause the Percussion sounds to change as well (although individual pad sounds may be replaced freely once a Drum Set has been loaded). You can, however, independently choose a different set of Bass sounds for the selected set. Press the BASS button while on pаge 1 of Drum Set Mode (if you have navigated to other pages, use the PAGE UP / DOWN buttons to return to pаge 1).
You will see the screen shown on the right.
![]()

- Now use the INC / DEC buttons, the VALUE dial or the number buttons to select a different set of bass sounds for the Drum Set you are currently editing. You can also view and edit a variety of settings for the bass sounds by using the PAGE UP / DOWN buttons to move between parameter pages.
![]()
- Once you are happy with your Drum Set, you will need to save it, Otherwise, your settings will be lost once you turn off the unit. To save your set, press and hold the SAVE button. While holding down SAVE, use the INC / DEC buttons, the VALUE dial, or the number buttons to select the destination where you would like to save your Drum Set.
You will notice that the REC LED will being to blink, indicating that user input is required. To save the Drum Set to the selected destination, press the REC button.
![]()
- To exit the Drum Set menus at any time, press the DRUM SET button once.
![]()


CREATING AND ERASING SONGS
The SR18 can remember the order in which you selected Patterns, which variations were selected, and when you selected fills. Recording this information in SR18's Song Mode creates a complete Song. Begin with the SR18 stopped.
- Select Song Mode by pressing the PATTERN / SONG button so the display says SONG.
![]()
- The display should say EMPTY SONG. If not, press the INC / DEC buttons (or use the VALUE dial) to select an empty song.
![]()
- Choose a Pattern for Song step 1 by switching back to Pattern Mode (press SONG / PATTERN so PATTERN is displayed). User Patterns should not be selected for now, so if the display says USER, press PRESET / USER button so USER is no longer illuminated. Now, use the INC / DEC buttons or the VALUE dial to select the first pattern.
![]()
- Press the PATTERN / SONG buttons to switch back to Song Mode (the display will show SONG).
![]()
Press the REC button to enable Record Mode (the REC LED will illuminate). Now press the PLAY button to begin recording the Song. You will see the screen shown on the right. The first three-digit number (000 in this example) shows the current Song Step. The second three-digit number (005 in this example) shows the Beat Number of the currently selected Pattern. The Pattern selected for this step is shown on the second line (PATT 05 in this example). A, B or FILL will be shown as well, depending on which iteration of the Pattern has been chosen.
![]()

- To select the Pattern which should be played next, use the INC / DEC buttons. Alternatively, you can use the VALUE dial or you can enter the Pattern number with the number keys. Remember to add a leading zero for patterns 0-9 (i.e. 00, 05, 09, etc). The screen will change to display NEXT and the cued Pattern number on the bottom line. The Pattern will begin playing as soon as the current Pattern plays through its end.
![]()

- Once you have finished creating the sequence of Patterns for your Song, press the STOP button to stop the recording.
![]()
- You will see the screen displayed on the right. The top line will indicate the last step of the Song (STEP 48 in this example) and the bottom line will say END.

To move between the steps, use the PAGE UP / DOWN buttons. Each step of the sequence will show the Pattern associated with it. If you have made any errors, you can correct them by selecting a different pattern for the step, using the INC / DEC buttons, the VALUE dial, or the number buttons.
![]()
- To hear the sequence from the beginning (step 00), press the PLAY button.
![]()
To audition the sequence from the start of the currently selected step (indicated on the top line), press the PAGE DOWN button.
![]()
To audition the sequence from the start of the next song step, press the PAGE UP button.
![]()
- If you are satisfied with the Song, great! Now you will need to save it so you can access it later. If you are in Step Edit Mode, press the STEP EDIT button once so the song name is displayed on the top line (it should display NO NAME unless the song has already been given a title).
![]()
To save the Song, press and hold the SAVE / COPY button. You will see SAVE TO SONG displayed on the screen and you will notice that the REC LED will begin to blink.
![]()

To confirm that you want to save the Song, press the REC button while holding down SAVE / COPY.
![]()
However, if you are not satisfied with the Song and wish to erase it, simply press and hold the ERASE button while in Song Mode. You will see SONG ERASE? displayed on the screen and the REC LED will begin to blink, indicating that user action is required. Press REC to erase the Song. If you change your mind, simply release the ERASE button and your Song will not be erased.
![]()


FOOTSWITCH CONTROL
Now that we have the basics down, let's investigate some live performance options using footswitch control. This is particularly useful if you're playing along with Patterns and Songs on the pads and can't use your hands to punch buttons.
There are two jacks for footswitches (Start/Stop and Count/A/B/Fill). Always plug these footswitches in before turning on power. Either normally open or normally closed types (the two most common footswitch types) can be used; the SR18 determines which kind is in use during power-up.
Here's how to use the footswitches:
SET TEMPO
The SR18 must be stopped. Before playing a Song or Pattern, tap the Count/A/B/Fill jack footswitch several times at the desired tempo. The SR18 will average the time between taps and derive a tempo, the display will update the tempo with each tap. Tapping the TAP TEMPO button accomplishes the same result as tapping the Count/A/B/Fill footswitch.
START A SONG OR PATTERN
When the SR18 is stopped, pressing the Start/Stop footswitch is equivalent to pressing PLAY. When the SR18 is running, pressing the Start/Stop footswitch is equivalent to pressing STOP.
INITIATE A FILL WHEN PLAYING PATTERNS
When playing patterns, the Count/A/B/Fill footswitch duplicates the FILL button function.
CANCEL A TRANSITION FROM A TO B, OR B TO A, PATTERNS
When you initiate a Fill, an A Pattern will transition to a B pattern (or vice-versa) when the Fill has finished playing. However, you can cancel this transition if desired. We've already explained how to do this with the front panel FILL button. However, you can also use the Count/A/B/Fill footswitch. If you press the footswitch before the fill has finished playing and hold it down until after the fill has played (i.e, past the downbeat of the next Pattern), the SR18 will return to the original Main A or B Pattern.
EXTEND A SONG STEP WHEN PLAYING BACK A SONG
During Song playback, pressing and holding the Count/A/B/Fill footswitch until past the end of a Song Step will cause that step to repeat. This is great if the soloist wants to take a few more bars.
FACTORY RESET
To restore the SR18's factory presets, hold the SAVE / COPY button and ERASE button simultaneously while turning on the SR18. (NOTE:This will erase all user data, including User Drum Sets, Patterns, Songs, etc.)
ADDITIONAL INFORMATION
For more information, please see the SR18 Reference Manual. Additional information may also be found on www.alesis.com.
For technical support: EMAIL: support@alesis.com/PHONE: 1-401-658-5760 (U.S.)
TECHNICAL SPECIFICATIONS
| Main and Aux outputs: | SNR 94dB A-weighted THD+N ~0.004% @ 1.38KHz |
| Samples: | 32MB 16 bit, max 44.1kHz sample rate uncompressed PCM |
| Pads: | 12 velocity-sensitive pads |
| MIDI: | In, Out/Thru |
| Power: | Input 12VDC 500mA, center pin is ground 6 AA batteries, 1.5V nominal each |
| Weight: | 2 lbs |
| Dimensions: | 9.6" x 7.5" x 1.8" |

Documents / Resources
References
Download manual
Here you can download full pdf version of manual, it may contain additional safety instructions, warranty information, FCC rules, etc.
Download Alesis SR18 Professional Drum Machine Quick Start Guide
Advertisement
Thank you! Your question has been received!


Need Assistance?
Do you have a question about the SR18 that isn't answered in the manual? Leave your question here.