Table of Contents
Advertisement
Quick Links
Advertisement
Table of Contents

Related Manuals for SMC Networks HPAV-ETH2 - annexe 1


Summary of Contents for SMC Networks HPAV-ETH2 - annexe 1
-
Page 1: User Guide
USER GUIDE EZ Connect Powerline™ 200Mbps HomePlug AV Adapter SMCHPAV-ETH2... - Page 2 Information furnished by SMC Networks, Inc. (SMC) is believed to be accurate and reliable. However, no responsibility is assumed by SMC for its use, nor for any infringements of patents or other rights of third parties which may result from its use. No license is granted by implication or otherwise under any patent or patent rights of SMC.
- Page 3 Trademarks: SMC is a registered trademark; and EZ Connect Powerline is a trademark of SMC Networks, Inc. Other product and company names are trademarks or registered trademarks of their respective holders.
-
Page 4: Product Registration
Warranty and Product Registration To register SMC products and to review the detailed warranty statement, please check www.smc.com for the warranty terms in your country/region. SMC Networks, Inc. 20 Mason Irvine, CA 92618... -
Page 5: Ec Declaration Of Conformity
EN 60950-1: 2006 EN 61000-3-2: 2006 EN 61000-3-3 : 1995+A1:2001+A2:2005 EN 55024: 1998+A1:2001+A2:2003 EN 55022: 1998+A1:2000+A2:2003 The official CE certificate of conformity can be downloaded by selecting the relevant model/ part number from www.smc.com -> support -> download"... -
Page 6: Table Of Contents
Contents Introduction ....................1 Minimum System Requirements ............1 Package List..................1 Safety Cautions ..................2 Hardware Overview ................... 3 Ethernet Interface................3 Buttons ..................... 3 LEDs....................3 Installing the Configuration Utility for Windows.......... 5 Working with the Configuration Utility for Windows ........8 Main Tab .................. -
Page 7: Introduction
1 Introduction Thank you for purchasing an SMC product. The SMCHPAV-ETH2 is a fast 200Mbps* Powerline HomePlug AV Ethernet Adapter which allows you to connect computers, or Ethernet-enabled devices in your home or office and to share an Internet connections through the in-house electrical wiring . -
Page 8: Safety Cautions
2 Safety Cautions This device is used for connection to the AC electrical wiring. In order to use the device correctly and safely please read the instructions before using the device. For installation instructions, please refer to the installation section of this user guide. -
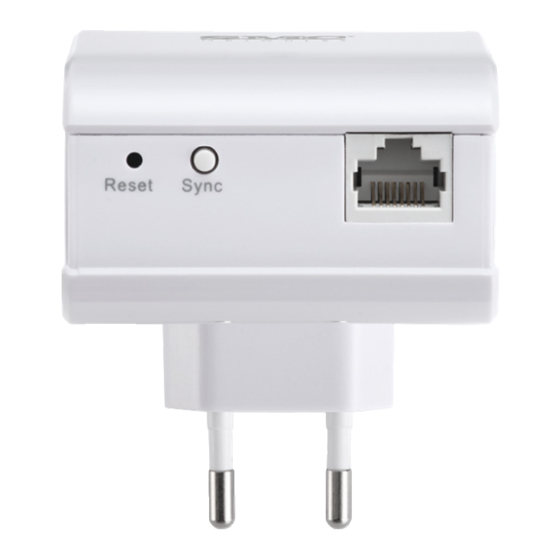
Page 9: Hardware Overview
3 Hardware Overview 3.1 Ethernet Interface Use one end of the network cable included in the box to connect to the Ethernet port (RJ-45) of the SMCHPAV-ETH2. Use the other end of the cable to connect to the Ethernet port (RJ-45) of a computer or any other Ethernet-enabled networking device. - Page 10 Power LED Green LED: Power on. OFF: Power off. Ethernet LED Green LED: The Ethernet connection is ready. Blinking: The Ethernet connection is transmitting or receiving data. OFF: No Ethernet network activity. Data LED Blinking: The Powerline connection is transmitting or receiving data. Red LED: Low link speed (Data rate is slower than 30Mbps) Yellow LED: Normal link speed (Data rate is between 30-50Mbps) Green LED: Excellent link speed (Data rate is faster than 50Mbps)
-
Page 11: Installing The Configuration Utility For Windows
4 Installing the Configuration Utility for Windows Before installing the configuration utility for Windows 7/Vista/XP/2000, please make sure that no other Powerline utility is installed on the computer. If another Powerline utility is already installed, please uninstall it and reboot the computer. Insert the CD-ROM with the utility into the CD-ROM drive of the computer. - Page 12 Figure 4-2 Select installation folder...
- Page 13 Figure 4-3 Confirm Installation Click Next to start the installation.
-
Page 14: Working With The Configuration Utility For Windows
Figure 4-4 Installation complete Click Close to complete the installation. 5 Working with the Configuration Utility for Windows 5.1 Main Tab The Main screen provides a list of all HomePlug AV devices logically connected to the computer where the utility is running on. The top panel shows all devices that are found locally connected to the computer where the utility is running on. -
Page 15: Device Name
scans the Powerline network periodically for other HomePlug AV. If no local HomePlug device has been found, the status bar displays NO HOMEPLUG ADAPTERS DETECTED. Figure 5-1: Main tab information The lower panel provides detailed information about all HomePlug AV devices found in the Powerline network. -
Page 16: Mac Address
edit it in the list. Password By default, this column is blank. You can select a device and click Enter Password to change it (see below). Quality This shows the signal quality in form of a progress bar. Rate (Mbps) This column indicates the current data rates in Mbps. - Page 17 Figure 5-2: Set device password Enter the password (typically a number and letter code in groups of four, separated by dashes, to be found on the backside of the device or the packaging) and click OK to verify the password. The password field accepts the device password in any format, with or without dashes.
-
Page 18: Privacy Tab
box appears. If a device was not found, a message appears, providing suggestions to solve the problem. Figure 5-3: Add remote device Note: The device must be in the Powerline network (plugged in), so that you can confirm the password and add the device to the network. If the device is not located, a warning message appears. - Page 19 select the devices that should be able to communicate in the same network. See Figure 5-4. Out-of-the-box, all HomePlug devices are pre-configured to be used in a public network with “HomePlugAV” as network name. In the Privacy screen, you can create a private network by changing the private network name of the relevant devices.
-
Page 20: Diagnostics Tab
Set Local Device Only This button is used to change the private network name of the local device only. If a new private network name (other than HomePlugAV) is entered, all the devices that appeared in the lower panel of the Main screen will disappear, effectively isolating the local device from the other devices in the logical network. - Page 21 to the host Identify versions of all Driver DLLs and Libraries used (NDIS) and optionally HomePlug chipset manufacturer name MAC Firmware Version MAC addresses of all devices connected locally to the host Version of the Configuration Utility Vendor name Figure 5-5: Diagnostics screen The Lower panel displays the history of all devices that appeared on the computer over a certain period of time.
-
Page 22: About Tab
5.4 About Tab The About screen shows the software version and provides an HTML link to a website, such as www.smc.com. Clicking the web address, will open the website in your web browser. -
Page 23: Sync Button Usage
Figure 5-6: About screen 6 SYNC button Usage This section describes how to add or remove devices from a Powerline network by using the SYNC button on the devices. This process allows to create a Powerline network without using the configuration utility for Windows and works independent from the operating system. -
Page 24: Joining A Network
The button on device B must be pressed within 1 minute. Wait for the SYNC process to complete. The Power LED on both devices will blink evenly at 1-second intervals until the operation succeeded or failed. If the connection succeeded, it illuminates steadily. -
Page 25: Leaving A Network
the SYNC button on the ‘adder’ is pressed again or the ‘joiner’ is reset by pressing the RESET button down for more than 10 seconds. Figure 6-2: Joining a network 6.3 Leaving a Network In this scenario a Powerline network exists and one device, the ‘leaver’, should be removed from the network. - Page 26 Figure 6-3: leaving a network...
-
Page 27: Appendix A Specifications
Appendix A Specifications Protocol Compliant with HomePlug AV 1.0 Co-existing with existing HomePlug 1.0 System Support Windows 98SE, Windows 2000, Windows ME, Windows XP 32/64 bit and Windows Vista 32/ 64bit Powerline Data Rate 200 Mbps Modulation Band 2MHz~30MHz Modulation Schemes Support QAM 1024/256/64/16/8, QPSK, BPSK and ROBO Encryption... -
Page 28: Appendix B Acronyms And Abbreviations
Appendix B Acronyms and Abbreviations AVLN AV In-home Logical Network, the AVLAN is the set STAs that possess same network Membership key, every AVLN is managed by a single CCo Central Coordinator, the CCo is a superset of a STA which includes terminal equipment identifiers and global link identifiers CSMA/CA Carrier... -
Page 29: Appendix C About Qos
Appendix C About QoS The SMCHPAV-ETH2 allows 4 levels of Channel Access Priority (CAP, 0 – 3). The 8 levels of VLAN Ethernet tags must be mapped to the 4 levels of CAP priority, where CAP 3 is the highest priority and CAP 0 is the lowest. CAP 3 priority is used for voice and network management frames, CAP 2 is used for streaming video and music while CAP 1 and CAP 0 are used for data. - Page 30 SMCHPAV-ETH2...