Table of Contents
Advertisement
Quick Links
Advertisement
Table of Contents

Related Manuals for Johannus Studio 260


Summary of Contents for Johannus Studio 260
- Page 2 Global Organ Group B.V. User Manual Studio 260 / 360 / P-360...
-
Page 3: Table Of Contents
Accessories ....................25 Pre-programmed memory locations ............26 4.10 Capture memory: ..................27 4.11 Transposer ....................27 4.12 Quick Access ..................... 28 4.12.1 Reverb Settings................... 28 4.12.2 Tuning ......................28 4.12.3 Orchestrals ....................28 User Manual Studio 260 / 360 / P-360... - Page 4 Maintenance ..................... 44 6.1.1 Maintenance of the cabinet ............... 44 6.1.2 Maintenance of the manuals ..............44 Problems ....................44 Warranty ....................44 MIDI IMPLEMENTATIONS ..............45 MIDI Implementation Chart..............45 MIDI Specifications ................... 46 User Manual Studio 260 / 360 / P-360...
-
Page 5: Safety
User Manual Studio 260 / 360 / P-360... -
Page 6: Symbols On The Organ
/ touching the instrument. Symbols in this manual Caution, Warning or important information Do not, or forbidden to do Note User Manual Studio 260 / 360 / P-360... -
Page 7: Transport And Storage
Make sure to have a firm grip, to protect yourself from injury and the instrument from damage. If you need to move the instrument, consult with your retailer, or Global Organ Group B.V. User Manual Studio 260 / 360 / P-360... -
Page 8: Cautions And Important Notes
The instrument is equipped with a AC mains power switch that switches off the instrument completely, so that no (standby) power is consumed in the off position. User Manual Studio 260 / 360 / P-360... - Page 9 Therefore, the power switch shall be readily accessible. Do not use internal connections. Do connect, do not use internal connections for optional external speakers by yourself. Refer all servicing to your retailer, or Global Organ Group B.V. User Manual Studio 260 / 360 / P-360...
-
Page 10: Placement
(such as when circuitry related to memory itself is out of order), we regret that it may not be possible to restore the data, and Global Organ Group B.V. assumes no liability concerning such loss of data. Refer all servicing to your retailer, or Global Organ Group B.V. User Manual Studio 260 / 360 / P-360... -
Page 11: Additional Precautions
Note, however, that your Organ may incorporate a newer, enhanced version of the system (e.g., includes newer sounds), so what you actually see in the display may not always match what appears in the manual. User Manual Studio 260 / 360 / P-360... -
Page 12: Installation
Look for the serial plate (A). When a power cord plug is fitted with an earth pin: Make sure to connect to a mains socket outlet with a protective earthing connection. User Manual Studio 260 / 360 / P-360... -
Page 13: Studio 260 / 360
Look for the serial plate (B). When a power cord plug is fitted with an earth pin: Make sure to connect to a mains socket outlet with a protective earthing connection. User Manual Studio 260 / 360 / P-360... -
Page 14: Installation Music Desk
Installation pedal board Shift pedal board against black pedal front cover (A). Pedal bolts (B) will stick out 5 mm. For security reasons mount pedal board to organ with wing nuts (C). User Manual Studio 260 / 360 / P-360... -
Page 15: Switch On
The organ is prepared when the lights for 0 Rom. Front piston and standard functions light up and the Tr: 0/440 display shows the settings. User Manual Studio 260 / 360 / P-360... -
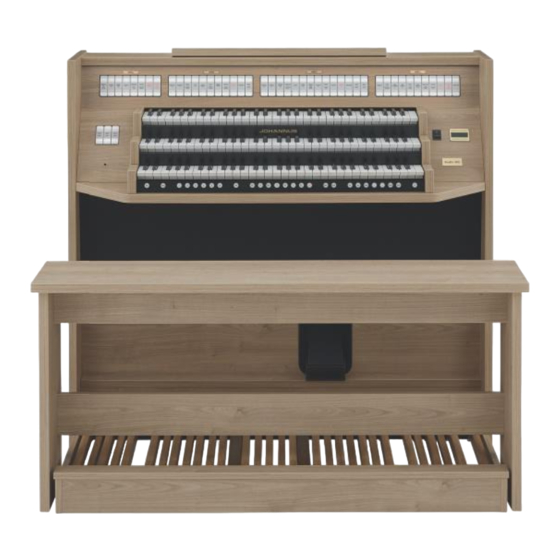
Page 16: Description Of The Organ
3 DESCRIPTION OF THE ORGAN Overview of the main components 3.1.1 Studio 260 Shown model: Studio 260 A Music desk B Front channels and subwoofer C Organ bench D Swell or Crescendo pedal E Pedal board User Manual Studio 260 / 360 / P-360... -
Page 17: Studio 360
3.1.2 Studio 360 Shown model: Studio 360 A Music desk B Front channels and subwoofer C Organ bench D Swell or Crescendo pedal E Pedal board User Manual Studio 260 / 360 / P-360... -
Page 18: Studio P-360
3.1.3 Studio P-360 Shown model: Studio P-360 A Front channels B Music desk C Subwoofer D Organ bench E Swell or Crescendo pedal Pedal board User Manual Studio 260 / 360 / P-360... -
Page 19: Overview Of Controls
R On/Off pistons, § 2.2 (PP, P, MF, F, FF, T, PL), § 4.9. S Display, § 5 RO: Reeds Off, § 4.8. T Manual Great K PANFL.: Panflute, TRUMP.: Trumpet, § 4.8. U Manual Swell User Manual Studio 260 / 360 / P-360... -
Page 20: Studio 360
K Pre-programmed memory locations V Manual Choir (PP, P, MF, F, FF, T, PL), § 4.9. W Manual Great L RO: Reeds Off, § 4.8. X Manual Swell M PANFL.: Panflute, TRUMP.: Trumpet, § 4.8. User Manual Studio 260 / 360 / P-360... -
Page 21: Studio P-360
T Display, § 5 (PP, P, MF, F, FF, T, PL), § 4.9. U Manual Choir K RO: Reeds Off, § 4.8. V Manual Great L PANFL.: Panflute, TRUMP.: Trumpet, § 4.8. W Manual Swell User Manual Studio 260 / 360 / P-360... -
Page 22: Connect And Switch On The Peripherals
(refer to the headphone specifications for details). Volume, Bass and Brilliance can be adjusted separately, see § 5.6 Headphones/Aux. When headphones are plugged in, the speakers of the organ will automatically turn off. User Manual Studio 260 / 360 / P-360... -
Page 23: Operation
With the expression pedal the volume of the Swell or the entire organ can be changed. Using the Johannus Menu the expression pedal can also be set as a general swell for the entire organ, see § 5.9.1 Expression Pedal. -
Page 24: Reverb
The volume control (REV.) is used not only to adjust the volume of the reverb, but also to adjust the balance between the organ sound and the ambience, see § 4.1. The Adaptive Ambiance System can be configured using the Johannus Menu. See § 5.1 Ambiance. -
Page 25: Stops
. When Chorus is active the pitch § 5.9.6) will fluctuate a little, so the sound becomes more lively the more keys and stops are activated. Chorus can be activated via menu selection, for details see § 5.9.4 User Manual Studio 260 / 360 / P-360... -
Page 26: Pre-Programmed Memory Locations
Calling up a pre-programmed memory location: Press a pre-programmed memory location (PP-T or PL). The active stops light up. Programming a pre-programmed memory location: The current setting of the pre-programmed memory location will be lost. User Manual Studio 260 / 360 / P-360... -
Page 27: Capture Memory
The Transposer function shifts the pitch by half-tone increments (from -8 to +8). The transposer setting can be read on the display Rom. Front (Tr: …). Tr: 0/440 Press the TRANS piston. Use the - and + pistons to set the pitch. User Manual Studio 260 / 360 / P-360... -
Page 28: Quick Access
Press and hold the ENTER piston and simultaneously press the orchestral piston, either Panflute or Trumpet, to assign the selected instrument to a manual. See § 4.8 Accessories and § 5.3 Orchestrals, sub 4 for next steps. User Manual Studio 260 / 360 / P-360... -
Page 29: Johannus Menu
5 JOHANNUS MENU In the Johannus menu you can set various functions of the organ. Press the MENU piston to activate the menu on the display. Navigating the menu is done with the - and + pistons. To confirm a selection, press the ENTER piston. -
Page 30: Reverb
Press the MENU piston to exit the menu. Rom. Front Tr: 0/440 Holding down the SET (or Enter) piston and pressing the Reverb piston will also select the desired reverb – see points 4 to 7. User Manual Studio 260 / 360 / P-360... -
Page 31: Orchestrals
Neidhardt III Werckmeister III 1/6 Meantone (1/6 comma meantone) 1/5 Meantone (1/5 comma meantone) 1/4 Meantone (1/4 comma meantone) Pythagorean Press the MENU piston. Johannus Menu: Ambiance User Manual Studio 260 / 360 / P-360... -
Page 32: Tuning
The actual tuning setting is visible on the display, in this Tr: 0/442 example 442 The tuning can also be assigned by holding down the SET (or Enter) piston and pressing the Transpose piston – see points 3 to 6. User Manual Studio 260 / 360 / P-360... -
Page 33: Headphones/Aux
6 dB, with 0 dB for an original flat sound. Press the MENU piston. Johannus Menu: Ambiance Use the - and + pistons to select the Johannus Menu: Bass/Brilliance menu. Bass/Brilliance Press the ENTER piston. Bass/Brilliance The Bass function appear. Bass User Manual Studio 260 / 360 / P-360... -
Page 34: Demo Songs
While playing a demo song, the operating functions of the organ are disabled except the following function: 0 piston: stop playing the demo song(’s). Press the MENU piston twice after having played the Rom. Front demo song(s) to exit the menu. Tr: 0/440 User Manual Studio 260 / 360 / P-360... -
Page 35: System Settings
ENTER to confirm. Use the - and + pistons to select the Keyboards System Settings: submenu. Keyboards Press the ENTER piston. The actual setting of the first >Great manual appears. Automatic User Manual Studio 260 / 360 / P-360... -
Page 36: Style Default
System Settings: style setting, or Style Default Press the MENU piston twice to exit the menu. The Rom. Front actual style setting is visible on the default display, for Tr: 0/440 example Rom. User Manual Studio 260 / 360 / P-360... -
Page 37: Chorus Default
Keyb. Transfer for example Off. Press ENTER to confirm to return to the System settings System Settings: menu. Keyb. Transfer Press the MENU piston twice to exit the menu. Rom. Front Tr: 0/440 User Manual Studio 260 / 360 / P-360... -
Page 38: Wind Distribution
Use the - and + pistons to select the Key Volumes System Settings: submenu. Key Volumes Press the ENTER piston. The first sub function of the Key Volumes Key Volumes menu appear. Adjust User Manual Studio 260 / 360 / P-360... - Page 39 Switch off all stops Select an organ style Press the MENU piston. Use the - and + pistons to Johannus Menu: select the function System Settings on the Ambiance display and press ENTER to confirm. User Manual Studio 260 / 360 / P-360...
- Page 40 Reset ALL stops Press the ENTER piston. A question to confirm appear. Reset ALL stops? No/Yes Use the - and + pistons to select No or Yes. Reset ALL stop? No/Yes User Manual Studio 260 / 360 / P-360...
-
Page 41: Aux-In Reverb
1 – 15. Press ENTER to confirm to return to the System Settings System Settings: menu. Display Contrast Press the MENU piston to exit the menu. Rom. Front Tr: 0/440 User Manual Studio 260 / 360 / P-360... -
Page 42: Datadump
Tr: 0/440 b. Uploading data to the organ Receiving a data file has no relation to the Johannus menu and can be done any time the organ is switched on, except when playing a demo song. Make sure to upload only data files which are recorded from the instrument concerned. -
Page 43: Reset Menu
Press the ENTER piston. The data of the software and 9881-XXX 7.1.X the organ appear on the display (after each other). OC X XX XX XX Press the MENU piston twice to exit the menu. Rom. Front Tr: 0/440 User Manual Studio 260 / 360 / P-360... -
Page 44: Maintenance, Troubleshooting And Warranty
The conditions are specified in the warranty certificate. The warranty is void if changes or repairs are made to the organ by persons or organizations that are not authorized by Global Organ Group B.V. User Manual Studio 260 / 360 / P-360... -
Page 45: Midi Implementations
: Active Sense : Reset Notes Depends on number of divisions Mode 1: OMNI ON, POLY Mode 2: OMNI ON, MONO Y=YES Mode 3: OMNI OFF, POLY Mode 4: OMNI OFF, MONO N=NO User Manual Studio 260 / 360 / P-360... -
Page 46: Midi Specifications
Only the value of the 8th byte varies. This is the ‘sys ex message’ that Johannus generally uses: F0 00 4A 4F 48 41 53 XX F7 (hexadecimal). The ‘sys ex messages’ described below only indicates the value of the 8th byte (XX) and the output from which it is transmitted. - Page 47 For EU: This product complies with the requirements of EMCD 2014/30/EU, LVD 2014/35/EU and Electromagnetic Compatibility Regulations 2016, Electrical Equipment (Safety) Regulations 2016. User Manual Studio 260 / 360 / P-360...
- Page 48 THIS APPARATUS MUST BE EARTHED WHEN MAINS POWER CORD PLUG HAS AN EARTH-PIN (ONLY) THE WIRES IN THIS MAINS LEAD ARE COLOURED IN ACCORDANCE WITH THE FOLLOWING CODE. GREEN-AND-YELLOW: EARTH, BLUE: NEUTRAL, BROWN: LIVE User Manual Studio 260 / 360 / P-360...
- Page 49 User Manual Studio 260 / 360 / P-360...