Table of Contents
Advertisement
Advertisement
Table of Contents

Related Manuals for Johannus Vivaldi 15


Summary of Contents for Johannus Vivaldi 15
- Page 1 User Manual User Manual...
- Page 2 All rights reserved. Nothing in this publication may be reproduced, stored in a data file or made public in any form or in any way either electronically, mechanically by way of photocopying, recording or in any other way without the prior written permission of Johannus Orgelbouw b.v.
-
Page 3: Table Of Contents
Open and close the rolltop cover ..................7 DESCRIPTION OF THE ORGAN ..................8 Overview of the main components ................. 8 Overview of controls ....................... 9 3.2.1 Vivaldi 15........................9 3.2.2 Vivaldi 25........................10 Vivaldi 35........................11 3.2.3 Connect and switch on the peripherals ................ 12 External connections .................... - Page 4 MAINTENANCE, TROUBLESHOOTING AND WARRANTY ..........29 Maintenance ......................... 29 5.1.1 Cabinet maintenance ....................29 5.1.2 Maintenance of the manuals ..................29 Problems ........................29 5.2.1 Reposition the pedal ....................30 Warranty ........................30 MIDI IMPLEMENTATIONS ....................31 MIDI Implementation Chart ..................31 MIDI specifications .......................
-
Page 5: Safety
Keep this user manual with the organ. The organ may only be opened by a technician authorised by Johannus Orgelbouw b.v. The organ contains static-sensitive components. The warranty is void if the organ is opened by a non-authorised person. -
Page 6: Installation
INSTALLATION Installation and connection Vivaldi 15 Vivaldi 25 1. Position the organ on a stable, horizontal surface. 2. Lean the organ slightly backward. 3. Slide the pedalboard (A) against the organ (B). 4. Set the organ upright. 5. Put the music desk (E) in the groove on the cover of the organ. -
Page 7: Switch On
Switch on Switch on the organ with the on/off piston at the right, next to the manuals. Wait several seconds. Starting the control functions and the settings will take some time. The lamps of the on/off and 0 pistons light up and the settings appear on the display. -
Page 8: Description Of The Organ
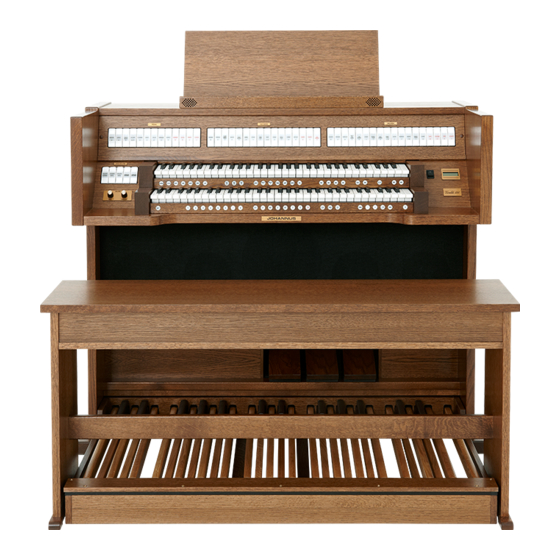
Overview of the main components Vivaldi 15 Vivaldi 25 A Rolltop cover B Rolltop cover lock C Music desk Vivaldi 15 C Music desk with tweeters Vivaldi 25 C Music desk with tweeters Vivaldi 35 D Loudspeakers E General Crescendo pedal... -
Page 9: Overview Of Controls
Overview of controls 3.2.1 Vivaldi 15 Vivaldi 15 Pedalboard stops, couplers M General Crescendo Great stops, tremulant, coupler and MIDI - and + pistons Main group intonations Transposer Subgroup intonations Chorus, Manual Bass Cantus Firmus, Fix Accessories Super Solos Q Reeds Off accessory... -
Page 10: Vivaldi 25
3.2.2 Vivaldi 25 Vivaldi 25 Pedal stops M General Crescendo Great stops - and + pistons Main group intonations O Transposer Subgroup intonations Chorus, Manual Bass Cantus Firmus, Fix Accessories Super Solos Q Reeds Off accessory Swell stops 0/reset piston G Manual Swell Pre-programmed memory locations... -
Page 11: Vivaldi 35
3.2.3 Vivaldi 35 Vivaldi 35 Great stops M Manual choir Great stops, tremulant and couplers On/off Midi Pedal/Great O Swell stops, tremulant Display Choir stops, tremulant and coupler Midi Swell/Choir Q 0/reset piston Main group intonations MENU G Subgroup intonations General Crescendo Rolltop cover lock - and + pistons... -
Page 12: Connect And Switch On The Peripherals
MIDI IN: This is an input for receiving MIDI codes from other devices. MIDI MOD.: This is a programmable MIDI output for connecting a module or expander, for example. MIDI SEQ.: This is a non-programmable MIDI output for connecting a sequencer or PC (with the optional Johannus Intonat program), for example. - Page 13 MIDI MOD. connection of the instrument. AUX OUT: This is an output for connecting an external (stereo) amplifier. EXT. REV.: This is an output for connecting Johannus external acoustics. This is a system that imitates the spatial effect of a concert hall or cathedral.
-
Page 14: Operation
ACOUSTICS volume control. Expression pedals Expression pedals adjust the volume of the Great/Pedal, the Swell and the Choir (Vivaldi 15 / 25) (Vivaldi 35) Acoustics (Adaptive Surround Reverb ASR 12) The ASR 12 reverb system produces a digital acoustic effect. This effect provides a spatial reproduction of the organ sound that can be adjusted continuously. -
Page 15: Intonations
If not subgroup is selected, Classic is selected automatically. Factory intonation Saving the intonation settings You require the Johannus intonation program to save the intonation settings. Connect a PC to the organ. Use the MIDI SEQ. output, see § 3.4. -
Page 16: Super Solos / Orchestrals
Pedal (Vivaldi 35) Fully couples all keys of the Choir to the Pedal. Great – Pedal: stops on the Pedal (Vivaldi 15 / 25 / 35) Fully couples all keys of the Great to the Pedal. Swell – Pedal: stops on the Pedal (Vivaldi 15 / 25 / 35) Fully couples all keys of the Swell to the Pedal. - Page 17 Manual Bass (MB): Couples the pedal monophone to the Great. Only the lowest note that is played on the Great is coupled from the pedal to the Great. Activate the Manual Bass with the MB piston. If only the lowest tone of a chord is released, the tone activated by the MB function is dropped until a new lowest tone is played.
-
Page 18: Accessories
Accessories Chorus (CH): Is a function for lightly detuning the organ stops to give it a broader and livelier sound. Use the CH piston to activate the Chorus. Fix Accessories (FA): This is a function for fixing accessories. As long as this piston is active, the couplers and tremulants can only be switched on and off manually. -
Page 19: Capture Memory
4.12 Capture memory Through use of the capture memory, a registration can be made active with just one piston. The capture memory consists of eight levels. Each level has eight memory locations. These levels can be seen on the display (Mem:..). The 128 capture memory locations are not pre-programmed and can be programmed by the musician. -
Page 20: General Crescendo
Changing the transposer 1. Press the TRANS piston. 2. Use the - and + pistons to set the pitch. The pitch shift is not stored in memory. When the organ is switched on again, the most recently programmed pitch will be active. -
Page 21: Easy Menu
You can choose from following different voices: Strings Vivaldi 25 / 35 Flute Vivaldi 25 / 35 Panflute Vivaldi 15 / 25 / 35 Tuba Vivaldi 25 / 35 Trumpet Vivaldi 15 / 25 / 35 Oboe Vivaldi 25 / 35... -
Page 22: Midi Config
4.15.2 MIDI Config MIDI is a protocol for communication between the organ and other devices, such as: Sequencer Other musical instruments The programmable MIDI stops allow you to control any module voice (1- 128) through any MIDI channel (1-16). 1. Press the MENU piston. MIDI Program appears on the display. 2. -
Page 23: Temperaments
4.15.4 Temperaments The Temperaments function sets the temperament. This setting cannot be saved. When the organ is switched on again, it is set to Equal automatically. 1. Press the MENU piston. 2. Use the - and + pistons to select the Temperaments function on the display. -
Page 24: Reset Procedures
4.15.6 Reset Procedures The Reset Procedures function is used to delete the capture memory or to reset a number of settings to the factory settings. 1. Press the MENU piston. 2. Use the - and + pistons to select the Reset Procedures function on the display. -
Page 25: Demo Songs
4.15.8 Demo Songs The Demo Songs function plays thirteen different demo songs. 1. Press the MENU piston. 2. Use the - and + pistons to select the Demo Songs function. 3. Press the SET piston. The title and composer of the first demo song appear on the display. -
Page 26: Reverb
4.15.10 Reverb 1. Use the ROM, SYM, BAR, HIS (styles), SOLO and TRIO (intonation) pistons to activate the style and intonation the reverberation of which must be changed. 2. Press the MENU piston. 3. Use the - and + pistons to select the Reverb function on the display. 4. - Page 27 9. Press one key on the corresponding division and hold the key. The display will now show following Key: the key indicator and following Vol: the volume. 10. Use the - and + pistons to set the desired volume. 11. Press the SET piston to save the change. 12.
-
Page 28: Tracker Action
4. Use the - and + pistons to select the manual the setting of which must be changed. Choir: Choir Vivaldi 35 Great: Great Vivaldi 15 / 25 / 35 Swell: Swell Vivaldi 15 / 25 / 35 Pedal: Pedal Vivaldi 15 / 25 / 35 5. -
Page 29: Maintenance, Troubleshooting And Warranty
MAINTENANCE, TROUBLESHOOTING AND WARRANTY Maintenance Overview Component Maintenance Frequency Cabinet Cleaning. See § 5.1.1. As required Manuals Cleaning and removing scratches. As required See § 5.1.2. 5.1.1 Cabinet maintenance The cabinet is made of solid wood and wood veneer. Do not use furniture polish or teak oil to clean the organ cabinet. -
Page 30: Reposition The Pedal
6. Contact your dealer if the pedalboard does not work properly. Warranty The conditions are specified in the warranty certificate. The warranty is void if changes or repairs are made to the organ by persons or organisations that are not authorised by Johannus Orgelbouw b.v. -
Page 31: Midi Implementations
MIDI IMPLEMENTATIONS MIDI Implementation Chart JOHANNUS Organs Date: September 2008 Version 1.00 MIDI Implementation card Functions Transmitted Recognized Remarks Default See MIDI Specs See MIDI Specs Basic See MIDI Specs Changes See MIDI Specs Channel Default Mode 3 Mode 3... -
Page 32: Midi Specifications
MIDI specifications This paragraph describes the specifications on the MIDI Implementation Chart in more detail. Default basic channels (transmitted/ recognized) 2-manual instrument (with standard keyboard layout): 1: Great 2: Swell 3: Pedal 12: Stops 3-manual instrument (with standard keyboard layout): 1: Choir 2: Great 3: Swell... - Page 33 7 bytes and the last byte are always the same. Only the value of the 8th byte varies. This is the ‘sys ex message’ that Johannus generally uses: F0 00 4A 4F 48 41 53 XX F7 (hexadecimal). The ‘sys ex messages’...