Table of Contents
Advertisement
Advertisement
Table of Contents

Related Manuals for Johannus Opus 250


Summary of Contents for Johannus Opus 250
- Page 1 250 / 350...
- Page 2 All rights reserved. Nothing in this publication may be reproduced, stored in a data file or made public in any form or in any way either electronically, mechanically by way of photocopying, recording or in any other way without the prior written permission of Johannus Orgelbouw b.v. User Manual Opus 250/350...
-
Page 3: Table Of Contents
Installation music desk ................. 7 Switch on ....................7 DESCRIPTION OF THE ORGAN ............8 Overview of the main components ............8 3.1.1 Opus 250 ...................... 8 3.1.2 Opus 350 ...................... 9 Overview of controls................. 10 3.2.1 Opus 250 ....................10 3.2.2... - Page 4 6.1.1 Maintenance of the cabinet ............... 33 6.1.2 Maintenance of the manuals ..............33 Problems ....................33 Warranty ....................33 MIDI IMPLEMENTATIONS ..............34 MIDI Implementation Chart..............34 MIDI Specifications ................... 35 User Manual Opus 250/350...
-
Page 5: Safety
Follow the instructions and precautionary measures in this user manual. Keep this user manual with the organ. The organ may only be opened by a technician authorised by Johannus Orgelbouw b.v. The organ contains static-sensitive components. The warranty is void if the organ is opened by a non-authorised person. -
Page 6: Installation
2 INSTALLATION Installation and connection 2.1.1 Installation organ Shown model: Opus 250 Position the organ on a stable, horizontal surface. Install the music desk (A) on top of the organ, see § 2.1.2. Lean the organ slightly backward. Slide the pedal board (D) against the organ. -
Page 7: Installation Music Desk
Starting the control functions and the settings will take some time. The lamps of the 0 piston and the as standard Opus 250 Mem: 1 set functions light up. The settings appear on Tr: 0/440 Cr:-- the display. User Manual Opus 250/350... -
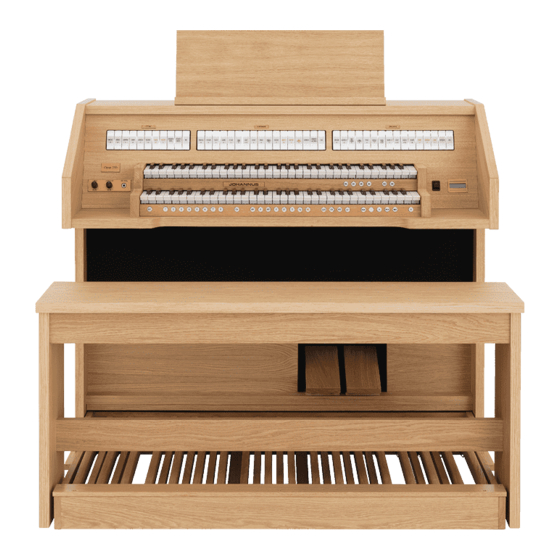
Page 8: Description Of The Organ
3 DESCRIPTION OF THE ORGAN Overview of the main components 3.1.1 Opus 250 A Music desk B Loudspeakers C Surround loudspeakers D Organ bench E Swell pedal Crescendo pedal G Pedal board User Manual Opus 250/350... -
Page 9: Opus 350
3.1.2 Opus 350 A Music desk B Loudspeakers C Surround loudspeakers D Organ bench E Swell pedal Crescendo pedal G Pedal board User Manual Opus 250/350... -
Page 10: Overview Of Controls
Pre-programmed memory locations, § 4.8 W On/Off pistons, § 2.2 RO: Reeds Off, § 4.7 Display, § 5 S/S: All Swells to Swell, § 4.7 Intonation styles, § 4.4 M CR: Crescendo, § 4.11 Intonation variations, § 4.4 User Manual Opus 250/350... -
Page 11: Opus 350
RO: Reeds Off, § 4.7 AA Intonation styles, § 4.4 M S/S: All Swells to Swell, § 4.7 AB Intonation variations, § 4.4 CR: Crescendo, § 4.11 AC KT: Keyboard Transfer, § 4.7 MB: Manual Bass, § 4.6 User Manual Opus 250/350... -
Page 12: Connect And Switch On The Peripherals
MIDI SEQ: A non-programmable MIDI output for connecting a Johannus Sequencer+ or PC (with the optional Johannus Intonat program), for example. AUX IN: A stereo audio input for playing the sound of an external device through the amplifiers of the organ. For example, an expander connected to the organ through the MIDI MOD can be played through the instrument's loudspeakers. -
Page 13: Operation
The organ has two expression pedals. One is configured as a swell pedal for the Swell, and one is configured as a crescendo pedal. With use of the Johannus Menu, the function of the expression pedals can be changed, see § 5.5 Expression Pedals. -
Page 14: Intonations
Manual Bass function is dropped until a new lowest key is played. Activate the Manual Bass with the MB piston. It is advisable not to use the Manual Bass while playing the pedal board to avoid double bass tones. User Manual Opus 250/350... -
Page 15: Accessories
Pre-programmed memory locations Pre-programmed memory locations are available by operating pistons PP to T and PL. These seven memory locations have factory settings (presets) appropriate for the quiet pianissimo to the loud tutti and the classic plenum. User Manual Opus 250/350... -
Page 16: Capture Memory
Press the desired memory location (1-8). The active stops light up. 4.10 Transposer The Transposer function shifts the pitch by half-tone increments (from -8 to +8). The transposer setting can be read on the display Opus 250 Mem: 1 (Tr: …). 0/440 Cr:-- User Manual Opus 250/350... -
Page 17: Crescendo Pedal
This function is not available if no expression pedal is set as crescendo pedal. Pressing the ENTER and CR piston simultaneously enters the programming mode of the crescendo pedal. See § 5.1 Crescendo, sub 4 for next steps. User Manual Opus 250/350... -
Page 18: Johannus Menu
5 JOHANNUS MENU In the Johannus Menu several functions of the organ can be set. Press the MENU piston to activate the Johannus Menu on the display. Navigating the menu is done with the - and + pistons. Confirmation of a choice is done with the ENTER piston. -
Page 19: Datadump
The settings to sent are: the content of all capture memory locations and all settings which can be set via the Johannus Menu, except Key Volumes. Key Volumes settings is a part of the intonation data. These data can be received with the optional Johannus Intonat software. -
Page 20: Demo Songs
Make sure the storage medium, the Johannus Sequencer+ for example, with a previous recorded data file is properly connected. Start sending the data file on the sequencer. A message Uploading stored that a data file is being received appears on the display data of the organ. -
Page 21: Expression Pedals
Use the - and + pistons to select the desired contrast level. Press the ENTER piston to confirm and to return to the Johannus Menu: main menu. Display Contrast Press the MENU piston to exit the Johannus Menu. Opus 250 Mem: 1 Tr: 0/440 Cr:-- Expression Pedals The organ is equipped with PEPC™... -
Page 22: Keyboard Config
Use the - and + pistons to select the manual the setting of which must be changed: Choir (Positif) (Opus 350 Great, or Swell only), Press the ENTER piston. The cursor moves to the Great second line of the display. >Automatic User Manual Opus 250/350... -
Page 23: Key Volumes
Enter the code using the pistons of the capture memory locations and press the ENTER piston. Press the ENTER piston. A question to select a stop to Select a stop adjust appears on the display. to adjust User Manual Opus 250/350... - Page 24 No/Yes 16. Use the - and + pistons to select Yes. Press the ENTER Key: press a key piston for confirmation. Vol: 17. Press the MENU piston 3x to exit the Johannus Menu. Opus 250 Mem: 1 Tr: 0/440 Cr:-- More key volumes can be changed by pressing another key or by selecting another stop.
- Page 25 No/Yes 10. Press the ENTER piston to confirm and to return to the Key Volumes Key Volumes menu. Reset one stop 11. Press the MENU pistons 2x to exit the Johannus Menu. Opus 250 Mem: 1 Tr: 0/440 Cr:-- c. Reset ALL stops The Reset ALL stops function resets the key volumes of all stops in one intonation style or variation to the factory setting.
-
Page 26: Midi Config
Reset ALL stop? No/Yes Press the ENTER piston to confirm and to return to the Key Volumes Key Volumes menu. Reset one stop Press the MENU piston 2x to exit the Johannus Menu. Opus 250 Mem: 1 Tr: 0/440 Cr:-- MIDI Config MIDI is a protocol for communication between the organ and other devices, such as PC, Johannus Sequencer+ or other musical instruments. -
Page 27: Reset Procedures
12. Press the ENTER piston. The selected configuration is Swell Channel now stored in memory. The first of the four parts of the programmable MIDI code appears on the display. 13. Press the MENU piston 2x to exit the Johannus Menu. Opus 250 Mem: 1 Tr: 0/440... -
Page 28: Reverb Settings
Cr:-- 5.10 Reverb Settings The Opus 250 is equipped with the Adaptive Surround Reverb ASR-12 system. With this system it is possible to choose a matching reverb for each intonation style and variation. The length of the reverb can be changed and a 3D Surround effect can be enabled. - Page 29 Off. Press the ENTER piston to confirm and to return to the Startup Settings Startup Settings menu. Chorus On/Off Press the MENU piston 2x to exit the Johannus Menu. Opus 250 Mem: 1 Tr: 0/440 Cr:-- b. Default Intonation Startup Setting Default Intonation determines which intonation style is selected at startup of the organ.
-
Page 30: Temperaments
Use only unequal levels to correct different volumes caused by, for example, reflective surfaces on one side of the organ. 10. Press the MENU piston 3x to exit the Johannus Menu. Opus 250 Mem: 1... -
Page 31: Tuning
Equal Use the - and + pistons to select the desired Temperaments temperament, for example Kirnberger III. Kirnberger III Press the MENU piston 2x to exit the Johannus Menu. Opus 250 Mem: 1 Tr: 0/440 Cr:-- This setting cannot be saved. When the organ is switched off and on again, it is set to Equal automatically. -
Page 32: Version
Version Press the ENTER piston. The data of the software of the JHOXXXX organ appears on the display. OC XXXX Press the MENU piston 2x to exit the Johannus Menu. Opus 250 Mem: 1 Tr: 0/442 Cr:-- User Manual Opus 250/350... -
Page 33: Maintenance, Troubleshooting And Warranty
Warranty The conditions are specified in the warranty certificate. The warranty is void if changes or repairs are made to the organ by persons or organizations that are not authorized by Johannus Orgelbouw b.v. User Manual Opus 250/350... -
Page 34: Midi Implementations
: All Notes OFF : Active Sense : Reset Notes Depends on number of divisions Mode 1: OMNY ON, POLY Mode 2: OMNY ON, MONO Y=YES Mode 3: OMNY OFF, POLY Mode 4: OMNY OFF, MONO N=NO User Manual Opus 250/350... -
Page 35: Midi Specifications
Only the value of the 8th byte varies. This is the ‘sys ex message’ that Johannus generally uses: F0 00 4A 4F 48 41 53 XX F7 (hexadecimal). The ‘sys ex messages’ described below only indicates the value of the 8th byte (XX) and the output from which it is transmitted. - Page 36 When a piston is pressed, a sys ex code is transmitted with the value of the piston that is pressed (for example PP = 00 P = 01) through the MIDI MOD. output. These sys ex codes are only important when the Johannus sound module CSM 128 is connected to your instrument.
- Page 37 User Manual Opus 250/350...
- Page 38 User Manual Opus 250/350...
- Page 39 User Manual Opus 250/350...
- Page 40 User Manual Opus 250/350...