Dymo RHINO 4200 - Industrial Handheld Labeling Printer Manual
- User manual (21 pages) ,
- User manual (21 pages)
Advertisement
- 1 Overview
- 2 About Your New Printer
- 3 Getting Started
- 4 Getting to Know Your Printer
- 5 Working with Labels
- 6 Formatting a Label
- 7 Creating Industrial Labels
- 8 Using Barcodes
- 9 Using Custom Defaults
- 10 Creating a Series of Labels
- 11 Using the Library
- 12 Using the Favorites Key
- 13 Printing Options
- 14 Cleaning Your Printer
- 15 Symbols
- 16 Terms
- 17 Troubleshooting
- 18 Videos
- 19 Documents / Resources
Overview

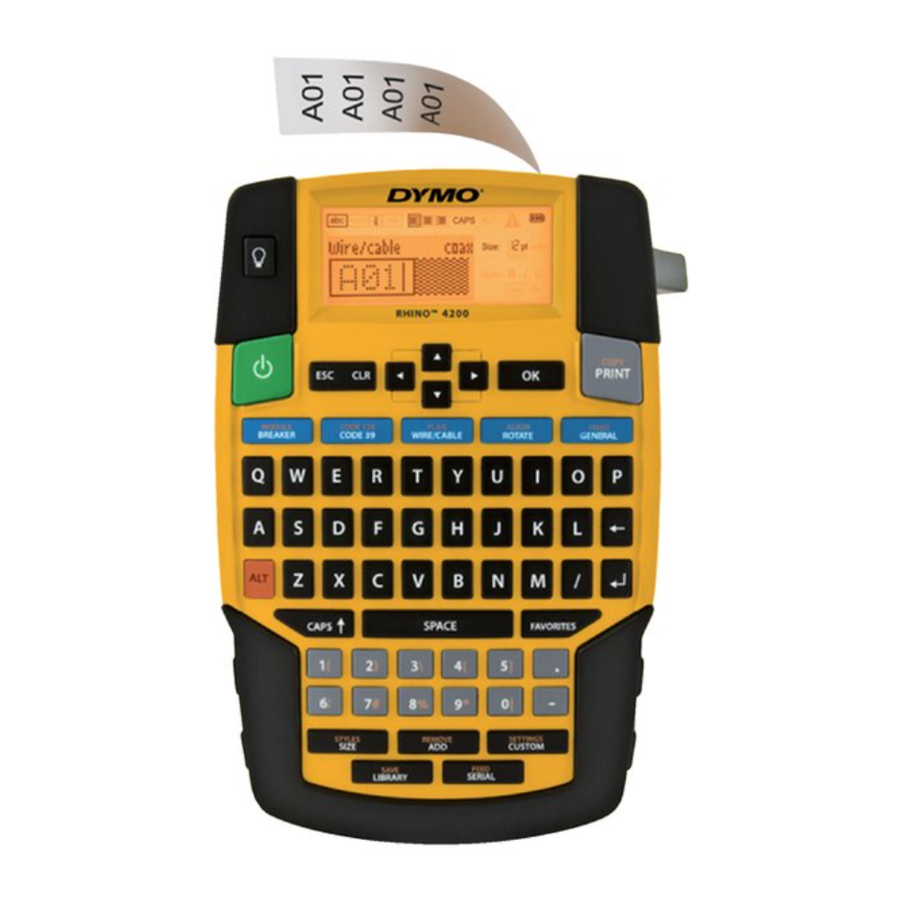
Figure 1 RHINO 4200 Label Printer
- Power connector
- Label exit slot
- LCD Display
- Cutter button
- OK
- Navigation
- Backspace
- Return
- Favorites
- Add/Remove
- Custom/Settings
- Serial/Feed
- Library/Save
- Size/Styles
- Caps
- Space bar
- Alt
- Hot Keys
- Clear
- Escape
- Power
- Backlight
About Your New Printer
With your new RHINO 4200 label printer, you can create a wide variety of high-quality labels. You can choose to print your labels in many different sizes and styles. The printer uses RHINO Industrial label cartridges in widths of 6 mm (1/4"), 9 mm (3/8"), 12 mm (1/2"), or 19 mm (3/4"). RHINO label cartridges are also available in a wide range of materials, such as flexible nylon, permanent polyester, vinyl, non-adhesive tag, and heat shrink tubes.
Visit www.dymo.com for information on the full line of labels and accessories for your printer.
Warranty Registration
Visit www.dymo.com/register to register your label printer online. During the registration process, you will need the serial number, which is located inside the battery compartment.
Getting Started
Follow the instructions in this section to start using your printer for the first time.
Connecting the Power
The printer can be powered using batteries or AC power. Visit www.dymo.com for information on obtaining an optional rechargeable battery pack or AC power adapter.
![]() For optimal power, use the optional rechargeable Lithium-ion battery pack or the AC power adapter.
For optimal power, use the optional rechargeable Lithium-ion battery pack or the AC power adapter.
To save power, the printer automatically goes into standby mode after two minutes of inactivity and automatically turns off after five minutes of inactivity.
Inserting the Batteries
The printer can operate using six AA alkaline batteries.
To insert the batteries
- Press the thumb latch on the back of the printer to remove the battery compartment cover. See Figure 2.

- Insert the batteries following the polarity markings (+ and -). See Figure 2.
- Replace the battery compartment cover.

Safety Precautions
- Do not mix old and new batteries.
- Do not mix alkaline, standard (carbon-zinc), or rechargeable (ni-cad, ni-mh, etc.) batteries.
- Remove the batteries if the printer will not be used for a long period of time.
![]() Remove the batteries if the printer will not be used for a long period of time.
Remove the batteries if the printer will not be used for a long period of time.
Connecting the Optional Power Adapter
The printer uses an optional power adapter (DYMO Switching Adapter 9V DC 2A). Connecting the power adapter with the optional battery pack inserted recharges the battery pack.
Use only the power adapter listed in this user guide:
Adapter model DSA-18PFM-09 Fc 090200 (note: "c" can be EU, UP, UK, US, UJ, JP, CH, IN, AU, KA, KR, AN, AR, BZ, SA, AF or CA) from Dee Van Enterprise Co., Ltd.
 Make sure the power adapter is disconnected before handling the Lithium-ion battery pack.
To connect the power adapter
- Plug the power adapter into the power connector on the top of the printer. See Figure 3.
![]()
- Plug the other end of the power adapter into a power outlet.

Inserting the Optional Battery Pack
The printer can operate using an optional rechargeable, Lithium-ion battery pack (DYMO Li-ion Battery 7.2V 1400mAh).
Make sure the power adapter is disconnected before handling the Lithium-ion battery pack.
To insert the battery pack
- Press the thumb latch on the back of the printer to remove the battery compartment cover. See Figure 4.

- Insert the battery pack into the battery compartment following the polarity markings. See Figure 4.
- Replace the battery compartment cover.

Make sure to read the Lithium-ion Safety Precautions.
Removing the Optional Battery Pack
Remove the battery pack if the printer will not be used for a long period of time.
Make sure the power adapter is disconnected before handling the Lithium-ion battery pack.
To remove the battery pack
- Unplug the power adapter.
- Press the thumb latch on the back of the printer to remove the battery compartment cover.
- Remove the battery from the battery compartment.
Make sure to read the Lithium-ion Safety Precautions.
Recharging the Battery Pack
The battery pack automatically recharges while the printer is connected to a power source through the power adapter. Charging the battery pack for the first time will take approximately eight hours; recharging the battery pack will take approximately two hours.
Inserting and Removing the Label Cartridge
Your printer comes with a starter label cartridge. Visit www.dymo.com for information about purchasing additional label cartridges.

 Cutter blade is extremely sharp. While replacing the label cartridge, keep fingers and other body parts away from cutter blade and do not press the cutter button.
To insert the label cartridge
- Gently lift the label cartridge door on the back of the printer.
- Make sure the label and ribbon are taut across the mouth of the cartridge and that the label passes between the label guides.
If necessary, turn the ribbon rewind spool clockwise to tighten the ribbon. - Insert the cartridge with the label and ribbon positioned between the label guides. See Figure 5.

- Press firmly on the cartridge until the cartridge snaps into place.
To avoid label jams, make sure both sides of the label cartridge snap into place. - Close the label cartridge door.

To remove the label cartridge
- Gently lift the label cartridge door on the back of the printer.
- Gently remove the label cartridge.
- Insert a new label cartridge as described above.
- Select the width of the new label cartridge when prompted.
Setting the Label Width
Each time you insert a label cartridge into the printer, you are prompted to set the label width so the printer knows what size label you are currently using. Some of the features you use to design labels depend on the width of the label. You can change the label width setting at any time from the Settings menu.
To set the label width
- Press
![]() .
. - Select Print options and press
![]() .
. - Select Label width and press
![]() .
. - Select the width of the label currently inserted in the printer and press
![]() .
.
 .
.Selecting a Language
The first time you turn on the power, you are prompted to select your desired language. By default, the language is set to English.
Several language-related features of the printer, such as special characters, menu text, and so on, are determined by the language setting. You can change the language selection at any time from the Settings menu.
To select a language
- Press
![]() .
. - Select System and press
![]() .
. - Select Language and press
![]() .
. - Select the language and press
![]() .
.
Selecting Units of Measure
The first time you turn on the power, you are prompted to select your desired units of measure. You can choose to work in millimeters or inches. You can change the units of measure at any time from the Settings menu.
To select the units of measure
- Press
![]() .
. - Select System and press
![]() .
. - Select Units and press
![]() .
. - Select mm or Inches (") and press
![]() .
.
Getting to Know Your Printer
Become familiar with the location of the feature and function keys on your printer. See Figure 1. The following sections describe each feature in detail.
Power
The ![]() button turns the power on and off. To save power, the printer automatically turns off after five minutes of inactivity.
button turns the power on and off. To save power, the printer automatically turns off after five minutes of inactivity.
When the printer is turned off, the current label and settings are remembered for the next time the printer is turned on. If the batteries and power adapter are disconnected at the same time, some of the settings are remembered; however, the current label is lost and you will need to reset the label width when you reconnect the power and turn on the printer.
LCD Display
The LCD display includes a caption bar showing the current label type, and feature indicators across the top and on the right side showing which features are currently selected. Feature indicators appear black when selected. See Figure 6.

- Caption bar
- Rotation indicator
- Alignment indicator
- Caps indicator
- ALT indicator
- Error indicator
- Battery indicator
- Text size indicators
- Text style indicators
When the text you have entered will not fit on the label as currently defined, the portion of the text that will not fit is shaded. If you attempt to print the label containing text that will not fit, the excess text will not be printed.
Using the Backlight
In low light conditions, you can turn on the backlight to see the display more easily.
To save power, the backlight turns off automatically after 15 seconds of inactivity. Pressing any key will turn the backlight back on again. The backlight key acts as a toggle to turn the light on and off.
You can increase or decrease the time for the backlight timer from the Settings menu.
To toggle the backlight on and off
- Press
![]() .
.
 .
.To set the backlight timer
- Press
![]() .
. - Select System and press
![]() .
. - Select Backlight timer and press
![]() .
. - Press
![]() or
or ![]() to increase or decrease the time for the backlight timer.
to increase or decrease the time for the backlight timer.
You can set the timer for 5 to 30 seconds. - Press
![]() .
.
Adjusting the Display Contrast
In addition to backlighting, you can adjust the display contrast for different lighting conditions.
To adjust the display contrast
- Press
![]() .
. - Select System and press
![]() .
. - Select Screen contrast and press
![]() .
. - Press
![]() or
or ![]() to increase or decrease the contrast.
to increase or decrease the contrast. - Press
![]() .
.
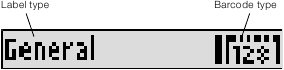
Caption Bar
The caption bar shows the current label type. For some label types, additional information, such as size or barcode type, is also shown.
CAPS Mode
The  key toggles capitalization on and off. When CAPS mode is turned on, the CAPS indicator is shown on the display and all letters that you enter are capitalized. The default setting is CAPS mode on. When CAPS mode is off, all letters entered appear in lowercase.
To toggle CAPS mode on and off
- Press
![]() .
.
ALT Key
The  key is used to select the function or symbol printed above a key. For example, when you press
  , the number 9 appears in the display; however, if you press and then , an asterisk (*) appears in the display.
Escape Key
The ![]() key cancels an action or exits from a menu without making a selection.
key cancels an action or exits from a menu without making a selection.
Navigation Keys
The navigation keys operate as follows:
| Keys | Function |
 | Moves one character to the left in the display. Returns to the previous menu (you can also use  ). ). |
 | Moves one cell to the left in a multi-cell label. Moves one label to the left in the display. |
 | Moves one character to the right in the display. Moves to the next menu level (you can also use  ). ). |
 | Moves one cell to the right in a multi-cell label. Moves one label to the right in the display. |
 | Moves up in a list of items. |
 | Moves down in a list of items. |
| Selects a menu item. |
Backspace Key
The  key deletes the character to the left of the cursor.
Clear Key
The ![]() key clears all current text and format settings, returning the display to the General label type.
key clears all current text and format settings, returning the display to the General label type.
Cutter Button
The ![]() button cuts the label. When printing multiple labels, the printer pauses after printing each label so that you can cut the label. You can turn this feature off, so that multiple labels will print continuously. See Pausing Between Labels.
button cuts the label. When printing multiple labels, the printer pauses after printing each label so that you can cut the label. You can turn this feature off, so that multiple labels will print continuously. See Pausing Between Labels.
Hot Keys
A number of Hot Keys are available for creating specific types of labels, adding barcodes, and formatting text. These Hot Keys are described in detail later in this User Guide.
Working with Labels
You can create a single label or a group of labels. A group of labels can be created manually by adding labels to the current label or automatically using serialization. See Creating a Series of Labels for information about using serialization.
Creating a Label
The printer remembers the last label that you were working on when the power was turned off. You need to clear that label text and formatting before you create a new label.
To create a new label
- If necessary, press
![]() to clear the previous label and formatting from the display.
to clear the previous label and formatting from the display. - Enter some text using the keypad.
- Format the text size and style.
See Formatting a Label. - Optionally, save the label to the library.
See Saving Labels.
Adding a Label
You can insert a label before or after the current label.
To add a label
- Press
![]() .
. - Select one of the following:
- Left to add a label to the left of the cursor position.
- Right to add a label to the right of the cursor position.
- Press
![]() .
.
A new blank label is inserted in the display to the left or right of the current label.
 .
.You can move from label to label by pressing and .
Removing a Label
You can remove a label from the current group.
To remove a label
- Press
![]() .
. - Select one of the following:
- All to remove all of the labels in the group.
- Current to remove the label at the current cursor position.
- Press
![]() .
.
The selected labels are removed from the display.
 .
.Printing Labels
When you print a group of labels, you choose whether to print all of the labels or only the current label in the group.
To print labels
- Press
![]() .
.
If you are printing a group of labels, the Print menu is displayed. - Select one of the following:
- All to print all of the labels in the group.
- Current to print the label at the current cursor position.
- Press
![]() .
.
The selected labels are printed. - Press the
![]() button and remove the labels.
button and remove the labels.
 button and remove the labels.
Formatting a Label
You can choose from a number of formatting options to enhance the appearance of your labels.
Changing the Text Size
You can print the text on your label in several sizes: 6, 8, 12, 16, 18, 22, 24, 32, 50 point, and MAX. The text size selected applies to all the text on all the labels in a group of labels.
The text size available for you to use depends on the width set for the label and the type of label you are creating.
You can also select Auto as the text size. When Auto is selected, the best text size is automatically determined for the height and width of the label you are creating. MAX font is not used when Auto text size is selected.
To set the text size
- Press
![]() .
.
Each time you press![]() , the next available text size is selected.
, the next available text size is selected.
 .
.You can print the text on your label in several styles: bold, italic, underlined, boxed, and narrow. The text style selected applies to all the text on all the labels in a group of labels, including most symbols.
To set the text style
- Press
![]() .
. - Select the desired text style and press
![]() .
. - Select On or Off to turn the selected style on or off.
- Press
![]() .
.
 .
.To insert an underlined 6 or 9 character
- Press and hold
![]() or
or ![]() until 6 or 9 appears in the display, and then press
until 6 or 9 appears in the display, and then press ![]() .
.
 or
or Rotating Text
You can print the text on your label in one of four rotations: horizontal, vertical, 90-degree, and mirror (the text appears in inverse order as it would in a mirror).
The following table shows the text rotations that are available for the different types of labels.

![]() Barcode labels print only horizontally.
Barcode labels print only horizontally.
To rotate text
- Press
![]() .
.
Each time you press![]() , the next available rotation option is selected.
, the next available rotation option is selected.
 .
.Aligning Text
You can align the text to print left or right justified on the label. The default alignment is centered.
To align text
- Press
![]() .
.
Each time you press![]() , the next available text alignment option is selected.
, the next available text alignment option is selected.
 .
.![]() Module and breaker labels use center alignment only.
Module and breaker labels use center alignment only.
Creating Multi-Line Labels
You can print a maximum of five lines on a label.
The number of lines you can print on a label depends on the label width you have selected.
| Label Width | 6 mm (1/4") | 9 mm (3/8") | 12 mm (1/2") | 19 mm (3/4") |
| # Lines | 1 | 3 | 3 | 5 |
The display only shows one line of text at a time. Use the navigation keys to scroll through multiple lines.
To create a multi-line label
- Enter the text for the first line, and press
![]() .
. - Enter the text for the next line.
- Repeat these steps for each additional line.
 .
.Using International Characters
The printer supports the extended Latin character set using RACE technology. Similar to using a mobile phone keypad, holding down a letter key will display all the variations of that letter.
For example, if French is selected as the language and you hold down the letter a, you will see à á â ã ä å and so on through all the variations available. The order in which the variations appear depends on the language you have selected.
Creating Industrial Labels
You can quickly create labels for special industrial applications, such as wire/cable wrap, flag, breaker, or module. You can also create a fixed length label. Hot Keys are available for each of the label types.
The current label type is displayed in the Caption bar. By default, the label type is General with no special formatting, text center aligned, and the length automatically determined by the amount of text.
Pressing a Hot Key always changes the current label type to the selected label type. For example, if you choose Flag and later want a General label, press the General key to remove the Flag settings and return to General label type.
![]() See Using Custom Defaults for information about setting up custom defaults for each label type.
See Using Custom Defaults for information about setting up custom defaults for each label type.
Creating Fixed Length Labels
Normally, the length of the label is determined by the length of the text entered. However, you may want to make a label for a specific purpose that is a fixed length regardless of the length of the text.
The default fixed length is 25 mm (1.0"). Any change you make to the fixed length setting remains in effect until you change the setting.
To set the label length
- Press
![]() .
. - Select the length of the label and press
![]() .
.
 .
.Any text that does not fit within the fixed length appears shaded in the display and will not print.
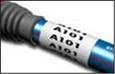
Creating Wire/Cable Labels
A wire/cable label is placed around a wire or cable. The label text is repeated as many times as possible depending on the size of the text and the width or length of the label.
To create a wire/cable label
- Press
![]() .
. - Enter the diameter of the cable and press
![]() .
.
 .
.To create multiple labels quickly, see Creating a Series of Labels.
Creating Flag Labels
A flag label wraps around a wire or cable leaving the text part of the label extending out from the cable. The text on a flag label is automatically printed on both ends of the label, leaving a blank space in the middle that wraps around the cable. When the label is applied to the cable, both ends of the label are applied back to back leaving a tail or flag. The result is a label that can be read from both sides.

To create a flag label
- Press
![]() .
. - Select the flag type and press
![]() .
. - Do one of the following:
- Select the length for the flag portion of the label.
- Select AUTO to have the length for the flag portion automatically determined by the amount of text.
- Press
![]() .
.
 .
.To create multiple labels quickly, see Creating a Series of Labels.
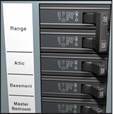
Creating Breaker Labels
A breaker label is a multi-cell label used to label a row of breakers. You select the breaker height and number of breakers, enter the text for each breaker, and print. The result is a long label with a text for each breaker.
To create a breaker label
- Press
![]() .
. - Select the breaker height and press
![]() .
.
The default breaker height is 25 mm (1.0"). - Select the number of breakers and press
![]() .
. - Select the number of poles for each breaker and press
![]() .
. - Select one of the following:
- On to print empty breakers at the end of the label.
- Off to not print empty breakers at the end of the label.
- Press
![]() .
.
Each breaker is separated by a line in the display. - Enter the text for each breaker in the label.
![]() Press
Press ![]() and
and ![]() to move from breaker to breaker.
to move from breaker to breaker.
 .
.By default, a separator line is printed between each cell on a breaker label. To turn off the separator lines, see Printing Separator Lines between Cells.
To create data for the breakers automatically, see Creating a Series of Labels.
Creating Module Labels
A module label is a multi-cell label used to label a row of modules of varying widths. You set the width of a module and the number of modules, enter the text for each module, and print. You can use multipliers to adjust the width of individual modules as necessary.
To create a module label
- Press
![]() .
. - Select the module length and press
![]() .
.
Select the length that applies to the smallest size module. You can then use multipliers to increase the size of individual modules that are larger. The default module length is 17.5 mm (0.5"). - Select the number of modules and press
![]() .
. - Select the multiplier for each module and press
![]() .
. - Select one of the following:
- On to print empty modules at the end of the label.
- Off to not print empty modules at the end of the label.
- Press
![]() .
.
Each module is separated by a line in the display. - Enter the text for each module.
![]() Press
Press ![]() and
and ![]() to move from module to module.
to move from module to module.
 .
.By default, a separator line is printed between each cell on a module label. To turn off the separator lines, see Printing Separator Lines between Cells.
To create data for the modules automatically, see Creating a Series of Labels.
Changing the Label Type
Once you create a label using one label type, you can easily change the label type without losing your data.
If the data from one label type will not fit in the new label type, the text that will not fit is shaded in the display.
When you change from a multi-cell label, such as a breaker label, to a single cell label, such as general or flag, each cell becomes a new label. All blank cells are deleted.
![]() When you change from a multi-cell label type to another multi-cell label type, make sure the new label type contains the same number of cells.
When you change from a multi-cell label type to another multi-cell label type, make sure the new label type contains the same number of cells.
To change the label type
- Press the Hot Key for the new label type.
- Make any necessary adjustments to the settings for the new label type.
Using Barcodes
The printer can generate Code 39 and Code 128 barcodes. You can add a barcode to the following label types:
General
Fixed length
Flag
Module
![]() Barcodes cannot be printed on 6 mm (1/4") labels.
Barcodes cannot be printed on 6 mm (1/4") labels.
The barcode prints horizontally along the label. You can choose to print the barcode text in small print either below or above the barcode. Optionally, you can add text before and after the barcode and serialize barcodes.
Adding a Barcode
The barcode text appears on the label in the display just like any other text. If the cursor is positioned within the barcode text, the type of barcode and the position of the barcode text are displayed in the caption bar.
To add a barcode
- Do one of the following:
- To add a Code 39 barcode, press
![]() .
. - To add a Code 128 barcode, press
![]() .
.
- To add a Code 39 barcode, press
- Enter the text for the barcode within the barcode on the display and press
![]() .
. - Select whether or not to show the barcode text and press
![]() .
. - If necessary, select the location for the barcode text and press
![]() .
.
 .
. .
.The barcode appears as text in the display.
Editing a Barcode
You can edit the text for an existing barcode.
To edit a barcode
- Press
![]() .
.
A message appears asking if you would like to edit the barcode. - Press
![]() .
.
The text of the existing barcode is displayed. - Edit the barcode text and press
![]() .
.
 .
.Deleting a Barcode
A barcode is treated as a single character on the label.
To delete a barcode
- Place the cursor at the end of the barcode text in the display.
- Press
![]() .
.
Using Custom Defaults
Each time you create a label, you are guided through selecting the settings for the type of label you are creating. However, you can set custom defaults for each label type. Once custom default settings are created for a label type, you can quickly create that type of label using these custom default settings.
Setting Custom Defaults
You can set the custom defaults for each label type.
To set custom defaults
- Press the Hot Key for the desired label type and enter any necessary settings for the label type.
- Press
![]() .
. - Make any desired adjustments to the settings for the label type and press
![]() .
. - Press
![]() to save the settings as the custom default for this label type.
to save the settings as the custom default for this label type.
 .
.Each time you create this label type, these custom default settings are used.
Changing Custom Defaults
You can change the custom default settings for a label type at any time.
You can also choose to create a label using settings that are different from the custom default settings without changing the custom default settings.
To change custom defaults
- Press the Hot Key for the desired label type.
- Press
![]() .
. - Make any desired adjustments to the settings for the label type and press
![]() .
. - Do one of the following:
- Press
![]() to use the settings for the current label only.
to use the settings for the current label only. - Press
![]() to save the settings as the new custom default for this label type.
to save the settings as the new custom default for this label type.
- Press
Turning Off Custom Defaults
You can choose to turn custom defaults on or off for each label type individually.
To turn off custom defaults
- Press
![]() .
. - Select Custom defaults and press
![]() .
. - Select the label type to turn off custom defaults for and press
![]() .
. - Select No and press
![]() .
.
 .
.Creating a Series of Labels
You can automatically generate labels by creating a series. You create a starting pattern, and then set the increment and count for the series.
You can serialize any number or letter by selecting the character to be incremented, such as the number 2 in 123 or the letter B in ABC. For example, when the 2 is selected in 123 and the increment is 3, the resulting labels would print as 123, 153, 183, and so on.
Letters can be incremented from A to Z and a to z, and numbers from 0 to 9. When the letter Z or the number 9 is reached during serialization, a letter or number is added to increase the increment. For example, Az increments to Aaa, AZ increments to BA, and A9 increments to A10.
To use serialization
- Enter the text for your label.
- Press
![]() .
.
A box appears around the character where the cursor was positioned. - Press
![]() and
and ![]() to move the cursor to the character you want to increment and press
to move the cursor to the character you want to increment and press ![]() .
. - Select the amount you want to increment the character and press
![]() .
.
You can choose to increment in steps up to 10. - Select the number of times to increment and press
![]() .
.
 .
.New labels are added in the display as needed to complete the series.
To print multiple copies of the same serialized label, see Printing Multiple Copies.
Using the Library
The library includes a set of default symbols and terms to use on your labels. In addition, you can save your own custom terms and frequently-used labels to the library.
Using Symbols
The printer includes a set of commonly used symbols to include on your labels. The symbols are separated into the following categories:
Arrows/Brackets
Numbers
Hazard/Warnings
Currency
Pro AV/Security
Electrical
See Symbols for a complete list of the default symbols.
Some of the more popular symbols can be accessed from the number keys using plus the number. For example, pressing + 4 inserts an open bracket ( [ ).
Inserting Symbols
Symbols added to a label can be formatted or deleted just like any other character you enter.
To insert a symbol
- Press
![]() .
. - Select Symbols and press
![]() .
. - Select a category of symbols and press
![]() .
. - Select the desired symbol and press
![]() .
.
 .
.Using Terms
The printer includes a set of commonly used terms to use on your labels. The terms are separated into the following categories:
Audio
Security
Video
My terms
You can also save custom terms to the My terms category of the library.
See Terms for complete listings of default terms.
Adding Terms to the Library
You can save up to 25 custom terms to the My terms category of the library.
![]() Barcode text cannot be saved as a term. You can save text that appears either before or after the barcode, but not both together.
Barcode text cannot be saved as a term. You can save text that appears either before or after the barcode, but not both together.
To add a term to the library
- Enter text to save to the library.
If your label contains a barcode, place the cursor within the text you want to save. - Press
![]() .
. - Select Term and press
![]() .
. - Select a location for the term and press
![]() .
.
The term is added to the My terms category of the library.
 .
.Inserting Terms on Labels
Terms inserted on a label are the same as text entered from the keypad. Terms can be edited, formatted, or deleted.
To insert a term on a label
- Press
![]() .
. - Select Terms and press
![]() .
. - Select a category of terms and press
![]() .
. - Select the desired term and press
![]() .
.
Deleting a Term from the Library
You can delete previously saved terms from the My terms category of the library.
To delete a term from the library
- Press
![]() .
. - Select Terms and press
![]() .
. - Select My terms and press
![]() .
. - Select the term to delete and press
![]() .
. - Press
![]() to delete the term.
to delete the term.
 .
.![]() Deleting a term or label from the library also deletes that term or label from the Favorites list.
Deleting a term or label from the library also deletes that term or label from the Favorites list.
Using My Labels
Your printer includes a My Labels section of the library for storing your frequently-used labels. You can quickly recall saved labels to use at any time.
Saving Labels
You can save up to 25 frequently-used labels. When you save a label, the label text and all formatting are saved.
To save a label
- Press
![]() .
. - Select Label and press
![]() .
. - Select a location for the label and press
![]() .
. - Enter a name for the label and press
![]() .
.
The label name can contain up to 20 alphanumeric characters.
![]() You cannot save a group of labels to the library. If you have multiple labels in the label edit screen, only the label where the cursor is located will be saved.
You cannot save a group of labels to the library. If you have multiple labels in the label edit screen, only the label where the cursor is located will be saved.
Recalling Labels
Once a label is saved to the library, you can recall the label to print or edit. Recalling a label replaces the current label in the display.
To recall a label
- Press
![]() .
. - Select My Labels and press
![]() .
. - Select the label to recall and press
![]() .
.
Deleting Labels
When you no longer need a stored label, you can delete the label from the library.
To delete a label from My labels
- Press
![]() .
. - Select My Labels and press
![]() .
. - Select the label to delete and press
![]() .
. - Press
![]() to delete the label from the library.
to delete the label from the library.
![]() Deleting a term or label from the library also deletes that term or label the Favorites list.
Deleting a term or label from the library also deletes that term or label the Favorites list.
Using the Favorites Key
You can add your frequently-used symbols, terms, and labels to your Favorites list. Once an item is added to the Favorites list, you can quickly access the item without navigating the Library menu.
Adding an Item to the Favorites List
A symbol, term, or label must first be saved to the library before it can be added to the Favorites list.
To add an item to the Favorites list
- Select a symbol, term, or label from the library.
- Press
![]() and hold for three seconds.
and hold for three seconds.
A message appears confirming that the item was saved to the Favorites list.
 and hold for three seconds.
Inserting Items from the Favorites List
You can quickly insert a symbol or term on your label or recall a label from the Favorites list. To insert an item from the Favorites list
- Press
![]() .
. - Select the symbol or term to add or the label to recall, and press
![]() .
.
Deleting Items from the Favorites list
When you no longer need an item in the Favorites list, you can delete the item from the Favorites list.
To delete an item from the Favorites list
- Press
![]() .
. - Select the symbol, term, or label to delete and press
![]() .
.
A confirmation message appears. - Press
![]() to delete the entry.
to delete the entry.
A message appears confirming that the item was deleted.
![]() Deleting a term or label from the library also deletes that term or label from the Favorites list.
Deleting a term or label from the library also deletes that term or label from the Favorites list.
Printing Options
You can choose to print multiple copies of the same label, collate the copies, print separator lines, pause to cut between labels, advance the label, and adjust the print contrast.
Printing Multiple Copies
You can print up to 10 copies of the same label at one time.
To print multiple copies
- Press
![]() .
. - Select the number of copies to print.
The default is 2 copies. - Press
![]() to begin printing.
to begin printing.
 .
.When printing is finished, the number of copies to print returns to 2.
Collating Multiple Copies
When printing multiple copies of a group of labels, you can select to print the labels normally or collated. If you choose to have the labels print normally, all the copies of the first label are printed before the next label starts printing. If you choose to have the labels print collated, each complete copy of the group of labels prints before the second copy starts.
The following example shows three copies of a group of three labels printed normally and collated.
Normal
A101 A101 A101 A102 A102 A102 A103 A103 A103
Collated
A101 A102 A103 A101 A102 A103 A101 A102 A103
To print and collate multiple copies
- Press
![]() .
. - Select the number of copies of the group of labels to print and press
![]() .
. - Select All to print all of labels in the group.
- Press
![]() .
. - Select one of the following:
- Yes to print collated.
- No to print normally.
- Press
![]() to begin printing.
to begin printing.
Printing Separator Lines between Cells
For multi-cell labels, such as breaker and module labels, you can choose whether or not to print a separator line between each of the cells. By default, separator lines are printed between cells.
To turn off printing of separator lines
- Press
![]() .
. - Select Print options and press
![]() .
. - Select Separator lines and press
![]() .
. - Select No and press
![]() .
.
 .
.Pausing Between Labels
When printing multiple copies, the printer pauses after printing each label so you can cut the label. You can turn this feature off to have the labels print continuously.
To print continuously
- Press
![]() .
. - Select Print options and press
![]() .
. - Select Pause to cut and press
![]() .
. - Select No and press
![]() .
.
 .
.Advancing the Label
To add additional blank space to the beginning or end of your label, you can advance the label in 6.5 mm (1/4") increments.
To advance the label
- Press
![]() .
. - Press
![]() to advance the label.
to advance the label.
 .
.Adjusting the Print Contrast
Depending on the label material you choose, you may need to lighten or darken the printed text on the label.
To adjust the print contrast
- Press
![]() .
. - Select Print options and press
![]() .
. - Select Print contrast and press
![]() .
. - Press
![]() or
or ![]() to increase or decrease the print contrast.
to increase or decrease the print contrast. - Press
![]() .
. - Repeat as necessary until you are satisfied with the print quality.
 .
.Cleaning Your Printer
Your printer is designed to give you long and trouble-free service, while requiring very little maintenance.
Clean your printer from time to time to keep it working properly.
To clean the cutter blade
- Remove the label cassette.
- Press and hold the cutter button to expose the cutter blade.
- Use a cotton ball and alcohol to clean both sides of the blade.
Cutter blade is extremely sharp. Keep fingers and other body parts away from cutter blade and do not press the cutter button.
To clean the print head
- Remove the label cartridge.
- Remove the cleaning tool from inside the label cartridge door.
- Gently wipe the padded side of the tool across the print head. See Figure 7.


Symbols
The following tables show the commonly used symbols by category.
Arrows and Brackets

Hazard and Warning

Pro AV and Security

Numbers

Currency

Electrical

Terms
The following lists the commonly used terms by category.
Audio

Video

Security

Troubleshooting
Review the following possible solutions if you encounter a problem while using your printer.
| Problem/Error Message | Solution | |
| Battery Discharged |
| |
| Poor print quality |
| |
| Label Jam Motor is stalled due to label jam. |
| |
| Uneven or slanted printing The cartridge is not positioned correctly. |
| |
| Cannot close the label cartridge lid The cartridge is not inserted correctly. | Make sure nothing is blocking the cartridge cover and that the label cartridge is inserted properly. See Inserting and Removing the Label Cartridge. | |
| Unable to return to the previous menu | Press  to return to the previous menu. to return to the previous menu. | |
| Nothing shows in the display |
| |
| No label found No cartridge is present. | Open the cartridge compartment and insert a label cartridge. See Inserting and Removing the Label Cartridge. | |
| Display text is too light to read |
| |
| Maximum number of lines reached | Insert a wider label cartridge. | |
| Too many lines for selected label width |
| |
| Maximum number of characters reached | Reduce the number of characters for the label. | |
| Printing... | No action required. Message disappears when printing is finished. | |
| Barcode not allowed Barcodes cannot be printed on 6mm (1/4") labels, wire/cable labels, or breaker labels. |
| |
| No response when pressing keys One of the keys may be jammed. |
| |
| How do I remove the backing from the label? | DYMO labels have an easy-to-peel split back.
| |

If you need further assistance, visit the DYMO Web site at www.dymo.com.

VideosDYMO 4200 Labeling Tool Video
DYMO Rhino Industrial Label Maker 4200 Review Video
Documents / ResourcesDownload manual
Here you can download full pdf version of manual, it may contain additional safety instructions, warranty information, FCC rules, etc.
Download Dymo RHINO 4200 - Industrial Handheld Labeling Printer Manual
Advertisement
Thank you! Your question has been received!


Need Assistance?
Do you have a question about the RHINO 4200 that isn't answered in the manual? Leave your question here.