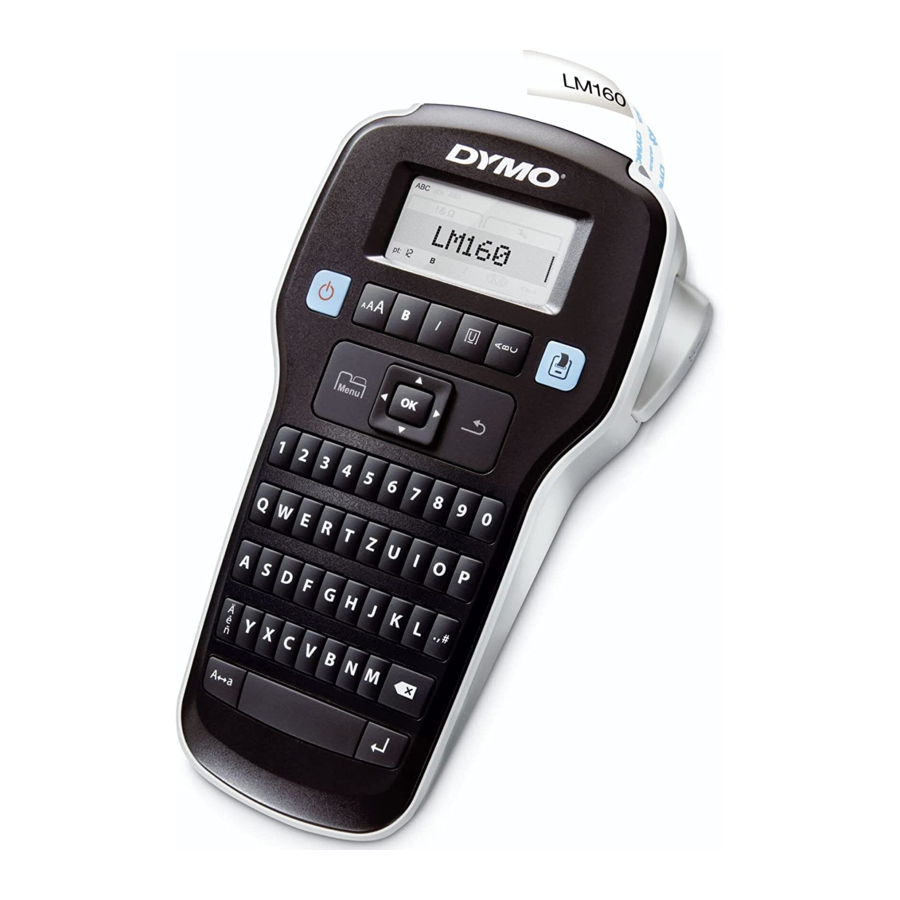
Dymo LabelManager 160 - Label Maker Manual
- User manual (11 pages) ,
- Specifications (2 pages)
Advertisement
- 1 Key Description
- 2 About Your New Label Maker
- 3 Getting Started
- 4 Using the Label Maker for the First Time
- 5 Getting to Know the Label Maker
- 6 Using Clip Art, Symbols, and Special Characters
- 7 Formatting Your Label
- 8 Caring for Your Label Maker
- 9 Symbols
- 10 Troubleshooting
- 11 Copyright
- 12 Trademarks
- 13 FCC Statement
- 14 Documents / Resources

Key Description

Figure 1 DYMO LabelManager 160 Label Maker
- LCD display
- Italic
- Label exit slot
- Underline/Boxes
- Vertical
- Cutter button
- Cancel
- OK
- Symbols – Punctuation
- Backspace
- Return
- Space bar
- Caps
- Accented characters
- Navigation
- Menu
- On/Off
- Font size
- Bold
About Your New Label Maker
With the DYMO LabelManager 160 label maker, you can create a wide variety of high-quality, self-adhesive labels. You can choose to print your labels in many different font sizes and styles. The label maker uses DYMO D1 label cassettes in widths of 1/4", 3/8", or 1/2". Labels are available in a wide range of colors.
Visit www.dymo.com for information on obtaining labels and accessories for your label maker.
Registering Your Label Maker
Visit www.dymo.com/register to register your label maker online.
Register your label maker to receive these benefits:
- Notification of availability of upgrades by email
- Special offers and new product announcements
During the registration process, you will need the serial number, which is located inside the back cover of the label maker.
Getting Started
Follow the instructions in this section to print your first label.
Connecting the Power
The label maker is powered by alkaline batteries or an optional AC power adapter. To save power, the label maker automatically turns off after two minutes of inactivity.
Inserting the Batteries
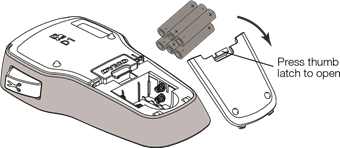
The label maker is powered by six AAA alkaline batteries. To insert the batteries
- Press the thumb latch on the back of the label maker to remove the battery compartment cover. See Figure 2.
![]()
Figure 2
- Insert the batteries following the polarity markings (+ and –).
- Replace the battery compartment cover.
Safety Precautions
- Do not mix old and new batteries.
- Do not mix alkaline, standard (carbon-zinc), or rechargeable (ni-cad, ni-mh, etc.) batteries.
- Remove the batteries if the printer will not be used for a long period of time.
Connecting the Optional Power Adapter
An optional 9 Volt, 2 A power adapter can be used to power the label maker. Connecting the power adapter to the label maker disconnects the batteries as a power source.
Use only the power adapter listed in this user guide:
Adapter model DSA-18PFM-09 Fc 090200 (note: "c" can be EU, UP, UK, US, UJ, JP, CH, IN, AU, KA, KR, AN, AR, BZ, SA, AF or CA) from Dee Van Enterprise Co., Ltd.
To connect the optional power adapter
- Plug the power adapter into the power connector on the top of the label maker.
- Plug the other end of the power adapter into a power outlet.
Inserting and Removing the Label Cassette
Your label maker uses DYMO D1 label cassettes.
Visit www.dymo.com for information about purchasing additional label cassettes.
 Cutter blade is extremely sharp. While replacing the label cassette, keep fingers and other body parts away from cutter blade and do not press the cutter button.
To insert the label cassette
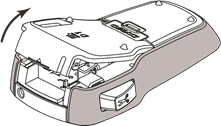
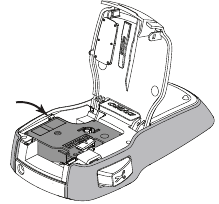
- Lift the label cassette cover to open the label compartment. See Figure 3.
![]()
Figure 3
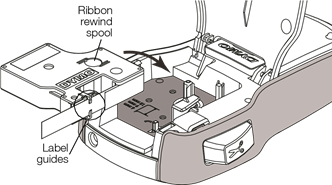
- Make sure that the label and ribbon are taut across the mouth of the cassette and that the label passes between the label guides. See Figure 4.
![]()
Figure 4
If necessary, turn the ribbon rewind spool clockwise to tighten the ribbon.
- Insert the cassette and press firmly until the cassette clicks into place. See Figure 5.
![]()
Figure 5
- Close the label cassette cover.

To remove the label cassette
- Lift the label cartridge door on the back of the printer.
- Remove the label cassette.
- Insert a new label cassette as described above.
- Select the new label width when prompted by the label maker.
Using the Label Maker for the First Time
The first time you turn on the power, you are asked to select the language and label width settings. These selections remain set until you change them.
You can change these selections using the ![]() key.
key.
To set up the label maker
- Press
![]() to turn on the label maker.
to turn on the label maker. - Select the language and press
![]() .
. - Select the width of the label cassette currently in the label maker and press
![]() .
.
You are now ready to print your first label.
To print a label
- Enter text to create a simple label.
- Press
![]()
- Press the cutter button to cut the label.
- Remove the backing from the label to expose the adhesive, and then attach the label. See Figure 6.
![]()
Figure 6
Congratulations! You printed your first label. Continue reading to learn more about the options available for creating labels.
Getting to Know the Label Maker
Become familiar with the location of the function keys on your label maker. Refer to Figure 1. The following sections describe each feature in detail.
Power
The ![]() key turns the label maker on and off. After two minutes of inactivity, the label maker is switched off automatically.
key turns the label maker on and off. After two minutes of inactivity, the label maker is switched off automatically.
When the label maker is turned off, the current label text and formatting are remembered and will be displayed when power to the label maker is turned back on.
When the batteries are removed and the optional power adapter is disconnected, the current label text and formatting are lost.
LCD Display
With DYMO's exclusive graphical display, most of the formatting you add is visible instantly.
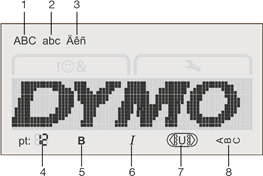
- Uppercase
- Lowercase
- Accented characters
- Font size
- Bold
- Italic
- Underline/Boxes
- Vertical
Feature indicators along the top and bottom of the LCD display appear black when a feature or setting is selected.
Navigation Keys
You can review and edit your label using the left and right navigation keys. You can move through menu selections using all four navigation keys, and then press ![]() to make a selection.
to make a selection.
Cancel
The ![]() key exits from a menu without making a selection or cancels an action, such as printing.
key exits from a menu without making a selection or cancels an action, such as printing.
Backspace/Clear
The ![]() key deletes the character to the left of the cursor.
key deletes the character to the left of the cursor.
Pressing and holding the ![]() key quickly deletes the characters to the left of the cursor.
key quickly deletes the characters to the left of the cursor.
Caps Mode
The ![]() key toggles capitalization on or off. When CAPS mode is on, all the letters entered are in uppercase. When CAPS mode is off, all the letters entered are in lowercase. The default setting is CAPS mode on.
key toggles capitalization on or off. When CAPS mode is on, all the letters entered are in uppercase. When CAPS mode is off, all the letters entered are in lowercase. The default setting is CAPS mode on.
Menu
The  key displays the Symbols/Clip Art and Settings tabs.
Pressing the  key toggles between the Symbols/ Clip Art and Settings tabs.
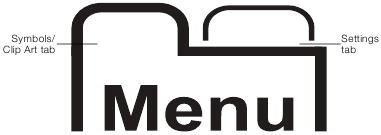
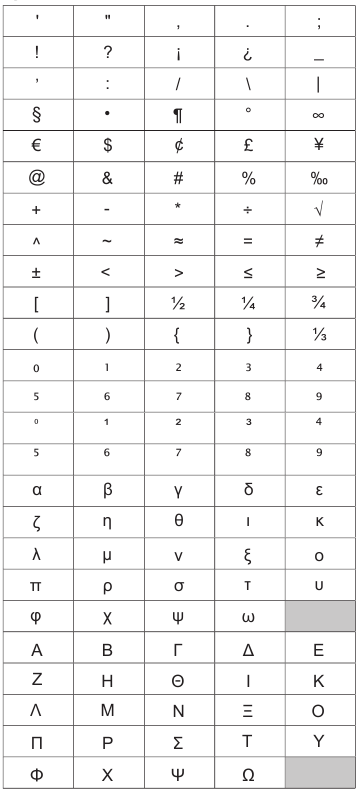
You can use the Symbols and Clip Art menu to insert symbols and clip art on your labels.
You can use the Settings menu to change the language and label width settings.
Using Clip Art, Symbols, and Special Characters
You can add clip art, symbols, punctuation, and other special characters to your labels.
Adding Clip Art
The label maker includes the clip art.
To insert clip art:
- Press
![]() .
. - Press
![]() and
and ![]() to select Clip Art.
to select Clip Art. - Press
![]() .
. - Use the navigation keys to select the desired image.
- Press
![]() to add the image to your label.
to add the image to your label.
Adding Symbols
The label maker supports the extended symbol set.
To insert a symbol:
- Press
![]() .
. - Press
![]() and
and ![]() to select Symbols.
to select Symbols. - Press
![]() .
. - Use the navigation keys to select the desired symbol.
- Press
![]() to add the symbol to your label.
to add the symbol to your label.

Adding International Characters
The label maker supports the extended Latin character set.
Pressing  followed by a letter displays all of the available variations of that letter.
For example, if you press  and then the letter a, you will see à á â ã ä and so on through all the variations available.
To add accented characters
- Press
![]() and then press an alpha character.
and then press an alpha character.
The accent variations for that alpha character are displayed. - Use the navigation keys to select the character you want and press
![]() .
.

Formatting Your Label
You can choose from several format options to enhance the appearance of your labels.
Changing the Font Size
Six font sizes are available for your labels.
The font sizes available depend on the label width selected. The font size applies to all characters on a label.
| Label Width | Font Sizes Available |
| 1/4" | 8, 10, 12 point |
| 3/8" | 8, 10, 12, 16, 20 point |
| 1/2" | 8, 10, 12, 16, 20, 24 point |
To change the font size
- Press
![]() until the desired font size is displayed.
until the desired font size is displayed.
Changing the Font Style
Two font styles are available: bold and italic. These styles can be combined.

To change the font style
- Press
![]() to add or remove bold.
to add or remove bold. - Press
![]() to add or remove italic.
to add or remove italic.
The style is instantly visible in the display.
Adding Box and Underline Styles
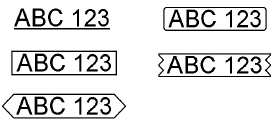
You can highlight the text by adding a box or underline style.
Five styles are available:
To add a box or underline
- Press
![]() until the desired box or underline style is displayed.
until the desired box or underline style is displayed.
A label can be underlined or enclosed within a box, but not both together.
When adding an underline on a two-line label, each line is underlined. When adding a box on a two-line label, both lines are enclosed in a single box.
Creating Vertical Labels
You can print labels with the text oriented vertically.
When printing two-line vertical labels, the label will print with the second line of text after the first line.
To create a vertical label
- Press
![]() .
. - Enter text.
- Press
![]() to print.
to print.

Creating Two-Line Labels
You can print a maximum of two lines on a label. Only one line of text can be printed on 1/4" labels.
To create a two-line label
- Enter text for the first line and press
![]() .
.
The![]() symbol appears. This symbol is not printed.
symbol appears. This symbol is not printed. - Enter text for the second line.
- Press
![]() to print.
to print.
Caring for Your Label Maker
Your label maker is designed to give you long and trouble-free service, while requiring very little maintenance. Clean your label maker regularly to keep it working properly. Clean the cutter blade each time you replace the label cassette.
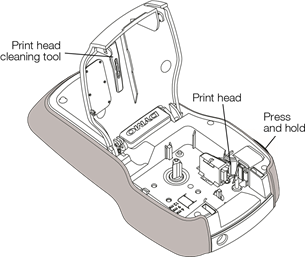
Figure 7
![]() The cutter blade is extremely sharp. Avoid direct contact with the cutter button while cleaning the blade.
The cutter blade is extremely sharp. Avoid direct contact with the cutter button while cleaning the blade.
To clean the cutter blade
- Remove the label cassette.
- Press and hold the cutter button to expose the cutter blade. See Figure 7.
- Use a cotton ball and alcohol to clean both sides of the blade.
To clean the print head
- Remove the label cassette.
- Remove the print head cleaning tool from inside the label compartment cover. See Figure 7.
If you do not have a cleaning tool, contact DYMO Customer Care (http://support.dymo.com). - Gently wipe the padded side of the tool across the print head.
Clip Art
 |  |  |  |  |
 |  |  |  |  |
 |  |  |  |  |
 |  |  |  |  |
 |  |  |  |  |
 |  |  |  |  |
 |  |  |  |  |
 |  |  |  |  |
 |  |  |  |  |
 |  |  |  |  |
 |  |  |  |  |
 |  |  |  |  |
 |  |  |  |  |
 |  |  |  |  |
 |  |  |  |  |
 |  |  |  |  |
 |  |  |  |  |
 |  |  |  |  |
 |  |  |  |  |
 |  |  |  |  |
 |  |  |  |  |
Symbols
Troubleshooting
Review the following possible solutions if you encounter a problem while using your label maker.
| Problem/Error Message | Solution |
| No display |
|
| Poor print quality |
|
| Poor cutter performance | Clean the cutter blade. See Caring for Your Label Maker. |
| Printing... | No action required. Message disappears when printing is finished. |
| Too many characters! Exceeded maximum number of characters in buffer | Additional characters cannot be added. |
| Too many lines! Exceeded maximum number of lines |
Up to two lines of text are allowed on 3/8" and 1/2" labels. |
 Battery low | Replace batteries or connect the optional power adapter. |
| Insert cassette! No label cassette is inserted. | Insert a label cassette. See Inserting and Removing the Label Cassette. |
| Label jam! Motor is stalled due to label jam. |
|
| How do I remove the backing from the label? | DYMO labels have an easy-to-peel split back.
|
If you need further assistance, visit the DYMO Web site at www.dymo.com.
Copyright
© 2011-2015 Newell Rubbermaid Europe, LLC. All rights reserved. Rev. 6/20
No part of this document may be reproduced or transmitted in any form or by any means or translated into another language without the prior written consent of Newell Rubbermaid Europe, LLC.
Trademarks
DYMO and LabelManager are registered marks in the US and other countries. All other trademarks are the property of their respective holders.
FCC Statement
The user is cautioned that changes or modifications not expressly approved by the party responsible for compliance could void the user's authority to operate the equipment.

- Reorient or relocate the receiving antenna.
- Increase the separation between the equipment and receiver.
- Connect the equipment into an outlet on a circuit different from that to which the receiver is connected.
- Consult the dealer or an experienced radio/TV technician for help.

Documents / ResourcesDownload manual
Here you can download full pdf version of manual, it may contain additional safety instructions, warranty information, FCC rules, etc.
Advertisement
Thank you! Your question has been received!


 and
and  to select Clip Art.
 to add or remove bold.
 to add or remove italic.
 .
. to print.
 symbol appears. This symbol is not printed.


Need Assistance?
Do you have a question about the LabelManager 160 that isn't answered in the manual? Leave your question here.