Dymo 1000 - Electronic Labelmaker Manual
- User manual (5 pages) ,
- Quick reference (2 pages) ,
- Instructions for use (2 pages)
Advertisement
Power supply
Insert five size AA alkaline or nickel-cadmium re-chargeable batteries, observing the polarity markings. Re-chargeable batteries must be charged externally before use.

Connect the AC adaptor plug here. Use only the recommended adaptor. Plugging in the AC adaptor disconnects the batteries.
Note: Re-chargeable batteries will not be charged.
Cassette door
To remove the door, press in where shown below then swing the door open and lift it away. When re-fitting, hold the door at the angle shown below and engage the tabs on the door in the slots in the case. Now close the door, ensuring that the lever engages with the ramp on the door as it closes.

Cleaning

- Use a ball pen or pencil to hold down interlock button.
- Press
![]()
- Use a cotton bud and alcohol to clean both sides of cutter blade regularly.
- Check and clean print head and pinch roller regularly using cotton bud and alcohol ONLY.

Changing the cassette

- Ensure tape and ribbon is taught across mouth of cassette and tape passes between the guide posts before installing.
- Make sure that this switch is set to the RIGHT before installing the cassette. A notch in the cassette will fit over the switch when it is set correctly.

- Ensure tape and ribbon are positioned as shown between print head and pinch roller.
- Label cutter – press to cut off printed label.
- Print head
- Push firmly until cassette clicks into place.
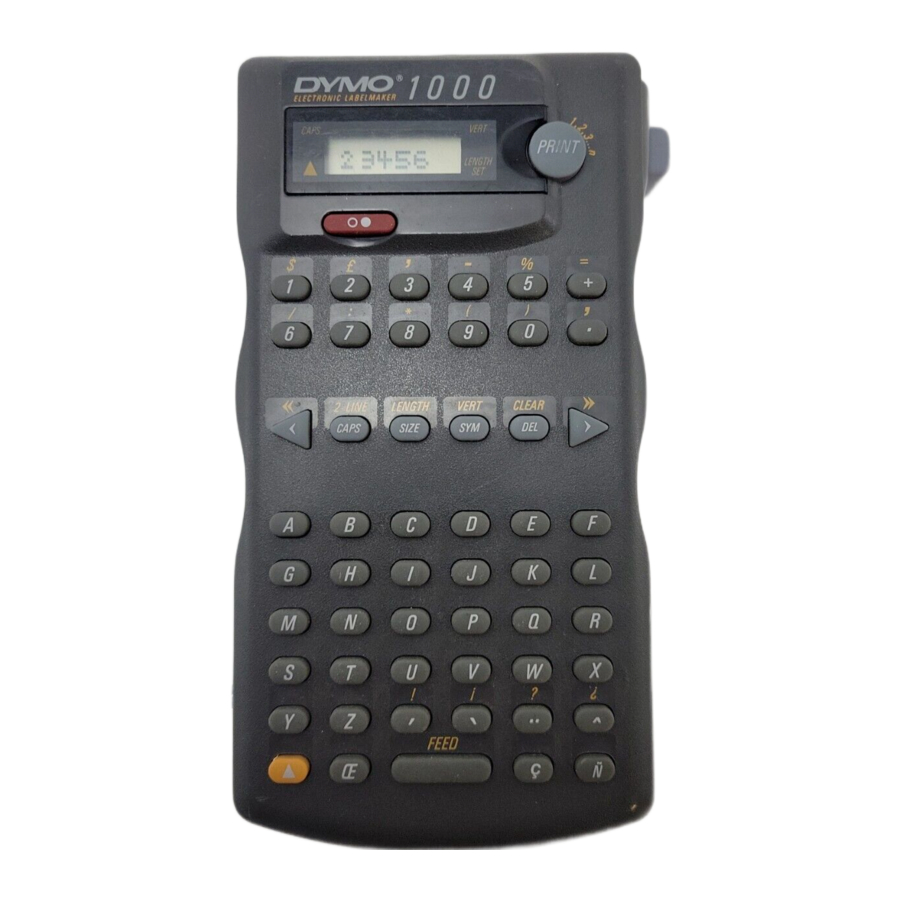
Introduction
The Dymo 1000 Electronic Labelmaker enables you to create a wide variety of high quality self-adhesive labels of up to 100 characters. The Labelmaker uses 12mm ( 1 / 2 ") wide tape cassettes in a number of label colours. Normal or double width, full and half-height text can be printed in a single line, or in half-height on two lines. Text can be set horizontally or  and is always centred on the label.
Function keys
ON/OFF
Switches the power on and off.
-
Switches off automatically after three minutes if no keys are pressed. The last label created will be stored and displayed when next turned on.
Note: If the batteries are removed for more than a few seconds, or the external power supply interrupted, all text and settings will be lost. When power is restored, the display will show a flashing cursor (no text) and the settings will be fullheight, normal width, auto length,![]() and
and ![]() off.
off.
CAPITALS 
-
Press for all subsequent characters in UPPER CASE (CAPITALS), as confirmed by the indicator in the top left corner of the display.
-
Press again to cancel and return to lower case.
SHIFT KEY
-
Press and release
![]() before pressing an alphabet key to produce an UPPER CASE character, as confirmed by the indicator in the lower left corner of the display.
before pressing an alphabet key to produce an UPPER CASE character, as confirmed by the indicator in the lower left corner of the display. -
For dual purpose keys, press
![]() first to produce the legend above the key.
first to produce the legend above the key. -
Pressing
![]() while
while ![]() is set, will give lower case characters.
is set, will give lower case characters.
DELETE 
- Press to delete the character to the left of the cursor, or to cancel certain function key operations.
CLEAR TEXT +
- Press to clear all the text and the length setting, but leave the print size and style settings unchanged.
CURSOR KEYS ![]()
![]()
These keys move the cursor along the text.
- Pressing
![]() +
+ ![]() or
or ![]() +
+ ![]() moves the cursor to the beginning or end of the text. When used in conjunction with certain function keys, use or
moves the cursor to the beginning or end of the text. When used in conjunction with certain function keys, use or ![]() to select options and < numerical values.
to select options and < numerical values. - To insert characters into the text, use
![]() or
or![]() to position the cursor under the character to the right of the insertion point, then type in the characters required.
to position the cursor under the character to the right of the insertion point, then type in the characters required.
PRINTING
- Press
![]() to print the label.
to print the label. - Press the cutter button to release the label.
SPACE KEY
- Press
![]() to insert a space into the text.
to insert a space into the text.
FEED +
- Press to feed out 25mm of tape without printing.
SYMBOLS
- Press to select a symbol character – see 'Symbols and special characters'.
TEXT SIZE 
- Press to display the symbols representing the four text print sizes:
![]()
normal height and width ![]()
normal height, double width ![]()
half-height, normal width ![]()
half-height, double width. The cursor will be positioned over the current selection.
- Press
![]() to cancel, or use
to cancel, or use ![]() or
or![]() to move the cursor over the size symbol required, then press to confirm the
to move the cursor over the size symbol required, then press to confirm the ![]() selection, or
selection, or ![]() to fix the new size and print the label.
to fix the new size and print the label.


TWO-LINE TEXT + 
Labels comprising two lines of text can be printed on the 12mm ( 1 / 2 ") wide labels.
- Press to insert the special character
![]() at the point where you want the text to break, eg:
at the point where you want the text to break, eg:
This label has![]() two line text.
two line text.
on the display will print as:
![]()
Only one![]() can be included in a label at a time.
can be included in a label at a time. - Press
![]() to delete
to delete![]() , as for normal text characters.
, as for normal text characters.
Note: Two lines cannot be printed vertically.
 at the point where you want the text to break, eg:
VERTICAL TEXT + 
- Rotates the text through 90° so that the label is printed
![]() , as confirmed by the indicator in the top right of the display.
, as confirmed by the indicator in the top right of the display. - Press again to cancel and return to horizontal text.
LABEL LENGTH + 
Displays the current label length. The length is normally calculated automatically, according to the length of the text on the label.
- Press
![]() to cancel the length function without changing the length, or:
to cancel the length function without changing the length, or: - use
![]() or
or ![]() to increase (up to 400mm or 15" max.) or decrease the length in 5mm ( 1 / ") steps. The display will flash if you try to make the label 5 shorter than the text.
to increase (up to 400mm or 15" max.) or decrease the length in 5mm ( 1 / ") steps. The display will flash if you try to make the label 5 shorter than the text. - If the length displayed is preceded by the > symbol, the length has already been fixed; the label is too short for the text and it will not print. Either press
![]() to increase the length in < 5mm ( 1 / 5 ") steps until the > symbol disappears, or press
to increase the length in < 5mm ( 1 / 5 ") steps until the > symbol disappears, or press ![]() +
+ ![]() to cancel fixed DEL length; the label is now long enough for the text and can be printed. LENGTH
to cancel fixed DEL length; the label is now long enough for the text and can be printed. LENGTH - Press
![]() + again to fix the length for all subsequent labels as indicated in the lower right corner of the display, or
+ again to fix the length for all subsequent labels as indicated in the lower right corner of the display, or - press
![]() to fix the new length and print the label.
to fix the new length and print the label. - Pressing
![]() +
+![]() will cancel the fixed length and restore the automatic length.
will cancel the fixed length and restore the automatic length.

INCREMENTAL PRINTING +
Prints a label then increments the last digit of any number in the label by 1, ready for the next print command.
- Press
![]() to print the next label, or
to print the next label, or ![]() +
+ ![]() to print the next label and increment again by 1.
to print the next label and increment again by 1.
The Display

The display shows:
- Up to five text characters, plus the cursor, at one time. Use
![]() or
or![]() to move along the text.
to move along the text. - Four indicators, one in each corner – as shown above.
- The display will flash if you press an incorrect key in a function sequence.

Press to release label.
NOTE: Always remove a cut label before printing another.
Creating your first label
- Fit batteries or connect the AC adaptor, and insert a tape cassette.
- Press
![]() to switch on.
to switch on. - Type in your text using the alphabet keys; each character will appear in the display. If you make a mistake, press
![]() to delete the error, then type in the correction.
to delete the error, then type in the correction. - Press
![]() to print the label, then press the cutter button to release the label.
to print the label, then press the cutter button to release the label.
Symbols and special characters
International characters
You can create international characters by combining a letter and a diacritical (accent). Diacriticals available on the keyboard are ´ ' ¨ and ^. To add a diacritical to a character, enter the character first, followed immediately by the diacritical. For example, press 'E' followed by '´' to get é.
To add a diacritical to an existing character, use  or
or to place the cursor under the character to be changed, then press the appropriate diacritical key.
Symbols
Pressing changes the display to show symbols and special characters, some of which are not available direct from the keyboard. The display will show:
a-o? (or a-r? where available).
Each letter selects a line of five symbol characters, as shown in the table below. Note that some of the more complex printed symbols are represented by simpler symbols in the display.
Press to cancel or press the letter key required.
Use or to select a symbol.
Press again to place the symbol in the label, or press to place it and print the label.

Note: Rows p, q and r where available.
Print contrast — may be adjusted by pressing followed by the space key to display five contrast symbols. Use or to select a symbol. Press again to confirm the setting. The contrast level will revert to the mid-setting when the Labelmaker is turned off and on again.
Troubleshooting
No display
- check machine is on
- replace discharged batteries or use the AC adaptor
- check AC adaptor plugged in and switched on.
No printing or poor text
- replace discharged batteries or use the AC adaptor
- check tape cassette installed correctly and tape not kinked
- replace the tape cassette.
No response to print key
- label length too short for text – press
![]() until > disappears or clear fixed length
until > disappears or clear fixed length - !!!!! in display indicates a printer jam. Printing will stop and the display return to normal. Open the cassette compartment and free the jam.
![]() flashing in the display indicates low battery volts. Replace discharged batteries or use the AC adaptor.
flashing in the display indicates low battery volts. Replace discharged batteries or use the AC adaptor.

Accessories
12mm (1/2") cassettes
Black/Clear 45010
Blue/Clear 45011
Red/Clear 45012
Black/White 45013
Blue/White 45014
Red/White 45015
Black/Blue 45016
Black/Red 45017
Black/Yellow 45018
Black/Green 45019
Replacement Cutter 15030
Carrying Case 15010
AC Adaptor 40030
This product is designed to conform with the following international standards:
| EN 60950 IEC 950 UL 1950 | Specification for safety of information technology equipment including electrical business equipment |
| EN 55022 Class B | Specification for limits and methods of measurement of radio interference characteristics of information technology equipment. |
| FCC pt15 Sub pt B Class B | Federal communications commission radio frequency emissions. |
| Written by | DAW Publications, Cambridge |
Documents / ResourcesDownload manual
Here you can download full pdf version of manual, it may contain additional safety instructions, warranty information, FCC rules, etc.
Advertisement
Thank you! Your question has been received!


Need Assistance?
Do you have a question about the 1000 that isn't answered in the manual? Leave your question here.