Sunbeam DiamondForce PUM4000DF - Frypan & Skillet Set Manual
- User manual (17 pages)
Advertisement
Safety Precautions
SAFETY PRECAUTIONS FOR YOUR DIAMONDFORCE FRYPAN & SKILLET SET.
- Use your frypan and skillet at least 200mm away from walls and curtains.
- Do not immerse the control probe in water.
- If using a plastic spatula do not leave in cooking vessel when hot.
- The frypan and skillet must only be used with the control probe provided.
- Avoid using on metal surfaces e.g. sink, hotplate.
- Remove the control probe before cleaning the frypan and skillet.
- After cleaning the frypan and skillet ensure that the control probe inlet area is completely dry before using again.
Sunbeam is very safety conscious when designing and manufacturing consumer products, but it is essential that the product user also exercise care when using an electrical appliance. Listed below are precautions which are essential for the safe use of an electrical appliance:
- Read carefully and save all the instructions provided with an appliance.
- Always turn the power off at the power outlet before you insert or remove a plug. Remove by grasping the plug - do not pull on the cord.
- Turn the power off and remove the plug when the appliance is not in use and before cleaning.
- Do not use your appliance with an extension cord unless this cord has been checked and tested by a qualified technician or service person.
- Always use your appliance from a power outlet of the voltage (A.C. only) marked on the appliance.
- This appliance is not intended for use by persons (including children) with reduced physical, sensory or mental capabilities, or lack of experience and knowledge, unless they have been given supervision or instruction concerning use of the appliance by a person responsible for their safety.
- Children should be supervised to ensure that they do not play with the appliance.
- The temperature of accessible surfaces may be high when the appliance is operating.
- Never leave an appliance unattended while in use.
- Do not use an appliance for any purpose other than its intended use.
- Do not place an appliance on or near a hot gas flame, electric element or on a heated oven.
- Do not place on top of any other appliance.
- Do not let the power cord of an appliance hang over the edge of a table or bench top or touch any hot surface.
- Do not operate any electrical appliance with a damaged cord or after the appliance has been damaged in any manner. If damage is suspected, return the appliance to the nearest Sunbeam Appointed Service Centre for examination, repair or adjustment.
- For additional protection, Sunbeam recommend the use of a residual current device (RCD) with a tripping current not exceeding 30mA in the electrical circuit supplying power to your appliances.
- Do not immerse the appliance in water or any other liquid unless recommended.
- Appliances are not intended to be operated by means of an external timer or separate remote control system.
- This appliance is intended to be used in household and similar applications such as: staff kitchen areas in shops, offices and other working environments; farm houses; by clients in hotels, motels and other residential type environments; bed and breakfast type environments.
 Hot Surface
Do Not Touch
This symbol indicates, temperature of accessible surfaces may be high when the appliance is operating and for some time after use.
If you have any concerns regarding the performance and use of your appliance, please visit www.sunbeam.com.au or contact the Sunbeam Consumer Service Line.
Ensure the above safety precautions are understood.
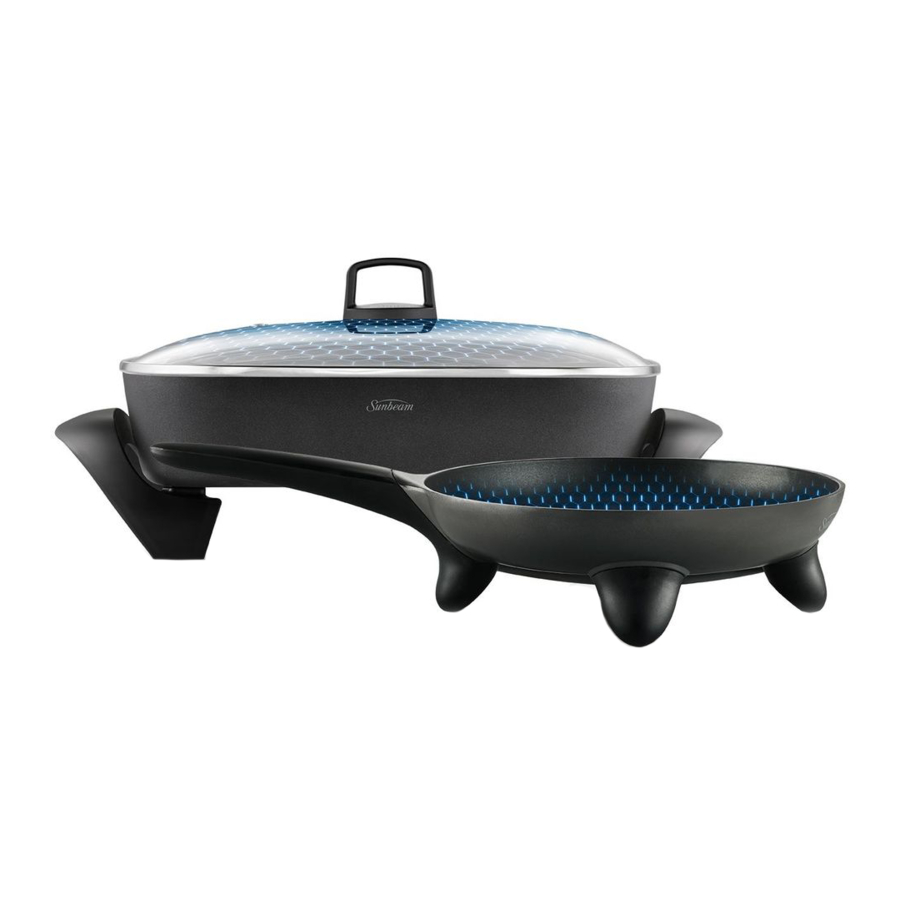
Features of your Sunbeam DiamondForce Banquet Frypan


Integrated steam vent
Fixed steam vent controls the moisture level during cooking.
DiamondForce non-stick cooking surface
The DiamondForce coating advantage with advanced non-stick performance provides superior food release, requiring little to no oil when cooking food and easy wipe clean up.
Cool touch handles and lid knob
For safer cooking and carrying of the frypan
Tilt & baste lever
When the lever is in the lowered position the cooking pan is tilted, forcing juices to collect at one end of the pan. Both hands are then free for basting. Dishwasher safe The pan, base and lid are dishwasher safe and fully immersible making cleaning a breeze.
Glass lid
The clear glass lid allows you to monitor the cooking process without lifting the lid and allowing the heat to escape, ensuring the selected temperature is maintained.
Extra large cooking vessel
The large rectangular frypan (38cm (15") x 29.5cm (11.5")) is 78mm deep, ideal for cooking 2 chickens, roasts, family size meals or liquid based dishes.
Cast-in rectangle element
The powerful 2400 watt rectangle element is completely cast into the heavy duty base providing superior heat distribution, faster heating and a longer element life.

Perfect Temp control probe
The removable probe is thermostatically controlled to provide accurate cooking temperatures. The trigger-release makes the probe easy to remove.
Features of your Sunbeam DiamondForce 25cm Skillet


DiamondForce non-stick cooking surface
The DiamondForce coating advantage with advanced non-stick performance provides superior food release, requiring little to no oil when cooking food and easy wipe clean up.
Cast-in element
The 1200 watt element is completely cast into the heavy duty base providing superior heat distribution, faster heating and a longer element life.
Dishwasher safe
The pan and base are dishwasher safe and fully immersible making cleaning a breeze.

Perfect Temp control probe
The removable probe is thermostatically controlled to provide accurate cooking temperatures. The trigger-release makes the probe easy to remove.
Parts & Accessories
Your Frypan and Skillet set includes 1 control probe which can be used alternately for both units.
Trigger-Release Control Probe
The heat control probe is thermostatically controlled to deliver perfect cooking control. The indicator light switches 'on' when it is heating. When the frypan or skillet has reached the desired temperature the indicator light switches 'off'. The indicator light will then cycle 'on' and 'off' as the thermostat maintains the set temperature.
The heat control probe is ergonomically designed with a handy trigger-release. Simply hold the probe and squeeze the trigger with your thumb to remove it.

Heat control probe with trigger release
Usage Instructions
Before First Use
Before using your Frypan and Skillet for the first time, remove all packaging and promotional materials from the product and control probe.
With the control probe detached, wash with warm soapy water using a mild household detergent.
Rinse thoroughly and dry. Make sure the interior of the probe inlet is fully dry.
Note: Do not immerse the heat control probe in water or any other liquid.
Using your Frypan and Skillet
- Place on a flat, level, heat-resistant surface.
- Insert the control probe fully into the probe inlet of the frypan or skillet.
- Plug the cord into 230-240V power outlet and turn the power on.
- Pre heat the frypan and skillet on MED/MAX setting. Then set the control probe dial to the desired temperature setting. Refer to the temperature guide.
Note: The thermostat light on the control probe indicates the temperature at which the dial is set. The light will remain on until the set temperature has been reached and then will cycle on and off throughout the cooking. This will ensure that the frypan and skillet maintains the correct temperature. On the initial heating of the frypan and skillet, it is recommended that the temperature be allowed to cycle (the light cycling on and off) several times. This will help the cooking surface to adjust to a more accurate cooking temperature.
- After you have completed cooking, turn the power OFF and unplug from the power outlet.
Note: Ensure the cord is kept well away from the frypan and skillet when in use.

Do not touch the frypan and skillet when in use. Avoid touching hot surfaces. Take care when removing food from the frypan and skillet. Do not transport the frypan and skillet when it is hot.
Using the tilt & baste lever
The tilt & baste lever of the frypan is positioned under the inlet where the control probe is inserted. To tilt the frypan, push the lever down. This allows the fat and juices to drain from the food for crisp, low fat cooking. It also makes it easier to baste food and serve sauces or gravy.

Care & Cleaning
Use heat-resistant plastic or wooden or silicone utensils when cooking on the frypan or skillet. Avoid using sharp or metal objects as these will scratch the non-stick surface. Do not cut food on top of the cooking surface. Do not leave plastic utensils in contact with the cooking surface while in use.
To clean after use
Always turn the power off and remove the plug from the power outlet and the control probe from the probe inlet before cleaning. Allow the frypan and skillet to cool before cleaning.
DiamondForce non-stick coating
When cleaning with the DiamondForce non-stick coating, do not use metal (or other abrasrive scourer). When the frypan or skillet have cooled down, you may wipe using a paper towel to remove residue on the frypan or skillet. With the control probe detached, wash with warm soapy water using a mild household detergent. Rinse thoroughly and dry the frypan or skillet with a soft cloth before storing. Make sure the interior of the probe inlet is fully dry.
Heat Control probe
If cleaning is necessary, wipe over with a damp cloth.
Note: The control probe must be removed before the frypan or skillet is cleaned and the control probe inlet must be dried before the frypan or skillet is used again.

Do not immerse the control probe in water or any other liquid. Store the crontrol probe carefully. Do not knock or drop it as this can damage the probe.
Storage
Store the control probe carefully in a safe place. Do not knock or drop it as this can damage the probe.
If damage is suspected, return the control probe to your nearest Sunbeam Service Centre for inspection.
Glass lid
Wash the lid in warm soapy water using a soft sponge, rinse and dry thoroughly.
Alternatively, wash the lid in a dishwasher.
Temperature Setting Guide
The settings on the dial represent the following temperatures approximately.
Pre-heat your frypan or skillet on MAX setting then change to your desired setting.
| DIAL SETTING | CELCIUS (approx) | USES | TEMPERATURE |
| MIN | 50°C - 70°C | Keeping food warm | LOW |
| MIN/MED | 80°C - 105°C | Simmering, slow cooking | |
| MED | 120°C - 140°C | Pan frying | MEDIUM |
| MED/MAX | 150°C - 175°C | Shallow frying, roasting | |
| MAX | 190°C - 210°C | Searing and sealing | HIGH |
Note: The temperature settings are a guide only and may require adjustment to suit various foods and individual tastes. When the dial is set to a MIN setting, it is quite normal for food to stop and start bubbling, as the thermostat maintains the selected temperature.
Cooking Guide
Baking
Your frypan can be used for baking cakes, with deliciously moist results.
- Preheat the frypan to MAX setting, with the lid on.
- Elevate the cake pan or tray from the base of the frypan using a small wire rack.
Cooking times will be longer than those of a conventional oven.
Basting
The tilt & baste lever makes basting easy as it allows the juices to drain to one side of the pan. Reduce the temperature to prevent any fat and juices splattering. Position the pan tilt lever and spoon the juices over the food as desired.
Browning and Sealing Meat
It is necessary to brown and seal meat in many recipes. Meat retains its juices and the flavours develop after browning and sealing. This also prevents it from sticking when baking or roasting. Preferably use meat that is at room temperature, as this reduces the cooking time.
- Preheat the frypan to MED/MAX setting.
- Brown meat on all sides, with the lid off.
- After sealing, reduce the temperature to MED setting and replace the lid until the meat is cooked as desired.
Frying
The frypan is ideal for shallow or pan frying. Deep frying is not particularly suitable as the frypan has shallow sides and a greater surface area, which results in heat loss and the possible overflow of oil.
Pan frying:
Suitable for eggs, omelettes, bacon, sausages, steaks and chicken pieces. Preheat to MED setting with a little oil to add flavour. Non-stick cooking surfaces do not require a large amount of oil. Steaks should only be turned once during cooking.
Shallow frying:
Suitable for vegetable pieces e.g roast pumpkin and potato, and crumbed food. Preheat on MED setting with sufficient oil so that the food is half immersed. Cook food with the lid off.
Sautéeing:
Preheat on MED setting with a little oil to add flavour.
Stir frying:
Food is cooked quickly, over a high heat and vegetables retain their flavour and crispness. For best results and even cooking, cut food into even sized, smaller pieces.
- Preheat the frypan on MED/MAX setting with a little oil.
- Slice meat into strips. Coat meat in a little oil and stir-fry in batches until browned. This prevents meat from stewing.
- Add vegetables and seasoning, stirring continuously. Vegetables which take longer to cook, such as carrots, should be cooked first, adding the other ingredients later.
Cook until the vegetables are crisp.
Return the meat back into the pan when the vegetables are almost cooked. The lid can be in position in the last few minutes of cooking.
Roasting
Meat and poultry:
The frypan is ideal for roasting meat and poultry, as the meat retains the flavour and juices.
- Preheat the frypan to MED/MAX setting. Use only a small amount of oil for less fatty joints and no oil for fattier joints of meat.
- Brown and seal the meat on all sides and position the lid.
- After browning, turn the dial to MED setting to cook the meat as desired. Turn meat occasionally during cooking to ensure even cooking.
- Remove meat from pan and cover with foil. Allow meat to rest for 5-10 minutes, meanwhile you can make a gravy from the juices in the frypan.
Vegetables:
Cut into even sized pieces. Add to the frypan 45-60 minutes before serving.
For crisper vegetables, remove the meat and increase the heat for the last few minutes of cooking.
Roasting times:
Note: These times are for well done. Reduce the times to suit personal taste.
| PORK | 30-40 minutes per 500g after browning. |
| VEAL | 30-40 minutes per 500g after browning. |
| BEEF | 20-25 minutes per 500g after browning. |
| LAMB | 25-30 minutes per 500g after browning. |
| CHICKEN | 30-35 minutes per 500g after browning. |

Documents / ResourcesDownload manual
Here you can download full pdf version of manual, it may contain additional safety instructions, warranty information, FCC rules, etc.
Download Sunbeam DiamondForce PUM4000DF - Frypan & Skillet Set Manual
Advertisement
Thank you! Your question has been received!


Need Assistance?
Do you have a question about the DiamondForce PUM4000DF that isn't answered in the manual? Leave your question here.