Chapters
Table of Contents

Related Manuals for Swann SW331-PR6


Summary of Contents for Swann SW331-PR6
-
Page 1: Pan Tilt Zoom
Advanced security made easy Advanced security made easy PRO-650™ PRO-650™ Pan Tilt Zoom Dome Camera Operating Instructions Operating Instructions SW331-PR6 www.swannsecurity.com SR331-PR6-60010-040909... -
Page 2: Before You Begin
Before You Begin FCC Verification: NOTE: This equipment has been tested and found to comply with the limits for Class B digital device, pursuant to part 15 of the FCC Rules. These limits are de- signed to provide reasonable protection against harmful interference in a residen- tial installation. -
Page 3: Table Of Contents
Contents Before you Begin Table of Contents Quick Reference Overview Package Contents Layout of the Camera and PTZ Controller Layout of Remote Control Connecting the Camera Mounting the Camera Setting the Command Address Configuring the PTZ Controller Connecting Multiple PTZ Systems Operating the Camera Advanced Operation Additional Functions... -
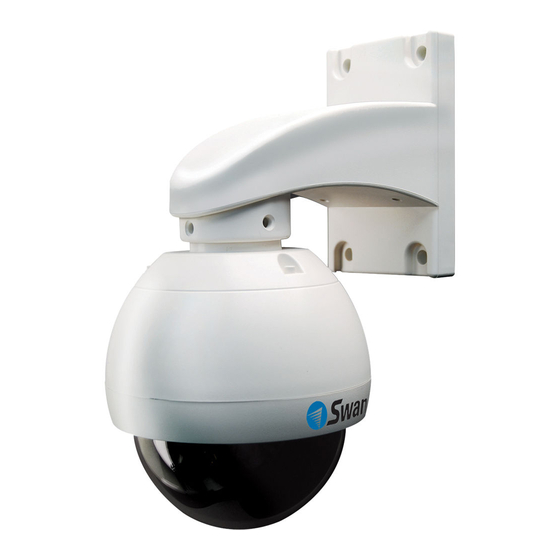
Page 4: Overview
PRO-650 PTZ 4” Dome Camera Roof Mounting Arm/Bracket Wall Mount Arm PTZ Controller/Receiver Remote Control If any of these components are missing, contact Swann Technical Support. Contact details are on the back cover of this booklet. 4 4 4 Mounting Screws Operating Instructions... -
Page 5: Layout Of The Camera And Ptz Controller
Layout of the Camera and PTZ Controller 1. Wall-Mount Arm 1. Wall-Mount Arm For mounting the PRO-650 Dome to a wall, post or similar vertical surface. 2. Ceiling-mount Bracket For mounting the PRO-650 Dome to the underside of a ceiling or overhang. 3. -
Page 6: Layout Of Remote Control
Layout of Remote Control DISP (Display) Toggles the display on the front of the PTZ Controller, showing the Command Address, Protocol and Baud Rate. PRESET (HOLD to define) Changes or accesses preset points. PATTERN (press and HOLD) Allows for the programming of lists of preset points for the camera to view in sequence. - Page 7 ESC (Escape) Stops the current action and returns to the default interface. Aborts half completed sequences, such as programming a cruise pattern. ARROWS Used to move the camera. SHOT Readies the controller to accept a numerical value for a Preset Position, noted on the display by the letter “P”.
-
Page 8: Connecting The Camera
Connecting the Camera After running the camera cable through the mounting arm/bracket, attach to the main plug on the camera circuit board (see opposite). Connect the BNC connector and power connectors to an extension cable. Connect the purple and white wires to the RS485 plug, and insert the RS485 plug into the RS485 port on the rear of the controller (see opposite). - Page 9 1. Connecting the Camera Cable Before mounting the camera, it is important to connect it correctly. Run the cable through the mounting arm or bracket you would like to use. Make sure you run the cable through starting with the camera end (not the end with the BNC connectors - they’re too big to fit).
-
Page 10: Mounting The Camera
Mounting the Camera NOTE: Before you begin, be sure that there are no live electrical cables in the area you wish to mount the camera. To mount the camera: After connecting the camera as described on page 8 and installing the cables as shown on page 9, place it in the desired location. - Page 11 Field of view The PRO-650 can pan a full 360º. This means that (for example) installing the PRO-650 in a tight corner is probably not an ideal utilization of its potential! A wall is a better option, as it allows 180º of view for the camera. A freestanding pole of sufficient height and integrity to reliably hold the camera securely is an ideal choice, as is the centre of the ceiling in a larger room or a warehouse.
-
Page 12: Setting The Command Address
Setting the Command Address The included PTZ controller is capable of controlling multiple PTZ cameras. Thus, each camera needs its own unique identification (a “Command Address”). To define a camera’s Command Address, connect the camera (and only that camera) to the PTZ controller. Then: •... -
Page 13: Connecting Multiple Ptz Systems
The exact details of the wiring solution will vary by environment - the following is presented only as a guide. Please Note: If you already have, or are planning on getting, a PTZ capable Swann DVR, then using the supplied PTZ controller is optional. The PTZ system can be controlled by the RS485 connection built into the DVR. -
Page 14: Operating The Camera
Operating the Camera The information in this section assumes that you have the PRO-650 attached to the supplied IR receiver/PTZ Controller module and have followed the instructions on page 10 for configuring the Command Address, Protocol and Baud Rate settings. Alternately, if you have the RS485 connections to the PRO-650 attached to a PTZ capable DVR, then use the PTZ controls through your DVR (consult your DVR manual for more details). - Page 15 Removing a Preset Point Removing Preset Points is performed in much the same manner as defining them. Once a Preset Point has been removed, selecting it as detailed opposite will no longer have any effect, until a new point is set. •...
-
Page 16: Advanced Operation
Advanced Operation The numerical command functions shown in this section are recommended only for advanced users. Improper use of these commands may interfere with the functionality of the PTZ system. The PRO-650 PTZ dome can accept many additional commands to those already listed. -
Page 17: Additional Functions
Additional Functions Auto-Home Function The PRO-650 can be configured to automatically return to it’s master Preset Point, the “Home Point”. This is particularly useful for monitoring a door, hallway, car space or similar, where the default position of the camera should be viewing this location. -
Page 18: Troubleshooting Guide
Troubleshooting Guide Problem: My DVR is in Motion Detection mode, and continually records whilst the camera is moving. Solution: This is not a malfunction. When a DVR looks for “motion”, what it is really doing is looking for a change between one image it captures and the next. Therefore, it doesn’t matter whether it’s something the camera sees or the camera itself that is moving, the DVR will interpret the change as movement. -
Page 19: Technical Specifications
Technical Specifications Video Image Sensor Video Quality Number of Effective Pixels Minimum Illumination White Balance Signal / Noise Ratio Electronic Shutter Gain Control Backlight Compensation Lens Viewing Angle Zoom PTZ Features Dome Type Baud Rate Pan Rotation Tilt Rotation Preset Points Preset Panning Speed Preset Panning Accuracy Programmable Pattern... - Page 20 Swann. The end user is responsible for all freight charges incurred to send the product to Swann’s repair centres. The end user is responsible for all shipping costs incurred when shipping from and to any country other than the country of origin.
- Page 21 Advanced security made easy d security made easy Caméra Dôme Pan, Tilt & Zoom PRO-650™ SW331-PR6 www.swannsecurity.com Instructions SR331-PR6-60010-040909...
- Page 22 Avant de commencer Vérifi cation FCC : Note : Cet équipement a été testé et est en conformité avec les limites édictées dans le paragraphe 15 des Règlementations FCC, relatif aux équipements numériques de classe B. Ces limites ont été défi nies dans le but de fournir une protection raisonnable contre les interférences néfastes dans les installations résidentielles.
- Page 23 Table des matières Avant de commencer Table des matières Guide de référence rapide Vue d’ensemble Contenu de l’emballage Présentation de la caméra et du contrôleur PTZ Présentation de la télécommande Connecter la caméra Fixation de la caméra Paramétrage de l’adresse de commande Confi...
-
Page 24: Vue D'ensemble
Kit de montage mur Contrôleur / récepteur PTZ Télécommande Si un de ces éléments est manquant, veuillez contacter le Support technique Swann Les informations de contact se trouvent sur la quatrième de couverture de ce guide. 4 4 4 Vis de montage... -
Page 25: Présentation De La Caméra Et Du Contrôleur Ptz
Présentation de la caméra et du contrôleur PTZ 1. Kit de montage mur ntage mur Pour installer le dôme PRO-650 à un mur ou à une surface verticale. 2. Kit d’installation plafond. Pour installer le système PRO-650 sur un plafond. 3. -
Page 26: Présentation De La Télécommande
Présentation de la télécommande DISP (affi chage) : Fait basculer l’affi chage à l’avant du contrôleur PTZ, montrant l’adresse de commande, le protocole et le taux de transfert. PRESET (Maintenir appuyé pour défi nir) Permet de défi nir ou modifi er les paramètres préenregistrés. PATTERN (Maintenez appuyé) Permet de programmer une liste de paramètres prédéfi... - Page 27 ESC (Echap.) Arrête l’action entreprise et renvoie à l’interface par défaut. Arrête les séquences à moitié entreprises, comme la programmation d’un cycle. FLECHES : Permettent de déplacer manuellement la caméra. SHOT Permet au contrôleur d’accepter une valeur numérique de position prédéfi nie, représentée sur l’affi...
-
Page 28: Connecter La Caméra
Connecter la caméra Après avoir fait passer le câble de la caméra dans son kit d’installation, attachez la prise principale de cette dernière dans le tableau de branchements (voir ci-contre). Branchez le connecteur BNC et les connecteurs d’alimentation à un câble de rallonge. - Page 29 1. Connecter le câble caméra Avant de fi xer la caméra, il est important de s’assurer que tous les branchements ont été effectués. Passez le câble dans le bras du kit de montage que vous souhaitez utiliser. Assurez-vous de faire passer le câble par l’extrémité...
- Page 30 Mise en place de la caméra Note : Avant de commencer, assurez-vous que l’espace dans lequel vous travaillez n’est pas traversé par des câbles électriques branchés. Pour installer la caméra : Après avoir connecté la caméra comme décrit en page 8, installez cette dernière dans l’emplacement désiré.
- Page 31 Hauteur Pour de meilleurs résultats, il est conseillé d’installer le dôme PRO-650 aussi haut que possible. Ceci est dû au fait que la caméra a une liberté de mouvement complète sur 180º sous le plan horizontal. Pour le dire plus simplement, elle peut voir les choses qui sont en dessous d’elle, pas celles qui sont au dessus ! Jonction de câbles Nous conseillons fortement contre la modifi...
-
Page 32: Paramétrage De L'adresse De Commande
Paramétrage de l’adresse de commande Le contrôleur PTZ inclus peut contrôler plusieurs caméras. Chaque caméra doit alors posséder un identifi ant unique (appelé Adresse de commande). Pour défi nir l’adresse de commande d’une caméra, branchez cette dernière (et uniquement cette dernière) au contrôleur PTZ. Ensuite : •... -
Page 33: Connexion De Plusieurs Systèmes Ptz
S’il vous plaît noter: Si vous avez déjà, ou sont sur l’obtention de planifi cation, une mesure PTZ Swann DVR, puis en utilisant le contrôleur PTZ est fournie en option. Le système PTZ peuvent être contrôlés par la liaison RS485 intégré dans le DVR. -
Page 34: Fonctionnement De La Caméra
Fonctionnement de la caméra Les informations présentées dans cette section partent du principe qu’un système PRO-650 est relié au module récepteur IR / contrôleur PTZ fourni et que vous avez suivi les instructions de confi guration de l’adresse de commande, de protocole et de taux de transfert en page 10. De manière alternative, si les connexions RS485 du dôme PRO-650 sont reliées à... - Page 35 Enlever un point de contrôle La technique permettant de supprimer les points de contrôle est sensiblement la même que celle qui permet de les défi nir. Une fois qu’un point de contrôle a été supprimé, le sélectionner comme expliqué ci-contre n’aura aucun effet jusqu’à ce qu’un nouveau point de contrôle ne soit défi...
-
Page 36: Fonctionnement Avancé
Fonctionnement avancé Les fonctions de commande numériques indiquées dans la présente section ne sont recommandées que pour les utilisateurs avancés. Une mauvaise utilisation de ces commandes mai interférer avec le fonctionnement du système de PTZ. Le PRO-650 dôme PTZ peut accepter plusieurs commandes supplémentaires à celles déjà... -
Page 37: Fonctionnement Supplémentaires
Fonctionnement supplémentaires Auto-Démarrage Fonction Le PRO-650 peut être confi guré pour renvoyer automatiquement pour le maître de Preset Point, le “Home Point”. Ceci est particulièrement utile pour surveiller une porte, couloir, espace voiture ou similaires, où la position par défaut de l’appareil devraient voir dans cet endroit. - Page 38 Troubleshooting Guide Problème : Mon DVR est en mode détection de mouvement et ne cesse d’enregistrer quand la caméra bouge. Solution : Ceci n’est pas un dysfonctionnement : Lorsqu’un DVR rehcherche un ‘mouvement’, il esaie en fait de repérer tout changement dans l’image. Ainsi, si la caméra se déplace, le DVR interprétera le changement d’image comme un mouvement.
- Page 39 Technical Specifications Vidéo Capteur d’image Qualité vidéo Nombre de pixels effectifs Éclairage minimal Balance des blancs Signal / Bruit Obturateur électronique Contrôle de gain Compensation de contre Lentille Viewing Angle Zoom Caractéristiques du PTZ Type Dome Baud Rate Pan Rotation Tilt Rotation Preset Points Preset Panning Speed...
-
Page 40: Garantie / Support Technique
à la seule discrétion de Swann. La réparation ou le remplacement sera garanti soit pour quatre-vingt-dix jours soit pour le reste de la période initiale de garantie, selon la période la plus longue.