Table of Contents
Advertisement
Available languages
Available languages
Spotlight Outdoor Security Camera
Cámara de seguridad para exteriores con foco
Caméra de sécurité extérieure Spotlight
Telecamera di sicurezza per esterno con illuminazione
Überwachungskamera für den Außenbereich
SWIFI-SPOTCAM
Quick Start Guide
EN
Guida rapida
IT
Guía de inicio rápido
ES
Schnellstartanleitung
DE
Guide de démarrage rapide
FR
EN
1
Advertisement
Table of Contents

Related Manuals for Swann SWIFI-SPOTCAM


Summary of Contents for Swann SWIFI-SPOTCAM
- Page 1 Spotlight Outdoor Security Camera Cámara de seguridad para exteriores con foco Caméra de sécurité extérieure Spotlight Telecamera di sicurezza per esterno con illuminazione Überwachungskamera für den Außenbereich SWIFI-SPOTCAM Quick Start Guide Guía de inicio rápido Guide de démarrage rapide Guida rapida...
-
Page 2: Camera Overview
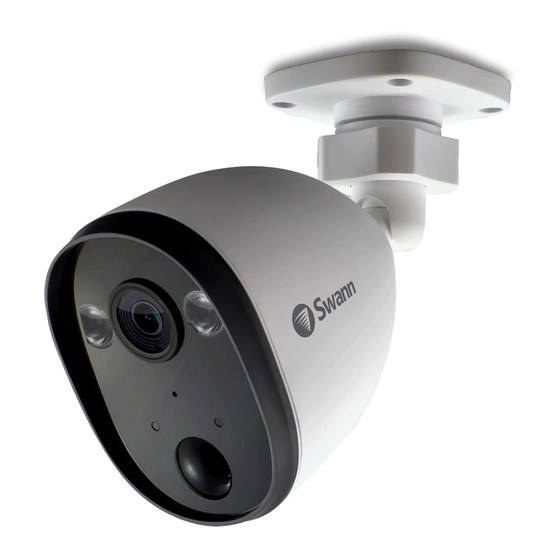
CAMERA OVERVIEW Remember to remove the protective film from the front of the camera before use. Reset Spotlight button Infrared LEDs (for night vision) Power Microphone Connector LED indicator Night detection sensor Passive infrared motion sensor Ethernet Connector Speaker (optional wired connection (bottom) to your router;... -
Page 3: Power The Camera
POWER THE CAMERA Connect the camera to the power adapter using the power & ethernet cable, then plug the power adapter to a power outlet, as shown below. Make sure the camera is within range of the Wi-Fi network to which you want to connect. Power adapter To router LAN port (Optional) Power &... - Page 4 Play™ Store on your iOS or Android device. Simply search for "Swann Security". Open the app and create your Swann Security account. You will need to activate your account by confirming the email sent to the registered email account before you can sign in.
-
Page 5: Set Up The Camera
SET UP THE CAMERA Launch the Swann Security app and sign in. Tap the Pair Device button on the screen (or open Menu and select Pair Device) and follow the in-app instructions to set up your new camera. Before you begin, be close to your router or access point and have your Wi-Fi network information (including password) handy. -
Page 6: Mount The Camera
MOUNT THE CAMERA The camera can be mounted on a flat surface using the included screws (and wall plugs). For best performance, make sure the camera location has good, reliable Wi-Fi reception available. Using the app, try streaming live video from the camera there. If you don’t experience any streaming issues (buffering, etc), you’ve found a good place for your device. - Page 7 Connecting to Wi-Fi Have questions? We’re here to help! Visit our Support Center at support.swann.com. You can register your product for dedicated technical support, find answers to commonly asked questions, and more. You can also email us at any time via: tech@swann.com...
-
Page 8: Descripción De La Cámara
DESCRIPCIÓN DE LA CÁMARA Recuerde retirar la película de protección de frente de la cámara antes de usar. Botón de LED infrarrojos Foco reinicio (para visión nocturna) Conector de Micrófono corriente Indicador LED Sensor de detección nocturna Sensor infrarrojo pasivo de movimiento Conector de Ethernet Altavoz (conexión cableada... -
Page 9: Encienda La Cámara
ENCIENDA LA CÁMARA Conecte la cámara al adaptador de corriente usando el cable de corriente y E ethernet cable, luego enchufe el adaptador de corriente a un tomacorriente, como se muestra a continuación. Verifique que la cámara se encuentre dentro del rango de la red Wi-Fi a la que desea conectarla. Adaptador de corriente Al puerto LAN del enrutador (Opcional) Cable de corriente y... - Page 10 Play™ Store en su dispositivo con iOS o Android. Simplemente busque "Swann Security". Abra la aplicación e cree su cuenta de Swann Security. Deberá activar su cuenta confirmando el correo electrónico enviado a la cuenta de correo electrónico registrada antes de poder iniciar...
- Page 11 CONFIGURE LA CÁMARA Abra la aplicación Swann Security e inicie sesión. Toque el botón Vincular dispositivo en la pantalla (o abra el Menú y seleccione Vincular dispositivo) y siga las instrucciones en la aplicación para configurar su nueva cámara. Antes de comenzar, manténgase cerca de su enrutador o punto de acceso y conserve la información de su red Wi-Fi (incluida la contraseña) a mano.
- Page 12 MONTE LA CÁMARA Monte la cámara en un lugar con recepción buena y confiable de Wi-Fi para garantizar el mejor desempeño en la transmisión de video. Mediante la aplicación, intente transmitir video en vivo desde la cámara. Si no experimenta problemas de transmisión (retraso en la carga, etc.), ha encontrado un buen lugar para su dispositivo.
- Page 13 Conectando a Wi-Fi ¿Alguna pregunta? ¡Estamos aquí para ayudarlo! Visite nuestro Centro de Asistencia en support.swann.com. Puede registrar su producto para obtener asistencia técnica dedicada, encontrar respuestas a preguntas frecuentes y más. También puede enviarnos un correo electrónico en cualquier momento a:...
- Page 14 PRÉSENTATION GÉNÉRALE DE LA CAMÉRA N'oubliez pas de retirer le film protecteur de l'avant de l'appareil avant de l'utiliser. Bouton de LED infrarouges Projecteur réinitialisation (pour la vision nocturne) Câble Microphone d'alimentation Indicateur LED Capteur de détection de nuit Capteur de mouvement infrarouge passif Connecteur Ethernet Haut-parleur (bas)
-
Page 15: Alimentation De La Caméra
ALIMENTATION DE LA CAMÉRA Connectez la caméra à l'adaptateur secteur à l'aide du câble d'alimentation et Ethernet, puis branchez l'adaptateur secteur sur une prise secteur, comme indiqué ci-dessous. Assurez-vous que la caméra est à portée du réseau Wi-Fi auquel vous souhaitez vous connecter. Adaptateur secteur Vers le port LAN du routeur (en option) Câble d'alimentation et... - Page 16 Téléchargez la dernière version de Swann Security depuis l'Apple App Store® ou le Google Play™ Store sur votre appareil iOS ou Android. Il suffit de rechercher "Swann Security". Ouvrez l'application et créez votre compte Swann Security. Vous devrez activer votre compte en...
-
Page 17: Configuration De La Caméra
CONFIGURATION DE LA CAMÉRA Lancez l’application Swann Security et connectez-vous. Appuyez sur le bouton Associer appareil à l’écran (ou ouvrez le Menu et sélectionnez Associer appareil) et suivez les instructions fournies avec l'application pour configurer votre nouvelle caméra. Avant de commencer, approchez-vous de votre routeur ou de votre point d'accès et notez les informations de votre réseau Wi-Fi (y compris votre mot... -
Page 18: Installation De La Caméra
INSTALLATION DE LA CAMÉRA Installez la caméra dans un endroit offrant une réception Wi-Fi fiable et fiable pour garantir les meilleures performances de streaming vidéo. À l'aide de l'application, essayez de diffuser en continu des vidéos en direct à partir de la caméra. Si vous ne rencontrez aucun problème de streaming (mise en mémoire tampon, etc.), vous avez trouvé... - Page 19 Connexion au Wi-Fi Des questions ? Nous sommes là pour vous aider! Visitez notre Centre de Support à l'adresse support.swann.com. Vous pouvez enregistrer votre produit pour un support technique dédié, trouver des réponses aux questions fréquemment posées, etc. Vous pouvez également nous envoyer un email à tout moment via:...
-
Page 20: Panoramica Della Telecamera
PANORAMICA DELLA TELECAMERA Ricordarsi di rimuovere la pellicola protettiva dal lato anteriore della telecamera prima dell’uso. Tasto LED a infrarossi Illuminazione Ripristino (per visione notturna) Connettore Microfono di alimentazione Indicatore a LED Sensore di rilevamento del notturno Sensore di rilevamento del movimento a raggi infrarossi passivo Connettore Ethernet... - Page 21 ALIMENTARE LA TELECAMERA Collegare la telecamera all'alimentatore utilizzando il cavo di alimentazione e Ethernet in dotazione, quindi collegare l'alimentatore a una presa di corrente, come indicato. Verificate che la telecamera sia nel raggio della rete Wi-Fi al quale desiderate collegarvi. Alimentatore Alla porta LAN del router (opzionale) Cavo di alimentazione e...
- Page 22 Scaricare la versione più recente dell’app Swann Security dal’Apple App Store® o da Google Play™ Store sul dispositivo iOS o Android. Basta cercare "Swann Security". Aprire l'app ed creare l'account Swann Security. Prima di poter accedere bisogna attivare l'account confermando l'email inviata all'account email fornito.
- Page 23 CONFIGURAZIONE DELLE TELECAMERA Aprire l’app Swann Security e eseguite l’accesso. Toccate il tasto Abbina dispositivo sullo schermo (o aprire Menu e selezionare Abbina dispositivo) e seguire le istruzioni dell’app per configurare la nuova telecamera. Prima di iniziare avvicinarsi al router o punto di accesso e tenere a portata di mano le informazioni della rete Wi-Fi (inclusa la password).
-
Page 24: Montaggio Della Telecamera
MONTAGGIO DELLA TELECAMERA Montare la telecamera in un luogo con una ricezione Wi-Fi buona e affidabile per garantire la migliore prestazione streaming video. Usando l’app, provare a mostrare video dal vivo dalla telecamera. Laddove non si presentassero problemi di streaming (buffering, ecc.), quello è il luogo perfetto per il dispositivo. - Page 25 Connessione al Wi-Fi Hai domande? Siamo qui per aiutarti! Visita il nostro Centro di supporto su support.swann.com. È possibile registrare il prodotto per l'assistenza tecnica dedicata, trovare le risposte alle domande più frequenti e altro ancora. Puoi anche contattarci via email in qualsiasi momento all'indirizzo: tech@swann.com...
- Page 26 KAMERAÜBERSICHT Entfernen Sie bitte vor Gebrauch die Schutzfolie auf der Vorderseite der Kamera. Reset Spotlight Taste Infrarot-LEDs (für Nachtsicht) Strom- Mikrofon anschluss LED-Anzeige Nacht-Bewegungs- sensor Passiv-Infrarot Bewegungssensor Ethernetanschluss (optionale Lautsprecher Kabelverbindung zum Router, (unten) Kamera muss zuerst über WLAN gekoppelt werden)
- Page 27 KAMERA MIT STROM VERSORGEN Verbinden Sie die Kamera mit dem Strom- und Ethernetkabel mit dem Stromadapter und stecken dann den Stromadapter in eine Steckdose, wie nachstehend gezeigt. Achten Sie darauf, dass sich die Kamera im Empfangsbereich des WLAN befindet, mit dem Sie sie verbinden wollen. Netzadapter An Router-LAN-Anschluss (optional) Strom- und Ethernet-...
- Page 28 Google Play™ Store auf dem iOS- oder Android-Gerät. Suchen Sie einfach nach „Swann Security“. Öffnen Sie die App und erstellen ein Swann Security Konto. Sie müssen vor der Anmeldung Ihr Konto aktivieren, indem Sie die E-Mail bestätigen, die an die registrierte E-Mail gesendet wurde.
-
Page 29: Kamera Einrichten
KAMERA EINRICHTEN Starten Sie die Swann Security App und melden sichan. Tippen Sie auf die Schaltfläche Gerät verknüpfen auf dem Bildschirm (oder öffnen Sie das Menü und wählen Gerät verknüpfen) und befolgen die Anweisungen zum Einrichten der neuen Kamera. Bevor Sie beginnen sollten Sie dicht an Ihrem Router oder Access Point stehen und die WLAN-Daten zur Hand haben (einschließlich dem... -
Page 30: Montage Der Kamera
MONTAGE DER KAMERA Bringen Sie die Kamera an einem Ort mit gutem, zuverlässigem WLAN-Empfang an, um die beste Leistung für den Videostream zu gewährleisten. Versuchen Sie von dieser Stelel aus mit Hilfe der App, Live-Video von der Kamera zu streamen. Wenn Sie keine Probleme beim Streamen haben (Pufferung usw.), haben Sie einen guten Platz für das Gerät gefunden. - Page 31 WLAN verbinden Noch Fragen? Wir helfen Ihnen gerne. Besuchen Sie unser Support-Center auf support.swann.com. Sie können dort Ihr Produkt registrieren und erhalten so technischen Support, Antworten auf häufig gestellte Fragen und vieles mehr. Sie können uns auch jederzeit per E-Mail erreichen unter: tech@swann.com...
- Page 32 20cm from nearby persons. swann.com/uk/compliance. Ce produit ne doit pas être éliminé avec les autres déchets ménagers dans l’UE. Pour WARNING: Modifications not approved by the party responsible for compliance could void user’s authority to éviter tout risque pour l’environnement ou la santé...