KODAK Pocket Pico Projector Manual
- User manual ,
- Quick start manual (24 pages) ,
- User manual (25 pages)
Advertisement
INTRODUCTION
This User Guide is intended to provide you with guidelines to ensure that operation of this product is safe and does not pose risk to the user. Any use that does not conform to the guidelines described in this User Guide may void the limited warranty.
Please read all directions before using the product and retain this guide for reference. This product is intended for household use only.
This product is covered by a limited one-year warranty. Coverage is subject to limits and exclusions. See warranty for details.
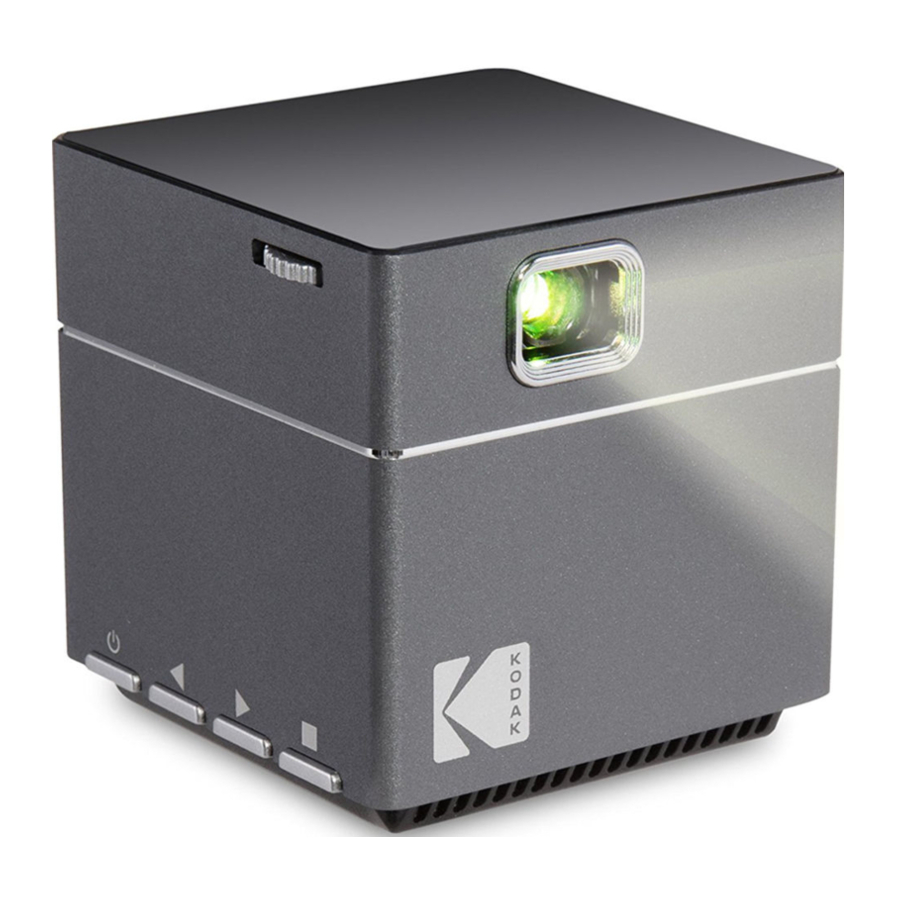
FEATURES

- Focus Wheel
Turn the focus wheel to adjust the image focus of the projector. - Power/Exit Button
Press and hold this button for 5 seconds to turn the projector on or off. Press this button once to return to the previous screen. - Volume – / Previous Button
Decreases the volume or moves to the previous option on the main menu. - Volume + / Next Button
Increases the volume or moves to the next option on the main menu. - Confirm Button
Selects the highlighted option on the menu. - Lens
Projects the video or image files from your input device.
NOTE: Never touch the lens using your hands or any sharp object.
- Air Vent
When the projector is in use, air will cycle through this vent.
NOTE: Always take care that the air vents are never blocked by paper, clothing, or any other obstruction. Blocking the vents may result in overheating of the projector. - MicroSD™ Card Slot
This slot allows you to insert a microSD™ card (up to 64GB), allowing you to access your files directly from the projector. - DC Input
This port allows you to connect the DC power cord to the projector.
NOTE: the power adapter may become warm or hot while in use. Never cover or attempt to touch the adapter while it is connected to a power source. - Mini HDMI® Input
This port is used to connect the HDMI® (High-Definition Multimedia Interface) connector. It is compatible with HD DVD, Blu-ray™, and other protected content playback. - Audio Output
This port allows you to connect an external speaker or headphones to the projector. - Power Indicator Light
Reference the chart below to understand your projector's current status:
- Always take care that the replacement battery is the correct type. Risk of explosion.
- Only use the parts provided by the manufacturer.
| LIGHT COLOR | PRJECTOR IS ON | PROJECTOR IS OFF |
| Red | Charging | Charging |
| Blue | Working | — |
NOTE: the battery capacity status will be displayed on the upper right corner of the projector's main screen.
The ![]() icon will appear on the upper right side of the screen when the power adapter is connected or the battery is fully charged.
icon will appear on the upper right side of the screen when the power adapter is connected or the battery is fully charged.
The  will appear on the upper right side of the screen when the battery power is low. When this happens, you should charge the projector.
Controller

- Volume – Button
- Volume + Button
- Up/Down/Left/Right Buttons
- OK Button
- Menu Button
- Exit Button
- Rewind Button
- Fast Forward Button
- Previous Button
- Next Button
- Play/Pause Button
- Stop Button
- Mute Button
Main Menu

Movie
Accesses the video files on your microSD™ card.
Music
Accesses the music files on your microSD™ card.
Picture
Accesses the image files on your microSD™ card.
HDMI®
Connects the projector to an external device via the HDMI® cable.
Setup
Opens the settings menu, which includes the following options:
Language: the following languages are available
- English
- Spanish
- French
- Japanese
- Italian
- Dutch
- Portuguese
- Chinese
- German
Restore Default: restores the projector to factory settings
Power Off
When this option is selected, you will be prompted "yes" or "no". Select "yes" to power the projector off.
BOX CONTENTS
- KODAK Pocket Pico Projector
- HDMI® Cable
- HDMI® Adapter
- Power Cable
- Power Adapter
- Controller
- Mini Tripod
- Quick Start Guide
SAFETY PRECAUTIONS
When Using the Projector
- Refer to this user guide and take note of all safety precautions before using your projector.
- Do not place the projector on uneven or unstable surfaces.
- Do not use the projector in any place where it may come into contact with smoke. The residue from smoke may cause build-up on critical parts of the projector, resulting in damage or decreased performance.
- Do not use damaged power cords, accessories, and other parts with your projector.
- Keep all parts out of the reach of children.
- Do not block or place anything near the projector's ventilation holes. Doing so may cause internal heat build-up that can result in degraded picture quality and damage to the projector.
- Always ensure that the operating voltage of your projector matches the voltage of your power source.
- Do not store your projector in high temperatures, in direct sunlight, or any place where it may become wet or damp.
- Do not handle this product with wet or damp hands.
- Do not reach for the unit if it has fallen into water. Always unplug it first.
- Do not use this product in a place where it may fall.
- When using for the first time, ensure that the projector is plugged into a grounded wall socket.
- Never attempt to short-circuit the battery.
- Discontinue use if leakage is found.
When Servicing or Replacing Parts
- Never attempt to disassemble this product. There are no user serviceable parts.
- Do not attempt to remove or disassemble the battery. This will increase the risk of fire or chemical burns.
- Always take care that the replacement battery is the correct type. There is a risk of explosion.
- Only use the parts provided by the manufacturer.
SETUP
Before using your projector, check that all parts listed in the Box Contents section of this manual are present. For best results, we recommend mounting the projector on the included tripod.
CHARGE THE PROJECTOR

- Connect the power cable to the power adapter.
- Plug the power cord into an outlet or other power source.
- Plug the power adapter into the projector's DC input.
- You may now use the projector.
- While plugged in, the projector's battery will automatically charge. It is recommended that you allow the projector to charge for at least 4 hours before using it in battery mode for the first time.
NOTE1: When the projector is charging, the power indicator light will glow red, regardless of whether it is powered on or off. When the projector is on, but not charging, or is fully charged, the power indicator light will glow blue.
NOTE2: You may charge the projector with any power adapter that uses a micro USB plug.
AC Power Cord Requirements
Ensure that the correct AC plug type is used, according to your location. If the power cord included with your projector does not match your local power source, contact your sales dealer.
NOTE: It is recommended that your video source device uses a grounded plug. This will prevent signal interference from voltage fluctuations. When using the included power adapter, a two-pronged plug is required.

GENERAL SETUP

- Turn on the Projector
Press and hold the power button for 5 seconds to turn on the projector. - Adjust Screen Size
The screen size will increase or decrease as the projector is brought closer or further from the wall. The chart below details the correlation between distance and screen size.
| SCREEN SIZE (INCHES) | PROJECTED DISTANCE (FEET/METERS) |
| 7 | 0.6 ft. / 0.18 m |
| 38 | 3 ft. / 1 m |
| 56 | 5 ft. / 1.5 m |
| 100 | 8 ft. / 2.5 m |
- Adjust the Focus
Wheel Open a still image and carefully rotate the focus wheel until the image is clear. - Connect Speakers or Headphones
Connect your speakers or headphones to the projector's audio output port using a 3.5mm cable. Adjust the volume as needed. - Insert MicroSD™ Card
Position the microSD™ card with the chip facing up, and slide it into the microSD™ card slot until it clicks into place.
NOTE: when the projector recognizes that a microSD™ card has been inserted, the blue SD card icon will light up on the upper right corner of the screen.
CONNECT TO AN HDMI® DEVICE
Your projector can be connected to a variety of external devices using the included HDMI® cable. Compatible devices include laptops, smartphones, tablets, gaming devices, and more.
- Connect the mini HDMI® end of the cable to the projector.
- Connect the other end of the HDMI® cable to the external device.
| 1 | Devices with HDMI port |  |
| 2 | Devices with mini HDMI port |  |
| 3 | Devices with micro HDMI port |  |
| 4 | iOS devices with lightning port |  |
| 5 | Devices with USB-C (USB type C) port |  |
| 6 | Devices with USB-C (USB type C) port |  |
| 7 | Devices with Screen Mirroring Function |  |
ENABLE YOUR COMPUTER FOR EXTERNAL DISPLAYS
If your computer does not automatically recognize the projector, it means that you must first enable the use of external displays. Each computer is different and may require a different setup.
To set up Windows 7 for external displays, follow the instructions below.
- Open the start menu and select the "Control Panel".

- Select "Appearance and Personalization".

- Under the "Display" section, select "Connect to an external display".

- Here you will be able to select your projector as an external display.


To set up a Mac® computer, follow the instructions below:
Note: in order to connect a Mac® computer to the projector via HDMI®, an adapter is needed.
- Go to the "System Preferences" menu and select "Displays".

- Select the "Arrangements" tab. Make sure that "Mirror Displays" is checked.

- After checking "Mirror Displays", a new window will open. On this display screen, set the resolution to 1024 x 768.


OPERATION
Turn on the Projector
Press and hold the power button to turn on the projector.
PLAYING A MOVIE FILE
- From the main menu, use the
![]() and
and ![]() buttons on the projector, or the direction buttons on the remote to highlight the Movies icon. Use the
buttons on the projector, or the direction buttons on the remote to highlight the Movies icon. Use the ![]() button on the projector or the OK button on the controller to confirm.
button on the projector or the OK button on the controller to confirm. - Select the file that you would like to play. You may select multiple files. Note that after selecting a file, a red checkmark will appear on each selection.
![]()
- Press the
![]() button on the projector or the
button on the projector or the ![]() button on the remote to play the files.
button on the remote to play the files.

Video Controls
Projector:
While playing a video, press the  button on the projector to open the video controls menu. Use the
  and
and buttons to cycle through menu options. Use the button to select.
Menu Options:
Pause: pauses or plays the video
Fast forward: each press will increase the speed by x2, x4, x8, x16, and x32
Rewind: each press will increase the speed by x2, x4, x8, x16, and x32
Previous: play the previous file in the playlist
Next: play the next file in the playlist
Stop: return to the video file list
Repeat: each time this option is selected, a different repeat setting will be confirmed:
R_None: each selected file will play in order. The projector will then return to the file select screen
R_One: one file will play on a loop
R_ALL: each selected file will play in order, in a loop
Random: each selected file will play in a random order Playlist: view and select the files in the current playlist
Controller:
While playing a video, press the OK button on the projector to open the video controls menu. Use the directional buttons to cycle through menu options. Use the OK button to select.
 | decreases the volume |
 | increases the volume |
 | use these buttons to cycle through menu options |
 | use this button to open the control menu and confirm menu choice |
 | press this button, then use the directional buttons to cycle through the following menu options: picture mode, language, and restore settings |
 | press this button to return to the video file list |
 | each press will increase the speed by x2, x4, x8, x16, and x32 |
 | each press will increase the speed by x2, x4, x8, x16, and x32 |
 | play the previous file in the playlist |
 | play the next file in the playlist |
 | pause or play the video |
| return to the video file list. |
 | mutes the sound |
PLAYING A MUSIC FILE
- From the main menu, use the
![]() and
and ![]() buttons on the projector, or the direction buttons on the remote to highlight the Music icon. Use the button on the projector or the OK button on the controller to confirm.
buttons on the projector, or the direction buttons on the remote to highlight the Music icon. Use the button on the projector or the OK button on the controller to confirm. - Select the file that you would like to play. You may select multiple files. Note that after selecting a file, a red checkmark will appear on each selection.


- Press the
![]() on the projector or the
on the projector or the ![]() button on the remote to play the files.
button on the remote to play the files.
Projector:
While playing music, press the button on the projector to open the music controls menu. Use the and buttons to cycle through menu options. Use the to select.
Menu Options:
Pause: pauses or plays the music
Fast forward: each press will increase the speed by x2, x4, x8, and x16
Rewind: each press will increase the speed by x2, x4, x8, and x16
Previous: play the previous file in the playlist
Next: play the next file in the playlist
Stop: return to the video file list
Repeat: each time this option is selected, a different repeat setting will be confirmed:
R_None: each selected file will play in order. The projector will then return to the file select screen
R_One: one file will play on a loop
R_ALL: each selected file will play in order, in a loop
Random: each selected file will play at random Playlist: view and select the files in the current playlist
Controller:
While playing music, press the OK button on the projector to open the music controls menu. Use the directional buttons to cycle through menu options. Use the OK button to select.
| decreases the volume |
| increases the volume |
 | use these buttons to cycle through menu options |
 | use this button to open the control menu and confirm menu choice |
| not available in music mode |
| press this button to return to the video file list |
| each press will increase the speed by x2, x4, x8, x16, and x32 |
| each press will increase the speed by x2, x4, x8, x16, and x32 |
| play the previous file in the playlist |
| play the next file in the playlist |
| pause or play the video |
| return to the video file list. |
| mutes the sound |
VIEWING A PICTURE FILE
- From the main menu, use the
![]() and
and ![]() buttons on the projector, or the direction buttons on the remote to highlight the Picture icon. Use the
buttons on the projector, or the direction buttons on the remote to highlight the Picture icon. Use the ![]() button on the projector or the OK button on the controller to confirm.
button on the projector or the OK button on the controller to confirm. - Select the file that you would like to view. You may select multiple files. Note that after selecting a file, a red checkmark will appear on each selection.


- Press the
![]() on the projector or the
on the projector or the ![]() button on the remote to view the files.
button on the remote to view the files.
Picture Controls
While viewing photos, press the OK button on the projector to open the photo controls menu. Use the directional buttons to cycle through menu options. Use the OK button to select.
NOTE: When viewing photo files, the projector will automatically enter slideshow mode. While in this mode, each photo in the file list will automatically play in order.
Menu Options:
Pause: pauses or plays the slideshow
Previous: play the previous file in the playlist
Next: play the next file in the playlist
Stop: return to the video file list
Repeat: each time this option is selected, a different repeat setting will be confirmed:
R_None: each selected file will play in order. The projector will then return to the file select screen.
R_One: one file will play on a loop
R_ALL: each selected file will play in order, in a loop
Random: each selected file will play at random
Playlist: view and select the files in the current playlist
Rotate Right: turns the photo clockwise by 90° Rotate Left: turns the photo counterclockwise by 90°
Controller:
While playing a slideshow, press the OK button on the projector to open the slideshow controls menu. Use the directional buttons to cycle through menu options. Use the OK button to select.
| not available in picture mode |
| not available in picture mode |
 | use these buttons to cycle through menu options |
 | use this button to open the control menu and confirm menu choice |
| press this button, then use the directional buttons to cycle through the following menu options: picture mode, language, and restore settings |
| press this button to return to the picture file list |
| not available in picture mode |
| not available in picture mode |
| play the previous file in the playlist |
| play the next file in the playlist |
| pause or play the slideshow |
| return to the picture file list |
| not available in picture mode |
CARE AND MAINTENANCE
- Before cleaning your projector, make sure that it is switched off and unplugged.
- Wipe the projector's housing using a clean dry cloth.
- Make sure that the lens is cool before cleaning it. Wipe it gently using a lens cleaning paper or cloth. Never touch the lens with bare hands.
- Do not clean the projector with liquid or aerosol cleaners, or any harsh or abrasive chemicals
- Do not submerge this product in water or any other liquid.
- Never operate the projector immediately after moving it to a cold location. When exposed to a drastic temperature change, moisture may condense on the lens and other internal parts, resulting in damage to the projector. It is recommended to wait at least 2 hours after exposing the projector to drastic temperature changes.
TROUBLESHOOTING
Q Why is the projector's blue indicator on, but the projection screen has not yet turned on?
A Make sure not to press and hold the power key too long. Release the power key as soon as the blue indicator is on. Please be patient and not push the power key repeatedly while the projector system is booting. Otherwise this may cause the projector to become stuck.
Why can I not play the files from my microSD™ card?
A Please check:
- If the capacity of this microSD™ card is higher than 64GB. The capacity supported by the projector is only up to 64GB.
- If the microSD™ card is not standard compliant.
Why can some movies not be played
A In this case, there are several possibilities:
- The file size is too large.
- The video resolution is higher than 1080p. The supported resolution is only up to 1080p.
- The file format is not supported. Please refer to the video format support list in the specifications section.
Why is my movie not playing sound?
A Due to the copyright issue of Dolby®, this projector does not support Dolby® audio decoding. You might not get sound from videos if they use Dolby® audio decoding.
Q What should I do if the projector system has crashed or is stuck?
A In this case, there are several possibilities that may cause the system to crash.
- The computing power of the projector cannot catch up the one of the connected devices.
- The display resolutions between the projector and the connected device do not match. The possible solution is to restart the projector. Then the projector will work normally.
DISPOSAL PRECAUTIONS
- Do not throw your projector into municipal waste. This product is designed to allow for proper reuse of parts and recycling. The symbol of the crossed-out bin indicates that the product should not be placed in municipal waste. Check local regulations for disposal of electronic products.
- Do not throw the battery into municipal waste. The symbol of the crossed-out bin indicates that the battery should not be placed in municipal waste.
- Never attempt to dispose of this product in fire or water. Risk of explosion or injury.
- When disposing of this product, contact your local recycling center for proper and responsible disposal instructions.
SPECIFICATIONS
Native resolution 854*480 (FWVGA)
Compatible resolution 640*480~1920*1080
Display technology Ti DLP
Light source: RGB LED
Focus: manual adjust
Brightness (ANSI): 100 Lumens
Contrast ratio: 1000:1
Power supply: DC 5V/2A (Micro USB type)
Power consumption: 7W
Built-in Speaker: 8Ω1W(x1)
Input: mini HDMI®/MicroSD™ slot (up to 64GB)
Audio output: ( ![]() 3.5mm)
3.5mm)
Battery: 3.7V 2500MAH
Dimensions: 2" x 2" x 2" (55 x 55 x 55mm)
Weight: 5.8 oz. (165g)
LED working life: above 30000 hrs.
Relative working humidity: 10%~90%
Supported photo file formats: PNG/BMP/JPEG/JPG
Supported video file formats: DAT/FLV/MKV/MOV/MP4/MPG/RM/TRP/TS/WMB/RMVB
Supported audio file formats AAC/FLAC/M4A/OGG/MP3/WAV/WMA
FCC COMPLIANCE STATEMENT
This equipment has been tested and found to comply with the limits for a Class B digital device, pursuant to Part 15 of the FCC Rules. These limits are designed to provide reasonable protection against harmful interference in a residential installation. This equipment generates uses and can radiate radio frequency energy and, if not installed and used in accordance with the instructions, may cause harmful interference to radio communications. However, there is no guarantee that interference will not occur in a particular installation. If this equipment does cause harmful interference to radio or television reception, which can be determined by turning the equipment off and on, the user is encouraged to try to correct the interference by one or more of the following measures:
- Reorient or relocate the receiving antenna.
- Increase the separation between the equipment and receiver.
- Connect the equipment into an outlet on a circuit different from that to which the receiver is connected.
- Consult the dealer or an experienced radio/TV technician for help. This device complies with part 15 of the FCC Rules. Operation is subject to the following two conditions:
- This device may not cause harmful interference.
- This device must accept any interference received, including interference that may cause undesired operation.
You are cautioned that any change or modifications to the equipment not expressly approved by the party responsible for compliance could void your authority to operate such equipment.
If the time arises to throw away your product, please recycle all the components possible. Batteries and rechargeable batteries are not to be disposed in your domestic waste! Please recycle them at your local recycling point.
CUSTOMER SERVICE CONTACT INFORMATION
Should you experience any problems with your product, please contact us before returning the item to the place of purchase. We're here to help!
U.S. Support: kodak@camarketing.com, 844-516-1539
International Support: kodakintl@camarketing.com, 844-516-1540

Documents / ResourcesDownload manual
Here you can download full pdf version of manual, it may contain additional safety instructions, warranty information, FCC rules, etc.
Advertisement
Thank you! Your question has been received!


Need Assistance?
Do you have a question about the Pocket Pico Projector that isn't answered in the manual? Leave your question here.