KODAK Pocket Portable Projector 3"H | 3"W | 0.8"D Manual
- User manual (16 pages) ,
- User manual (16 pages)
Advertisement
BOX CONTENTS
KODAK Pocket Portable Projector
HDMI Cable
USB Cable
User Guide
SAFETY PRECAUTIONS
When Using the Projector
- Refer to this user guide and take note of all safety precautions before using your projector.
- Do not place the projector on uneven or unstable surfaces.
- Do not use the projector in any place where it may come into contact with smoke. The residue from smoke may cause build-up on critical parts of the projector, resulting in damage or decreased performance.
- Do not use damaged power cords, accessories, and other parts with your projector.
- Keep all parts out of reach of children.
- Do not block or place anything near the projector's ventilation holes. Doing so may cause internal heat build-up that can result in degraded picture quality and damage to the projector.
- Always ensure that the operating voltage of your projector matches the voltage of your power source.
- Do not store your projector in high temperatures, in direct sunlight, or any place where it may become wet or damp.
- Do not handle this product with wet or damp hands.
- Do not reach for the unit if it has fallen into water. Always unplug it first.
- Do not use this product in a place where it may fall.
- When using for the first time, ensure that the projector is plugged into a grounded wall socket.
- Never attempt to short-circuit the battery.
- Discontinue use if leakage is found.
When Servicing or Replacing Parts
- Never attempt to disassemble this product. There are no user serviceable parts.
![]()
Do not attempt to remove or disassemble the battery. This will increase the risk of fire or chemical burns.- Always take care that the replacement battery is the correct type. Risk of explosion.
- Only use the parts provided by the manufacturer.

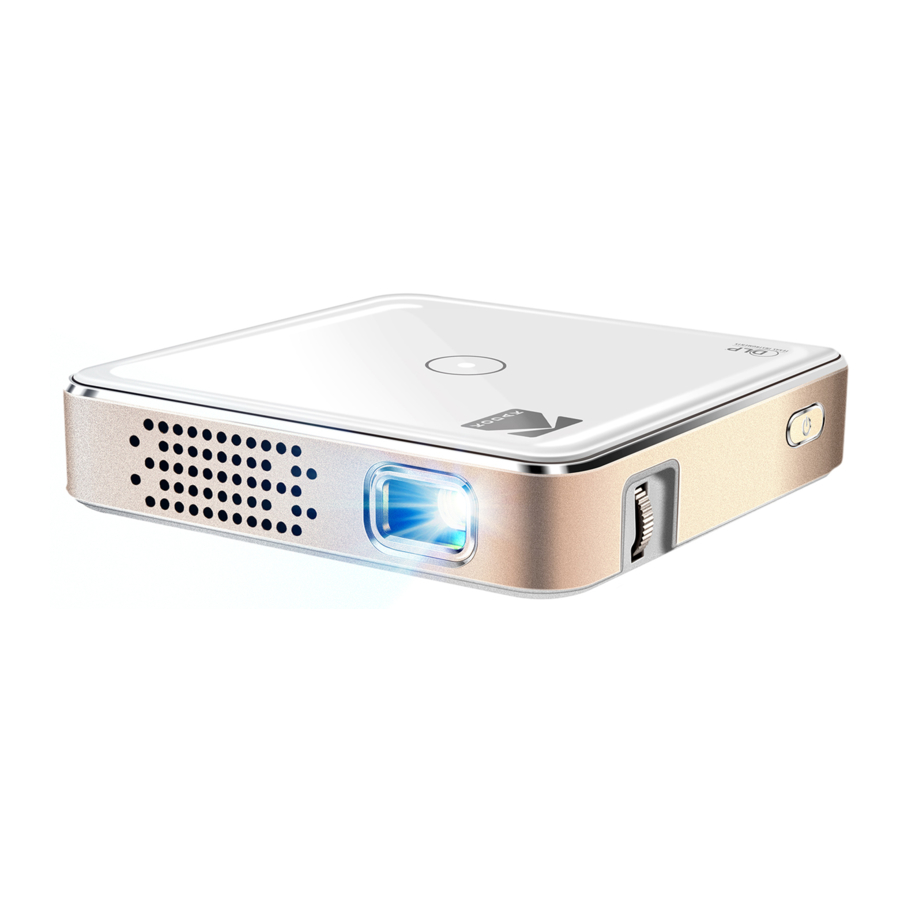
FEATURES
TOP VIEW

- Control Panel Buttons
Use the control panel buttons to navigate the on screen menu. These buttons are also used to control specific projector settings as shown below.- Back
- Confirm / Play / Pause
- Right / Fast-Forward / Volume+
- Left / Rewind / Volume–
- Volume
- Power Indicator
- Power Indicator
- The projector's current charge is shown by the 4 lights on the side of the control panel. When the projector is powered on, the lights will flash.
- Each light represents 25% charge, 1 light indicating low charge, and 4 lights indicating full charge.
- When charging, the next power level will blink on and off.
- To view the current charge, press the power button once.
FRONT VIEW

- Lens
Projects the video or image files from your input device.
NOTE: Never touch the lens using your hands or any sharp object. - Speaker
Plays back the audio from the currently playing video.
REAR VIEW

- Audio Output
This port allows you to connect an external speaker or headphones to the projector. - USB Input/Power Out
This port allows you to connect a USB flash drive or other external device to the projector. It also provides up to 5V/2A of voltage and current, allowing you to use the projector to charge a mobile device. - HDMI Input
This port is used to connect the HDMI® (High-Definition Multimedia Interface) connector. It is compatible with HD DVD, Blu-Ray, and other protected content playback.
NOTE: If the USB and/or microSD inputs are used at the same time as the HDMI®, the HDMI® will take priority. - DC Input
This port is used to connect the power adapter (not included). It is used both to provide direct power to the projector and to charge the internal battery.
NOTE: the power adapter may become warm or hot while in use. Never cover or attempt to touch the adapter while it is connected to a power source.
RIGHT SIDE

- Power Button
Press and hold this button for 5 seconds to turn the projector on or off. Press this button once to view the current charge. - Focus Wheel
Turn the focus wheel to adjust the image focus of the projector.
LEFT SIDE

- MicroSD Slot
This slot allows you to insert a microSD card, giving you access to your files directly from the projector. - Air Outlet Vent
When the projector is in use, warm air will exit from this vent.
NOTE: Always take care that the air vents are never blocked by paper, clothing, or any other obstruction. Blocking the vents may result in overheating of the projector.
BOTTOM VIEW

- Air Inlet Vent
When the projector is in use, cool air will enter this vent.
NOTE: Always take care that the air vents are never blocked by paper, clothing, or any other obstruction. Blocking the vents may result in overheating of the projector. - Tripod Dock
This dock allows the projector to be mounted onto a tripod. - Rating Label
The specifications of the projector can be found here. - Non-Slip Feet
These rubber feet provide additional traction to the projector, allowing it to be more stable when on a surface.
SETUP
Charge the Device
- Connect the adapter to the micro USB port of the projector, using the included power cord.

- Plug the adapter into an outlet or other power source.
- You may now use the projector.
- While plugged in, the projector's battery will automatically charge. It is recommended that you allow the projector to charge for at least 4 hours before using it in battery mode for the first time.

AC Power Cord Requirements
Ensure that the correct AC plug type is used, according to your location. If the power cord included with your projector does not match your local power source, contact your sales dealer.
NOTE: It is recommended that your video source device uses a grounded plug. This will prevent signal interference from voltage fluctuations.

Connect an External Device to the Unit
- Turn on the Projector
Press and hold the power button for 5 seconds to turn on the projector.

- Adjust the Focus Wheel
Open a still image and carefully rotate the focus wheel until the image is clear. - Adjust Screen Size
The screen size will increase or decrease as the projector is brought closer or further from the wall. The chart below details the correlation between distance and screen size.
After the screen is the desired size, use the focus wheel to adjust the image clarity.

- Connect to a an External Device
Your projector can be connected to a variety of external devices using the included HDMI cable. Compatible devices include laptops, smart phones, tablets, gaming devices, and more.- Connect one end of the HDMI cable to the projector.

- Connect the other end of the HDMI cable to the external device.
- Connect one end of the HDMI cable to the projector.


NOTE: Some devices may require an adapter in order to connect to the projector. Check the table below if using a device that is not HDMI compatible.
| 1 | Devices with HDMI port |  |
| 2 | Devices with mini HDMI port |  |
| 3 | Devices with micro HDMI port |  |
| 4 | iOS devices with lightning port |  |
| 5 | Devices with USB-C (USB type C) port |  |
| 6 | Devices with USB-C (USB type C) port |  |
| 7 | Devices with Screen Mirroring Function |  |
- Enable your Computer for External Displays
If your computer does not automatically recognize the projector, it means that you must first enable the use of external displays. Each computer is different and may require a different setup.
To set up Windows 7 for external displays, follow the instructions below.- Open the start menu and select the "Control Panel".

- Select "Appearance and Personalization".

- Under the "Display" section, select "Connect to an external display".

- Here you will be able to select your projector as an external display.

- Open the start menu and select the "Control Panel".


To set up a Mac computer, follow the instructions below.
NOTE: In order to connect a Mac computer to the projector via HDMI, an adapter is needed (not included).
- Go to the "System Preferences" menu and select "Displays"

- Select the "Arrangements" tab. Make sure that "Mirror Displays" is checked.

- After checking "Mirror Displays", a new window will open. On this display screen, set the resolution to 1024 x 768.


Connect Speakers or Headphones
- Connect your speakers or headphones to the projector's audio output port, using a 3.5mm cable.
- Adjust the volume as needed.
Insert MicroSD Card or USB Drive
Slide the microSD card into the microSD card slot until it clicks into place. If using a USB drive, insert it into the USB input.
OPERATION
Turn on the Device
Press and hold the power button to turn on the projector.
Playing a Video File
- After turning on the projector, you will be prompted to select either Movies or Images.
- Tap the Confirm button to gain access to the control panel, then use the confirm button to select Movies.
![]()
- You will then be prompted to select either USB or MicroSD. Use the
![]() and
and ![]() buttons to highlight the format you wish to access. Then tap the confirm button to select.
buttons to highlight the format you wish to access. Then tap the confirm button to select.
![]()
- Use the
![]() and
and ![]() buttons to cycle through the list of files. Select the file you wish to play with the confirm button.
buttons to cycle through the list of files. Select the file you wish to play with the confirm button.
![]()


Video Controls

Before you can use the control panel, you must always tap the confirm button to make it appear first.
Pause: Tap the confirm button.
Fast Forward: Tap the  button. Each tap will increase the speed by x2, x4, x8, and x16.
Rewind: Tap the  button. Each tap will increase the speed by x2, x4, x8, and x16.
Back: tap the  button to return to the video file list. Tap this button again to return to the main menu.
Volume Control: Tap the  button. Then use the and
  buttons to increase or decrease the volume.
Playing a Photo File
- After turning on the projector, you will be prompted to select either Movies or Images.
- Tap the confirm button to gain access to the control panel.
- Use the
![]() to highlight the Images option. Then use the confirm button to select Images.
to highlight the Images option. Then use the confirm button to select Images.
![]()
- You will then be prompted to select either USB or MicroSD. Use the
![]()
![]() buttons to highlight the format you wish to access. Then tap the confirm button to select.
buttons to highlight the format you wish to access. Then tap the confirm button to select.
![]()
- Use the left and right buttons to cycle through the list of files. Select the file you wish to play with the confirm button.
![]()


Photo Controls
When playing a photo file, the projector will automatically enter slideshow mode. While in this mode, each photo in the file list will automatically play in order.
Pause Slideshow: Tap the confirm button.
Resume Slideshow: Tap the confirm button.
Play Next Image: Tap the button.
Play Previous Image: Tap the button.
CARE AND MAINTENANCE
- Before cleaning your projector, make sure that it is switched off and unplugged.
- Wipe the projector's housing using a clean dry cloth.
- Make sure that the lens is cool before cleaning it. Wipe it gently using a lens cleaning paper or cloth. Never touch the lens with bare hands.
- Do not clean the projector with liquid or aerosol cleaners, or any harsh or abrasive chemicals.
- Do not submerge this product in water or any other liquid.
- Never operate the projector immediately after moving it to a cold location. When exposed to a drastic temperature change, moisture may condense on the lens and other internal parts, resulting in damage to the projector. It is recommended to wait at least 2 hours after exposing the projector to drastic temperature changes.
DISPOSAL
- Do not throw your projector into municipal waste. This product is designed to allow for proper reuse of parts and recycling. The symbol of the crossed-out bin indicates that the product should not be placed in municipal waste. Check local regulations for disposal of electronic products.
- Do not throw the battery into municipal waste. The symbol of the crossed-out bin indicates that the battery should not be placed in municipal waste.
- Never attempt to dispose of this product in fire or water. Risk of explosion or injury.
- When disposing of this product, contact your local recycling center for proper and responsible disposal instructions.
SPECIFICATIONS
| Display | Display Technology | 0.2" DLP DMD |
| Light Source | RGB LED | |
| Light Source Life | 30000 hours | |
| Native Resolution | 640x360 | |
| Brightness | 75 lumens | |
| Contrast Ratio(typical) | 1300:1 | |
| Color Saturation(NTSC) | 100% | |
| Display Colors | 16.7 million colors | |
| Pixel Shape | Square | |
| Projection images | Throw Ratio | 2.2 |
| Aspect Ratio | 16:9 | |
| Projection Distance | 0.65 ft. to 12.5 ft. (0.2m to 3.8m) | |
| Projection Screen Size | 5-80 inches (12.7cm to 203cm) | |
| Projection Offset | 100% | |
| Input/Output | Image Input Modes | HDMI input |
| Speakers | 1w *1 | |
| Audio Out | 3.5 mm Headphone jack | |
| Signal Frequency | Digital Signal Frequency | 24.7 KHz(H) to 74.6 KHz(H)/50Hz(V) to 60Hz(V) |
| Power | Power On Mode | ≤ 4W |
| Power Off Mode | ≤ 0.003W | |
| Battery | Battery Capacity | 2500 mAH |
| Battery Life | up to 2 hours when Video Mode | |
| Noise | Acoustic Noise | 30dB |
| Mechanical Design | Panel Colors | White |
| Frame Colors | Gold | |
| Chassis Colors | White | |
| Tripod Socket | Copper M6 screw hole | |
| Button | Touch button | |
| Dimension | Physical Dimensions | 3" x 3" x 0.8" (80mm x 80mm x 20mm) |
| Weight | Net Weight | 5 oz. (140g) |
| Gross Weight with Packing | 10 oz. (280g) | |
| Working Environment | Operating Temperature | 0°F to 40°F |
| Operating Humidity | 20% to 90% | |
| Regulation Approvals | Certificate | FCC, IC, CP65, IEC60065 |
CUSTOMER SERVICE
kodak@camarketing.com 844-516-1539
WARRANTY
LIMITED WARRANTY TO ORIGINAL CONSUMER
This product is covered by a limited one-year warranty. Coverage is subject to limits and exclusions.
This KODAK Pocket Portable Projector ("Product"), including any accessories included in the original packaging, as supplied and distributed new by an authorized retailer is warranted by C&A Marketing, Inc. (the "Company") to the original consumer purchaser only, against certain defects in material and workmanship ("Warranty") as follows:
To receive Warranty service, the original consumer purchaser must contact the Company or its authorized service provider for problem determination and service procedures. Proof of purchase in the form of a bill of sale or receipted invoice, evidencing that the Product is within the applicable Warranty period(s), MUST be presented to the Company or its authorized service provider in order to obtain the requested service.
Service options, parts availability, and response times may vary and may change at any time. In accordance with applicable law, the Company may require that you furnish additional documents and/or comply with registration requirements before receiving warranty service. Please contact our

Documents / ResourcesDownload manual
Here you can download full pdf version of manual, it may contain additional safety instructions, warranty information, FCC rules, etc.
Download KODAK Pocket Portable Projector 3"H | 3"W | 0.8"D Manual
Advertisement
Thank you! Your question has been received!


Need Assistance?
Do you have a question about the Pocket Portable Projector that isn't answered in the manual? Leave your question here.