Table of Contents
Advertisement
Advertisement
Table of Contents

Related Manuals for Kodak Slide Projector


Summary of Contents for Kodak Slide Projector
- Page 1 Operating Manual KODAK CAROUSEL ® Slide Projector CONSUMER IMAGING...
-
Page 2: Important Safety Instructions
6. Position the cord so that it is not tripped over, pulled, or placed in contact with hot surfaces. 7. If an extension cord is necessary, use a cord with a current rating at least equal to that of the projector. - Page 3 Operating Manual KODAK CAROUSEL Slide Projector...
-
Page 5: Table Of Contents
How to Obtain Service ........29 Serial Number The serial number of your projector is printed on the label affixed to the power cord retainer on the base of the projector. Record this number, as well as the model identification, date, and place of purchase, for future reference. -
Page 6: Introduction
Introduction Congratulations! You have just purchased a KODAK CAROUSEL Slide Projector which: • triples lamp life • provides brighter and more vivid colors! Introduction Take the time to read the instructions in this operating manual to become familiar with your KODAK CAROUSEL it properly. -
Page 7: Overview
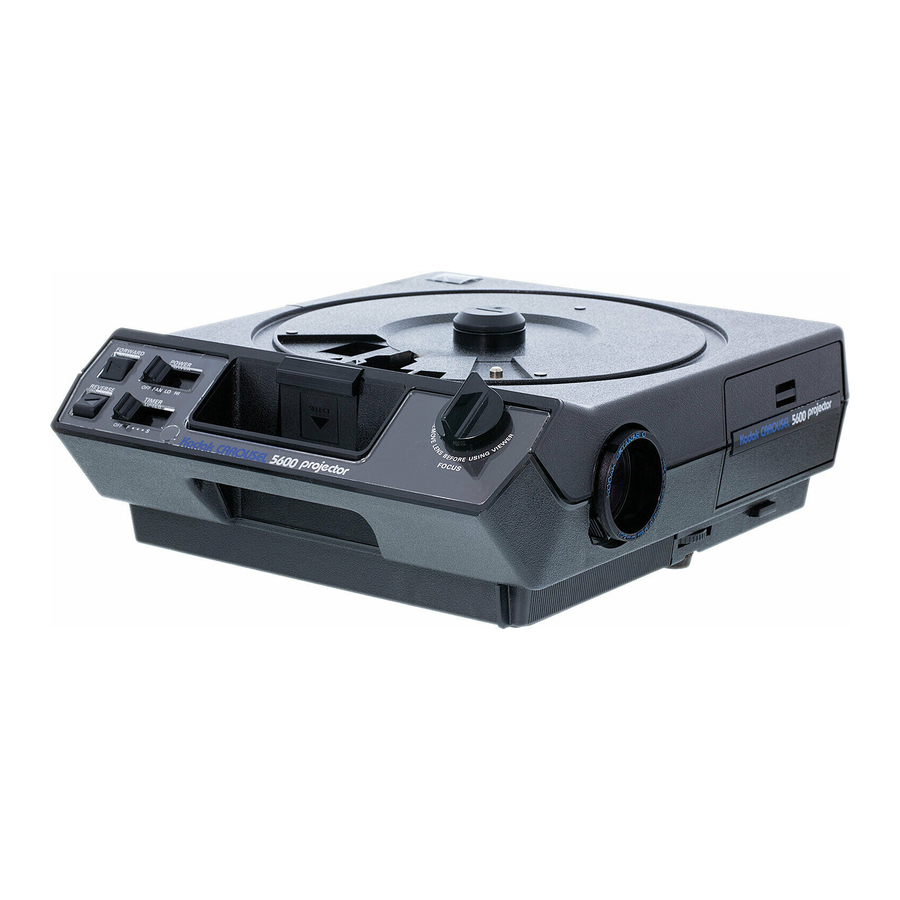
15 – Tray Release Latch 16 – Lamp Module 17 – Reading Light 18 – Room Light Outlet (Model 5600) 19 – Remote Control Receptacle BASE 20 – Power Cord 21 – Power Cord Retainer 22 – Leveling Foot KODAK CAROUSEL® Slide Projector... -
Page 8: Operation
Open the storage compartment and remove the remote control. Plug the 5-pin cable remote connector into the remote-control receptacle, aligning the raised dot with the metallic rivet head. Plug the power cord into a grounded outlet with 110- to 125-volt 60 Hz current only. KODAK CAROUSEL® Slide Projector... -
Page 9: Loading The Slide Tray
Be sure that your slide mounts are in good condition; frayed or bent mounts may fail to drop into the projector. A variety of slide trays are available with capacity up to 140 slides. See your dealer in Kodak products for a complete list of Kodak trays and accessories. - Page 10 Insert your first slide into the first slot in the tray so that the number is visible on the outer circumference of the tray. Insert your second slide in the second slot with the emulsion (dull side) facing your first slide, and so on. KODAK CAROUSEL® Slide Projector...
- Page 11 Replace the lock ring by turning it clockwise until it is secure Tray Place the loaded slide tray on the projector. Align the tray index bar with the gate index. The tray will drop into position. KODAK CAROUSEL® Slide Projector...
- Page 12 Operation Removing the Tray To remove the slide tray: press the • align the • You can then lift off the tray. all the way down select bar with the tray index bar gate index KODAK CAROUSEL® Slide Projector...
-
Page 13: Projecting Your Slides
Projecting Your Slides Lens To insert a lens, push the focus knob up and position the lens gear teeth on the lens barrel with the notch on the projector. Lamp Slide the power switch to lamp. KODAK CAROUSEL® Slide Projector Operation... - Page 14 Reverse first slide. To change slides, briefly press the forward or reverse buttons. Focus Focus your first slide using the focus knob on the projector or the focus button on the remote control (Models 4400 and 5600 only). Autofocus The autofocus feature automatically focuses each slide after you focus your first slide manually.
- Page 15 Use the elevating foot to horizontally center the projected image on the screen. To release the foot, press the release button, while lifting the front of the projector to the desired height. Use the elevating wheel to make fine adjustments.
- Page 16 Plug any standard room light into the room light outlet and turn it on. It will (Model 5600 only) remain on until the projector is turned to the lamp position (when a darkened room is required). When you turn the projector off at the end of your presentation, the room light will come on again.
- Page 17 Single Slides To project single slides, slide the power switch on. Remove the tray and insert a slide upside down into the projector gate. Push the slide all the way down. After viewing the slide, press forward, reverse, or the select bar to eject the slide.
- Page 18 Operation Choosing a Curved- The lens you select depends on how you use your projector and what type of or Flat-Field Lens slide mount you use. So that you may choose the lens that best meets your needs, we do not include a lens with the projector.
- Page 19 Operation KODAK CAROUSEL® Slide Projector...
-
Page 20: Editing Your Presentation
Adding a Slide When the lock ring is off, you can add a slide to any empty slot. (See “Adding Your Slides” on page 6.) Replace and secure the lock ring. KODAK CAROUSEL® Slide Projector... -
Page 21: Clearing A Gate Jam
Clearing a Gate Jam To remove a defective slide or foreign object stuck in the projector gate, you need to remove the tray. • Slide the tray release latch in the direction of the arrow, and • with your other hand, lift off the back of the tray. -
Page 22: Using The Built-In Viewer (Model 5600 Only)
Lens of the projector as you withdraw the lens. Opening the Grasp the viewer handle and pull it out from the base of the projector. It will Viewer pop into place. Slide the power switch to lamp to project your slides. -
Page 23: Shutdown
Reinserting the To reinsert the lens, push the focus knob up and position the lens gear teeth Lens on the lens barrel with the notch on the projector. Shutdown To shut down, • remove and store the tray • slide the power switch to off Your projector will remain warm for several minutes. -
Page 24: Maintenance
EXY (200 hours/less brightness) EXR (35 hours/maximum brightness) Note: An EXW lamp is not recommended for older models of CAROUSEL Projectors. Contact the Kodak Information Center at 1-800-242-2424 in the U.S. or 1-800-465-6325 in Canada if you need help identifying your particular model. -
Page 25: Changing The Projection Lamp
Changing the Projection Lamp Slide the power switch to Off and unplug the projector. Allow the projector and lamp to cool for about 10 minutes. Push the lamp-module release button and remove the lamp module. Note: There is an additional... -
Page 26: Cleaning The Condenser, Heat-Absorbing Glass, And Mirror
Use a torx-head screwdriver to remove the screw. Using a flat-blade screwdriver, apply ample pressure to release each of the metal tabs. Lift off the top of the lamp module. KODAK CAROUSEL® Slide Projector... - Page 27 You can clean the condenser lens in place, or by pulling it out. Wear gloves to prevent fingerprints. Caution Heat-Absorbing The heat-absorbing glass is fragile. Handle it only when cool. Glass (For lamp modules The green-tinted heat-absorbing glass easily removes for cleaning. with a heat-absorbing glass.) KODAK CAROUSEL® Slide Projector Maintenance...
- Page 28 Start with the tabs in the rear of the lamp module. Insert the remainder of the tabs into slots until all 7 tabs on the top and 2 on the bottom are secured. Insert the screw and tighten. Then insert and seat the lamp. KODAK CAROUSEL® Slide Projector...
- Page 29 To clean the mirror, invert the lamp module to reach the mirror. Gently clean the mirror with a soft, lint-free cloth moistened with lens cleaner. When your maintenance is complete, push the lamp module back into the projector. KODAK CAROUSEL® Slide Projector Maintenance...
-
Page 30: Troubleshooting
Try a flat field lens. (See “Choosing a Curved- or Flat-Field Lens” on page 14.) Use a flat field lens. UInstall new lamp and try again. Turn off autofocus. Install new lamp and try autofocus again. KODAK CAROUSEL® Slide Projector... - Page 31 Straighten mount or remount slide. Set projector on a stand equal with center of screen. Check lamp. Check condenser lens. Check slide position and slide- mount condition. Reposition tray. See "Clearing a Gate Jam" on page 17. KODAK CAROUSEL® Slide Projector...
-
Page 32: Warranty
Kodak will repair it without charge, except for worn-out projector lamps. If Kodak is unable to repair the projector, the option of replacement or refund of the purchase price will be available. -
Page 33: How To Obtain Service
1-800-465-6325, Monday through Friday, 8:30 a.m. to 5 p.m. (Eastern time). Or call Kodak in your country. Shipping To help us get your KODAK CAROUSEL Slide Projector back to you promptly, please enclose a note giving details of the problem, dated proof of Instructions purchase, and your complete name and shipping address. - Page 34 Consumer Imaging EASTMAN KODAK COMPANY Rochester, New York 14650 www.kodak.com/go/projectors Kodak, Ektagraphic, and Kodalux are trademarks. CONSUMER IMAGING Part No. 5B4904 9/99 Minor Revision ©EastmanKodak Company Printed In U.S.A.