Table of Contents
Advertisement
Quick Links
Advertisement
Table of Contents

Related Manuals for Cortelco 1 4-Line Multi-User


Summary of Contents for Cortelco 1 4-Line Multi-User
-
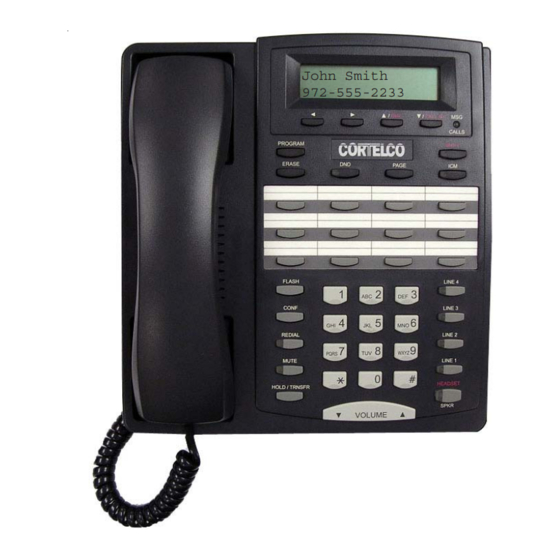
Page 1: Telephone System
4-Line Multi-User Capable Telephone System John Smith 972-555-2233... -
Page 2: Table Of Contents
Receiving Multiple Calls Simultaneously ... 13 Viewing the Caller ID Database ... 13 Dial a Telephone Number from the Caller ID Database ... 14 Store the Telephone Number in a Speed Dial Location ... 14 Erasing a Caller’s Information from the Caller ID Database ... 14 Erasing All Caller ID Information from the Caller ID Database ... - Page 3 Handset / Headset Volume ... 25 Ringer Volume ... 25 Speakerphone Volume ... 25 Important Safety Instructions ... 26 Repair Of Your Telephone ... 27 The FCC Wants You To Know ... 28 Wall Mounting Template ... 29 Limited Warranty ... 30...
-
Page 4: Introduction
Introduction Button Descriptions and Functions... - Page 5 29 - 30. Volume - Adjusts the volume of the feature that you are currently using. If the telephone is idle, the ringer volume is adjusted. 31. Line 3 / Line 4 Telephone Jack - 2 Pair (4 conductor) line cord is required when plugging into a 2-line RJ14C wall jack.
-
Page 6: Installation
5. The combined total length of cable allowed between all telephones in the system cannot exceed 600 feet. Select a Location For Your Telephone This telephone may be used on a desk or wall mounted. Choose a location that meets the following requirements: 1. Near an AC outlet. -
Page 7: Adjust The Viewing Angle
Adjust the Viewing Angle The telephone has 2 desktop viewing angles and a wall mount position. To adjust the angle, remove the brackets from the left and right side of the telephone and reposition as shown below. -
Page 8: Wall Mounting
7. Adjust the Viewing Angle Brackets on the left and right side of the telephone to allow the phone to rest flat on the wall. 8. Plug the short telephone cord into the L1/L2 jack on the back of the telephone. - Page 9 Handset Catch Press to release Wall Mount Adapter Move Viewing Angle Brackets on the left and right side of the telephone as shown. Telephone Cord Channel Replace Wall Mount Adapter Handset Jack Lines 1 & 2 Lines 3 & 4...
-
Page 10: Using Your Telephone
NOTE: The first available line will automatically be selected. You may press a line button to dial out from a specific line. 2. Dial the telephone number you wish to call. The number will appear on the display window. 3. After the conversation has finished, place the handset back in the cradle to disconnect. -
Page 11: Answering A Telephone Call (Co Line Or Intercom)
Pressing the line button while the telephone is idle will activate the speakerphone. 2. Dial the telephone number you wish to call. The number will appear on the display window. -
Page 12: Features And Operation Caller Id
Caller ID. Area Codes Prior to using the Caller ID feature of the telephone, your home area code and any local area codes should be programmed. This will allow you to dial local numbers from the Caller ID log. -
Page 13: Receiving Caller Id On An Idle Telephone
Receiving Caller ID on an Idle Telephone 1. When a call is received on an idle telephone, the display will show the name, telephone number, and line that the call is received on. a. If you answer the call, the Caller ID data will remain on your display for the duration of the call. -
Page 14: Dial A Telephone Number From The Caller Id Database
OCT 08 14:22 4. The display will return to idle after 20 seconds. Pressing any button other than Dial a Telephone Number from the Caller ID Database 1. Locate the number you wish to call (from Viewing Caller ID Database section). -
Page 15: Erasing All Caller Id Information From The Caller Id Database
Data Jack The data jack on the back of the telephone allows you to connect a fax or modem. The data jack is a spare jack that is connected directly to Line 2. If line 2 is not present, the data jack is not usable. -
Page 16: Date And Time
4. Press the up or down arrow key to turn the dial pad On or Off. 5. Press the right arrow key to confirm your selection. Do Not Disturb (DND) The Do Not Disturb function may be used to avoid any telephone interruptions. When activated, your telephone will not ring for any calls. •... -
Page 17: Extension Numbers
5. Press the right arrow key to confirm your selection. Headset Mode A headset may be used with your 4-line telephone to allow you to use your phone hands-free. When the phone is in Headset Mode, the Speakerphone and the hook-switch inside the handset cradle are disabled. -
Page 18: Operation
Use the headset and handset operation when in headset mode. • Pressing Speed Dial buttons or Line buttons will cause the telephone to go off hook. Use the NOTE: It is important to remember that the hook switch is inoperative when in headset mode. -
Page 19: Placing An Intercom Call
Intercom Calls. You may, however, still answer intercom calls. Line Connection Each 4-line telephone comes default with all four lines enabled. Because the phone has Line In Use detection, lines that are not connected will be lit constantly. Turning off line connections for inactive lines will turn the Line In Use light off, and disable access to the line. -
Page 20: Line Status Indication
Message Waiting / New Call Indication If you subscribe to Caller ID from your local telephone company, the MSG/CALLS light will light solid when a call is received, until it is reviewed from the Caller ID database. Message Waiting will show on the LCD with line #. -
Page 21: Paging An Individual Extension
Paging an Individual Extension 1. a. If using the handset, pick up the handset and press b. If using speakerphone or a headset, press 2. Dial the extension number you wish to page. 3. Speak your message. After you have finished, hang up or press the button to disconnect. -
Page 22: Prime Line Programming
5. Press the right arrow key to confirm your selection. Privacy / Privacy Release Privacy prevents other 4-line telephones from intruding on a outside line conversation with another 4-line telephone. Privacy can be released on a per-call basis or for all calls. Per Call Privacy Release •... -
Page 23: Ring Type Programming
5. If the you do not pick up the handset or press the telephone will hang up, wait 60 seconds, and dial again. This process will repeat for up to 10 times. NOTE: You may stop the process any time by pressing the... -
Page 24: Ringer Enable / Disable
7. Press the right arrow key to confirm your selection. Speed Dial There are a total of 24 speed dial locations on the telephone. The speed dial buttons are in 2 groups: 12 direct dial buttons, and 12 shifted direct dial buttons that can be accessed using the by one of the 12 direct dial buttons. -
Page 25: Tone/Pulse Mode
Press * any time during your call to change to tone dialing mode. The telephone is returned to pulse mode when you disconnect. Tone/Pulse Mode Depending on the phone service available in your area, you may need to adjust the dialing mode. -
Page 26: Important Safety Instructions
Do not place any objects on the telephone line cord. Do not locate the telephone where the line cord will be walked Do not block or cover ventilation slots and openings in the bottom of the telephone. The openings should never be blocked by placing the telephone on a bed, sofa, rug, or other similar surfaces. -
Page 27: Repair Of Your Telephone
DO NOT ATTEMPT TO REPAIR THIS PRODUCT YOURSELF. 4-Line Telephones manufactured by CORTELCO must be returned to us for repair. You can return your telephone to CORTELCO for repair or replacement in accordance with our LIMITED WARRANTY. DATE-OF-PURCHASE: CORTELCO warrants THIS PRODUCT against defects in material and workmanship in accordance with our LIMITED WARRANTY. -
Page 28: The Fcc Wants You To Know
RENs and be sure that the total is not more than five. Your telephones may not ring if the total is more than five. Also, in some rural locations, your telephone may not ring if the REN total is more than three. -
Page 29: Wall Mounting Template
PLACE THIS TEMPLATE ON THE WALL. THE LOCATION OF THE SCREWS IS INDICATED BY THE CENTERS OF THE CROSSED LINES. FASTEN THE SCREWS WITH ANCHORS, LEAVING 3/16” OF THE SCREW EXTENDING FROM THE WALL. -
Page 30: Limited Warranty
If this product was purchased by you new in the U.S. or Puerto Rico, CORTELCO warrants it against defects in material and workmanship for a period of one (1) year from the date of original purchase. This warranty is in lieu of all other express warranties.