Table of Contents
Advertisement
Available languages
Available languages
Quick Links
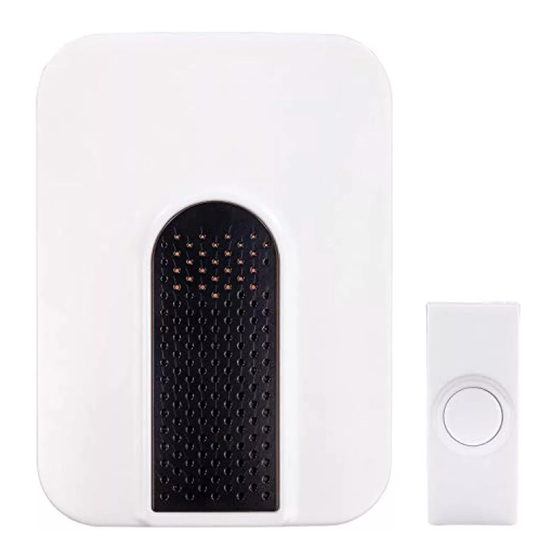
This package includes (Style of push button and chime may vary from illustration):
Model
7307
Figure 1
Figure 2
© 2018 HeathCo LLC
Wireless
plug-in
chime
✔
WARNING: To prevent possible
SERIOUS INJURY or DEATH:
• NEVER allow small children near
batteries.
• If battery is swallowed, immediately
notify doctor.
1. Remove orange battery tab from push
button. Remove back of case by pushing in
tab on bottom with a small screwdriver (see
Figure 1). Remove orange battery tab.
2. Plug in wireless chime (see Figure 2).
IMPORTANT: This power unit is intended to
be correctly orientated in its vertical mount
position.
This plug will fit into the power outlet only as
recommended by the manufacturer. Do not
try reversing the plug. This is a safety feature.
If you are unable to insert the plug fully into
the outlet, contact your electrician to replace
your obsolete outlet.
3. Test range. Temporarily position push button
where you want it mounted. Press push button
to verify chime and push button work properly.
If chime does not sound, see Troubleshooting.
Wireless Plug-In
Wireless push
Hardware
button
✔
Chime
pack
✔
209669-02A
Advertisement
Table of Contents

Related Manuals for Heath Zenith 7307


Summary of Contents for Heath Zenith 7307
- Page 1 This package includes (Style of push button and chime may vary from illustration): Wireless Wireless push Hardware plug-in button pack chime Model 7307 ✔ ✔ ✔ WARNING: To prevent possible SERIOUS INJURY or DEATH: • NEVER allow small children near batteries. • If battery is swallowed, immediately notify doctor.
- Page 2 4. Mount push button. Use either screws or double sided tape to mount push button. • Screw Mounting: To mount with screws, remove back of case by pushing in tab on bottom with a small screwdriver (see Figure 1). Note: Remove material in screw holes (if needed) before mounting with screws.
-
Page 3: Multifunction Button
Tune Settings The chime has different selectable tunes: Ding (one note tune), Ding-Dong (two note tune), Westminster, or Whittington. The factory setting is for the Westminster tune. This tune can be changed by following the instructions in the Tune Setting Table. Note: All chime models are designed to work with up to 5 push buttons (sold separately). -
Page 4: Troubleshooting
Troubleshooting 1. PROBLEM: Chime does not sound or rang one time and quit. A. POSSIBLE CAUSE: Push button and chime are not synced. A. CORRECTIVE ACTION: Sync the push button and chime. • Press and hold the button on the chime until the chime sounds a “Beep-Beep”. - Page 5 3. PROBLEM: Chime sounds when not intended (false triggers). POSSIBLE CAUSE: Chime is receiving interference from another wire- less device. CORRECTIVE ACTION: Reset chime and push button. • Remove push button battery. Wait 30 seconds. • Press and hold the push button for 10 to 15 seconds within 60 seconds after installing battery into the push button.
-
Page 6: Technical Service
Technical Service Please contact us for assistance No Service Parts Available for this before returning product to the Product store or to HeathCo LLC. HeathCo LLC If you experience a problem, follow P.O. Box 90045 this guide. You may also contact us be- 2445 Nashville Road tween 8:00 AM to 5:00 PM CST (M-F). -
Page 7: One-Year Limited Warranty
ONE YEAR LIMITED WARRANTY This is a “Limited Warranty” which gives you specific legal rights. You may also have other rights which vary from state to state or province to province. For a period of one year from the date of purchase, any malfunction caused by factory defective parts or workmanship will be corrected at no charge to you. - Page 8 Campana Pulsador Paquete de inalámbrica inalámbrico ferretería enchufable Modelo 7307 ✔ ✔ ✔ ADVERTENCIA: Para prevenir una posible LESIÓN SERIA o LA MUERTE: • NUNCA deje que los niños estén cerca de las baterías. • Si se traga una batería, notifique inme- diatamente al doctor.
- Page 9 3. Pruebe el alcance. Ponga provisionalmente el pulsador en la posición donde lo quiera instalar. Presione el pulsador para verificar que la campana y el pulsador funcionen apropiadamente. Si la campana no suena, vea Análisis de Averías. 4. Instale el pulsador. Use ya sean tornillos o cinta adhesiva por ambas caras para instalar el pulsador.
-
Page 10: Botón Multifunción
Programación del tono La campanilla tiene diferentes melodías que se pueden seleccionar: Ding (melodía de una nota), Ding-Dong (melodía de dos notas), Westminster, o Whit- tington. La calibración de fábrica es el tono Westminster. Esta melodía se puede cambiar siguiendo las instrucciones de la Tabla de Programación de Melodías. Nota: Todos los modelos de campanillas están diseñados para trabajar hasta con 5 botones pulsadores (se venden por separado). -
Page 11: Análisis De Averías
Análisis de Averías 1. PROBLEMA: La campanilla no suena o hace ruido una sola vez y se detiene. A. CAUSA POSIBLE: El botón pulsador y la campanilla no están sincroni- zados. A. ACCIÓN CORRECTIVA: Sincronice el botón pulsador y la campanilla. •... - Page 12 3. PROBLEMA: La campanilla suena cuando no debe hacerlo (activadores falsos). CAUSA POSIBLE: La campanilla está recibiendo interferencia de otro dispositivo inalámbrico. ACCIÓN CORRECTIVA: Reinicialice la campanilla y el botón pulsador. • Retire la batería del botón pulsador. Espere 30 segundos. •...
-
Page 13: Servicio Técnico
Servicio Técnico Por favor comuníquese con nosotros No hay piezas de servicio antes de devolver el producto a la disponibles para este producto. tienda o a HeathCo LLC. HeathCo LLC En caso de cualquier problema, siga P.O. Box 90045 esta guía. Puede también comunicarse 2445 Nashville Road con nosotros entre las 8:00 AM y las Bowling Green, KY 42101, USA... - Page 14 GARANTÍA LIMITADA A 1 AÑO Esta es una “Garantía Limitada” que le da a Ud. derechos legales espe- cíficos. Usted puede también tener otros derechos que varían de estado a estado o de provincia a provincia. Por un período de 1 año desde la fecha de compra, cualquier mal fun- cionamiento ocasionado por partes defectuosas de fábrica o mano de obra será...
- Page 15 Carillon Bouton-poussoir Ensemble de sans fil avec sans fil ferrures stroboscope Modèle 7307 ✔ ✔ ✔ MISE EN GARDE : Pour éviter les risques de BLESSURES GRAVES, voire de DÉCÈS : • Ne laissez JAMAIS un enfant seul près des piles.
- Page 16 3. Plage d’essai. Positionnez temporairement l’unité de bouton-poussoir à l’endroit où vous désirez la monter. Enfoncez le bouton-poussoir pour vous assurer que celui-ci et le carillon fonc- tionnent correctement. Si le carillon ne retentit pas, consultez la section Dépannage. 4. Montez l’unité de bouton-poussoir. Utilisez soit des vis, soit du ruban adhésif double face pour monter l’unité...
-
Page 17: Réglage De La Mélodie
Réglage de la mélodie Le carillon offre plusieurs sonneries distinctes : « ding » (sonnerie à une note), « ding, dong » (sonnerie à deux notes), Westminster ou Whittington. Le réglage de l’usine est celui du timbre Westminster. Cette mélodie peut être changée en suivant les instructions retrouvées dans le Tableau du réglage des mélodies. -
Page 18: Dépannage
Dépannage 1. PROBLÈME : Le carillon n’émet pas de son, ou a sonné une fois avant de s’arrêter. A. CAUSE POSSIBLE : Le bouton-poussoir et le carillon ne sont pas synchronisés. A. MESURE CORRECTIVE : Synchronisez le bouton-poussoir et le carillon. •... - Page 19 3. PROBLÈME : Le carillon sonne à des moments inopportuns (déclenche- ments intempestifs). CAUSE POSSIBLE : Le carillon subit des interférences provenant d’un autre appareil sans fil. MESURE CORRECTIVE : Réinitialisez le carillon et appuyez sur le bouton. • Retirez le pile du bouton-poussoir. Attendez 30 secondes. •...
-
Page 20: Service Technique
Service Technique Veuillez communiquer avec nous Aucune pièce de rechange n’est pour obtenir de l’aide avant de disponible pour ce produit. retourner le produit au magasin HeathCo LLC ou à HeathCo LLC. P.O. Box 90045 En cas de problème, consultez ce 2445 Nashville Road guide. -
Page 21: Garantie Limitée De 1 An
GARANTIE LIMITÉE DE 1 AN Il s’agit d’une « Garantie limitée » qui vous confère des droits juridiques spécifiques. Vous pouvez également jouir d’autres droits, variables d’une province à l’autre. Pendant une période de 1 an à compter de la date d’achat, toute anomalie de fonctionnement imputable à... - Page 22 This device complies with Part 15 of the FCC Rules. Operation is subject to the following two conditions: (1) this device may not cause harmful interference, and (2) this device must accept any interference received, including interference that may cause undesired operation. CAN ICES-003 (B)/NMB-003 (B) Note: This equipment has been tested and found to comply with the limits for a Class B digital device, pursuant to part 15 of the FCC Rules.
- Page 23 NOTES / NOTAS _________ _______________________ _______________________ _______________________ _______________________ _______________________ _______________________ _______________________ _______________________ _______________________ _______________________ _______________________ _______________________ _______________________ _______________________ _______________________ _______________________ Helpful Videos – www.hzsupport.com Helpful Answers – 1-800-858-8501...
- Page 24 Chime Purchase Information Información de la compra de la campana Renseignements d’achat du carillon Model #: _____________________________________________ Nº de modelo / N° de modèle Date of Purchase: _____________________________________ Fecha de compra / Date d’achat Staple Purchase Receipt Here Engrape aquí el recibo de compra Agrafez le reçu d’achat ici PLEASE KEEP YOUR DATED SALES RECEIPT, IT IS REQUIRED FOR ALL WARRANTY REQUESTS.