Table of Contents
Advertisement
Quick Links
Amplified Telephone with SOS
Emergency Calls
English
NOTE:
This phone may be used by people with hearing problems.
It has a variable volume headset until 40dB. On first use,
make sure that the handset volume is set to minimum. The
hearing impaired person may subsequently increase the
volume to suit their needs.
Advertisement
Table of Contents

Related Manuals for Geemarc CL610


Summary of Contents for Geemarc CL610
- Page 1 Amplified Telephone with SOS Emergency Calls English NOTE: This phone may be used by people with hearing problems. It has a variable volume headset until 40dB. On first use, make sure that the handset volume is set to minimum. The hearing impaired person may subsequently increase the volume to suit their needs.
- Page 3 Please refer to our website: www.geemarc.com for an up to date user guide, as there may be important updates and changes you need to be aware of!
-
Page 4: Table Of Contents
Contents Contents ..............3 Prior To Use ..............5 - Congratulations ..............5 - Safety Precautions ............6 - Setting Up ................. 7 Check the contents of the box ..........7 Choosing a location ..............7 Adapter installation ..............7 - Connecting the Telephone .......... - Page 5 Contents Phone Setting ............20 1) LCD Contrast setting ............. 20 2) Ringer setting ..............20 3) Alarm bracelet ............... 20 4) Flash time setting ............21 5) Voice function ............... 21 6) Language setting ............22 7) Playing the outgoing SOS message ......22 8) Recording the outgoing SOS message ......
-
Page 6: Prior To Use
Prior To Use Congratulations Congratulations on purchasing our product. Please read the manual carefully to learn all about the features available and how your telephone works. This will help you to get the best of your new phone. -
Page 7: Safety Precautions
Prior To Use Safety Precautions To prevent any risk of electrical shock and injury, please follow these basic safety precautions before using the phone: 1. Carefully read and observe the instructions in this manual. 2. The phone is capable of amplifying sounds to a loud volume. It is important to instruct all potential users of its proper operation. -
Page 8: Setting Up
Prior To Use Setting Up CHECK THE CONTENTS OF THE BOX Box should contain: Handset with handset cord and phone base Telephone line cord 4 Alkaline batteries AA 1.5V User's manual Remote for emergency call with his battery CR2025 Adapter (9VDC 0.2A) Wall mount bracket CHOOSE A LOCATION The unit should be located in an area where it is easy to see the... -
Page 9: Connecting The Telephone
Prior To Use Connecting the telephone - Connect the handset cord (1). - Unclip the battery door with a screw driver in the hole. Insert 4 x AA alkaline batteries (2). In case of power failure, batteries are required for the ring. - Snap the battery door back in place. -
Page 10: Wall Mounting
Prior To Use Wall mounting The telephone can also be installed on a wall. You require two screws in order to fix the telephone on a wall. Feed the guide tabs (1) on the wall-mounting bracket (2) in the slots (3) on the rear side of the telephone. Slide the wall bracket (2) 10mm upwards until it audibly snaps into place. -
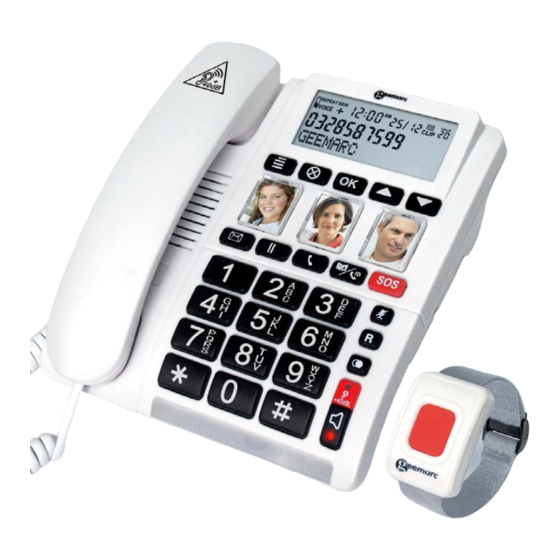
Page 11: Location Of Controls
Prior To Use 1. LDC screen 13. Handsfree mode button 2. Menu button 14. Handsfree mode indicator 3. Delete button 15. Incoming ring indicator/new call 16. Slide receiver volume (hidden under 4. OK button handset) 17. One−touch dialling button (mail 5. -
Page 12: Keys Description
Prior To Use Keys Description Make / Answer / End a call. Activates the speakerphone if pressed during a call, as described in page 17. The LED is ON to inform you that the function is activated. Last number redial, as described in page 15. When you dial a phone number, press this key to insert an Pause. -
Page 13: Lcd Description
Prior To Use Press this key to enter in Menu. Press this key to access to the function EDIT when you are in Phonebook contact. Press this key to access at the function DELETE or DELETE ALL when you are positioned on CID number. - Page 14 Prior To Use In Emergency SOS dialing mode or while review Phone book, if you see this icon “ ” means the numbers are Set as emergency number. If the caller has exercised the option to prevent his name from being sent, "OUT OF AREA"...
-
Page 15: Menu Functions
Basic Functions Menu Functions Ringer level settings A switch located on right side allows the ringer to be switched HI, MIDDLE or LOW position: : Low, : Middle, : Hi. Menu Navigation To access a menu option: 1. To display menu list, press the Menu soft key. -
Page 16: Dialing The Last Number Dialed
Basic Functions Basic Functions Menu Functions Dialing the last Number dialed Lift the handset or press on key and press key to dial the last number dialed. Dialing a Number from the Phonebook Make sure “ ” icon is showed on the top right display. If not, press “CLIP/PB”... -
Page 17: Muting The Microphone
Menu Functions 3. To end the call, replace he handset on the base or press Muting the Microphone During a conversation, you can temporarily switch your phone's microphone off. The other party will not be able to hear you. To mute your microphone, press and hold the key during the conversation. -
Page 18: Using Your Phone With Hearing Aids
Basic Functions Menu Functions Basic Functions Using your Phone with hearing aids Your phone can be used with hearing aids equipped with a telecoil (T-coil). Adjust your hearing aid "T-switch" position. Make sure to hold the handset close to your hearing aid. Hands-free During a call, you may turn on the speakerphone that is built into the phone. -
Page 19: Caller Id Function
Menu Functions Caller ID This telephone automatically displays an incoming caller's number / name along with the date and time of the call. It will record up to 64 calls and store the data into memory. IMPORTANT: You must subscribe to Caller ID Service from your local telephone company to utilize this feature. -
Page 20: Menu Map
CID Functions Menu Functions Deleting all entries Make sure “CLIP” icon is showed on the display. If not, press key, you should hear “Caller ID list”. CLIP/PB Select an entry using key. Press and hold key. The display shows DELETE ALL?. Press again. -
Page 21: Phone Setting
Phone Setting Phone Setting Phone setting 1) LCD Contrast Setting Press soft key to display the main menu list. Press key to access LCD CONTRAST. Press key to valid. Press key repeatedly to choose among the 5 available contrast levels and then press soft key. -
Page 22: Flash Time Setting
Phone Setting Press key to move to DELETE?, press key, you will see DELETE ALL?. All paired Emergency call units will be deleted. Press key to exit 4) Flash Time Setting Press soft key to display the main menu list. Press the key to move to FLASH and then press key. -
Page 23: Language Setting
Phone Setting 6) Language Setting The phone supports up to 7 predefined languages:English, Espanol, Françaish, Deutsch, Hebrew, Italiano, Nederlands. You can change the language used to display the menu messages and voice function. Press key to display the main menu list. Press the key to move to LANGUAGE and then press key. -
Page 24: Deleting The Outgoing Alert Message
Phone Setting Press key to display the main menu list. Press the key to move to RECORD MESSAGE. Press and hold key, after to hear a long beep, leaft your SOS message. Release the key to end recordind. Press key to exit. Deleting the outgoing alert message Press key to display the main menu list. -
Page 25: Creating Phone Book Entries
Phone Setting Enter a space by pressing “1”. Delete a character by pressing Wait until the cursor skips one place forward. Enter the letter again. Creating phone book entries Press key to display the main menu list. Press the key to move to STORE NUMBER.”... -
Page 26: Editing Entrie In The Phone Book
Phone Setting Menu Functions Deleting recording from one phonebook contact Press key to display the main menu list. Press the key to move to NAME RECORDING and press key. Press key repeatedly until the desired entry is displaied Press during playback to delete the recording. Editing entrie in the phone book Press to enter Phone book directory and select an... -
Page 27: Creating Memory Picture Key
Phone Setting Delete all entries from the phone book Press to enter Phone book directory and select an entry using Press and hold for approx. 4 s. The display shows DELETE ALL?. Press key again. The message DELETED! Confirm that your contact is deleted. To abort the deleting procedure press Creating memory picture key Press... -
Page 28: Sos Emergency Dialing
Phone Setting Enter the name and press Select “Alert Number” then press key. The screen displays LOCATION, enter the number of the location SOS position. Note: Set it to “1” if you want the number to be dialed first during SOS Emergency dialing mode. You have no limit for the number of SOS phone number. -
Page 29: Battery Replacement
Phone Setting Battery replacement Press shortly the SOS button on the emergency call. The LED lights up. If the LED no longer lights up when the button is pressed and held, replace the battery as below. Remove the 2 screws on the rear side of the emergency call unit using a small, crosstip screwdriver. -
Page 30: Technical Specifications
TECHNICAL SPECIFICATIONS TECHNICAL SPECIFICATIONS Carrier frequency : 433 MHz Receiving amplification : up to 40 dB Remote Range : Up to 20~30 meters (open area) Remote weight : 30 grams Operating voltage : Telephone base: DC 9V 0.2A, 1.8W : Remote: 3V Li-metal Battery CR2025 Radio Frequency Power : <20 dbm... -
Page 31: Features
FEATURES • 30 Emergency dialing from Phone book memory + (two way to activate the Emergency dialing by remote control or SOS Key) • 30 phone book memory (non volatile memory) • Loud ringer 90dB • Slide Tone frequency control •... -
Page 32: Troubleshooting
Troubleshooting No dial tone 1. Check that all phone cord connections are securely plugged into the telephone & wall jack. 2. Plug another phone into the wall jack to make sure your phone service is working properly. No audible ringer 1. -
Page 33: Safety Information
SAFETY INFORMATION General Only use the power supply included with the product. Do not open the unit. Contact the helpline for all repairs. Cleaning Clean the telephone with a soft cloth. Never use polishes or cleaning agents - they could damage the finish or the electrics inside. Environmental Do not expose to direct sunlight. -
Page 34: Guarantee
GUARANTEE From the moment your Geemarc CL610 is purchased, Geemarc guarantee it for the period of two years. During this time, all repairs or replacements (at our discretion) are free of charge. Should you experience a problem then contact our help line or visit our website at www.geemarc.com. -
Page 35: Recycling Directives
For product support and help visit our website at www.geemarc.com E-mail : help@geemarc.com Telephone : 01707 387602 Parc de l’étoile, 2 rue Galilée, 59760 Grande-Synthe, France. lines are open 09h00 to 16h00 Mon to Fri This product is made in China To Geemarc Telecom... - Page 36 UGCL610_En_V1.0...