Multitech RouteFinder RF560VPN Quick Start Manual
Soho internet security appliance
Hide thumbs
Also See for RouteFinder RF560VPN:
- Reference manual (18 pages) ,
- Reference manual (13 pages) ,
- User manual (82 pages)
Table of Contents
Advertisement
Quick Links
Advertisement
Table of Contents

Related Manuals for Multitech RouteFinder RF560VPN


Summary of Contents for Multitech RouteFinder RF560VPN
- Page 1 SOHO Internet Security Appliance RF560VPN Quick Start Guide...
- Page 3 Furthermore, Multi-Tech Systems, Inc. reserves the right to revise this publication and to make changes from time to time in the content hereof without obligation of Multi-Tech Systems, Inc. to notify any person or organization of such revisions or changes.
-
Page 4: Table Of Contents
System Requirements ...4 Unpacking Your RouteFinder ...4 Cabling Your RouteFinder ...5 3 – Configuring the PC...6 4 – Navigating the Screens...13 5 – Configuring the RF560VPN...14 About the Browser Interface ...14 Start the RF560VPN Configuration...14 Setup Wizard...16 6 – Technical Support ...33... -
Page 5: Introduction And Description
The User Guide The User Guide can be installed from the RF560VPN System CD by clicking Install Manuals on the Installation screen or downloading the file from the Multi-Tech Web site at: http://www.multitech.com. -
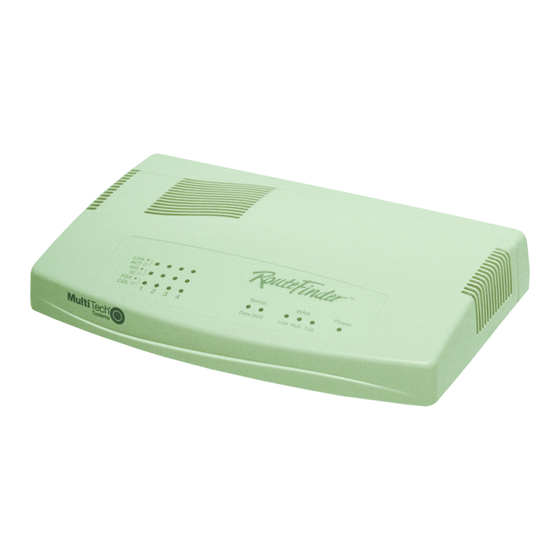
Page 6: Rf560Vpn Front Panel
Blinks when it is receiving or transmitting data. Blinks when it is starting, saving the configuration, or Status performing a firmware update. Normally, it should be off. Lights when power is being supplied to the router. Power Multi-Tech Systems, Inc. RF560VPN Quick Start Guide... -
Page 7: Rf560Vpn Back Panel
The Serial port connects a standard modem (optional). Serial The Reset button resets the router to factory defaults. Press and hold the Reset button until the Status LED of the RF560VPN Reset blinks, and then release it. Do not press this button unless you want to restore all settings to the factory defaults. -
Page 8: Installation
The RF560VPN shipping box contains the following items: · The RouteFinder RF560VPN · RF560VPN System CD · Power Supply · This Quick Start Guide If any of the items is missing or damaged, please contact Multi-Tech Systems, Inc. Multi-Tech Systems, Inc. RF560VPN Quick Start Guide... -
Page 9: Cabling Your Routefinder
(If you have more than one PC, connect the others in the same way to the other LAN ports). If using an analog modem, connect it to the RF560VPN’s serial port. Connect a network cable from the DSL modem or cable modem to the WAN port. -
Page 10: Configuring The Pc
If the TCP/IP protocol line associated with your network card/adapter is listed, proceed to Step 5. If not listed, see the User Guide, Appendix B, for installation directions. Then click the Properties button. Multi-Tech Systems, Inc. RF560VPN Quick Start Guide... - Page 11 You have completed the client settings. Click OK to close out of the Network Control Panel. Windows will ask you to restart the PC. Click the Yes button. Note: Repeat these steps for each PC on your network. Multi-Tech Systems, Inc. RF560VPN Quick Start Guide Chapter 3 – Configuring the PC...
- Page 12 The Network dialog box displays. Click the Protocols tab. Select the TCP/IP protocol line associated with your network card/adapter. If TCP/IP is not listed, see the User Guide, Appendix B, for installation directions. Multi-Tech Systems, Inc. RF560VPN Quick Start Guide...
- Page 13 Double-click the entry for your Ethernet card adapter. This expands the list. Verify that TCP/IP is included in the list below your adapter name. TCP/IP and your adapter are now setup. Multi-Tech Systems, Inc. RF560VPN Quick Start Guide Chapter 3 – Configuring the PC...
- Page 14 For our example, set the address to 192.168.2.x. Click OK. Close out of the Control Panel. Repeat these steps for each PC on your network. Multi-Tech Systems, Inc. RF560VPN Quick Start Guide...
- Page 15 Internet Protocol [TCP/IP] your adapter card should display in the · Click the button. Properties Multi-Tech Systems, Inc. RF560VPN Quick Start Guide Chapter 3 – Configuring the PC l. Double-click the Network and Dial-Up screen displays. Right-click the Properties dialog box displays.
- Page 16 To set a Fixed IP Address, check Specify an IP address. Fixed Addresses are used in all the examples, except the two mentioned above. Click OK. Close out of the Control Panel. Repeat these steps for each PC on your network. Multi-Tech Systems, Inc. RF560VPN Quick Start Guide...
-
Page 17: Navigating The Screens
When you select one of these buttons, it will turn from red to blue denoting that this is now the active selection. · Links: Click on Main Menu program. Multi-Tech Systems, Inc. RF560VPN Quick Start Guide Chapter 4 – Navigating the Screens to return to the Main Menu. Click on to exit the Logout... -
Page 18: Configuring The Rf560Vpn
(3DES) encryption to ensure that your information remains private. Start the RF560VPN Configuration 1. Connect your workstation. Be sure your workstation is connected to one of the RF560VPN’s LAN ports. 2. Apply power. Apply power to the RF560VPN RouteFinder and allow the LEDs to stabilize on the unit. - Page 19 To change your password, select Advanced Settings, and then choose Administrative Settings. See the User Guide for details. 6. The Main Menu displays. On the Main Menu, click the Setup Wizard Multi-Tech Systems, Inc. RF560VPN Quick Start Guide Chapter 5 – Configuring the RF560VPN button.
-
Page 20: Setup Wizard
The following screen is the first Setup Wizard screen. From here you will follow a step- by-step process that lets you input all of the basic settings to configure your RF560VPN. – Time Zone Selection Select the time zone, and then click the Next button to continue. - Page 21 – Device IP Settings On this screen, enter the internal LAN IP address that you want to assign to the LAN port of the RF560VPN. This is not the IP address from your ISP – it is the local internal LAN IP address.
- Page 22 IP settings. Enter the IP assigned by your ISP, your IP Subnet Mask, and your ISP Gateway Address. Chapter 5 – Configuring the RF560VPN you can choose one of four options for manually Multi-Tech Systems, Inc. RF560VPN Quick Start Guide...
- Page 23 IP settings from the ISP DHCP server and to see a description of each option. · Select Connect to Cable ISP and click Next. Multi-Tech Systems, Inc. RF560VPN Quick Start Guide Chapter 5 – Configuring the RF560VPN Use this screen to have the program...
- Page 24 Fixed IP address assigned by your ISP and your IP Netmask. · Click Next. Chapter 5 – Configuring the RF560VPN Use this screen when your ISP requires you to Multi-Tech Systems, Inc. RF560VPN Quick Start Guide...
- Page 25 Fixed IP address assigned by your ISP and your IP Netmask. · Click Next. Multi-Tech Systems, Inc. RF560VPN Quick Start Guide Chapter 5 – Configuring the RF560VPN Use this screen when your ISP requires you to enter...
- Page 26 Enter your User Name, Password, Retype the Password (for verification), and your Default Domain name. · Click Next. Chapter 5 – Configuring the RF560VPN Use this screen when your ISP requires you to Multi-Tech Systems, Inc. RF560VPN Quick Start Guide...
- Page 27 Check the box labeled Your ISP requires you to input WAN Ethernet MAC if your ISP requires this. Then enter the MAC address. Click the Next button. Multi-Tech Systems, Inc. RF560VPN Quick Start Guide Chapter 5 – Configuring the RF560VPN...
- Page 28 Next Chapter 5 – Configuring the RF560VPN Address if your ISP requires you to input the IP Address. Pre-Initial String Initial String Multi-Tech Systems, Inc. RF560VPN Quick Start Guide should be checked in (for , and Dialup String...
- Page 29 Chapter 5 – Configuring the RF560VPN – VPN Settings Use this screen to input LAN-to-LAN VPN settings and/or Client-to-LAN VPN settings. From the VPN Settings box, select the VPN connection you want to establish. Multi-Tech Systems, Inc. RF560VPN Quick Start Guide...
- Page 30 If you uncheck the Enable box, the connection will not be active, but the parameters will remain on the screen for you to enable, edit, or delete as desired. Chapter 5 – Configuring the RF560VPN Multi-Tech Systems, Inc. RF560VPN Quick Start Guide...
- Page 31 – Retype the secret password for verification. · Use Local Client List by the program. Multi-Tech Systems, Inc. RF560VPN Quick Start Guide Chapter 5 – Configuring the RF560VPN – Select the User Authentication method to be used. – Select the Encryption Strength desired.
- Page 32 Enable UID is an option for compatibility purposes only (other IPSEC VPN gateways might require you to input a Local and Remote IPSec Identifier). Chapter 5 – Configuring the RF560VPN Multi-Tech Systems, Inc. RF560VPN Quick Start Guide Example Site A Disable...
- Page 33 IPSec. Aggressive is similar but includes a Key Group. About IKE: The RF560VPN can be used with a wide range of other IKE compliant VPN devices. IKE creates two types of Security Associations to allow for encrypted traffic.
- Page 34 Enter the amount of time that tells the router to renegotiate the Key Enter the amount of time that tells the Router to renegotiate the IKE security association. Multi-Tech Systems, Inc. RF560VPN Quick Start Guide Example 102t3t4f 28800 sec = 8 hours...
- Page 35 This concludes the basic configuration of your SOHO RouteFinder. It is a good idea to save the settings at this time by clicking the Save and Restart button. See Chapter 6 in the User Guide for Advanced Settings. Multi-Tech Systems, Inc. RF560VPN Quick Start Guide Chapter 5 – Configuring the RF560VPN Example...
- Page 36 You will see a status bar across the bottom of your browser showing the progress of the startup process. Chapter 5 – Configuring the RF560VPN Multi-Tech Systems, Inc. RF560VPN Quick Start Guide...
-
Page 37: Technical Support
_____________________________________________________________ _____________________________________________________________ On-line Warranty Registration If you have access to the World Wide Web, you can register your Multi-Tech product online at the following URL Contacting Multi-Tech by Internet Multi-Tech System, Inc. maintains a Web site and an FTP site at: http://www.multitech.com... - Page 40 Warranty Multi-Tech Systems, Inc., (hereafter “MTS”) warrants that its products will be free from defects in material or workmanship for a period of two, five, or ten years (depending on model) from date of purchase, or if proof of purchase is not provided, two, five, or ten years (depending on model) from date of shipment.