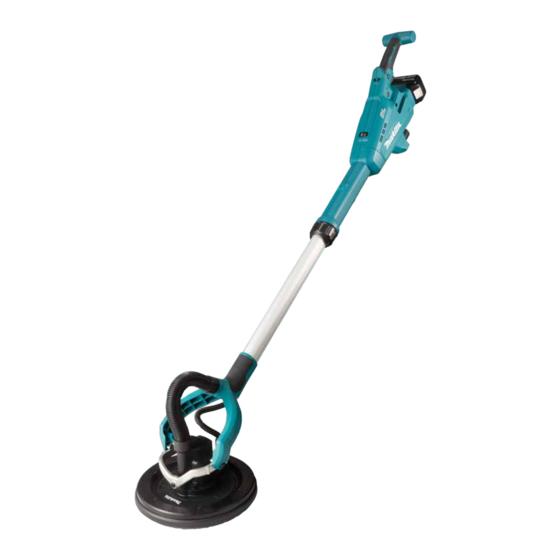
Makita DSL801 Instruction Manual
Cordless drywall sander
Hide thumbs
Also See for DSL801:
- Instruction manual (127 pages) ,
- Instruction manual (125 pages) ,
- Instruction manual (92 pages)
Table of Contents
Advertisement
Quick Links
Cordless Drywall Sander
EN
Ponceuse murale à batterie
FR
Akku-Langhalsschleifer
DE
Levigatrice per cartongesso a
IT
batteria
Accugipsplaatschuurmachine GEBRUIKSAANWIJZING
NL
Lijadora Inalámbrica para
ES
Tablaroca
PT
Lixadeira de Parede a Bateria MANUAL DE INSTRUÇÕES
Akku sandslibemaskine til
DA
gipsplader
Φορητός λειαντήρας για
EL
γυψοσανίδα
Akülü Alçı Panel Zımpara
TR
Makinası
DSL801
INSTRUCTION MANUAL
MANUEL D'INSTRUCTIONS
BETRIEBSANLEITUNG
ISTRUZIONI PER L'USO
MANUAL DE
INSTRUCCIONES
BRUGSANVISNING
ΕΓΧΕΙΡΙΔΙΟ ΟΔΗΓΙΩΝ
KULLANMA KILAVUZU
8
19
31
43
55
67
79
91
102
114
Advertisement
Table of Contents

Related Manuals for Makita DSL801


Summary of Contents for Makita DSL801
- Page 1 ISTRUZIONI PER L’USO batteria Accugipsplaatschuurmachine GEBRUIKSAANWIJZING Lijadora Inalámbrica para MANUAL DE Tablaroca INSTRUCCIONES Lixadeira de Parede a Bateria MANUAL DE INSTRUÇÕES Akku sandslibemaskine til BRUGSANVISNING gipsplader Φορητός λειαντήρας για ΕΓΧΕΙΡΙΔΙΟ ΟΔΗΓΙΩΝ γυψοσανίδα Akülü Alçı Panel Zımpara KULLANMA KILAVUZU Makinası DSL801...
- Page 2 Fig.1 Fig.5 Fig.2 Fig.6 Fig.3 Fig.7 Fig.4 Fig.8...
- Page 3 Fig.9 Fig.10 Fig.12 Fig.11 Fig.13...
- Page 4 Fig.16 Fig.14 Fig.17 Fig.18 Fig.15 Fig.19...
- Page 5 Fig.20 Fig.23 Fig.21 Fig.24 Fig.22 Fig.25...
- Page 6 Fig.26 Fig.29 Fig.27 Fig.30 Fig.28 Fig.31...
- Page 7 Fig.32...
-
Page 8: Specifications
ENGLISH (Original instructions) SPECIFICATIONS Model: DSL801 Paper size 225 mm Pad diameter 210 mm No load speed 1,000 - 1,800 min Dimensions (L x W x H) 1,120 mm - 1,540 mm x 278 mm x 273 mm Rated voltage D.C. -
Page 9: Ec Declaration Of Conformity
Wear personal protective equipment. EC Declaration of Conformity Depending on application, use face shield, safety goggles or safety glasses. As appro- For European countries only priate, wear dust mask, hearing protectors, The EC declaration of conformity is included as Annex A gloves and workshop apron capable of stop- to this instruction manual. ping small abrasive or workpiece fragments. - Page 10 Follow your local regulations relating to disposal of battery. 12. Use the batteries only with the products specified by Makita. Installing the batteries to non-compliant products may result in a fire, exces- sive heat, explosion, or leak of electrolyte. 13. If the tool is not used for a long period of time, the battery must be removed from the tool.
- Page 11 25. When storing the wireless unit, keep it in the supplied case or a static-free container. Do not disassemble or tamper with the wire- 26. Do not insert any devices other than Makita less unit. wireless unit into the slot on the tool.
-
Page 12: Functional Description
FUNCTIONAL DESCRIPTION NOTE: Depending on the conditions of use and the ambient temperature, the indication may differ slightly from the actual capacity. CAUTION: Always be sure that the tool is NOTE: The first (far left) indicator lamp will blink when switched off and the battery cartridge is removed the battery protection system works. before adjusting or checking function on the tool. Tool / battery protection system Installing or removing battery cartridge The tool is equipped with a tool/battery protection sys- tem. This system automatically cuts off power to the... -
Page 13: Electronic Function
Connecting a vacuum cleaner The tools equipped with electronic function are easy to operate because of the following features. Optional accessory Constant speed control When you wish to perform operation cleanly, connect a Makita vacuum cleaner to your tool. Connect a hose of Possible to get fine finish, because the rotating speed is the vacuum cleaner to the dust nozzle using the front kept constant even under the loaded condition. cuff 24. Soft start feature ► Fig.11: 1. Hose of the vacuum cleaner 2. Front cuff 24 3. -
Page 14: Operation
OPERATION WIRELESS ACTIVATION FUNCTION CAUTION: Only use Makita genuine pads for sanding (optional accessories). Optional accessory CAUTION: Make sure the work material is What you can do with the wireless secured and stable. Falling object may cause activation function personal injury. - Page 15 Push the wireless activation button on the tool Tool registration for the vacuum cleaner briefly. The wireless activation lamp will blink in blue. ► Fig.27: 1. Wireless activation button 2. Wireless NOTE: A Makita vacuum cleaner supporting the activation lamp wireless activation function is required for the tool registration. Pull the switch trigger of the tool. Check if the vacuum cleaner runs while the switch trigger is being NOTE: Finish installing the wireless unit to the tool pulled. before starting the tool registration. To stop the wireless activation of the vacuum cleaner, NOTE: During the tool registration, do not pull the push the wireless activation button on the tool.
- Page 16 Description of the wireless activation lamp status ► Fig.28: 1. Wireless activation lamp The wireless activation lamp shows the status of the wireless activation function. Refer to the table below for the meaning of the lamp status. Status Wireless activation lamp Description Color Duration Blinking Standby Blue 2 hours The wireless activation of the vacuum cleaner is available. The lamp will automatically turn off when no operation is performed for 2 hours. When The wireless activation of the vacuum cleaner is available and the the tool is tool is running.
- Page 17 Troubleshooting for wireless activation function Before asking for repairs, conduct your own inspection first. If you find a problem that is not explained in the manual, do not attempt to dismantle the tool. Instead, ask Makita Authorized Service Centers, always using Makita replace- ment parts for repairs. State of abnormality Probable cause (malfunction) Remedy The wireless activation lamp does The wireless unit is not installed into the tool. Install the wireless unit correctly. not light/blink. The wireless unit is improperly installed into the tool. The terminal of the wireless unit and/or Gently wipe off dust and dirt on the terminal of the the slot is dirty.
-
Page 18: Maintenance
► Fig.32: 1. Hook and loop fastener 2. Extension handle 3. Tool OPTIONAL ACCESSORIES CAUTION: These accessories or attachments are recommended for use with your Makita tool specified in this manual. The use of any other accessories or attachments might present a risk of injury to persons. Only use accessory or attachment for its stated purpose. If you need any assistance for more details regard- ing these accessories, ask your local Makita Service Center.