Table of Contents
Advertisement
Advertisement
Table of Contents

Related Manuals for La Crosse Technology WS-9065TWC


Summary of Contents for La Crosse Technology WS-9065TWC
- Page 1 WS-9065U Wireless 433 MHz Radio-controlled Weather Station Instruction Manual...
-
Page 2: Table Of Contents
TABLE OF CONTENTS Topic Inventory of Contents/Additional Equipment About WWVB Quick Set-Up Guide Detailed Set-Up Guide Battery installation Program Mode Program Sequence and Default Settings Function Keys Setting the LCD Contrast Setting the Time Zone Daylight Saving Time Setting Radio-controlled Time Setting 12/24-hour Time Setting Setting the Time Setting the Year, Day and Month... -
Page 3: Inventory Of Contents/Additional Equipment
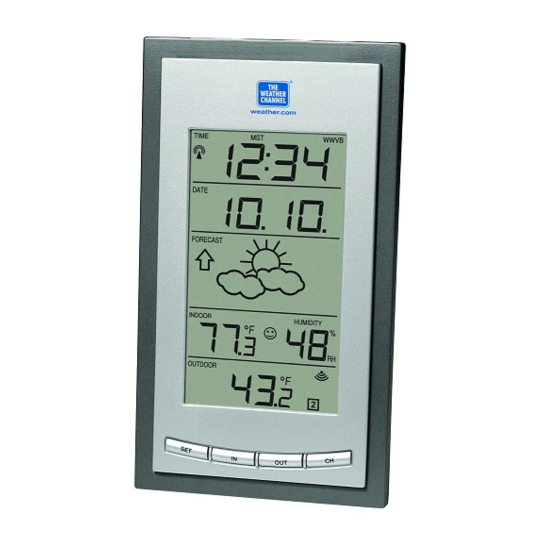
INVENTORY OF CONTENTS The indoor weather station (Figure 1). One remote temperature sensor with mounting bracket (Figure 2). Three each, ½” Philips screws. One strip double-sided adhesive tape. Instruction manual and warranty card. Time LCD Date LCD Forecast LCD Indoor LCD Outdoor LCD ADDITIONAL EQUIPMENT (not included) Three fresh AA 1.5V batteries for the indoor weather station. -
Page 4: Quick Set-Up Guide
QUICK SET-UP GUIDE Hint: Use good quality Alkaline Batteries and avoid rechargeable batteries. Have the indoor weather station and remote temperature sensor 3 to 5 feet apart. Batteries should be out of both units for 10 minutes. Place the batteries into the remote temperature sensor first then into the indoor weather station. -
Page 5: Detailed Set-Up Guide
DETAILED SET-UP GUIDE I. BATTERY INSTALLATION A. REMOTE TEMPERATURE SENSOR Remove the mounting bracket. The bracket snaps on and off easily. Remove the battery cover, by sliding the cover down. Observing the correct polarity install 2 AA batteries. The batteries will fit tightly (to avoid start-up problems make sure they do not spring free). -
Page 6: Program Mode
PROGRAM MODE Programming Note: If 30 seconds is allowed to pass, or the CH button is pressed during the programming mode, the unit will confirm/set the last information entered—the display will stop flashing and return to normal time-date readings. If you don’t leave the program mode during the programming of sections IV through XI, you can advance to step 4 of the next program setting. -
Page 7: Setting The Time Zone
Press and release the SET button to confirm and advance to the Time Zone setting. TIME ZONE SETTING Press and hold the SET button for 5 seconds. “LCD” will show in the time LCD and the number setting will flash. Press and release the SET button again. -
Page 8: Radio-Controlled Time Setting
“DST 0” indicates that the feature is off and the WWVB will not change times automatically. “DST 1” indicates that the feature is on and the WWVB will change times automatically. Note: Some locations (Arizona and parts of Indiana) do not follow Daylight Saving Time, and should select “DST 0.”... -
Page 9: Setting The Time
VIII. TIME SETTING There are two methods by which the time and date can be set: A) Automatically via WWVB reception, or B) Manually. A. WWVB (Remote Control Time) This method requires you to do nothing, except wait for the signal to be received, and to select a time zone. -
Page 10: Setting The Snooze
Press and release the SET button to confirm and advance to the day/month setting. The day and month will flash in the date LCD. Press and release the IN button to advance the day. Press and release the OUT button to advance the month. 10. -
Page 11: Weather Forecast Icons And Tendency Arrows
Press and hold the SET button for 5 seconds. “LCD” will show in the time LCD and the number setting will flash. Press and release the SET button ten times. Either “1”, “2” or “3” will flash in the time LCD. Press and release the IN button to select the forecast sensitivity Press and release the SET button to confirm the forecast sensitivity and complete the programming. -
Page 12: Indoor Temperature, Humidity, & Comfort
Sunny—indicates that the weather is expected to improve (not that the weather will be sunny). Sun with Clouds—indicates that the weather is expected to be fair (not that the weather will be sunny with clouds). Clouds with Rain—indicates that the weather is expected to get worse (not that the weather will be rainy). -
Page 13: Outdoor Temperatures
III. OUTDOOR TEMPERATURE The temperature received from the remote temperature sensor is viewed in the OUTDOOR LCD. When there is more than one remote temperature sensor unit in operation, a “boxed” number will appear to the right of the temperature. This indicates which remote temperature sensor unit (1, 2, or 3) is currently displaying its data in the OUTDOOR LCD. -
Page 14: Additional Remote Control Sending Units
Press the OUT button again (once while “MIN” is still displayed, twice otherwise). “MAX” appears above the outdoor temperature and the LCD will flash, indicating that the maximum temperature and the time and date of occurrence are displayed. While “MAX” is still displayed press the OUT button again to return to the current data display. -
Page 15: Mounting
In sequential order, install batteries (follow the same battery installation procedures seen in section I. A) of the Detailed Set-Up Guide). Install batteries into the indoor weather station. Follow the Detailed Set-Up Guide for programming and operating instructions. B. VIEWING AND OPERATING WITH MULTIPLE REMOTE TEMPERATURE SENSOR UNITS To view the temperature of a different remote temperature sensor unit, press and release the CH button. - Page 16 I. THE REMOTE TEMPERATURE SENSOR The remote temperature sensor can be mounted in two ways: • with the use of screws, or • using the adhesive tape. A. MOUNTING WITH SCREWS 1) Remove the mounting bracket from the remote temperature sensor.
-
Page 17: Troubleshooting
II. THE INDOOR WEATHER STATION The indoor temperature station can be mounted in two ways: • with the table stand or • on the wall with the use of a wall hanging screw (not included). TROUBLESHOOTING NOTE: For problems not solved, please contact La Crosse Technology. Problem: No reception of WWVB time signal. -
Page 18: Maintenance & Care
Problem: No outdoor temperature is displayed. Solution: 1) Remove all batteries, reinsert into sender first, then display. 2) Place remote sender closer to display. 3) Be sure all batteries are fresh. 4) Place Remote Control Sender and Weather Station in position so the straight- line signal is not passing through more than two or three walls. -
Page 19: Specifications
SPECIFICATIONS Temperature measuring range: Indoor: Outdoor: Indoor relative humidity measuring range: Indoor Temperature checking interval: Indoor Humidity checking interval: Outdoor Temperature checking interval (Remote Control Sender): Outdoor Temperature reception (Weather Station): Transmission Range: Power Supply: Weather Station: Temperature Transmitter: Battery life cycle: Recommended battery type: Dimensions (L x W x H) Weather Station:... -
Page 20: Warranty Information
WARRANTY INFORMATION La Crosse Technology, Ltd provides a 1-year limited warranty on this product against manufacturing defects in materials and workmanship. This limited warranty begins on the original date of purchase, is valid only on products purchased and used in North America and only to the original purchaser of this product. To receive warranty service, the purchaser must contact La Crosse Technology, Ltd for problem determination and service procedures. - Page 21 Questions ? Please see instruction video at FCC DISCLAIMER This device complies with part 15 of the FCC rules. Operation is subject to the following two conditions: (1) This device may not cause harmful interference. (2) This device must accept any interference received, including interference that may cause undesired operation.