Table of Contents
Advertisement
Advertisement
Table of Contents

Related Manuals for La Crosse Technology WS-9075TWC


Summary of Contents for La Crosse Technology WS-9075TWC
- Page 1 WS-9075U Wireless 433 MHz Radio-controlled Weather Station Instruction Manual...
-
Page 2: Table Of Contents
TABLE OF CONTENTS Topic Inventory of Contents/Additional Equipment About WWVB Quick Set-Up Guide Detailed Set-Up Guide Battery installation Program Mode Program Sequence and Default Settings Function Keys Setting the LCD Contrast Setting the Time Zone Daylight Saving Time Setting Radio-controlled Time Setting On/Off 12/24-hour Time Setting Setting the Time Setting the Year, Day and Month... -
Page 3: Inventory Of Contents/Additional Equipment
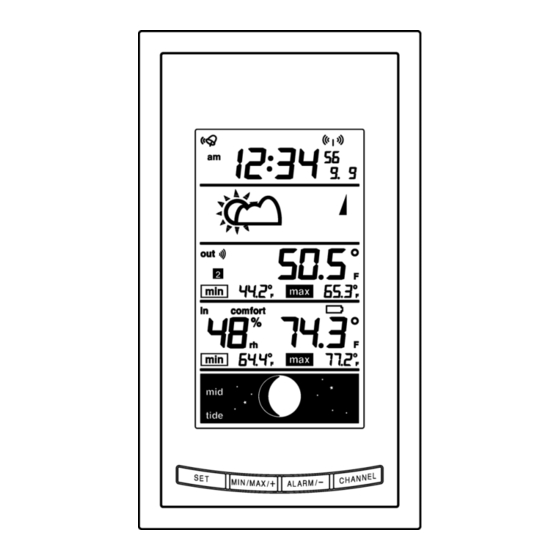
INVENTORY OF CONTENTS 1. The WS-9075U weather station (Figure 1) 2. One TX6U remote temperature sensor (Figure 2) 3. Mounting hardware 4. Instruction manual and warranty card. Time and Date LCD Forecast LCD Outdoor LCD Indoor LCD Moon Phase LCD *LCD (Liquid Crystal Display) ADDITIONAL EQUIPMENT (not included) 1. -
Page 4: Quick Set-Up Guide
QUICK SET-UP GUIDE Hint: Use good quality Alkaline Batteries and avoid rechargeable batteries. 1. Have the indoor weather station and remote temperature sensor 3 to 5 feet apart. 2. Batteries should be out of both the indoor weather station and remote temperature sensor units for 10 minutes. -
Page 5: Detailed Set-Up Guide
DETAILED SET-UP GUIDE BATTERY INSTALLATION REMOTE TEMPERATURE SENSOR 1. Remove the mounting bracket. The bracket snaps on and off easily. 2. Remove the battery cover, by sliding the cover down. 3. Observing the correct polarity install 2 AA batteries. The batteries will fit tightly (to avoid start-up problems make sure they do not spring free). -
Page 6: Program Mode
PROGRAM MODE Programming Note: If 15 seconds are allowed to pass, or the CHANNEL button is pressed during the programming mode, the unit will confirm/set the last information entered—the display will stop flashing and return to normal time-date readings. If you don’t leave the program mode during the programming of sections IV through XI, you can advance to step 4 of the next program setting. -
Page 7: Setting The Time Zone
III. TIME ZONE SETTING 1. The time zone will flash in the DATE LCD. 2. Press and release the MIN/MAX/+ or ALARM/- button to select your time zone. Note: It is possible to select any time zone from –12 GMT to +12 GMT (for example to see the time in another country). -
Page 8: Radio-Controlled Time Setting On/Off
V. RADIO-CONTROLLED TIME ON/OFF SETTING 1. “RCC” will appear in the DATE LCD and “ON” or “OFF” will flash in the TIME LCD. 2. Press and release the MIN/MAX/+ or the ALARM/- key to select radio-controlled time on or off. 3. -
Page 9: Setting The Year, Day And Month
3. Press and release the SET button to confirm the hours setting and advance to the minutes setting. 4. The minutes digits will flash in the TIME LCD. 5. Press and release the MIN/MAX/+ button to advance or the ALARM/- key to decrease the minutes. -
Page 10: Setting The Animation (Weather Icons And Stars)
SETTING THE ANIMATION (FORECAST ICONS AND STARS) 1. “ON” or “OFF” will flash in the TIME LCD. If “ON” the forecast icon and tendency arrows will flash in the FORECAST LCD and the stars will flash in the MOON PHASE LCD. If “OFF”, the forecast icon, tendency arrows, and stars will not flash. -
Page 11: Weather Forecast Icons And Tendency Arrows
WEATHER FORECAST The weather forecasting feature is estimated to be 75% accurate and is for the next 12 to 24 hours. The weather forecast is based solely upon the change of air pressure over time. The WS-9075U averages past air-pressure readings to provide an accurate forecast—creating a necessity to disregard all weather forecasting for 12-24 hours after the unit has been set-up, reset, or moved from one altitude to another (i.e. -
Page 12: Minimum & Maximum Records
IV. MINIMUM AND MAXIMUM TEMPERATURE AND HUMIDITY RECORDS The WS-9075U keeps a record of the MINIMUM and MAXIMUM and date of their occurrence, for both the indoor and outdoor modes. A. VIEWING THE OUTDOOR TEMPERATURE RECORDS 1. Press and release the MIN/MAX/+ button once. “min” temperature appears with the outdoor temperature, indicating that the minimum temperature and the time and date of occurrence are displayed. -
Page 13: Outdoor Channel Re-Learn Mode
V. OUTDOOR CHANNEL RE-LEARN MODE In case the temperature data in a particular outdoor channel often shows “--.-“ due to low battery level or false reset of a transmitter, that transmitter can be set up again individually and the “lost” channel can be re-learned again by entering the channel re-learn mode. -
Page 14: Adding Remote Temperature Sensors (Optional)
VII. ADDING REMOTE TEMPERATURE SENSORS (OPTIONAL) The WS-9075U is able to receive signals from 3 different remote temperature sensors. The remote temperature sensor model(s) that you choose will come with their own set of instructions—follow these instructions for a complete guide to setting up. Following are some brief instructions for the basic set-up of remote temperature sensor units with the WS-9075U. -
Page 15: Mounting
MOUNTING Note: Before permanently mounting ensure that the indoor weather station is able to receive WWVB signals from the desired location. Also, extreme and sudden changes in temperature will decrease the accuracy of the indoor weather station, and changes in elevation will result with inaccurate weather forecasting for the next 12 to 24 hours. -
Page 16: Troubleshooting
B. FOLDOUT TABLE STAND: The foldout table stand leg is located on the backside. 1) Pull the stand out from the bottom center edge of the weather station, below the battery compartment. 2) Once the foldout table stand is extended, place the weather station in an appropriate location. -
Page 17: Maintenance & Care
MAINTENANCE AND CARE INSTRUCTIONS • Extreme temperatures, vibration, and shock should be avoided to prevent damage to the units. • Clean displays and units with a soft, damp cloth. Do not use solvents or scouring agents; they may mark the displays and casings. •... -
Page 18: Warranty Information
WARRANTY INFORMATION La Crosse Technology, Ltd provides a 1-year limited warranty on this product against manufacturing defects in materials and workmanship. This limited warranty begins on the original date of purchase, is valid only on products purchased and used in North America and only to the original purchaser of this product. - Page 19 FCC DISCLAIMER This device complies with part 15 of the FCC rules. Operation is subject to the following two conditions: (1) This device may not cause harmful interference. (2) This device must accept any interference received, including interference that may cause undesired operation. FCC ID: OMO-01RX (Receiver), OMO-01TX (transmitter) All rights reserved.