Advertisement
Quick Links
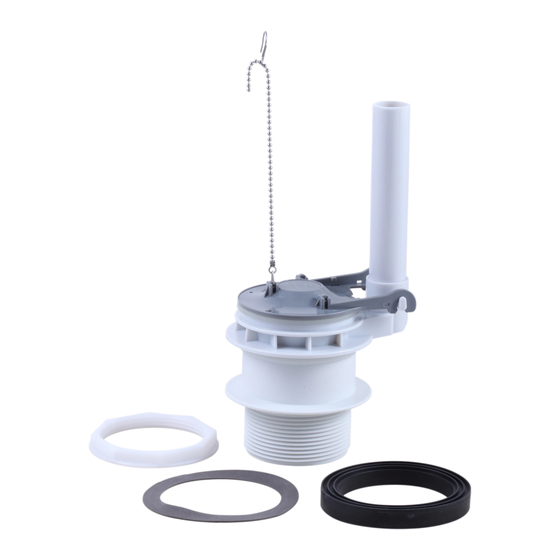
ASME A112.19.5 / CSA B45.15
Model/Modelo/Modèle
RP70878
You may need / Usted puede necesitar / Articles dont vous pouvez avoir besoin:
For easy installation of your
Delta
flush valve you will need:
®
• To READ ALL the instructions completely
before beginning.
• To READ ALL warnings, care, and
maintenance information.
Para instalación fácil de su válvula
de descarga Delta
®
• LEER TODAS las instrucciones completamente
antes de empezar.
• LEER TODOS los avisos, cuidados, e
información de mantenimiento.
Pour installer votre chasse d'eau
Delta
facilement, vous avez besoin
®
des articles suivants :
• LIRE TOUTES les instructions avant de débuter;
• LIRE TOUS les avertissements ainsi que toutes
les instructions de nettoyage et d'entretien;
1
Work Preparation
Turn off the water supply and drain the tank by
flushing the toilet. Hold down the handle to allow
water to drain completely. Use a towel or sponge
to remove any remaining water. Make sure all
debris has been removed prior to installing new
tank fittings.
www.deltatoilet.com
74547
usted necesitará:
FLUSH VALVE INSTALLATION
INSTALACIÓN DE LA VÁLVULA DE DESCARGA
INSTALLATION DE LA CHASSE D'EAU
Preparación para el trabajo
Cierre el suministro de agua y drene descargando
el agua del tanque. Mantenga presionada la palanca
para permitir que el agua drene completamente.
Use una toalla o una esponja para eliminar
cualquier agua restante. Asegúrese de que todos
los residuos se han eliminado antes de instalar los
nuevos accesorios del tanque.
1
Préparatifs
Fermez le robinet d'arrêt et actionnez la chasse
d'eau pour vider le réservoir. Tenez la manette
abaissée pour permettre à l'eau de s'écouler
complètement. Enlevez les résidus d'eau à l'aide
d'une serviette ou d'une éponge. Enlevez toutes
les saletés avant d'installer les nouveaux raccords
du réservoir.
8/10/12
Rev. A
Advertisement

Related Manuals for Delta RP70878


Summary of Contents for Delta RP70878
- Page 1 • To READ ALL the instructions completely before beginning. • To READ ALL warnings, care, and maintenance information. Para instalación fácil de su válvula de descarga Delta usted necesitará: ® • LEER TODAS las instrucciones completamente antes de empezar. • LEER TODOS los avisos, cuidados, e información de mantenimiento.
- Page 2 Models/Modelos/Modéles Prelude™ C41901-WH & C43901-WH Tank Removal Disconnect supply line (1). Remove nuts (6) and washers (7) from tank mounting bolts (8) under the bowl. Lift the tank Remove refill tube (2) from overflow pipe (3). straight up from the bowl and gently place it upside Unhook flapper chain (4) from flush handle trip down on a soft surface.
- Page 3 Models/Modelos/Modéles Corrente C43904-WH & Riosa C43906-WH ™ ™ Corrente C43904-WH Riosa C43906-WH ™ ™ Tank Removal Disconnect supply line (1). Remove nuts (7) and washers (8) from tank mounting bolts (9) under the bowl. Lift the tank Unhook flapper chain from flush handle trip lever. straight up from the bowl and gently place it upside Pull black gasket (2) up from the channel opening down on a soft surface.
- Page 4 Models/Modelos/Modéles Corrente™ C43904-WH-RSL & Riosa™ C43906-WH-RSL Corrente C43904-WH-RSL Riosa C43906-WH-RSL ™ ™ Tank Removal Disconnect supply line (1). Remove nuts (2) and washers (3) from tank mounting bolts (4) under the bowl. Lift the tank straight up from the bowl and gently place it upside down on a soft surface.
- Page 5 Models/Modelos/Modéles Prelude™ C41901-WH & C43901-WH Old Flush Valve Removal Remove old tank-to-bowl seal (1) from flush valve Unscrew the spud nut (3) with a spud wrench (4) or a pair of slip joint pliers. Remove old flush valve tailpiece and discard. and discard.
- Page 6 Models/Modelos/Modéles Corrente C43904-WH & Riosa C43906-WH ™ ™ Old Flush Valve Removal Remove old tank-to-bowl seal (1) from flush valve Unscrew the spud nut (3) with a spud wrench (4) or a pair of slip joint pliers. Remove old flush valve tailpiece and discard.
- Page 7 Models/Modelos/Modéles Corrente™ C43904-WH-RSL & Riosa™ C43906-WH-RSL Old Flush Valve Removal Remove old tank-to-bowl seal (1) from flush valve Unhook flapper chain from flush handle trip lever. tailpiece and discard. Pull black gasket (1) up from the channel opening (2). Loosen thumb screw (3) and lift fill valve (4) up Use a pencil to trace a line around the the tank from overflow tube (5) while pulling supply line (6) bracket (2) for reference when reinstalling.
- Page 8 Models/Modelos/Modéles Prelude™ C41901-WH & C43901-WH New Flush Valve Installation Slide rubber gasket (1) onto threaded flush valve Tighten the spud nut (5) with a spud wrench (6) or a tailpiece (2) and insert tailpiece through hole in tank pair of slip joint pliers to 160 in-lbs. (18 N•m). bottom.
- Page 9 Models/Modelos/Modéles Corrente C43904-WH & Riosa C43906-WH ™ ™ Corrente™ C43904-WH Riosa™ C43906-WH New Flush Valve Installation Slide rubber gasket (1) onto threaded flush valve Tighten the spud nut (5) with a spud wrench (6) or a tailpiece (2) and insert tailpiece through hole in tank pair of slip joint pliers 160 in-lbs.
- Page 10 Models/Modelos/Modéles Corrente C43904-WH-RSL & Riosa C43906-WH-RSL ™ ™ Corrente™ C43904-WH-RSL Riosa™ C43906-WH-RSL New Flush Valve Installation Slide rubber gasket (1) onto threaded flush valve Tighten the spud nut (5) with a spud wrench (6) Engage supply line with tank bracket and tighten nut. tailpiece (2) and insert tailpiece through hole in tank or a pair of slip joint pliers 160 in-lbs.
-
Page 11: Tank Installation
Models/Modelos/Modéles Prelude™ C41901-WH & C43901-WH Tank Installation Align the three mounting bolts (1) with the mounting CAUTION: Damage may occur if bolts are over lever (4) with hook (5). Turn on water supply, check holes (2). Slide the mounting bolts into the mounting tightened;... - Page 12 Models/Modelos/Modéles Corrente™ C43904-WH & Riosa™ C43906-WH Corrente C43904-WH Riosa C43906-WH ™ ™ Tank Installation tightened, and leaks may occur if under tightened. Align the three mounting bolts (1) with the mounting holes Make connection to water supply (1). Turn on water supply, (2).
- Page 13 Models/Modelos/Modéles Corrente™ C43904-WH-RSL & Riosa™ C43906-WH-RSL Corrente C43904-WH-RSL Riosa C43906-WH-RSL ™ ™ Tank Installation Align the three mounting bolts (1) with the mounting holes (2). Make connection to water supply (1). Turn on water supply, check Slide the mounting bolts into the mounting holes and place tank for leaks.
-
Page 14: Cleaning And Care
Robinet de chasse products can seriously damage fittings in the tank. This damage can cause leakage and property damage. DELTA shall not be responsible or liable for any tank fitting failure or damage caused by RP72850 the use of in-tank bowl cleaners. - Page 15 TROUBLESHOOTING GUIDE GUIA PARA LA SOLUCIÓN DE FALLAS GUIDE DE DÉPANNAGE Problem Solution Doesn’t Flush. A. Remove rubber band and tag from seal (flapper) (4). B. Reconnect the chain (1) to the trip lever (2) or flush valve seal (flapper) (4). C.
-
Page 16: Limited Warranty
Company ne saurait être tenue responsable de tout dommage occasionné à la toilette en raison d’une période de 1 an à compter de la date d’achat. Les sièges de toilette des toilettes Delta® ne sont pas mauvaise utilisation, d’un usage abusif, d’une négligence ou de travaux d’installation, d’entretien ou conçus pour un usage commercial.