Sony DCR-HC15 Operation Manual
Hide thumbs
Also See for DCR-HC15:
- Operation manual (196 pages) ,
- Service manual (74 pages) ,
- Service manual (74 pages)

Related Manuals for Sony DCR-HC15


Summary of Contents for Sony DCR-HC15
- Page 1 3-089-848-12(1) Camera Operations Guide Read this first Digital Video Camera Recorder DCR-HC15 © 2004 Sony Corporation...
- Page 2 Welcome! Congratulations on your purchase of this Sony Handycam. With your Handycam, you can capture life’s precious moments with superior picture and sound quality. Your Handycam is loaded with advanced features, but at the same time it is very easy to use.
-
Page 3: Checking Supplied Accessories
Checking supplied accessories Make sure that the following accessories are supplied with your camcorder. 1 AC-L15A/L15B AC Adaptor (1), Power 5 Shoe cover (1) cord (1) (p. 13) 6 USB cable (1) 2 NP-FM30 rechargeable battery pack 7 CD-ROM (SPVD-012 USB Driver) (1) (1) (p. -
Page 4: Main Features
Main Features •Recording moving pictures on the Recording moving pictures tape (p. 20) or still images, and playing •Playing back the tape (p. 32) them back •Viewing moving pictures recorded on the tape using the USB cable Capturing images on the •Capturing images on the computer computer from your camcorder using the USB... - Page 5 Main Features Other uses Functions for adjusting exposure during recording •Back light (p. 28) •NightShot (p. 29) •PROGRAM AE (p. 48) •Manual exposure (p. 50) •Flexible Spot Meter (p. 51) Functions for giving images more impact •Digital zoom (p. 27) The default setting is OFF.
-
Page 6: Table Of Contents
Table of contents Checking supplied accessories ....3 Advanced Recording Operations Main Features ......4 Photo recording ........39 Quick Start Guide ....8 Self-timer recording ......40 Adjusting the white balance manually .......... 41 Getting Started Using the wide mode ......43 Using this manual ......... - Page 7 Table of contents Customizing Your Camcorder Changing the menu settings ....78 Troubleshooting Types of trouble and how to correct trouble ..........86 Self-diagnosis display ......92 Warning indicators ....... 93 Warning messages ........ 94 Additional Information Usable cassettes ........95 About the “InfoLITHIUM”...
-
Page 8: Quick Start Guide
Quick Start Guide Connecting the power cord (p. 13) Use the battery pack when using your camcorder outdoors (p. 12). Open the DC IN jack cover. AC Adaptor (supplied) Connect the plug with its v mark facing the battery. Inserting the cassette Close the cassette Slide OPEN/ Push the center of the... - Page 9 Recording a picture on the tape (p. 20) Set the POWER switch Remove the lens cap (p. 20, 110). to CAMERA while pressing the small green button. Press OPEN to open the LCD panel. The picture appears on the screen. Viewfinder Press REC START/STOP.
-
Page 10: Getting Started
— Getting Started — Using this manual As you read through this manual, buttons and settings on your camcorder are shown in capital letters. After “Advanced Recording Operations” section of this manual, position of the POWER switch is shown by the icons below. - Page 11 Using this manual Precautions on camcorder care Lens and LCD screen/finder •The LCD screen and the finder are manufactured using extremely high-precision technology, so over 99.99% of the pixels are operational for effective use. However, there may be some tiny black points and/or bright points (white, red, blue or green in color) that constantly appear on the LCD screen and the finder.
-
Page 12: Step 1 Preparing The Power Source
Step 1 Preparing the power source Installing the battery pack (1) Lift up the viewfinder. (2) Slide the battery pack down until it clicks. To remove the battery pack (1) Lift up the viewfinder. (2) Slide the battery pack out in the direction of the arrow while pressing BATT down. -
Page 13: Charging The Battery Pack
Step 1 Preparing the power source Charging the battery pack Use the battery pack after charging it for your camcorder. Your camcorder operates only with the “InfoLITHIUM” battery pack (M series) . See page 98 for details of “InfoLITHIUM” battery pack. (1) Install the battery pack on your camcorder. - Page 14 Step 1 Preparing the power source Note Prevent metallic objects from coming into contact with the metal parts of the DC plug of the AC Adaptor. This may cause a short-circuit, damaging the AC Adaptor. When you use the AC Adaptor Place the AC Adaptor near a wall outlet.
-
Page 15: Checking Status Of Battery Pack - Battery Info
Step 1 Preparing the power source Playing time Playing time on Playing time on with Battery pack the LCD panel the LCD screen closed NP-FM30 (supplied) NP-FM50 NP-QM71/QM71D NP-QM91/QM91D Approximate minutes when you use a fully charged battery pack Note Approximate recording time and continuous playing time at 25°C (77°F). -
Page 16: Connecting To A Wall Outlet
Step 1 Preparing the power source Note The BATTERY INFO indicator may not be displayed in the following cases: – The battery pack is not installed. – Something is wrong with the battery pack. – The battery is exhausted. Battery Info The number displayed as Battery Info is the approximate recording time. -
Page 17: Step 2 Setting The Date And Time
Step 2 Setting the date and time Set the date and time when you use your camcorder for the first time. The “CLOCK SET” indicator will appear each time you set the POWER switch to CAMERA unless you set the date and time settings. If you do not set the date and time, “--- -- ----”... -
Page 18: Step 3 Using The Touch Panel
Step 3 Using the touch panel Your camcorder has operation buttons on the LCD screen. Touch the LCD screen directly with your finger to operate each function. (1) Set the POWER switch to CAMERA to record, or VCR to play back. (2) Press OPEN to open the LCD panel. - Page 19 Step 3 Using the touch panel Operation buttons on each display When the POWER switch is set to CAMERA PAGE1 SPOT FOCUS, MENU, FOCUS, FADER, END SCH, SPOT METER, EXPOSURE PAGE2 SELFTIMER, LCD BRT, VOL When the POWER switch is set to VCR PAGE1 MENU, LCD BRT, VOL, END SCH PAGE2...
-
Page 20: Recording - Basics
— Recording – Basics — Recording a picture Perform Step 1 (p. 12) and Step 2 (p. 17) in advance. (1) Remove the lens cap. (2) Prepare the power source (p. 12) and insert the cassette (p. 8). (3) Set the POWER switch to CAMERA while pressing the small green button. This sets your camcorder to standby. - Page 21 Recording a picture Note Avoid touching the microphone when you are recording. Note on recording Your camcorder records and plays back in the SP (standard play) mode and in the LP (long play) mode. Select SP or LP in in the menu settings (p. 83). In the LP mode, you can record 1.5 times as long as in the SP mode.
- Page 22 Recording a picture Indicators displayed during recording Indicators are not recorded on the tape. Remaining battery time Cassette Memory This appears when using a cassette with Cassette Memory. Recording mode STBY/REC Time code/Tape counter 0:00:01 60min Remaining tape This appears after you insert and run the cassette for a while (p.
- Page 23 Recording a picture After recording (1) Close the lens cap. (2) Set the POWER switch to OFF (CHG). (3) Close the LCD panel. (4) Eject the cassette. (5) Remove the power source. Adjusting the LCD screen 180° 90° 90° When you adjust the LCD panel, make sure that the LCD panel is opened up to 90 degrees.
- Page 24 Recording a picture Shooting with the mirror mode This feature allows the camera subject to view him- or herself on the LCD screen. The subject uses this feature to check his or her own image on the LCD screen while you look at the subject in the viewfinder.
- Page 25 Recording a picture Adjusting the brightness of the LCD screen (1) When the POWER switch is set to CAMERA, press FN and select PAGE2. When the POWER switch is set to VCR, press FN to display PAGE1. (2) Press LCD BRT. The screen to adjust the brightness of the LCD screen appears. (3) Adjust the brightness of the LCD screen using –...
- Page 26 Recording a picture Adjusting the viewfinder If you record pictures with the LCD panel closed, check the picture with the viewfinder. Adjust the viewfinder lens to your eyesight so that the images in the viewfinder come into sharp focus. Extend the viewfinder and move the viewfinder lens adjustment lever. Viewfinder lens adjustment lever Viewfinder backlight...
- Page 27 Recording a picture Using the zoom feature Move the power zoom lever a little for a slower zoom. Move it further for a faster zoom. Using the zoom sparingly results in better-looking recordings. W : Wide-angle (subject appears farther away) T : Telephoto (subject appears closer) To use zoom greater than 10×...
-
Page 28: Shooting Backlit Subjects - Back Light Function
Recording a picture Shooting backlit subjects – Back light function When you shoot a subject with the light source behind the subject or a subject with a light background, use the back light function. (1) Set the POWER switch to CAMERA. (2) Press BACK LIGHT. -
Page 29: Shooting In The Dark - Nightshot
Recording a picture Shooting in the dark – NightShot The NightShot enables you to shoot a subject in the night or in a dark place. When recording with the NightShot, the picture may be recorded in incorrect or unnatural colors. (1) Set the POWER switch to CAMERA. -
Page 30: Checking Recordings - End Search/Edit Search/Rec Review
Checking recordings – End search/Edit search/Rec Review You can use these buttons to check the recorded picture or shoot so that the transition between the last recorded scene and the next scene you record is smooth. EDIT End search You can go to the end of the recorded section after you record. (1) Set the POWER switch to CAMERA. - Page 31 Checking recordings – End search/Edit search/Rec Review Edit search You can search for the next recording start point. You cannot monitor the sound. (1) Set the POWER switch to CAMERA. (2) Press FN to display PAGE1. (3) Press MENU to display the menu. (4) Select EDITSEARCH in , then press EXEC (p.
-
Page 32: Playback
— Playback — Playing back tape You can monitor the recorded tape on the LCD screen. If you close the LCD panel, you can monitor the playback picture in the viewfinder. (1) Set the POWER switch to VCR while pressing the small green button. (2) Press OPEN to open the LCD panel. -
Page 33: To Display The Screen Indicators - Display Function
Playing back tape To display the screen indicators – Display function Press DSPL/BATT INFO on your camcorder. The indicators disappear from the screen. To make the indicators appear, press DSPL/BATT INFO. DSPL/BATT INFO About date/time and various settings Your camcorder automatically records not only images on the tape but also the recording data (date/time or various settings when recorded) (Data code) . - Page 34 Playing back tape Various settings Various settings show your camcorder’s recording information at the time of recording. During tape recording standby, the various settings will not be displayed. When you use data code, bars (-- -- --) appear if: – A blank portion of the tape is being played back. –...
- Page 35 Playing back tape Various playback modes To operate video control buttons, set the POWER switch to VCR. Using the touch panel (1) Press FN and select PAGE3. (2) Press V SPD PLAY to display video control buttons. To change the playback direction Press during playback to reverse the playback direction.
-
Page 36: Viewing A Recording On Tv
Viewing a recording on TV Connect your camcorder to a TV with the A/V connecting cable supplied with your camcorder to watch the playback pictures on the TV screen. You can operate the playback control buttons in the same way as when you view playback pictures on the LCD screen. - Page 37 Viewing a recording on TV If the equipment to be connected has an S video jack •Pictures can be reproduced more faithfully by using an S video cable (optional). With this connection, you do not need to connect the yellow (video) plug of the A/V connecting cable.
-
Page 38: Playing Back Tape With Picture Effect
Playing back tape with picture effect You can use NEG. ART, SEPIA, B&W and SOLARIZE. See page 47 for details of each mode. (1) Set the POWER switch to VCR, then play back the tape. (2) During playback or playback pause, press FN to display PAGE1. (3) Press MENU to display the menu. -
Page 39: Advanced Recording Operations
— Advanced Recording Operations — Photo recording You can record still images such as photographs. You can record about 510 images in the SP mode and about 765 images in the LP mode on a 60-minute tape. The POWER switch should be set to (1) Keep pressing PHOTO lightly until a still image appears. -
Page 40: Self-Timer Recording
Self-timer recording You can record still images and moving pictures using the self-timer recording feature. PHOTO REC START/STOP Recording moving pictures The POWER switch should be set to Operate by touching the panel. (1) During standby, press FN and select PAGE2. (2) Press SELFTIMER. -
Page 41: Adjusting The White Balance Manually
Adjusting the white balance manually Normally white balance is automatically adjusted. The POWER switch should be set to Operate by touching the panel. (1) Press FN to display PAGE1. (2) Press MENU to display the menu. (3) Select WHT BAL in , then press EXEC (p. - Page 42 Adjusting the white balance manually If the picture is being taken in a studio lit by TV lighting We recommend that you record in the INDOOR mode. When you record under fluorescent lighting Select AUTO or HOLD. Your camcorder may not adjust the white balance correctly in the INDOOR mode. If you did the followings in the AUTO mode –...
-
Page 43: Using The Wide Mode
Using the wide mode You can record a 16:9 wide picture to watch on the 16:9 wide-screen TV (16:9WIDE). Black bands appear on the screen during recording in the 16:9WIDE mode [a]. The picture during playing back in the 4:3 mode on a wide-screen TV [b] or a normal TV [c]* are compressed in the widthwise direction. - Page 44 Using the wide mode Notes •In the wide mode, you cannot activate BOUNCE (fader). •Pictures recorded on the tape in wide mode cannot be returned to normal size. Pictures on a TV screen Pictures recorded in the 16:9WIDE mode automatically appear on the TV screen at full size when: –...
-
Page 45: Using The Fader Function
Using the fader function You can fade in or out to give your recording a professional appearance. STBY NORM. (normal) FADER MOSC. (mosaic) FADER BOUNCE STBY MONOTONE When fading in, the picture gradually changes from black-and-white to color. When fading out, the picture gradually changes from color to black-and-white. Notes on the BOUNCE mode •You can fade in only. - Page 46 Using the fader function The POWER switch should be set to Operate by touching the panel. (1) When fading in [a] Press FN to display PAGE1 during recording standby. When fading out [b] Press FN to display PAGE1 during recording. (2) Press FADER.
-
Page 47: Using Special Effects - Picture Effect
Using special effects – Picture effect NEG. (negative) ART [a] : The color and brightness of the picture are reversed. SEPIA : The picture is sepia. B&W : The picture is monochrome (black-and-white). SOLARIZE [b] : The picture looks like an illustration with strong contrast. PASTEL [c] : The picture looks like a pale pastel drawing. -
Page 48: Using Program Ae
Using PROGRAM AE SPOTLIGHT* This mode prevents people’s faces, for example, from appearing excessively white when shooting subjects lit by strong light in the theater. PORTRAIT (soft portrait) This mode brings out the subject while creating a soft background for subjects such as people or flowers. - Page 49 Using PROGRAM AE The POWER switch should be set to Operate by touching the panel. (1) Press FN to display PAGE1. (2) Press MENU to display the menu. (3) Select PROGRAM AE in , then press EXEC (p. 79). MANUAL SET EXIT PROGRAM AE AUTO...
-
Page 50: Adjusting The Exposure Manually
Adjusting the exposure manually We recommend that you adjust the exposure manually in the following cases: – When the subject is backlit – When the subject is too bright against the background – When recording dark pictures (e.g. night scenes) faithfully The POWER switch should be set to Operate by touching the panel. -
Page 51: Using Spot Light-Metering Function - Flexible Spot Meter
Using spot light-metering function – Flexible Spot Meter You can take a picture with the appropriate exposure automatically for just the point you want to focus on and with its exposure fixed. Use Flexible Spot Meter in the following cases: –... -
Page 52: Focusing Manually
Focusing manually You can gain better results by manually adjusting the focus in the following cases. Normally, focus is automatically adjusted. •The autofocus mode is not effective when shooting: – Subjects through glass coated with water droplets – Horizontal stripes –... -
Page 53: Using Spot Focus Function - Spot Focus
Using spot focus function – Spot Focus You can take a picture with the appropriate focus automatically for just the point you want to focus on and with its focus fixed. The POWER switch should be set to Operate by touching the panel. (1) Press FN to display PAGE1. -
Page 54: Interval Recording
Interval Recording You can make time-lapse recordings by setting your camcorder to automatically record and standby sequentially. You can achieve excellent recordings of flowers blooming, insects hatching, etc. with this function. Example 9 min 59 s 9 min 59 s [a] REC TIME 10 min 10 min... -
Page 55: Frame By Frame Recording - Frame Recording
Frame by frame recording – Frame recording You can make a recording with a stop-motion animated effect using frame recording. To create this effect, alternately move the subject a little and make frame recording. We recommend that you use a tripod to avoid camera-shake. The POWER switch should be set to Operate by touching the panel. -
Page 56: Using The Viewfinder
Using the viewfinder You can operate camera brightness and fader on the touch panel when looking at the viewfinder. Turn the LCD panel over and move it back to your camcorder body with the LCD screen facing out to do this operation. The POWER switch should be set to Operate by touching the panel. -
Page 57: Editing
— Editing — Dubbing tape You can dub or edit on the VCR connected to your camcorder using your camcorder as a player. You can connect either the A/V connecting cable (supplied) or i.LINK cable (optional). If you connect with the i.LINK cable (optional), video and audio signals are transmitted in digital form for high-quality editing. - Page 58 Dubbing tape Dubbing If you are connecting the VCR with the A/V connecting cable •Set DISPLAY in to LCD in the menu settings. (The default setting is LCD.) •If you want to dub the data code, display it on the screen. •If you want to dub the title, set TITLE DSPL in to ON in the menu settings.
-
Page 59: Dubbing Only Desired Scenes - Digital Program Editing
Dubbing only desired scenes – Digital program editing You can duplicate selected scenes (programs) for editing onto the tape without operating the VCR. Scenes can be selected by frame. You can set up to 20 programs. Unwanted Unwanted scene scene Switch the order Before operating Digital program editing Step 1 Connecting to the VCR. - Page 60 Dubbing only desired scenes – Digital program editing Step 2: Setting the VCR to operate When you are connecting the camcorder and VCR using the A/V connecting cable, the signal is emitted from the infrared rays emitter of your camcorder to the remote sensor on the VCR to control the VCR.
- Page 61 Dubbing only desired scenes – Digital program editing (10) Select PAUSEMODE, then press EXEC. (11) Select the mode to cancel recording pause on the VCR, then press EXEC. The correct button depends on your VCR. Refer to the operating instructions of your VCR. V I DEO ED I T V I DEO ED I T ED I T SET...
- Page 62 The IR SETUP code is stored in the memory of your camcorder. Be sure to set the correct code, depending on your VCR. Default setting is code number 3. Brand IR SETUP code Brand IR SETUP code Sony 1, 2, 3, 4, 5, 6 Mitsubishi/MGA 22, 23, 24, 28, 29 Admiral (M. Wards) Multitech...
- Page 63 Dubbing only desired scenes – Digital program editing Note on the IR SETUP code Digital program editing is not possible if the VCR does not support IR SETUP codes. When the VCR does not operate correctly •After checking the code in “About the IR SETUP code” (p. 62), set the IR SETUP or the PAUSEMODE again.
- Page 64 Dubbing only desired scenes – Digital program editing V I DEO ED I T V I DEO ED I T ED I T SET ED I T SET CONTROL CONTROL ADJ TEST COMPLETE ADJ TEST RETURN ”CUT - I N” ”CUT - I N”...
- Page 65 Dubbing only desired scenes – Digital program editing Operation 1: Making a program The POWER switch should be set to Operate by touching the panel. (1) Insert the cassette for playback into your camcorder, and insert the tape for recording into the VCR. (2) Press FN to display PAGE1.
- Page 66 Dubbing only desired scenes – Digital program editing Note You cannot operate recording during Digital program editing. On a blank portion of the tape You cannot set IN or OUT. If there is a blank portion between the IN point and the OUT point on the tape The total time may not be displayed correctly.
- Page 67 Dubbing only desired scenes – Digital program editing Operation 2: Performing Digital program editing (Dubbing the tape) The POWER switch should be set to Operate by touching the panel. (1) When you use a digital video camera recorder for the VCR, set the power switch of the digital video camera recorder to VCR/VTR.
-
Page 68: Recording Video Or Tv Programs
Recording video or TV programs You can record the tape from another VCR or a TV program from a TV that has a DV output. Use your camcorder as a recorder. Connect the VCR with an i.LINK cable (optional). Video and audio signals are transmitted in digital form for high-quality editing. - Page 69 Recording video or TV programs Dubbing The POWER switch should be set to Operate by touching the panel. (1) Insert the blank tape (or the tape you want to record over) into your camcorder. If you are recording the tape from the VCR, insert the recorded tape into the VCR.
-
Page 70: Audio Dubbing
Audio dubbing You can record additional audio to the original sound on the tape by connecting audio equipment or a microphone. If you connect the audio equipment, you can add sound to your tape already recorded in the 12-bit mode by specifying starting and ending points. The original sound will not be erased. - Page 71 •When the write-protect tab of the cassette is set to lock We recommend that you add new sound on the tape recorded with your camcorder If you add new sound on the tape recorded with another camcorder (including other DCR-HC15), the sound quality may become deteriorated.
- Page 72 Audio dubbing Monitoring the new recorded sound The POWER switch should be set to Operate by touching the panel. (1) Play back the tape on which you added audio. (2) Press FN to display PAGE1. (3) Press MENU to display the menu. (4) Select AUDIO MIX in , then press EXEC (p.
-
Page 73: Superimposing A Title On A Cassette With Cassette Memory
Superimposing a title on a cassette with Cassette Memory VACATION A cassette can have up to about 20 titles, if a title consists of 5 characters. However, if the Cassette Memory is full with date, photo data and cassette label data, the cassette can have only up to about 11 titles with 5 characters each. - Page 74 Superimposing a title on a cassette with Cassette Memory To use the custom title If you want to use the custom title, select in step 5. The titles superimposed with your camcorder •They appear only by DV format video equipment with index titler function. •The point you superimposed the title may be detected as an index signal when searching a recording with other video equipment.
-
Page 75: Making Your Own Titles
Making your own titles You can make up to 2 titles and store them in the memory of your camcorder. Each title can have up to 20 characters. The POWER switch should be set to Operate by touching the panel. (1) Press FN to display PAGE1. -
Page 76: Labeling A Cassette On A Cassette With Cassette Memory
Labeling a cassette on a cassette with Cassette Memory The label can consist of up to 10 characters and is stored in Cassette Memory. When you insert the labeled cassette and set the POWER switch to CAMERA or VCR, the label is displayed for about 5 seconds. -
Page 77: Erasing All The Data In Cassette Memory
Erasing all the data in Cassette Memory The following data saved in Cassette Memory can be completely erased at once: – Date data – Title data – Cassette label – Photo data The POWER switch should be set to Operate by touching the panel. (1) Press FN to display PAGE1. -
Page 78: Customizing Your Camcorder
— Customizing Your Camcorder — Changing the menu settings To change the mode settings in the menu settings, select the menu items with r /R . The default settings can be partially changed. First, select the icon, then the menu item and the mode. - Page 79 Changing the menu settings Menu items are displayed as the following icons: MANUAL SET CAMERA SET VCR SET LCD/VF SET CM SET TAPE SET SETUP MENU OTHERS Selecting the mode setting of each item z is the default setting. Menu items differ depending on the position of the POWER switch. The screen shows only the items you can operate at the moment.
- Page 80 Changing the menu settings POWER switch Icon/item Mode Meaning CAMERA SET D ZOOM z OFF To deactivate the digital zoom. Up to 10× zoom is carried out. 20× To activate the digital zoom. More than 10× to 20× zoom is performed digitally (p. 27). 640×...
- Page 81 Changing the menu settings POWER switch Icon/item Mode Meaning VCR SET HiFi SOUND z STEREO To play back the stereo tape or dual sound track tape with main and sub sound (p. 96) To play back the stereo tape with the left sound or the dual sound track tape with main sound To play back the stereo tape with the right sound or the dual sound track tape with sub sound...
- Page 82 Changing the menu settings POWER switch Icon/item Mode Meaning CM SET TITLE —— To superimpose a title or make your own title (p. 73, 75) TITLEERASE —— To erase the title you have superimposed (p. 74) TITLE DSPL z ON To display the title you have superimposed Not to display the title (p.
- Page 83 When you play back the tape on other camcorders or VCRs, noise may occur in pictures or sound. •When you record in the LP mode, we recommend using a Sony Excellence/Master mini DV cassette so that you can get the most out of your camcorder.
- Page 84 Changing the menu settings POWER switch Icon/item Mode Meaning SETUP MENU CLOCK SET —— To set the date or time (p. 17) USB STREAM z OFF To deactivate the USB Streaming function To activate the USB Streaming function LANGUAGE z ENGLISH To display the information indicators in English FRANÇAIS To display some of the information indicators in...
- Page 85 Changing the menu settings POWER switch Icon/item Mode Meaning OTHERS WORLD TIME —— To set the clock to the local time. Press r/R to set a time difference. The clock changes by the time difference you set here. If you set the time difference to 0, the clock returns to the originally set time.
-
Page 86: Troubleshooting
If you run into any problem using your camcorder, use the following table to troubleshoot the problem. If the problem persists, disconnect the power source and contact your Sony dealer. If “C:ss:ss” appears on the screen, the self-diagnosis display function has activated. See page 92. - Page 87 Types of trouble and how to correct trouble Symptom Cause and/or Corrective Actions A vertical band appears when you • The contrast between the subject and background is too shoot a subject such as lights or a high. This is not a malfunction. candle flame against a dark background.
- Page 88 Types of trouble and how to correct trouble During playback Symptom Cause and/or Corrective Actions Playback is not possible. • The tape has run out. c Rewind the tape (p. 32). There are horizontal lines on the • The video head may be dirty. picture or the playback picture is c Clean the head using a cleaning cassette (optional) (p.
- Page 89 Types of trouble and how to correct trouble During recording and playback Symptom Cause and/or Corrective Actions The power does not turn on. • The battery pack is not installed, or has been exhausted. c Install a charged battery pack (p. 12, 13). •...
- Page 90 VCR and your camcorder (p. 57, 67). • Your camcorder is connected to DV equipment of other than Sony using the i.LINK cable. c Set it to IR (p. 60). • Setting program on a blank portion of the tape is attempted.
- Page 91 CHG (charge) lamp flashes. c Install it properly (p. 12). • Something is wrong with the battery pack. c Please contact your Sony dealer or local authorized Sony service facility. The buttons do not appear on the • DSPL/BATT INFO is pressed.
-
Page 92: Self-Diagnosis Display
Contact your Sony dealer or local authorized Sony service facility and inform them of the 5-digit code. (e.g. E:61:10) If you are unable to rectify the problem even if you try corrective actions a few times, contact your Sony dealer or local authorized Sony service facility. -
Page 93: Warning Indicators
Warning indicators If indicators appear on the screen, check the following: See the page in parentheses “( )” for details. C:21:00 Self-diagnosis display (p. 92) Warning indicator as to still image recording The battery pack has been exhausted Slow flashing: Slow flashing: •... -
Page 94: Warning Messages
Warning messages If messages appear on the screen, check the following. See the page in parentheses “( )” for details. • CLOCK SET Set the date and time (p. 17). • FOR ”InfoLITHIUM” Use an “InfoLITHIUM” battery pack (p. 13). BATTERY ONLY •... -
Page 95: Additional Information
— Additional Information — Usable cassettes Selecting cassette types You can use the mini DV cassette only.* You cannot use any other 8 mm , Digital8 , VHS , VHSC , S-VHS , S-VHSC , Betamax ED Betamax , DV or MICROMV cassette. - Page 96 Usable cassettes Audio mode 12-bit mode: The original sound can be recorded in stereo 1, and the new sound in stereo 2 in 32 kHz. The balance between stereo 1 and stereo 2 can be adjusted by selecting AUDIO MIX in the menu settings during playback. Both sounds can be played back.
- Page 97 Usable cassettes When the Cassette Memory function does not work Reinsert a cassette. The gold-plated connector of mini DV cassettes may be dirty or dusty. Cleaning gold-plated connector If the gold-plated connector on the cassette is dirty or dusty, the remaining tape indicator sometimes does not appear correctly, and you may not be able to operate functions using Cassette Memory.
-
Page 98: About The "Infolithium" Battery Pack
About the “InfoLITHIUM” battery pack This unit is compatible with the “InfoLITHIUM” battery pack (M series). Your camcorder operates only with the “InfoLITHIUM” battery pack. “InfoLITHIUM” M series battery packs have the mark. What is the “InfoLITHIUM” battery pack? The “InfoLITHIUM” battery pack is a lithium-ion battery pack that has functions for communicating information related to operating conditions between your camcorder and an optional AC adaptor/charger. - Page 99 Please buy a new battery pack. • The battery life varies depending on how it is stored and operating conditions and environment for each battery pack. “InfoLITHIUM” is a trademark of Sony Corporation.
-
Page 100: About I.link
Interfaces, refer to the operating instructions of the equipment to be connected. About the name “i.LINK” i.LINK is a more familiar term for IEEE 1394 data transport bus proposed by Sony, and is a trademark approved by many corporations. IEEE 1394 is an international standard standardized by the Institute of Electrical and Electronics Engineers. - Page 101 DV Interface, see page 57 and 68. This unit can also be connected to other i.LINK (DV Interface) compatible equipment made by Sony (e.g. VAIO series personal computer) other than video equipment. Before connecting this unit to your computer, make sure that application software supported by this unit is already installed on your computer.
-
Page 102: Using Your Camcorder Abroad
Using your camcorder abroad Using your camcorder abroad You can use your camcorder in any country/region with the AC Adaptor supplied with your camcorder within 100 V to 240 V AC, 50/60 Hz. Use a commercially available AC plug adaptor [a], if necessary, depending on the design of the wall outlet [b]. -
Page 103: Maintenance Information And Precautions
Maintenance information and precautions Moisture condensation If your camcorder is brought directly from a cold place to a warm place, moisture may condense inside your camcorder, on the surface of the tape, or on the lens. In this condition, the tape may stick to the head drum and be damaged or your camcorder may not operate correctly. - Page 104 The video head suffers from wear after long use. If you cannot obtain a clear image even after using a cleaning cassette, it might be because the video head is worn. Please contact your Sony dealer or local authorized Sony service facility to have the video head replaced.
- Page 105 Maintenance information and precautions Cleaning the LCD screen If fingerprints or dust make the LCD screen dirty, we recommend using the cleaning cloth (supplied) to clean the LCD screen. When you use the LCD Cleaning Kit (optional), do not apply the cleaning liquid directly to the LCD screen. Clean the LCD screen with cleaning paper moistened with the liquid.
- Page 106 Maintenance information and precautions Charging the built-in rechargeable battery Your camcorder has a built-in rechargeable battery so that the date, time and other settings are retained even when the POWER switch is set to OFF (CHG). The built-in rechargeable battery is always charged as long as you are using your camcorder. The battery, however, will get discharged gradually if you do not use your camcorder.
- Page 107 •If any solid object or liquid get inside the casing, unplug your camcorder and have it checked by a Sony dealer before operating it any further. •Avoid rough handling or mechanical shock. Be particularly careful of the lens. •Keep the POWER switch setting to OFF (CHG) when you are not using your camcorder.
- Page 108 •Do not disassemble nor modify the rechargeable battery pack. •Install the rechargeable battery pack to the video equipment securely. •Charging while some capacity remains does not affect the original battery capacity. If any problem occurs, unplug your camcorder and contact your nearest Sony dealer.
-
Page 109: Specifications
Specifications Supplied accessories Video camera Input/Output connectors See page 3. recorder S video output 4-pin mini DIN AC Adaptor Luminance signal: 1 Vp-p, System 75 Ω (ohms), unbalanced AC-L15A/L15B Video recording system Chrominance signal: 0.286 Vp-p, 75 Ω (ohms), unbalanced 2 rotary heads Power requirements Helical scanning system... -
Page 110: Quick Reference
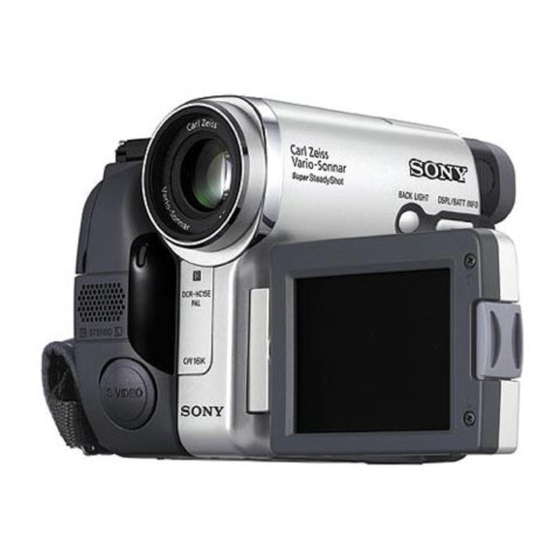
— Quick Reference — Identifying parts and controls Camcorder 1 Lens cap (p. 20) 6 DSPL/BATT INFO button (p. 15, 33) 2 LCD/Touch panel screen (p. 18, 23, 24) 7 CHG (charge) lamp (p. 13) 3 RESET button (p. 90) 8 Eyecup (p. - Page 111 Identifying parts and controls qd POWER switch (p. 9, 13) ql Tripod receptacle Make sure that the length of the tripod qf DC IN jack (p. 8) screw is less than 5.5 mm (7/32 inch). Otherwise, you cannot attach the tripod qg BATT release button (p.
- Page 112 Your camcorder is equipped with a Carl Zeiss lens which can reproduce fine images. The lens for your camcorder was developed jointly by Carl Zeiss, in Germany, and Sony Corporation. It adopts the MTF* measurement system for video camera and offers a quality as the Carl Zeiss lens.
- Page 113 Identifying parts and controls wh PHOTO button (p. 39) ed MIC jack (PLUG IN POWER) (red) (p. 70) Connect an external microphone wj Power zoom lever (p. 27) (optional). This jack also accepts a “plug-in-power” microphone. (USB) jack ef S VIDEO OUT jack (p. 37) DV Interface (p.
- Page 114 Identifying parts and controls Operation indicators LCD screen and Viewfinder 50min STBY 0 : 12 : 34 – 48min FADER FRAME REC 16 : 9WIDE NEG. ART SEARCH AUTO 60 AWB DV IN F1.7 16BIT 12:05:56PM 1 Cassette Memory (p. 22) qh NIGHTSHOT (p.
-
Page 115: Index
Index I, J, K, L T, U, V AC Adaptor ....... 13, 16 i.LINK ........100 Tape counter ......22 Adjusting the viewfinder ..26 i.LINK cable Telephoto ......... 27 Audio dubbing ......70 .......... 57, 68 Time code ......... 22 AUDIO MIX ...... - Page 116 Printed on 100% recycled paper using VOC (Volatile Organic Compound)-free vegetable oil based ink. Printed in Japan...