Vox AC15C1 Guitar Amplifier Manual
- Owner's manual (46 pages) ,
- Service manual (23 pages) ,
- Owner's manual (56 pages)
Advertisement
IMPORTANT SAFETY INSTRUCTIONS
- Read these instructions.
- Keep these instructions.
- Heed all warnings.
- Follow all instructions.
- Do not use this apparatus near water.
- Mains powered apparatus shall not be exposed to dripping or splashing and that no objects filled with liquids, such as vases, shall be placed on the apparatus.
- Clean only with dry cloth.
- Do not block any ventilation openings. Install in accordance with the manufacturer's instructions.
- Do not install near any heat sources such as radiators, heat registers, stoves, or other apparatus (including amplifiers) that produce heat.
- Do not defeat the safety purpose of the polarized or grounding-type plug. A polarized plug has two blades with one wider than the other. A grounding type plug has two blades and a third grounding prong. The wide blade or the third prong are provided for your safety. If the provided plug does not fit into your outlet, consult an electrician for replacement of the obsolete outlet. (for USA and Canada)
- Protect the power cord from being walked on or pinched particularly at plugs, convenience receptacles, and the point where they exit from the apparatus.
- Only use attachments/accessories specified by the manufacturer.
- Unplug this apparatus during lightning storms or when unused for long periods of time.
- Turning off the power switch does not completely isolate this product from the power line so remove the plug from the socket if not using it for extended periods of time.
- Install this product near the wall socket and keep the power plug easily accessible.
- WARNING—This apparatus shall be connected to a mains socket outlet with a protective earthing connection.
- Refer all servicing to qualified service personnel. Servicing is required when the apparatus has been damaged in any way, such as power-supply cord or plug is damaged, liquid has been spilled or objects have fallen into the apparatus, the apparatus has been exposed to rain or moisture, does not operate normally, or has been dropped.
- Do not install this equipment on the far position from wall outlet and/or convenience receptacle.
- Do not install this equipment in a confined space such as a box for the conveyance or similar unit.
- Excessive sound pressure from earphones and headphones can cause hearing loss.
- Use only with the cart, stand, tripod, bracket, or table specified by the manufacturer, or sold with the apparatus. When a cart is used, use caution when moving the cart/apparatus combination to avoid injury from tip-over.
![]()


TO REDUCE THE RISK OF FIRE OR ELECTRIC SHOCK DO NOT EXPOSE THIS PRODUCT TO RAIN OR MOISTURE.

 The lightning flash with arrowhead symbol within an equilateral triangle, is intended to alert the user to the presence of uninsulated "dangerous voltage" within the product's enclosure that may be of sufficient magnitude to constitute a risk of electric shock to persons.
 The exclamation point within an equilateral triangle is intended to alert the user to the presence of important operating and maintenance (servicing) instructions in the literature accompanying the product.
THE FCC REGULATION WARNING (for USA)
This equipment has been tested and found to comply with the limits for a Class B digital device, pursuant to Part 15 of the FCC Rules. These limits are designed to provide reasonable protection against harmful interference in a residential installation. This equipment generates, uses, and can radiate radio frequency energy and, if not installed and used in accordance with the instructions, may cause harmful interference to radio communications. However, there is no guarantee that interference will not occur in a particular installation. If this equipment does cause harmful interference to radio or television reception, which can be determined by turning the equipment off and on, the user is encouraged to try to correct the interference by one or more of the following measures:
- Reorient or relocate the receiving antenna.
- Increase the separation between the equipment and receiver.
- Connect the equipment into an outlet on a circuit different from that to which the receiver is connected.
- Consult the dealer or an experienced radio/TV technician for help.
Unauthorized changes or modification to this system can void the user's authority to operate this equipment.
Notice regarding disposal (EU only)
 When this "crossed-out wheeled bin" symbol is displayed on the product, owner's manual, battery, or battery package, it signifies that when you wish to dispose of this product, manual, package or battery you must do so in an approved manner. Do not discard this product, manual, package or battery along with ordinary household waste. Disposing in the correct manner will prevent harm to human health and potential damage to the environment. Since the correct method of disposal will depend on the applicable laws and regulations in your locality, please contact your local administrative body for details. If the battery contains heavy metals in excess of the regulated amount, a chemical symbol is displayed below the "crossed-out wheeled bin" symbol on the battery or battery package.
* All product names and company names are the trademarks or registered trademarks of their respective owners.
INTRODUCTION
This amp is the culmination of over 50 years of manufacturing expertise and high quality, guitar amplifier design. We have taken the best AC designs and added a number of useful features to give you the most tonally flexible AC to date!
We're confident you will find these improvements extremely useful and that your new amplifier will give you many hours of tonal pleasure. Your AC30 is equipped with a number of modern features and conveniences, a true bypass FX loop, master volume and Celestion AlNiCo Blue speakers (AC30C2X only), to name a few. Please read this manual carefully so that you can familiarize yourself with them.
The AC15C1 now features both NORMAL and TOP BOOST channels, and has many common features with the AC30C2X/AC30C2.
AC30C2(X) FRONT PANEL LAYOUT
 FRONT PANEL LAYOUT")
INPUTS
- NORMAL jack
Plugging your guitar into this input will route your signal through the NORMAL channel. Top jack for high Input, and bottom jack for low input. - TOP BOOST jack
Plugging your guitar into this input will route your signal through the TOP BOOST channel. Top jack for high Input, and bottom jack for low input.
NORMAL
- VOLUME control
This determines the sensitivity of the preamp section in the NORMAL channel. Depending on where this is set, you can either blend in more gain by turning it clockwise or you can turn it anticlockwise for a cleaner sound. The NORMAL volume can be used in conjunction with the MASTER volume which will allow you to get the perfect balance between distortion and overall volume. I.e. if you keep the NORMAL volume low and the MASTER volume high, you will get a clean sound at a high volume. Conversely, if you keep the NORMAL volume high and the MASTER volume low you will get more distortion at a lower overall volume.
TOP BOOST
NOTE!
The tone controls on the TOP BOOST channel are very interactive, eg increasing the level of the TREBLE control will cut the BASS level. It is best to begin with the Tone controls at 12 o'clock and experiment to find your perfect tone.
- VOLUME control
This determines the sensitivity of the preamp section in the TOP BOOST channel. Depending on where this is set, you can either blend in more gain by turning it clockwise or you can set it lower for a cleaner, "chimey" sound. The TOP BOOST Volume can be used in conjunction with the MASTER volume which will allow you to get the perfect balance between distortion and overall volume. I.e. If you keep the TOP BOOST volume low and the MASTER volume high, you will get a clean sound at a high volume. Conversely, if you keep the TOP BOOST volume high and the MASTER volume low you will get more distortion at a lower overall volume. - TREBLE control
This controls the high frequencies in your sound—from soft and round when turned down (counterclockwise) to bright and cutting when cranked (clockwise) and all points in-between. - BASS control
This controls the low frequencies in your sound—from thin and light when turned down (counterclockwise) to warm and heavy when turned up full (clockwise) and all points in-between.
REVERB
This section allows you to control the Reverb for both channels by adjusting the Tone and Level. You can remotely switch the reverb On or Off with the Optional VFS2A Foot Switch.
- TONE control
This controls the high and low frequencies of the REVERB. You can make the REVERB sound brighter by turning this control clockwise or you can make the sound darker by turning it counterclockwise. Experiment with this control to see which settings work best for you. - LEVEL control
This controls the mix (amount) of REVERB in your sound. Turning this knob fully clockwise will give you a wet, saturated sound while counterclockwise will give you a drier sound.
TREMOLO
This section allows you to control the TREMOLO for both channels on this amplifier by adjusting the Speed and Depth. You can remotely switch the TREMOLO on or off with the Optional VFS2A Foot Switch.
- SPEED control
As you might have guessed, this controls the SPEED of the built-in TREMOLO. - DEPTH control
This controls the DEPTH (intensity) of the built-in TREMOLO.
What is TREMOLO?
Tremolo is a Vintage Guitar Amplifier effect that hails from the Brit invasion during the 60's. Essentially it's like having someone sat next to your amplifier turning the master volume up and down! Having the Depth Control set to maximum will give a very dramatic effect, making your guitar sounding very choppy, you can adjust how quickly the volume is turned up and down with the speed control. Best thing to do is experiment to find your perfect sound.
MASTER
- TONE CUT control
This circuit is placed in the power amp as opposed to the preamp section like the TREBLE and BASS controls. What this does is the opposite of what you may think. Turning it clockwise will decrease the higher frequencies and turning it counterclockwise will add higher frequencies. - VOLUME control
This controls the overall (MASTER) VOLUME of your amplifier. Cleaner sounds can be achieved by lowering the NORMAL or TOP BOOST volumes and raising the MASTER. Setting the MASTER lower and the NORMAL and TOP BOOST volumes higher will give you a fatter, more distorted tone at a lower volume. As with all the controls of this amplifier, please experiment with different configurations to find the tones that fit your playing style.
POWER
- STANDBY Switch
This switch allows the amplifier to attain the correct working temperature before applying the H.T. supply. Before connecting the amplifier to the Mains supply, ensure the Power and STANDBY switches are in the off position. Turn on the POWER switch first and then wait 2–3 minutes before turning on the STANDBY switch. Doing this each time you play helps prolong tube life. The STANDBY switch is also very useful for playing live as it allows you to keep the valves at a functional temperature between sets. - POWER Switch
This is the ON/OFF switch for the power to the amplifier. Please ensure the amplifier is switched off and unplugged before being moved.
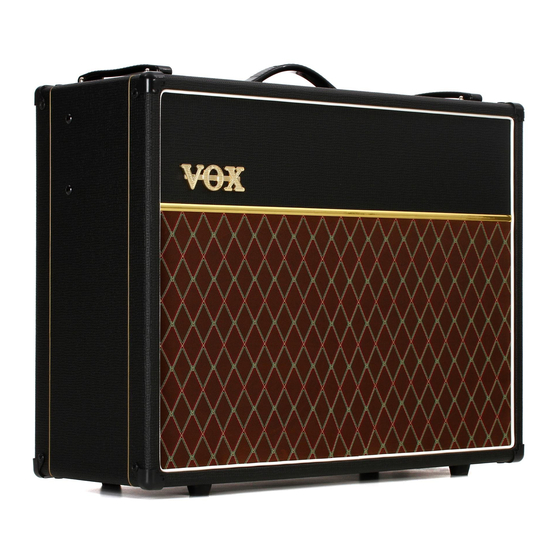
AC15C1 FRONT PANEL LAYOUT

POWER
- POWER Switch
This is the ON/OFF switch for the power to the amplifier. Please ensure the amplifier is switched off and unplugged before being moved. - STANDBY Switch
This switch allows the amplifier to attain the correct working temperature before applying the H.T. supply. Before connecting the amplifier to the Mains supply, ensure the Power and STANDBY switches are in the off position. Turn on the POWER switch first and then wait 2–3 minutes before turning on the STANDBY switch. Doing this each time you play helps prolong tube life. The STANDBY switch is also very useful for playing live as it allows you to keep the valves at a functional temperature between sets.
MASTER
- VOLUME control
This controls the overall (MASTER) VOLUME of your amplifier. Cleaner sounds can be achieved by lowering the NORMAL or TOP BOOST volumes and raising the MASTER. Setting the MASTER lower and the NORMAL and TOP BOOST volumes higher will give you a fatter, more distorted tone at a lower volume. As with all the controls of this amplifier, please experiment with different configurations to find the tones that fit your playing style. - TONE CUT control
This circuit is placed in the power amp as opposed to the preamp section like the TREBLE and BASS controls. What this does is the opposite of what you may think. Turning it clockwise will decrease the higher frequencies and turning it counterclockwise will add higher frequencies.
TREMOLO
This section allows you to control the TREMOLO for both channels on this amplifier by adjusting the Speed and Depth. You can remotely switch the TREMOLO on or off with the Optional VFS2A Foot Switch.
- DEPTH control
This controls the DEPTH (intensity) of the built-in TREMOLO. - SPEED control
As you might have guessed, this controls the SPEED of the built-in TREMOLO.
What is TREMOLO?
Tremolo is a Vintage Guitar Amplifier effect that hails from the Brit invasion during the 60's. Essentially it's like having someone sat next to your amplifier turning the master volume up and down! Having the Depth Control set to maximum will give a very dramatic effect, making your guitar sounding very choppy, you can adjust how quickly the volume is turned up and down with the speed control. Best thing to do is experiment to find your perfect sound.
REVERB
This section allows you to control the Reverb for both channels by adjusting the Level. You can remotely switch the reverb On or Off with the Optional VFS2A Foot Switch.
- LEVEL control
This controls the mix (amount) of REVERB in your sound. Turning this knob fully clockwise will give you a wet, saturated sound while counterclockwise will give you a drier sound.
TOP BOOST
NOTE!
The tone controls on the TOP BOOST channel are very interactive, eg increasing the level of the TREBLE control will cut the BASS level. It is best to begin with the Tone controls at 12 o'clock and experiment to find your perfect tone.
- BASS control
This controls the low frequencies in your sound—from thin and light when turned down (counterclockwise) to warm and heavy when turned up full (clockwise) and all points in-between. - TREBLE control
This controls the high frequencies in your sound—from soft and round when turned down (counterclockwise) to bright and cutting when cranked (clockwise) and all points in-between. - VOLUME control
This determines the sensitivity of the preamp section in the TOP BOOST channel. Depending on where this is set, you can either blend in more gain by turning it clockwise or you can set it lower for a cleaner, "chimey" sound. The TOP BOOST Volume can be used in conjunction with the MASTER volume which will allow you to get the perfect balance between distortion and overall volume. I.e. If you keep the TOP BOOST volume low and the MASTER volume high, you will get a clean sound at a high volume. Conversely, if you keep the TOP BOOST volume high and the MASTER volume low you will get more distortion at a lower overall volume.
NORMAL
- VOLUME control
This determines the sensitivity of the preamp section in the NORMAL channel. Depending on where this is set, you can either blend in more gain by turning it clockwise or you can turn it anticlockwise for a cleaner sound. The NORMAL volume can be used in conjunction with the MASTER volume which will allow you to get the perfect balance between distortion and overall volume. I.e. if you keep the NORMAL volume low and the MASTER volume high, you will get a clean sound at a high volume. Conversely, if you keep the NORMAL volume high and the MASTER volume low you will get more distortion at a lower overall volume.
INPUTS
- TOP BOOST jack
Plugging your guitar into this input will route your signal through the TOP BOOST channel. - NORMAL jack
Plugging your guitar into this input will route your signal through the NORMAL channel.
REAR PANEL LAYOUT


AC30C2(X)
- POWER OUTPUT Jacks
This is where you can hook up an extension or external speaker cabinet(s) if desired.
EXTENSION SP: This speaker jack runs parallel with the internal speakers which are wired for 16 Ohms. The extension cabinet must be 16 Ohms.
EXTERNAL SP: This speaker jack will mute (disconnect) the internal speakers and you can hook up either a 16 Ohm or 8 Ohm cabinet. Be sure to set the Output Select switch accordingly.
NOTE! Hooking up a cabinet through the External jack will mute (disconnect) the internal speakers!
![]()
To ensure that your system works correctly, you must observe the following points.- Don't use an extension cabinet whose impedance is other than 16 ohms.
- Don't connect a speaker whose rated input capacity is less than 30 watts (forAC30C2(X)) or 15 watts (AC15C1). The speaker may be destroyed if you ignore this caution—not recommended!
- You must use a speaker cable to connect an external speaker. Don't use ashielded cable like the one you use to connect a guitar to an amp.
- You must turn off the power before connecting the cable. Connecting the cablewhile the power is turned on may damage your amp.
NOTE! It is recommended that all audio cables, with the exception of the speaker lead, used to connect to the AC30C2(X)/AC15C1 of a high quality, screened type. These should not exceed 10 metres in length. Always use a non-screened Vox approved speaker lead with the AC30C2(X)/AC15C1 Amplifier and extension cabinets.
- IMPEDANCE Select switch
16 OHMS: Combos allow for the following configurations:- Set it to this if you use the internal speakers only.
- Set it to this if you connect an external 16 Ohm speaker cabinet through theExternal jack.
8 OHMS: Combos allow for the following configurations:- Set it to this if you connect an extension cabinet through the Extension jack. You'll be running the internal and external speakers in parallel. The impedance of the extension cabinet must be 16 Ohms.
- Set it to this if you connect an external 8 ohm speaker cabinet through theExternal jack.
- EFFECTS LOOP jack (AC30C2(X) only)
The EFFECTS LOOP allows effects to be added further down the signal chain, rather than just plugging them in line with your guitar and amplifier. By using the Effects loop with Delay stomp boxes, for example, will prevent any strange distortions to the time delayed repetitions. Please note that the EFFECTS LOOP sends at -10dB meaning it is suitable for stomp boxes.
BYPASS ON/OFF: This is a true bypass effects loop which means if this is set in the "BYPASS" position, absolutely none of your original signal will be running through until it's switched "ON".
RETURN: Think of this as the "input" of the effects loop and will be connected to the output of your effect(s).
NOTE! Be sure to use shielded guitar cables only! NEVER use unshielded speaker cables.
SEND: Think of this as the "output" of the FX loop and will be connected to the input of your effect(s). - FOOT SWITCH jack
This is where you connect the Optional VFS2A Foot Switch so you can turn the REVERB and TREMOLO on and off. - MAINS INPUT connector
This is where the supplied, detachable Mains (power) cord is connected. The specific mains input voltage rating that your amplifier needs to run at is located on the rear panel of your amplifier. Before making any connections or powering up the amplifier, make sure the correct voltage is set. If you have any doubt, refer to your local VOX dealer.
SPECIFICATION
AC30C2X
- Dimensions (W x D x H): 702 x 265 x 556 mm / 27.64 x 10.43 x 21.89 inches
- Weight: 33.4 kg / 73.59 lbs.
- Output Power: 30 Watts RMS into 16 Ohms
- Speaker: 2 x 12" 8 ohm Celestion Alnico Blue
- Inputs: Normal input jack (high and low), Top Boost input jack (high and low), FX RETURN jack, Footswitch jack
- Outputs: External loudspeaker jack, Extension loudspeaker jack, FX SEND jack
- Options: VFS2A Footswitch
AC30C2
- Dimensions (W x D x H): 702 x 265 x 556 mm / 27.64 x 10.43 x 21.89 inches
- Weight: 32.2 kg / 70.99 lbs.
- Output Power: 30 Watts RMS into 16 Ohms
- Speaker: 2 x 12" 8 ohm Celestion G12M Greenback
- Inputs: Normal input jack (high and low), Top Boost input jack (high and low), FX RETURN jack, Footswitch jack
- Outputs: External loudspeaker jack, Extension loudspeaker jack, FX SEND jack
- Options: VFS2A Footswitch
AC15C1
- Dimensions (W x D x H): 602 x 265 x 456 mm / 23.70 x 10.43 x 17.95 inches
- Weight: 22 kg / 48.50 lbs.
- Output Power: 15 Watts RMS into 16 Ohms
- Speaker: 1 x 12" 16 ohm Celestion G12M Greenback
- Inputs: Normal input jack, Top Boost input jack, Footswitch jack
- Outputs: External loudspeaker jack, Extension loudspeaker jack
- Options: VFS2A Footswitch
*Specifications and appearance are subject to change without notice for improvement.
IMPORTANT NOTICE TO CONSUMERS
This product has been manufactured according to strict specifications and voltage requirements that are applicable in the country in which it is intended that this product should be used. If you have purchased this product via the internet, through mail order, and/or via a telephone sale, you must verify that this product is intended to be used in the country in which you reside.

Use of this product in any country other than that for which it is intended could be dangerous and could invalidate the manufacturer´s or distributor´s warranty. Please also retain your receipt as proof of purchase otherwise your product may be disqualified from the manufacturer´s or distributor´s warranty.
VOX AMPLIFICATION LTD.
9 Newmarket Court, Kingstonm Milton Keynes, MK10 OAU, UK
www.voxamps.com
© 2009 VOX AMPLIFICATION LTD.

VideosVox AC15c1: Review Video, Tone Tips & More
Documents / Resources
References
Download manual
Here you can download full pdf version of manual, it may contain additional safety instructions, warranty information, FCC rules, etc.
Advertisement
Thank you! Your question has been received!


Need Assistance?
Do you have a question about the AC15C1 that isn't answered in the manual? Leave your question here.