Milwaukee M18 Radio Manual
- User manual ,
- Original instructions manual (161 pages) ,
- Operator's manual (29 pages)
Advertisement
- 1 IMPORTANT SAFETY INSTRUCTIONS
- 2 SPECIFIC SAFETY RULES
- 3 EXTENSION CORDS
- 4 GROUNDING
- 5 SPECIFICATIONS
- 6 SYMBOLOGY
- 7 FUNCTIONAL DESCRIPTION
- 8 ASSEMBLY
- 9 OPERATION
- 10 MAINTENANCE
- 11 ACCESSORIES
- 12 SERVICE - UNITED STATES
- 13 SERVICE - CANADA
- 14 LIMITED WARRANTY USA & CANADA
- 15 Videos
- 16 Documents / Resources


To reduce the risk of injury, user must read and understand operator's manual.
IMPORTANT SAFETY INSTRUCTIONS
READ, UNDERSTAND AND FOLLOW ALL INSTRUCTIONS.
Failure to heed all warnings listed below, may result in electric shock, fire and/or serious personal injury. KEEP THESE INSTRUCTIONS.
- Read these instructions.
- Keep these instructions.
- Heed all warnings.
- Follow all instructions.
- Do not use this apparatus near water.
- Clean only with dry cloth.
- Do not block any ventilation openings. Install in accordance with the manufacturer's instructions.
- Do not install near any heat sources such as radiators, heat registers, stoves, or other apparatus (including amplifiers) that produce heat.
- Do not defeat the safety purpose of the polarized or grounding-type plug. A polarized plug has two blades with one wider than the other. A grounding type plug has two blades and a third grounding prong. The wide blade or the third prong are provided for your safety. If the provided plug does not fit into your outlet, consult an electrician for replacement of the obsolete outlet.
- Protect the power cord from being walked on or pinched particularly at plugs, convenience receptacles, and the point where they exit from the apparatus.
- Only use attachments/accessories specified by the manufacturer.
- Unplug this apparatus during lightning storms or when unused for long periods of time.
- Refer all servicing to qualified service personnel. Servicing is required when the apparatus has been damaged in any way, such as power-supply cord or plug is damaged, liquid has been spilled or objects have fallen into the apparatus, the apparatus has been exposed to rain or moisture, does not operate normally, or has been dropped.
- Only plug power supply into readily accessible outlet to allow the appliance to be unplugged quickly.
- Only operate this apparatus in a well ventilated area.
- A battery operated radio with integral batteries or a separate battery pack must be recharged only with the specified charger for the battery. A charger that may be suitable for one type of battery may create a risk of fire when used with another battery.
- Use battery operated radio only with specifically designated battery packs. Use of any other batteries may create a risk of fire.
- When battery pack is not in use, keep it away from other metal objects like: paper clips, coins, keys, nails, screws, or other small metal objects that can make a connection from one terminal to another. Shorting the battery terminals together may cause sparks, burns, or a fire.
- Store your battery pack and charger in a cool, dry place. Do not store battery pack where temperatures may exceed 120°F (50°C) such as direct sunlight, a vehicle or metal building during the summer.
- Avoid body contact with grounded surfaces such as pipes, radiators, ranges and refrigerators. There is an increased risk of electric shock if your body is grounded.
- Do not use any adaptor plugs.
- When operating a radio outside, use an outdoor extension cord marked "W-A" or "W". These cords are rated for outdoor use and reduce the risk of electric shock.
- Never disassemble the radio or try to do any rewiring on the radio's electrical system.
- Do not expose this apparatus to dripping and splashing, or place objects filled with liquids on this unit.
SPECIFIC SAFETY RULES
- Maintain labels and nameplates. These carry important information. If unreadable or missing, contact a MILWAUKEE service facility for a free replacement.
- This radio is designed to be powered by a standard 120 volt AC line or AC generator. It may also be powered using a MILWAUKEE M18™ battery pack. Do not attempt to use with any other voltage or power supply.
 Federal Communications Commission
![]() Changes or modifications to this unit not expressly approved by the party responsible for compliance could void the user's authority to operate the equipment.
Changes or modifications to this unit not expressly approved by the party responsible for compliance could void the user's authority to operate the equipment.
This equipment has been tested and found to comply with the limits for a Class B digital device, pursuant to Part 15 of the FCC Rules. These limits are designed to provide reasonable protection against harmful interference in a residential installation. This equipment generates, uses and can radiate radio frequency energy and, if not installed and used in accordance with the instructions, may cause harmful interference to radio communications.
However, there is no guarantee that interference will not occur in a particular installation. If this equipment does cause harmful interference to radio or television reception, which can be determined by turning the equipment off and on, the user is encouraged to try to correct the interference by one or more of the following measures:- Reorient or relocate the receiving antenna.
- Increase the separation between the equipment and receiver.
- Connect the equipment into an outlet on a circuit different from that to which the receiver is connected.
- Consult the dealer or an experienced radio/TV technician for help.
EXTENSION CORDS
Double insulated tools can use either a two or three wire extension cord. As the distance from the supply outlet increases, you must use a heavier gauge extension cord. Using extension cords with inadequately sized wire causes a serious drop in voltage, resulting in loss of power and possible tool damage. Refer to the table shown to determine the required minimum wire size.
The smaller the gauge number of the wire, the greater the capacity of the cord. For example, a 14 gauge cord can carry a higher current than a 16 gauge cord. When using more than one extension cord to make up the total length, be sure each cord contains at least the minimum wire size required. If you are using one extension cord for more than one tool, add the nameplate amperes and use the sum to determine the required minimum wire size.
Guidelines for Using Extension Cords
- If you are using an extension cord outdoors, be sure it is marked with the suffix "W-A" ("W" in Canada) to indicate that it is acceptable for outdoor use.
- Be sure your extension cord is properly wired and in good electrical condition. Always replace a damaged extension cord or have it repaired by a qualified person before using it.
- Protect your extension cords from sharp objects, excessive heat and damp or wet areas.
- Unplug all cords during lightning storms or when unused for long periods of time.
| Recommended Minimum Wire Gauge For Extension Cords* | |||||
| Nameplate Amps | Extension Cord Length | ||||
| 25' | 50' | 75' | 100' | 150' | |
| 0 - 2.0 | 18 | 18 | 18 | 18 | 16 |
| 2.1 - 3.4 | 18 | 18 | 18 | 16 | 14 |
| 3.5 - 5.0 | 18 | 18 | 16 | 14 | 12 |
| 5.1 - 7.0 | 18 | 16 | 14 | 12 | 12 |
| 7.1 - 12.0 | 16 | 14 | 12 | 10 | -- |
| 12.1 - 16.0 | 14 | 12 | 10 | -- | -- |
| 16.1 - 20.0 | 12 | 10 | -- | -- | -- |
*Based on limiting the line voltage drop to five volts at 150% of the rated amperes.


TO REDUCE THE RISK OF ELECTRIC SHOCK, DO NOT REMOVE COVER (OR BACK). NO USER-SERVICABLE PARTS INSIDE. REFER SERVICIING TO QUALIFIED SERVICE PERSONNEL.
 The lightning flash with arrowhead symbol, within an equilateral triangle, is intended to alert the user to the presence of uninsulated "dangerous voltage" within the product's enclosure that may be of sufficient magnitude to constitute a risk of electric shock to persons.
 The exclamation point within an equilateral triangle is intended to alert the user to the presence of important operating and maintenance (servicing) instructions in the literature accompanying the appliance.
GROUNDING
Double Insulated Radios: Radios with Two Prong Plugs
Radios marked "Double Insulated" do not require grounding. They have a special double insulation system which satisfies OSHA requirements and complies with the applicable standards of Underwriters Laboratories, Inc., the Canadian Standard Association and the National Electrical Code. Double Insulated radios may be used in either of the 120 volt outlets shown in Figures A and B.

SPECIFICATIONS
Cat. No.: 2890-20
AC Volts: 120
AC Amps: 0.5
Battery Type: M18™
Charger Type: M18™
Recommended Ambient Operating Temperature: 0°F to 125°F
SYMBOLOGY
 To reduce the risk of injury, user must read operator's manual.
 Volts
Volts
 Alternating Current
 Amps
Amps
 Hertz
Hertz
 UL Listing for Canada and U.S.
 Federal Communications Commission
 Mexican Approvals Marking
 Double Insulated
Presence of important operating instructions.
Risk of electric shock.
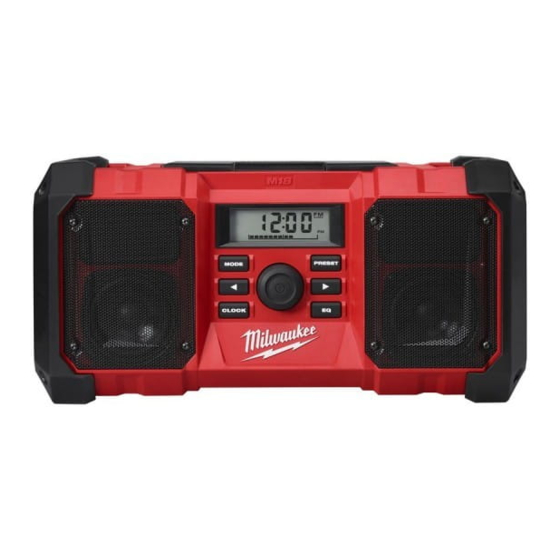
FUNCTIONAL DESCRIPTION

- Antenna
- Auxiliary compartment
- Cord wrap
- Cord
- Backup-battery compartment
- Battery bay
- AUX storage
- Stereo AUX jack
- USB power outlet
- Display
- Mode button
- Seek/adjust down
- Clock button
- On/off / Volume knob
- EQ button
- Seek/adjust up
- Preset button
ASSEMBLY
Recharge only with the charger specified for the battery. For specific charging instructions, read the operator's manual supplied with your charger and battery.
Inserting/Removing Battery Pack
Insert the battery pack by sliding it into the battery bay. To remove the battery pack, pull the battery pack off of the bay.
Low Battery Indicator
![]() When the radio is powered by a battery pack, a low battery indicator will be displayed when the battery pack needs to be charged.
When the radio is powered by a battery pack, a low battery indicator will be displayed when the battery pack needs to be charged.
Battery Pack Protection
To protect the life of the battery pack, the radio will shut off when the battery's charge becomes too low. If this happens, remove the battery pack and charge it according to the charger's instructions.
Installing an Auxiliary Device
Open the Auxiliary Compartment to connect an MP3 player, CD player, or other audio device using the stereo auxiliary jack. Small devices (less than 3-1/4" wide, 7-1/4" high, and 1-1/8" thick) can be stored in the compartment during use.
USB Power Outlet
This jack can be used to charge a cell phone, power a CD player or any other device that uses less than 2.1 A of DC electrical current. Function will only occur when the radio is plugged into an outlet, or the radio is on and an M18™ battery pack is inserted. The USB Power Outlet will not function off of a battery pack with the radio off.
NOTE: Any device that uses more than 2.1 A of DC electrical current will trip a self-resetting function and disable the output.
Batteries may leak chemicals or may explode if used incorrectly. The following care should be taken to prevent such an incident:
- Make sure the positive (+) and negative (-) battery terminals are positioned correctly.
- Do not mix new and old batteries together, or mix different types of batteries.
- Do not try to recharge non-rechargeable batteries.
If chemicals from the batteries come in contact with your skin, wash them off immediately with water. If chemicals leak onto the radio, clean the radio completely.
Changing Back-up Batteries
To hold station presets and clock time when the battery pack is removed and the radio is unplugged, 2 AAA batteries are required.

- Remove battery pack and unplug radio.
- Remove the screw and battery cover.
- Insert two (2) AAA batteries according to matching positive (+) and negative (-) marks.
- Replace the battery cover and screw.
OPERATION
Always remove battery pack before changing or removing accessories. Only use accessories specifically recommended for this tool. Others may be hazardous.
To reduce the risk of fire or electric shock, do not expose this radio to rain or moisture.
Turning On/Off and Volume Control
![]() Plug the cord into an appropriate AC outlet or install an M18™ battery pack.
Plug the cord into an appropriate AC outlet or install an M18™ battery pack.
Turn the On/off / Volume ![]() knob to control the power and sound functions.
knob to control the power and sound functions.
Setting the Clock
- Press and hold the CLOCK button until the hour begins to flash.
- Use the
![]() buttons to change the hour.
buttons to change the hour. - Press the CLOCK button again. Use the
![]() to change the minutes.
to change the minutes. - Press the CLOCK button again to save.
EQ Adjustment
To manually adjust the Bass/Treble sound, press the EQ button. Set the bass sound using the ![]() buttons. Press the EQ button again to set the treble sound, using the
buttons. Press the EQ button again to set the treble sound, using the ![]() buttons.
buttons.
Selecting Band
Push the MODE button to select AM, FM, or AUX.
Tuning (Seeking and Scanning)
Press and hold the ![]() buttons to SEEK through the band. When a station is found, the SEEK will stop. Use the SCAN button to continue through the stations, pausing at each.
buttons to SEEK through the band. When a station is found, the SEEK will stop. Use the SCAN button to continue through the stations, pausing at each.
PRESET Stations
To set the PRESET stations:
- Tune to desired station.
- Press and hold the PRESET button until the PRESET indicator on the display begins to flash.
- Use the
![]() buttons to select the PRESET location for the station. Five locations (1-5) are available.
buttons to select the PRESET location for the station. Five locations (1-5) are available. - Press the PRESET button to save the location.
To tune to a PRESET station: Press and release the PRESET button to step through the PRESET stations.
Using the Stereo AUX Jack
- Open the Auxiliary Compartment.
- Plug the auxiliary device into the Stereo AUX jack.
- Use the MODE button to select AUX.
- Start the auxiliary device.
MAINTENANCE
To reduce the risk of injury, always unplug the charger and remove the battery pack from the charger or tool before performing any maintenance. Never disassemble the tool, battery pack or charger. Contact a MILWAUKEE service facility for ALL repairs.
Maintaining Tool
Keep your tool, battery pack and charger in good repair by adopting a regular maintenance program. If the tool does not start or operate at full power with a fully charged battery pack, clean the contacts on the battery pack. If the tool still does not work properly, return the tool, charger and battery pack, to a MILWAUKEE service facility for repairs.
To reduce the risk of personal injury and damage, never immerse your tool, battery pack or charger in liquid or allow a liquid to flow inside them.
Cleaning
Clean dust and debris from any vents. Keep handles clean, dry and free of oil or grease. Use only mild soap and a damp cloth to clean, since certain cleaning agents and solvents are harmful to plastics and other insulated parts. Some of these include gasoline, turpentine, lacquer thinner, paint thinner, chlorinated cleaning solvents, ammonia and household detergents containing ammonia. Never use flammable or combustible solvents around tools.
Repairs
For repairs, return the tool, battery pack and charger to the nearest authorized service center.
ACCESSORIES
Always remove battery pack before changing or removing accessories. Only use accessories specifically recommended for this tool. Others may be hazardous. For a complete listing of accessories, go online to www.milwaukeetool.com or contact a local distributor.
SERVICE - UNITED STATES
1-800-SAWDUST (1.800.729.3878) Monday-Friday, 7:00 AM - 6:30 PM CST or visit www.milwaukeetool.com
Contact Corporate After Sales Service Technical Support with technical, service/repair, or warranty questions.
Email: metproductsupport@milwaukeetool.com
Register your tool at www.milwaukeetool.com...
- to receive important notifications regarding your purchase
- to ensure that your tool is protected under the warranty
- to become a Heavy Duty club member
SERVICE - CANADA
Milwaukee Tool (Canada) Ltd 1.800.268.4015 Monday-Friday, 7:00 AM - 4:30 PM CST or visit www.milwaukeetool.ca
LIMITED WARRANTY USA & CANADA
Every MILWAUKEE power tool* (see exceptions below) is warranted to the original purchaser only to be free from defects in material and workmanship. Subject to certain exceptions, MILWAUKEE will repair or replace any part on an electric power tool which, after examination, is determined by MILWAUKEE to be defective in material or workmanship for a period of five (5) years** after the date of purchase unless otherwise noted. Return of the power tool to a MILWAUKEE factory Service Center location or MILWAUKEE Authorized Service Station, freight prepaid and insured, is required. A copy of the proof of purchase should be included with the return product. This warranty does not apply to damage that MILWAUKEE determines to be from repairs made or attempted by anyone other than MILWAUKEE authorized personnel, misuse, alterations, abuse, normal wear and tear, lack of maintenance, or accidents.
Normal Wear: Many power tools need periodic parts replacement and service to achieve best performance. This warranty does not cover repair when normal use has exhausted the life of a part including, but not limited to, chucks, brushes, cords, saw shoes, blade clamps, o-rings, seals, bumpers, driver blades, pistons, strikers, lifters, and bumper cover washers.
*This warranty does not cover Air Nailers & Staplers; Airless Paint Sprayer; Cordless Battery Packs; Gasoline Driven Portable Power Generators; Hand Tools; Hoist – Electric, Lever & Hand Chain; M12™ Heated Gear; Reconditioned Product; and Test & Measurement Products. There are separate and distinct warranties available for these products.
**The warranty period for Job Site Radios, M12™ Power Port, M18™ Power Source, Jobsite Fan and Trade Titan™ Industrial Work Carts is one (1) year from the date of purchase. The warranty period for the M18 FUEL™ 1" D-Handle High Torque Impact Wrenches, Drain Cleaning Cables, AIRSNAKE™ Drain Cleaning Air Gun Accessories, and REDLITHIUM™ USB Laser Levels is two (2) years from the date of purchase. The warranty period for the M18™ Compact Heat Gun, 8 Gallon Dust Extractor, M18™ Framing Nailers, M18 FUEL™ 1/2" Ext. Anvil Controlled Torque Impact Wrench w/ ONE-KEY™, M18 FUEL™ 1" High Torque Impact Wrench w/ ONE-KEY™, M18 FUEL™ 2 Gal. Compact Quiet Compressor, M12™ Laser Levels, 165' Laser Detector, M12™ 23GA Pin Nailer, and M18 FUEL™ 1/4" Blind Rivet Tool w/ ONE-KEY™, and M12 FUEL™ Low Speed Tire Buffer is three (3) years from the date of purchase. The warranty period for the LED in the LED Work Light and the LED Upgrade Bulb for the Work Light is the lifetime of the product subject to the limitations above. If during normal use the LED or LED Bulb fails, the part will be replaced free of charge. Warranty Registration is not necessary to obtain the applicable warranty on a MILWAUKEE power tool product. The manufacturing date of the product will be used to determine the warranty period if no proof of purchase is provided at the time warranty service is requested.
ACCEPTANCE OF THE EXCLUSIVE REPAIR AND REPLACEMENT REMEDIES DESCRIBED HEREIN IS A CONDITION OF THE CONTRACT FOR THE PURCHASE OF EVERY MILWAUKEE PRODUCT. IF YOU DO NOT AGREE TO THIS CONDITION, YOU SHOULD NOT PURCHASE THE PRODUCT. IN NO EVENT SHALL MILWAUKEE BE LIABLE FOR ANY INCIDENTAL, SPECIAL, CONSEQUENTIAL OR PUNITIVE DAMAGES, OR FOR ANY COSTS, ATTORNEY FEES, EXPENSES, LOSSES OR DELAYS ALLEGED TO BE AS A CONSEQUENCE OF ANY DAMAGE TO, FAILURE OF, OR DEFECT IN ANY PRODUCT INCLUDING, BUT NOT LIMITED TO, ANY CLAIMS FOR LOSS OF PROFITS. SOME STATES DO NOT ALLOW THE EXCLUSION OR LIMITATION OF INCIDENTAL OR CONSEQUENTIAL DAMAGES, SO THE ABOVE LIMITATION OR EXCLUSION MAY NOT APPLY TO YOU. THIS WARRANTY IS EXCLUSIVE AND IN LIEU OF ALL OTHER EXPRESS WARRANTIES, WRITTEN OR ORAL. TO THE EXTENT PERMITTED BY LAW, MILWAUKEE DISCLAIMS ANY IMPLIED WARRANTIES, INCLUDING WITHOUT LIMITATION ANY IMPLIED WARRANTY OF MERCHANTABILITY OR FITNESS FOR A PARTICULAR USE OR PURPOSE; TO THE EXTENT SUCH DISCLAIMER IS NOT PERMITTED BY LAW, SUCH IMPLIED WARRANTIES ARE LIMITED TO THE DURATION OF THE APPLICABLE EXPRESS WARRANTY AS DESCRIBED ABOVE. SOME STATES DO NOT ALLOW LIMITATIONS ON HOW LONG AN IMPLIED WARRANTY LASTS, SO THE ABOVE LIMITATION MAY NOT APPLY TO YOU, THIS WARRANTY GIVES YOU SPECIFIC LEGAL RIGHTS, AND YOU MAY ALSO HAVE OTHER RIGHTS WHICH VARY FROM STATE TO STATE.
This warranty applies to product sold in the U.S.A. and Canada only. Please consult the 'Service Center Search' in the Parts & Service section of MILWAUKEE's website www.milwaukeetool.com or call 1.800. SAWDUST (1.800.729.3878) to locate your nearest service facility for warranty and non-warranty service on a Milwaukee electric power tool.

MILWAUKEE TOOL
13135 West Lisbon Road
Brookfield, Wisconsin, U.S.A. 53005
VideosMilwaukee M18 Job Site Radio - Deview Video
Documents / Resources
References
![www.milwaukeetool.com]() Milwaukee® Tool Official Site | Nothing but HEAVY DUTY® | Milwaukee Tool
Milwaukee® Tool Official Site | Nothing but HEAVY DUTY® | Milwaukee Tool![www.milwaukeetool.ca]() Milwaukee® Tool Official Site | Nothing but HEAVY DUTY® | Milwaukee Tool
Milwaukee® Tool Official Site | Nothing but HEAVY DUTY® | Milwaukee Tool
Download manual
Here you can download full pdf version of manual, it may contain additional safety instructions, warranty information, FCC rules, etc.
Advertisement
Thank you! Your question has been received!


Need Assistance?
Do you have a question about the M18 that isn't answered in the manual? Leave your question here.