Advertisement
Quick Links
Advertisement

Related Manuals for NCR 7772-K241


Summary of Contents for NCR 7772-K241
- Page 1 Kit Instructions Solid State Drive (SSD) 7772-K241/K253/K255 Issue G...
-
Page 2: Revision Record
NCR, therefore, reserves the right to change specifications without prior notice. All features, functions, and operations described herein may not be marketed by NCR in all parts of the world. In some instances, photographs are of equipment prototypes. Therefore, before using this document, consult with your NCR representative or NCR office for information that is applicable and current. -
Page 3: Solid State Drive (Ssd)
Solid State Drive (SSD) This kit provides a Solid State Drive for: • NCR CX7 All-in-One POS (7772) or NCR CX8 POS (7736) • 7772-K241 – 120GB SSD • 7772-K253 – 240GB SSD • 7772-K255 – 480GB SSD • NCR CX5 All-in-One POS (7773) • 7772-K241 – 120GB SSD... -
Page 4: Kit Contents
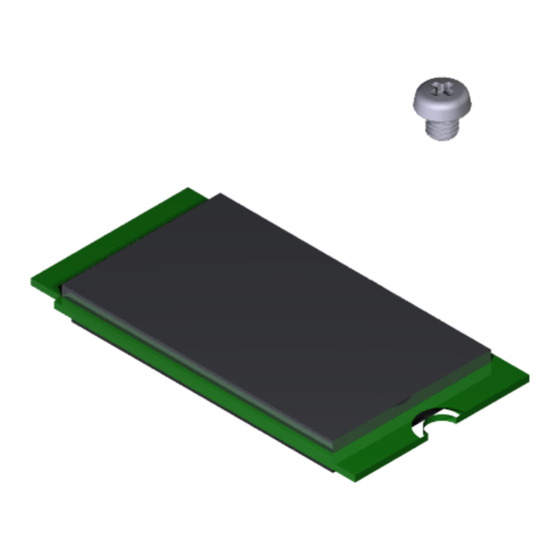
Solid State Drive (SSD) Kit Contents Item Part Number Description 7772-K241 120GB SSD 006-8627556 Screw, M3x4mm Phillips, Low Profile, Black 006-8627411 Storage, Apacer, 120GB M.2 42mm SATA 3D NAND Module 7772-K253 240GB SSD 006-8627556 Screw, M3x4mm Phillips, Low Profile, Black 006-8628119 Apacer 240GB 4-channel BiCs4 NVMe M.2 Module (PNPE1B3A) 7772-K255 480GB SSD... -
Page 5: Installation Procedure
Disconnect the AC power cord from the AC outlet and wait 30 seconds before servicing the terminal. NCR CX7 All-in-One POS (7772)/NCR CX5 All-in-One POS (7773) 1. Lay the Display face down on a flat surface. Note: Always use a soft material (cloth, foam) to protect the display screen when placing the terminal face down. - Page 6 Solid State Drive (SSD) 3. Disconnect the Cables. a. Loosen the thumbscrew of the 180-degree USB-C Cable then disconnect the Cable. b. Remove the Ethernet Cable from the Cable Management Hook then disconnect the Cable. 4. Loosen the two (2) captive screws that secure the Back Cover to the Display.
- Page 7 Solid State Drive (SSD) 5. Rotate the Back Cover away from the Display and unhook the Back Cover Tabs.
- Page 8 Solid State Drive (SSD) 6. Insert the M.2 SSD at an angle and slide it into the connector. Note: There are two M.2 Ports on the Motherboard. The primary M.2 SSD should be installed in the M.2 Port 1, and the secondary M.2 SSD (for dual media) should be installed in the M.2 Port 2.
- Page 9 Solid State Drive (SSD) NCR CX8 POS (7736) 1. Remove the Top Cover. There are two types of Top Covers: • Top Cover without Duct — Remove the four (4) screws securing the Top Cover to the chassis. • Top Cover with Duct...
- Page 10 Solid State Drive (SSD) b. Slide the Top Cover in the direction shown. 2. Insert the M.2 SSD at an angle and slide it into the connector. Note: There are two M.2 Ports on the Motherboard. The primary M.2 SSD should be installed in the M.2 Port 1, and the secondary M.2 SSD (for dual media) should be installed in the M.2 Port 2.
- Page 11 Solid State Drive (SSD) 3. Secure the M.2 SSD to the Motherboard with a screw. 4. Reinstall the Top Cover. • Top Cover without Duct – Install the Top Cover on the chassis using four (4) screws.
- Page 12 Solid State Drive (SSD) • Top Cover with Duct a. Set the Top Cover on the chassis. b. Slide the Top Cover in the direction shown to align the screw holes of the Cover with the screw holes of the chassis. c.