Table of Contents
Advertisement
Quick Links
Advertisement
Table of Contents

Related Manuals for Fisher & Paykel Minimal CID834DTB4


Summary of Contents for Fisher & Paykel Minimal CID834DTB4
- Page 1 DOWNDRAFT INDUCTION COOKTOP MINIMAL CID834DTB4 USER GUIDE AA BI...
-
Page 3: Table Of Contents
CONTENTS Safety and warnings First use Safety features Cookware Using your induction zones SmartZones PowerBoost GentleHeat Auto RapidHeat Using the timer Cooking guide Using the extractor Care and cleaning Maintenance alerts Troubleshooting Service and warranty Registration To register your appliance visit our website: fisherpaykel.com/register... -
Page 5: Safety And Warnings
SAFETY AND WARNINGS WARNING! Hot Surface Hazard Failure to follow this advice may result in serious injury. • DO NOT TOUCH SURFACE UNITS OR AREAS NEAR UNITS – Surface units may be hot even though they are dark in color. •... - Page 6 SAFETY AND WARNINGS WARNING! Fire Hazard Failure to follow this advice may result in serious injury. • Unattended cooking on a hob with fat or oil can be dangerous and may result in fire. • NEVER try to extinguish a fire with water, but switch off the appliance and cover flame, eg with a lid or fire blanket, or use dry chemical or foam-type extinguisher.
- Page 7 SAFETY AND WARNINGS READ AND SAVE THIS GUIDE To reduce the risk of fire, injury to persons or damage when using the appliance, follow the important safety instructions listed below. Read all the guidance before using the appliance. Ensure your appliance is properly installed and grounded by a qualified technician.
- Page 8 SAFETY AND WARNINGS Do not use water on grease fires – Smother fire or flame or use dry chemical or foam-type extinguisher. Use only dry potholders — Moist or damp potholders on hot surfaces may result in burns from steam. Do not let potholder touch hot heating elements. Do not use a towel or other bulky cloth.
- Page 9 SAFETY AND WARNINGS Servicing Do not repair or replace any part of the appliance unless specifically recommended in the user guide. All other servicing should be undertaken be a Fisher & Paykel trained and supported service technician or qualified person. If the power supply cable is damaged, it must only be replaced by a qualified technician.
-
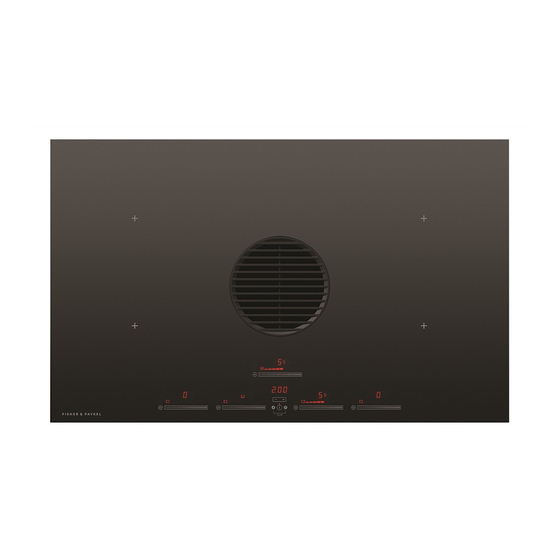
Page 10: First Use
FIRST USE Cooktop overview COOKTOP FEATURES 1 Induction zones 2 Extractor 3 Control panel Control panel overview !3 3 CONTROL PANEL FEATURES 1 Cooking zone indicator 8 Product On/Off !5 Auto-extraction indicator !6 Auto-function selector 2 Cooking zone display 9 Keylock / Childlock and filter saturation reset 3 Zone timer indicator !0 Pause / Childlock... - Page 11 FIRST USE Display overview ZONE DISPLAY DESCRIPTION Cooking zone off (not activated) Cooking zone on (activated but not operating) Touch display Power levels Your cooktop is operated using an intuitive touch display. Use the PowerBoost function control panel to navigate cooking settings.
-
Page 12: Safety Features
SAFETY FEATURES The cooktop controls can be locked for cleaning and to prevent unintended use. When the cooktop is locked the controls and cooktop display will remain unresponsive. Keylock ACTIVATING KEYLOCK DISABLING KEYLOCK Ensure all cooking zones have been turned To unlock the cooktop, touch and hold . -
Page 13: Cookware
COOKWARE Cookware size For optimal performance, ensure the size of the cookware is suitable for the zone in use. Cooking zone Min. pan size* Power** Powerboost unbridged 110mm 2100 W 3000 W 1 Smartzone bridged 230mm 3700 W * Recommended **Total max power 7400 W... - Page 14 COOKWARE Induction cookware The quality of your cookware can affect cooking performance. Only use induction-compatible cookware that has been specifically designed for induction cooking. Look for the induction symbol on the packaging or the bottom of the pan. Suitable cookware material: Unsuitable cookware material: stainless steel –...
-
Page 15: Using Your Induction Zones
USING YOUR INDUCTION ZONES To begin cooking Press the control. The indicator light ON/OFF above the control will glow. Place a suitable pan on the desired cooking zone. Ensure the bottom of the pan and the surface of the cooking zone are clean and dry. - Page 16 USING YOUR INDUCTION ZONES Turn the cooking zone off: touch or slide the setting selector until shows in the zone display. Turn the product off: touch the control. ON/OFF Pause cooking: touch to pause all cooking functions, will show in the main display.
-
Page 17: Smartzones
SMARTZONES The SmartZones can accommodate several small pots. These small pots will be detected as one large pot. The entire SmartZone is activated when a pot is detected. This means that other magnetic items (such as cutlery) sitting in the cooking zone will heat up. - Page 18 SMARTZONES If no pan is detected on one cooking zone: The left hand display will still show the selected temperature and the right hand display will still show If after 10 minutes no pan is detected: The bridging function will switch off. The cooking zone without a detectable pan will turn off.
-
Page 19: Powerboost
POWERBOOST Using PowerBoost This feature enables you to sear meat or bring liquid to boil very quickly. When a cooking zone is set to PowerBoost, it uses more than 100% of the power of that particular cooking zone, resulting in a boost of intense heat. PowerBoost heats food and liquids very quickly. Do not leave the cooktop unattended when using this feature. -
Page 20: Gentleheat
GENTLEHEAT Using GentleHeat There are two GentleHeat settings. The Low setting is ideal for the most delicate cooking tasks (such as melting chocolate), as the cooking zone will provide a very low continuous gentle heat. The Medium setting is ideal for keeping cooked food warm and the gentle warming of delicate foods. -
Page 21: Auto Rapidheat
AUTO RAPIDHEAT Using Auto RapidHeat APPROXIMATE TIME HEAT SETTING AT RAPID HEAT This feature enables the cooking zones to: 40 seconds heat up food or liquid quickly at the highest setting, and 1 minute reduce the temperature automatically 2 minutes to a pre-selected heat setting. - Page 22 AUTO RAPIDHEAT Then, when the period of highest setting is over, will stop flashing and the cooking zone will automatically reduce the heat to your pre-selected lower setting. If you would like a lower or higher heat setting than you originally selected, simply slide to the new setting and hold until the starts flashing.
-
Page 23: Using The Timer
USING THE TIMER You can set the timer for up to 1 hour and 59 minutes. The time will be displayed in hours and minutes when the timer is set for longer than 10 minutes. Using timer as minute minder The minute minder can be set when not using any cooking or extraction zones. - Page 24 USING THE TIMER To cancel a timer setting With the cooktop turned on, tap the – and + controls together until the indicator light in the desired cooking zone illuminates. Press and hold the control until the minute – display shows .
-
Page 25: Cooking Guide
COOKING GUIDE Take care when frying: oil and fat heat up very quickly, particularly if you’re using PowerBoost. At extremely high temperatures oil and fat will ignite spontaneously and this presents a serious fire risk. Cooking tips When food comes to the boil, reduce the temperature setting. Using a lid will reduce cooking times and save energy by retaining the heat. - Page 26 COOKING GUIDE Induction heat settings HEAT SETTING SUITABILITY melting chocolate, butter, and foods that burn quickly delicate warming for small amounts of food 1 - 2 gentle simmering slow warming 3 - 4 reheating rapid simmering cooking rice 5 - 6 pancakes 7 - 8 sautéing...
-
Page 27: Using The Extractor
USING THE EXTRACTOR To start the extractor Ensure the cooktop is turned Select an extraction setting by touching or sliding the extraction speed selector with your finger. If you don’t select an extraction setting within 10 seconds, the extractor will automatically turn off. - Page 28 USING THE EXTRACTOR Using Auto-extraction This feature enables your cooktop to automatically adjust its extraction speed based on the amount of steam generated during cooking. Setting Auto-extraction Press will illuminate to indicate Auto-extraction is active. To cancel Auto-extraction You can exit Auto-extraction at any time by pressing again or by manually adjusting the fan speed.
-
Page 29: Care And Cleaning
CARE AND CLEANING WHAT? HOW? IMPORTANT! Everyday soiling 1 Switch the power to the When the power to the on glass cooktop off at the wall. cooktop is switched off, (fingerprints, marks, there will be no ‘hot 2 Apply cooktop cleaner stains left by food or surface’... - Page 30 CARE AND CLEANING Cleaning the filter cover and grease filter 1 Lift the filter cover out. 2 Rotate the grease filter clockwise to unlock, then lift out. 3 Wash with hot soapy water or in the dishwasher. 4 For optimum performance clean the filter and cover once a week.
- Page 31 CARE AND CLEANING Cleaning the overflow trap To remove the overflow trap 1 The overflow trap is located under the cooktop unit. 2 Remove the plug in the base of the trap to drain any excess grease and liquids into a bucket or container.
-
Page 32: Maintenance Alerts
MAINTENANCE ALERTS Enable grease filter maintenance alert By default, the grease filter maintenance alerts will be deactivated. Ensure the cooktop is turned all extraction and cooking zones are turned Press and hold until illuminates dimly and G shows in the display. To confirm, press the extraction speed area. - Page 33 MAINTENANCE ALERTS Grease filter maintenance alert If the grease filter requires cleaning, will illuminate and G will show in the display for the first 10 seconds after turning the cooktop on. Refer to 'Cleaning the filter cover and grease filter' for guidance. Press and hold to clear the alert.
-
Page 34: Troubleshooting
TROUBLESHOOTING PROBLEM POSSIBLE CAUSES WHAT TO DO The cooktop cannot No power. Make sure the cooktop is be turned on. connected to the power supply and that it is switched on at the wall. Check whether there is a power outage in your home or area. - Page 35 TROUBLESHOOTING PROBLEM POSSIBLE CAUSES WHAT TO DO Some pans make This may be caused by the This is normal for induction crackling or construction of your cookware and does not clicking noises. cookware (layers of different indicate a fault. metals vibrating differently). The cooktop makes This is caused by This is normal, but the...
- Page 36 TROUBLESHOOTING PROBLEM POSSIBLE CAUSES WHAT TO DO The cooktop or a cooking Technical fault. Please note down the error zone has turned itself off letters and numbers, unexpectedly, a tone switch the power to the sounds and an error code cooktop off at the wall, and is displayed (typically contact your Authorized...
-
Page 37: Service And Warranty
SERVICE AND WARRANTY Before you call for service or assistance Check the things you can do yourself. Refer to the installation instructions and your user guide and check that: 1 Your product is correctly installed. 2 You are familiar with its normal operation. If after checking these points you still need assistance or parts, please refer to the Service &... - Page 40 FISHERPAYKEL.COM © Fisher & Paykel Appliances 2021. All rights reserved. The models shown in this guide may not be available in all markets and are subject to change at any time. The product specifications in this guide apply to the specific products and models described at the date of issue.