
Related Manuals for Sharp MX-C507P


Summary of Contents for Sharp MX-C507P
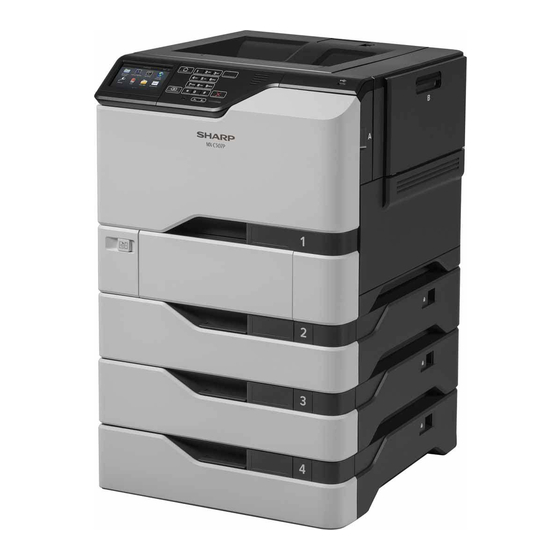
- Page 1 DIGITAL FULL COLOR PRINTER MX-C507P User's Guide September 2021 Machine type: 5028 Model:...
-
Page 2: Table Of Contents
Contents Contents Safety information..................5 Conventions................................5 Product statements............................. 5 Learning about the printer................8 Selecting a location for the printer........................8 Printer configurations............................9 Attaching cables..............................9 Using the control panel............................ 10 Understanding the status of the power button and indicator light............11 Setting up and using the home screen applications......12 Using the home screen.............................12 Customizing the home screen........................ - Page 3 Contents Printing from a mobile device........................27 Printing from a flash drive..........................28 Supported flash drives and file types......................29 Configuring confidential jobs......................... 30 Printing confidential and other held jobs....................30 Printing a font sample list..........................31 Canceling a print job............................31 Understanding the printer menus............32 Menu map................................32 Device...................................33...
- Page 4 Contents Ordering parts and supplies........................... 87 Replacing parts and supplies......................... 88 Moving the printer............................110 Saving energy and paper..........................111 Clearing jams....................112 Avoiding jams..............................112 Identifying jam locations..........................113 Paper jam in trays............................. 115 Paper jam in the multipurpose feeder......................116 Paper jam in the standard bin........................116 Paper jam in door A............................
-
Page 5: Safety Information
Safety information Safety information Conventions Note: A note identifies information that could help you. Warning: A warning identifies something that could damage the product hardware or software. CAUTION: A caution indicates a potentially hazardous situation that could injure you. Different types of caution statements include: CAUTION—POTENTIAL INJURY: Indicates a risk of injury. - Page 6 Safety information CAUTION—SHOCK HAZARD: To avoid the risk of electrical shock, make sure that all external connections (such as Ethernet and telephone system connections) are properly installed in their marked plug-in ports. CAUTION—SHOCK HAZARD: To avoid the risk of electrical shock, if you are accessing the controller board or installing optional hardware or memory devices sometime after setting up the printer, then turn the printer off, and unplug the power cord from the electrical outlet before continuing.
- Page 7 Safety information CAUTION—POTENTIAL INJURY: This product uses a laser. Use of controls or adjustments or performance of procedures other than those specified in the User’s Guide may result in hazardous radiation exposure. CAUTION—POTENTIAL INJURY: The lithium battery in this product is not intended to be replaced. There is a danger of explosion if a lithium battery is incorrectly replaced.
-
Page 8: Learning About The Printer
Learning about the printer Learning about the printer Selecting a location for the printer When selecting a location for the printer, leave enough room to open trays, covers, and doors and to install hardware options. • Set up the printer near an electrical outlet. CAUTION—POTENTIAL INJURY: To avoid the risk of fire or electrical shock, connect the power cord to an appropriately rated and properly grounded electrical outlet that is near the product and easily accessible. -
Page 9: Printer Configurations
Learning about the printer Rear 76 mm (3 in.) Printer configurations CAUTION—TIPPING HAZARD: Installing one or more options on your printer or MFP may require a caster base, furniture, or other feature to prevent instability causing possible injury. For more information on supported configurations, contact the place where you purchased the printer. -
Page 10: Using The Control Panel
Learning about the printer CAUTION—POTENTIAL INJURY: To avoid the risk of fire or electrical shock, connect the power cord to an appropriately rated and properly grounded electrical outlet that is near the product and easily accessible. CAUTION—POTENTIAL INJURY: To avoid the risk of fire or electrical shock, use only the power cord provided with this product or the manufacturer's authorized replacement. -
Page 11: Understanding The Status Of The Power Button And Indicator Light
Learning about the printer Use the Display • View the printer messages and supply status. • Set up and operate the printer. Home button Go to the home screen. Keypad Enter numbers or symbols in an input field. Power button •... -
Page 12: Setting Up And Using The Home Screen Applications
Setting up and using the home screen applications Setting up and using the home screen applications Using the home screen When the printer is turned on, the display shows the home screen. Use the home screen buttons and icons to initiate an action. -
Page 13: Customizing The Home Screen
Setting up and using the home screen applications These settings may also appear on the home screen Touch Bookmarks Access bookmarks. App Profiles Access application profiles. Lock Device Prevent users from accessing any printer functions from the home screen. Customizing the home screen From the control panel, touch Settings >... -
Page 14: Setting Up Forms And Favorites
Setting up and using the home screen applications Setting up Forms and Favorites Open a Web browser, and then type the printer IP address in the address field. Notes: • View the printer IP address on the printer home screen. The IP address appears as four sets of numbers separated by periods, such as 123.123.123.123. -
Page 15: Managing Contacts
Setting up and using the home screen applications For FTP, type the FTP address. For example, myServer/myDirectory. Enter the FTP port. Port 21 is • the default port for sending commands. For SMB, type the network folder address. For example, myServer/myShare/myFile.pdf. Type the •... - Page 16 Setting up and using the home screen applications Adding groups Open a web browser, and then type the printer IP address in the address field. Notes: • View the printer IP address on the printer home screen. The IP address appears as four sets of numbers separated by periods, such as 123.123.123.123.
-
Page 17: Loading Paper And Specialty Media
Loading paper and specialty media Loading paper and specialty media Setting the size and type of the specialty media The trays automatically detect the size of plain paper. For specialty media like labels, card stock, or envelopes, do the following: From the home screen, navigate to: Settings >... - Page 18 Loading paper and specialty media Adjust the guides to match the size of the paper you are loading. Note: Use the indicators on the bottom of the tray to position the guides.
- Page 19 Loading paper and specialty media Flex, fan, and align the paper edges before loading. Load the paper stack with the printable side faceup. Notes: • For one‑sided printing, load letterhead faceup with the header toward the front of the tray. •...
-
Page 20: Loading The Multipurpose Feeder
Loading paper and specialty media Insert the tray. If necessary, set the paper size and type to match the paper loaded in the tray. Loading the multipurpose feeder Open the multipurpose feeder. - Page 21 Loading paper and specialty media Adjust the guide to match the size of the paper you are loading. Flex, fan, and align the paper edges before loading. Load the paper. • Load paper and card stock with the printable side facedown and the top edge entering the printer first.
-
Page 22: Linking Trays
Loading paper and specialty media • Load envelopes with the flap side up and against the right side of the paper guide. Load European envelopes with the flap entering the printer first. Warning—Potential Damage: Do not use envelopes with stamps, clasps, snaps, windows, coated linings, or self‑stick adhesives. -
Page 23: Paper Support
Paper support Paper support Supported paper sizes Paper size and dimension Standard or optional Multipurpose Two‑sided printing 550‑sheet tray feeder 210 x 297 mm (8.27 x 11.7 in.) A5 long edge 210 x 148 mm (8.27 x 5.83 in.) A5 short edge 148 x 210 mm (5.83 x 8.27 in.) 105 x 148 mm (4.13 x 5.83 in.) Banner... -
Page 24: Supported Paper Types
Paper support Paper size and dimension Standard or optional Multipurpose Two‑sided printing 550‑sheet tray feeder Universal 76.2 x 127 mm to 215.9 x 355.6 mm (3 x 5 in. to 8.5 x 14 in.) 7 3/4 Envelope 98.4 x 190.5 mm (3.875 x 7.5 in.) 9 Envelope 98.4 x 225.4 mm (3.875 x 8.9 in.) 10 Envelope... -
Page 25: Supported Paper Weights
Paper support Paper type Standard or optional Multipurpose feeder 550‑sheet tray Plain Paper Card Stock Recycled Glossy Labels Vinyl Labels Bond Envelope Transparency Letterhead Preprinted Colored Paper Light Paper Heavy Paper Custom Type Supported paper weights Paper type and weight Standard or optional Multipurpose feeder 550‑sheet tray... - Page 26 Paper support Paper type and weight Standard or optional Multipurpose feeder 550‑sheet tray Card stock 105.1–218 g/m grain long (28.1–58‑lb bond) Paper Labels 218 g/m (58‑lb bond) Vinyl Labels 300 g/m (70‑lb bond) Envelopes 60–105 g/m (16–28‑lb bond) Paper less than 75 g/m (20 lb) must be printed with Paper Type set to Light Paper.
-
Page 27: Printing
Printing Printing Printing from a computer Note: For labels, card stock, and envelopes, set the paper size and type in the printer before printing the document. From the document that you are trying to print, open the Print dialog. If necessary, adjust the settings. Print the document. -
Page 28: Printing From A Flash Drive
Printing Printing from a mobile device using Wi‑Fi Direct® ® Wi‑Fi Direct is a printing service that lets you print to any Wi‑Fi Direct‑ready printer. Note: Make sure that the mobile device is connected to the printer wireless network. For more information, “Connecting a mobile device to the printer”... -
Page 29: Supported Flash Drives And File Types
Printing Supported flash drives and file types Flash drives Notes: – The printer supports high‑speed USB flash drives with full‑speed standard. – USB flash drives must support the File Allocation Table (FAT) system. Many flash drives are tested and approved for use with the printer. For more information, contact the place where you purchased the printer. -
Page 30: Configuring Confidential Jobs
Printing Configuring confidential jobs From the home screen, touch Settings > Security > Confidential Print Setup. Configure the settings. Setting Description Max Invalid PIN Set the limit for entering an invalid PIN. Note: When the limit is reached, the print jobs for that user name are deleted. Confidential Job Set an individual expiration time for each held job before it is automatically deleted from Expiration... -
Page 31: Printing A Font Sample List
Printing Click Print. From the printer home screen, release the print job. Touch Held jobs > select your computer name > Confidential > enter the PIN > select the print job > Print. Using the print driver With a document open, choose File > Print. Select a printer, and then from the drop-down menu following the Orientation menu, choose Print and Hold. -
Page 32: Understanding The Printer Menus
Understanding the printer menus Understanding the printer menus Menu map Device • • Preferences Accessibility • • Eco‑Mode Restore Factory Defaults • • Remote Operator Panel Maintenance • • Notifications Visible Home Screen Icons • • Power Management About this Printer •... -
Page 33: Device
Understanding the printer menus Device Preferences Menu item Description Display Language Set the language of the text that appears on the display. Country/Region Identify the country or region that the printer is configured to operate. Run initial setup Run the setup wizard. Off* Keyboard Select a language as a keyboard type. - Page 34 Understanding the printer menus Menu item Description Screen Timeout Set the idle time before the display shows the home screen or before the printer logs out a user account automatically. 5–300 seconds (60*) Note: An asterisk (*) next to a value indicates the factory default setting. Eco-Mode Menu item Description...
- Page 35 Understanding the printer menus Menu item Description VNC Password Specify the password to connect to the VNC client server. Note: This menu item appears only if Authentication Type is set to Standard Authentication. Note: An asterisk (*) next to a value indicates the factory default setting. Notifications Menu item Description...
- Page 36 Understanding the printer menus Menu item Description E‑mail Alerts Setup Enter the server port number of your secondary or backup SMTP server. E‑mail Setup Secondary SMTP Gateway Port 1–65535 (25*) E‑mail Alerts Setup Specify how long before the printer times out if the SMTP server does not respond.
- Page 37 Understanding the printer menus Menu item Description E‑mail Alerts Setup Set whether credentials are required for user‑initiated e‑mails. E‑mail Setup User‑Initiated E‑mail None* Use Device SMTP Credentials Use Session User ID and Password Use Session E‑mail address and Password Prompt user E‑mail Alerts Setup Enable user credentials and group designations to connect to the SMTP server.
- Page 38 Understanding the printer menus Menu item Description Error Prevention Set the printer to restart when an error occurs. Auto Reboot Auto Reboot Reboot when idle Reboot always* Reboot never Error Prevention Set the number of automatic reboots that the printer can perform.
- Page 39 Understanding the printer menus Menu item Description Timeouts Set the idle time before the printer begins operating in Sleep mode. Sleep Mode 1–120 minutes (15*) Timeouts Set the time before the printer turns off. Hibernate Timeout Disabled 1 hour 2 hours 3 hours 6 hours 1 day...
- Page 40 Understanding the printer menus Accessibility Menu item Description Duplicate Key Strike Interval Set the interval in seconds during which the printer ignores duplicate key presses on an attached keyboard. 0–5 (0*) Key Repeat Initial Delay Set the initial length of delay in seconds before a repeating key starts repeating.
- Page 41 Understanding the printer menus Restore Factory Defaults Menu item Description Restore Settings Restore the printer factory default settings. Restore all settings Restore printer settings Restore network settings Restore app settings Maintenance Configuration Menu Menu item Description USB Configuration Change the USB driver mode of the printer to improve its compatibility with a personal computer.
- Page 42 Understanding the printer menus Menu item Description Tray Configuration Set the paper source that the user fills when a prompt to load paper appears. Paper Prompts Auto* Multipurpose Feeder Manual Paper Tray Configuration Set the paper source that the user fills when a prompt to load envelope appears.
- Page 43 Understanding the printer menus Menu item Description Printer Emulations Reset the emulator after a print job. Emulator Security Reset Emulator After Job Off* Printer Emulations Disable access to printer message during emulation. Emulator Security Disable Printer Message Access Print Configuration Print non‑copy jobs in grayscale.
- Page 44 Understanding the printer menus Menu item Description Device Operations Erase messages that were remotely installed. Clear all remotely‑installed messages Device Operations Show existing error messages on the display after the printer remains inactive on the home screen for a length of time equal Automatically Display Error Screens to the Screen Timeout setting.
-
Page 45: Print
Understanding the printer menus Visible Home Screen Icons Menu Description Status/Supplies Specify which icons to show on the home screen. Job Queue Change Language Address Book Bookmarks Held Jobs App Profiles Display Customization Eco-Settings Forms and Favorites About this Printer Menu item Description Asset Tag... - Page 46 Understanding the printer menus Menu item Description Collate Keep the pages of a print job stacked in sequence, particularly when printing multiple copies of the job. Off [1,1,1,2,2,2]* On [1,2,1,2,1,2] Separator Sheets Insert blank separator sheets when printing. None* Between Copies Between Jobs Between Pages Separator Sheet Source...
- Page 47 Understanding the printer menus Setup Menu item Description Printer Language Set the printer language. PCL Emulation Note: Setting a printer language default does not prevent a software PS Emulation* program from sending print jobs that use another printer language. Job Waiting Preserve print jobs requiring supplies so that jobs not requiring the missing supplies can print.
- Page 48 Understanding the printer menus Quality Menu item Description Print Mode Set how the printer generates color content. Black and White Color* Print Resolution Set the resolution for the printed output. 4800 CQ* Note: 4800 CQ provides high‑quality output at maximum speed. 1200 dpi Toner Darkness Determine the lightness or darkness of text images.
- Page 49 Understanding the printer menus Menu item Description Color Correction Modify the color settings used to print documents. Notes: Auto* • Off sets the printer to receive the color correction from the software. Manual • Auto sets the printer to apply different color profiles to each object on the printed page.
- Page 50 Understanding the printer menus Menu item Description Log Action at Near Full Specify how the printer responds when the hard disk is nearly full. None* E‑mail Current Log E‑mail & Delete Current Log E‑mail & Delete Oldest Log Post Current Log Post &...
- Page 51 Understanding the printer menus Menu item Description Scale To Fit Scale the page content to fit the selected paper size. Off* Annotations Specify whether to print annotations in the PDF. Print Do Not Print* Print PDF Error Enable the printing of PDF error. Note: An asterisk (*) next to a value indicates the factory default setting.
- Page 52 Understanding the printer menus Menu item Description Font Source Choose the source which contains the default font selection. Resident* Notes: Disk • Flash and Disk appear only when a flash memory or hard disk is Flash installed. • For Flash and Disk to appear, make sure that they are not read‑ or write‑protected.
- Page 53 Understanding the printer menus Menu item Description Auto LF after CR Set the printer to perform a line feed after a carriage return control command. Off* Tray Renumber • Configure the printer to work with a different print driver or custom application that uses a different set of source assignments to request a Assign MP Feeder given paper source.
-
Page 54: Paper
Understanding the printer menus Menu item Description Invert Invert bitonal monochrome images. Off* Note: This menu item does not apply to GIF or JPEG image formats. Scaling Adjust the image to fit the printable area. Anchor Top Left Note: When Auto Fit is set to On, Scaling is automatically set to Best Fit. Best Fit* Anchor Center Fit Height/Width... - Page 55 Understanding the printer menus Menu item Description Substitute Size Set the printer to substitute a specified paper size if the requested size is not loaded in any paper source. Statement/A5 Notes: Letter/A4 • Off prompts the user to load the required paper size. All Listed* •...
-
Page 56: Usb Drive
Understanding the printer menus Media Types Menu item Description Plain Specify the texture, weight, and orientation of the paper. Card Stock Recycled Glossy Labels Vinyl Labels Bond Envelope Letterhead Preprinted Colored Paper Light Heavy Rough/Cotton Custom Type [X] USB Drive Flash Drive Print Menu item Description... - Page 57 Understanding the printer menus Menu item Description Flip Style Determine which side of the paper is bound when performing two‑sided printing. Long Edge* Short Edge Pages per Side Print multiple page images on one side of a sheet of paper. Off* 2 pages per side 3 pages per side...
-
Page 58: Network/Ports
Understanding the printer menus Network/Ports Network Overview Menu item Description Active Adapter Specify the type of the network connection. Auto* Note: Wireless is available only in printers connected to a wireless network. Standard Network Wireless Network Status Show the connectivity status of the printer network. Display Network Status on Show the network status on the display. - Page 59 Understanding the printer menus Menu item Description Setup On Printer Panel Configure the Wi‑Fi connection using the control panel. Choose Network Note: 802.1x - RADIUS can be configured only from the Embedded Add Wi‑Fi Network Web Server. Network Name Network Mode Infrastructure Wireless Security Mode Disabled*...
- Page 60 Understanding the printer menus Menu item Description WPA2/WPA Personal Enable Wi‑Fi security through Wi-Fi Protected Access (WPA). Note: This menu item appears only when the Wireless Security Mode is set to WPA2/WPA-Personal. Set Pre‑Shared Key Set the password for secure Wi‑Fi connection. WPA2-Personal Enable Wi‑Fi security through WPA2.
- Page 61 Understanding the printer menus Menu item Description PCL SmartSwitch Set the printer to switch automatically to PCL emulation when a print job requires it, regardless of the default printer language. Note: If PCL SmartSwitch is off, then the printer does not examine incoming data and uses the default printer language specified in the Setup menu.
- Page 62 Understanding the printer menus Ethernet Menu item Description Network Speed Show the speed of the active network adapter. IPv4 Configure the IPv4 settings. Enable DHCP (On*) Set Static IP Address IPv6 Configure the IPv6 settings. Enable IPv6 (On*) Enable DHCPv6 (Off*) Stateless Address Autoconfiguration (On*) DNS Server Address Manually Assigned IPv6 Address...
- Page 63 Understanding the printer menus TCP/IP Note: This menu appears only in network printers or printers attached to print servers. Menu item Description Set Hostname Set the current TCP/IP host name. Domain Name Set the domain name. Allow DHCP/BOOTP to update Allow the DHCP and BOOTP clients to update the NTP settings of the printer.
- Page 64 Understanding the printer menus Menu item Description Restricted Server List Specify the IP addresses that are allowed to communicate with the printer over TCP/IP. Notes: • Use a comma to separate each IP address. • You can add up to 50 IP addresses. Restricted Server List Options Specify the access option for IP addresses that are not in the list.
- Page 65 Understanding the printer menus Menu item Description SNMP Versions 1 and 2c Configure Simple Network Management Protocol (SNMP) versions 1 and 2c to install print drivers and applications. Enabled Allow SNMP Set Enable PPM MIB SNMP Community SNMP Version 3 Configure SNMP version 3 to install and update the printer security.
- Page 66 Understanding the printer menus Menu item Description Enable IPSec Enable Internet Protocol Security (IPSec). Base Configuration Set the IPSec base configuration. Default* Compatibility Secure DH (Diffie‑Hellman) Group Proposal Set the IPSec base configuration. modp2048 (14)* Note: This menu item appears only when Base Configuration is set modp3072 (15) to Compatibility.
- Page 67 Understanding the printer menus Menu item Description Active Let the printer join networks that require authentication before allowing access. Off* Note: An asterisk (*) next to a value indicates the factory default setting. LPD Configuration Note: This menu appears only in network printers or printers that are attached to print servers. Menu item Description LPD Timeout...
- Page 68 Understanding the printer menus Menu item Description Local Domains Specify domain names for HTTP and FTP servers. HTTP Proxy IP Address Configure the HTTP and FTP server settings. FTP Proxy IP Address HTTP Default IP Port HTTPS Device Certificate FTP Default IP Port Timeout for HTTP/FTP Specify the amount of time before the server connection stops.
- Page 69 Understanding the printer menus Menu item Description Job Buffering Temporarily store jobs on the hard disk before printing. Off* Note: This menu item appears only when a hard disk is installed. Mac Binary PS Set the printer to process Macintosh binary PostScript print jobs. Auto* Notes: •...
-
Page 70: Security
Understanding the printer menus Security Login Methods Manage Permissions Menu item Description Function Access Control access to the printer functions. Manage Shortcuts Modify Address Book Create Profiles Manage Bookmarks Flash Drive Print Flash Drive Color Printing Held Jobs Access Use Profiles Cancel Jobs at the Device Change Language Internet Printing Protocol (IPP) - Page 71 Understanding the printer menus Menu item Description Apps Control access to printer applications. New Apps Slideshow Change Wallpaper Screen Saver Forms and Favorites Eco‑Settings Local Accounts Menu item Description Manage Groups/Permissions Show a list of all saved groups in the printer. Add User Create local accounts and specify their access to the printer functions, administrative menus, printer management options, and applications.
- Page 72 Understanding the printer menus Menu item Description Remote Syslog Facility Specify a facility code that the printer uses when sending log events to a remote 0 ‑ Kernel Messages server. 1 ‑ User‑Level Messages 2 ‑ Mail System 3 ‑ System Daemons 4 ‑...
- Page 73 Understanding the printer menus Menu item Description E‑mail Log Cleared Alert Send e‑mail notification to the administrator when a log entry is deleted. Off* E‑mail Log Wrapped Alert Send e‑mail notification to the administrator when the log becomes full and begins to overwrite the oldest entries.
- Page 74 Understanding the printer menus Login Restrictions Menu item Description Login failures Specify the number of failed login attempts before the user gets locked out. 1–10 (3*) Failure time frame Specify the time frame between failed login attempts before the user gets locked out. 1–60 minutes (5*) Lockout time Specify the lockout duration.
- Page 75 Understanding the printer menus Menu item Description Require All Jobs to be Held Set the printer to hold all print jobs. Off* Keep duplicate documents Set the printer to keep all documents with the same file name. Off* Note: An asterisk (*) next to a value indicates the factory default setting. Disk Encryption Note: This menu appears only when a hard disk is installed.
-
Page 76: Reports
Understanding the printer menus Miscellaneous Menu item Description Protected Features Show all the features that Function Access Control (FAC) protects regardless of the security permission that the user has. Show* Hide Note: Hide displays only FAC‑protected features that the user has access. Print Permission Let the user log in before printing. -
Page 77: Help
Understanding the printer menus Print Menu item Description Print Fonts Print samples and information about the fonts that are available in each printer language. PCL Fonts PS Fonts Print Demo Print a page that shows the printer capabilities and supported solutions. Demo Page Print Directory Print the resources that are stored in the flash drive or printer hard disk. -
Page 78: Printing The Menu Settings Page
Understanding the printer menus Printing the Menu Settings Page From the home screen, touch Settings > Reports > Menu Settings Page. -
Page 79: Securing The Printer
Securing the printer Securing the printer Locating the security slot The printer is equipped with a security lock feature. Attach a security lock compatible with most laptop computers in the location shown to secure the printer in place. Erasing printer memory To erase volatile memory or buffered data in your printer, turn off the printer. -
Page 80: Encrypting The Printer Hard Disk
Securing the printer Note: This process can take from several minutes to more than an hour, making the printer unavailable for other tasks. Encrypting the printer hard disk This process erases all contents in the hard disk. If necessary, back up important data from the printer before starting the encryption. - Page 81 Securing the printer • The printer is removed from your premises for service. • The printer is sold to another organization. Disposing of a printer hard disk • Degaussing—Flushes the hard disk with a magnetic field that erases stored data •...
-
Page 82: Maintaining The Printer
Maintaining the printer Maintaining the printer Warning—Potential Damage: Failure to maintain optimum printer performance, or to replace parts and supplies, may cause damage to your printer. Configuring supply notifications Open a web browser, and then type the printer IP address in the address field. Notes: •... -
Page 83: Adjusting The Speaker Volume
Maintaining the printer Adjusting the speaker volume Adjusting the default internal speaker volume From the control panel, navigate to: Settings > Device > Preferences > Audio Feedback Adjust the volume. Notes: • If Quiet Mode is enabled, then audible alerts are turned off. This setting also slows the printer performance. - Page 84 Maintaining the printer • Active Adapter is set to Auto. From the home screen, touch Settings > Network/Ports > Network Overview > Active Adapter. Using the Push Button method From the home screen, touch Settings > Network/Ports > Wireless > Wi‑Fi Protected Setup > Start Push Button Method.
- Page 85 Maintaining the printer Connecting a mobile device to the printer Before connecting your mobile device, make sure that Wi‑Fi Direct has been configured. For more information, “Configuring Wi‑Fi Direct” on page Connecting using Wi‑Fi Direct Note: These instructions apply only to Android mobile devices. From the mobile device, go to the settings menu.
-
Page 86: Setting Up Serial Printing (Windows Only)
Maintaining the printer Deactivating the Wi‑Fi network From the home screen, touch Settings > Network/Ports > Network Overview > Active Adapter > Standard Network. Follow the instructions on the display. Changing the printer port settings after installing an internal solutions port Notes: •... -
Page 87: Cleaning The Printer
Maintaining the printer Cleaning the printer CAUTION—SHOCK HAZARD: To avoid the risk of electrical shock when cleaning the exterior of the printer, unplug the power cord from the electrical outlet and disconnect all cables from the printer before proceeding. Notes: •... -
Page 88: Replacing Parts And Supplies
Maintaining the printer Ordering imaging unit or imaging kit To order imaging units, contact the place where you purchased the printer. Ordering a waste toner bottle To order a waste toner bottle, contact the place where you purchased the printer. Ordering a fuser maintenance kit To order a fuser maintenance kit, contact the place where you purchased the printer. - Page 89 Maintaining the printer Remove the waste toner bottle. Remove the imaging kit.
- Page 90 Maintaining the printer Remove the black toner cartridge. Remove the imaging unit. Warning—Potential Damage: Do not expose the photoconductor unit to direct light for more than 10 minutes. Extended exposure to light may cause print quality problems. Warning—Potential Damage: Do not touch the shiny photoconductor drum under the imaging kit. Doing so may affect the quality of future print jobs.
- Page 91 Maintaining the printer Insert the black toner cartridge. Insert the imaging kit.
- Page 92 Maintaining the printer Insert the waste toner bottle. Close door B. Replacing the imaging kit Open door B.
- Page 93 Maintaining the printer Remove the waste toner bottle. Remove the imaging kit.
- Page 94 Maintaining the printer Remove the toner cartridges. Unpack the new imaging kit, and then remove the packing material. Note: The imaging kit includes the imaging kit and the cyan, magenta, and yellow developer units. Remove the black imaging unit. Warning—Potential Damage: Do not expose the photoconductor unit to direct light for more than 10 minutes.
- Page 95 Maintaining the printer Insert the toner cartridges. Insert the new imaging kit.
- Page 96 Maintaining the printer Insert the waste toner bottle. Close door B. Replacing a toner cartridge Open door B.
- Page 97 Maintaining the printer Remove the toner cartridge. Unpack the new toner cartridge. Insert the new toner cartridge. Close door B.
- Page 98 Maintaining the printer Replacing the waste toner bottle Open door B. Remove the waste toner bottle. Unpack the new waste toner bottle.
- Page 99 Maintaining the printer Insert the new waste toner bottle. Close door B. Replacing the fuser Turn off the printer, and then unplug the power cord from the electrical outlet. Open doors A and D. CAUTION—HOT SURFACE: The inside of the printer might be hot. To reduce the risk of injury from a hot component, allow the surface to cool before touching it.
- Page 100 Maintaining the printer Insert the new fuser. Close doors D and A. Connect the power cord to the electrical outlet, and then turn on the printer. CAUTION—POTENTIAL INJURY: To avoid the risk of fire or electrical shock, connect the power cord to an appropriately rated and properly grounded electrical outlet that is near the product and easily accessible.
- Page 101 Maintaining the printer Replacing the pick roller Replacing the pick roller in the 550‑sheet tray Turn off the printer, and then unplug the power cord from the electrical outlet. Remove the tray.
- Page 102 Maintaining the printer Remove the pick roller. Unpack the new pick roller.
- Page 103 Maintaining the printer Insert the new pick roller until it clicks into place. Insert the tray. Connect the power cord to the electrical outlet, and then turn on the printer. CAUTION—POTENTIAL INJURY: To avoid the risk of fire or electrical shock, connect the power cord to an appropriately rated and properly grounded electrical outlet that is near the product and easily accessible.
- Page 104 Maintaining the printer Remove the pick roller. Unpack the new pick roller. Insert the new pick roller until it clicks into place. Close the multipurpose feeder. Connect the power cord to the electrical outlet, and then turn on the printer. CAUTION—POTENTIAL INJURY: To avoid the risk of fire or electrical shock, connect the power cord to an appropriately rated and properly grounded electrical outlet that is near the product and easily accessible.
- Page 105 Maintaining the printer Remove the separator pad. Unpack the new separator pad. Insert the new separator pad until it clicks into place. Insert the tray.
- Page 106 Maintaining the printer Replacing the transfer module Turn off the printer, and then unplug the power cord from the electrical outlet. Open door B. Remove the waste toner bottle.
- Page 107 Maintaining the printer Remove the imaging kit. Open door A. CAUTION—HOT SURFACE: The inside of the printer might be hot. To reduce the risk of injury from a hot component, allow the surface to cool before touching it.
- Page 108 Maintaining the printer Remove the transfer module. Unpack the new transfer module, and then remove the packing material. Insert the new transfer module. Close door A.
- Page 109 Maintaining the printer Insert the imaging kit. Insert the waste toner bottle. Close door B. Connect the power cord to the electrical outlet, and then turn on the printer. CAUTION—POTENTIAL INJURY: To avoid the risk of fire or electrical shock, connect the power cord to an appropriately rated and properly grounded electrical outlet that is near the product and easily accessible.
-
Page 110: Moving The Printer
Maintaining the printer Resetting the maintenance counter From the home screen, touch Settings > Device > Maintenance > Configuration Menu > Supply Usage And Counters. Select Fuser Reset or ITM Reset. Resetting the supply usage counters From the home screen, touch Settings > Device > Maintenance > Configuration Menu > Supply Usage And Counters. -
Page 111: Saving Energy And Paper
Maintaining the printer • Make sure that your fingers are not under the printer when you set it down. • Make sure that there is adequate clearance around the printer. Note: Damage to the printer caused by improper moving is not covered by the printer warranty. Shipping the printer When shipping the printer, use the original packaging or contact the place where you purchased the printer. -
Page 112: Clearing Jams
Clearing jams Clearing jams Avoiding jams Load paper properly • Make sure that the paper lies flat in the tray. Correct loading of paper Incorrect loading of paper • Do not load or remove a tray while the printer is printing. •... -
Page 113: Identifying Jam Locations
Clearing jams • Flex, fan, and align the paper edges before loading. • Do not use paper that has been cut or trimmed by hand. • Do not mix paper sizes, weights, or types in the same tray. • Make sure that the paper size and type are set correctly on the computer or printer control panel. •... - Page 114 Clearing jams Jam locations Standard bin Fuser Trays Duplex unit Multipurpose feeder...
-
Page 115: Paper Jam In Trays
Clearing jams Paper jam in trays Pull out the tray. Warning—Potential Damage: A sensor inside the optional tray is easily damaged by static electricity. Touch a metal surface before removing the jammed paper in the tray. Remove the jammed paper. Note: Make sure that all paper fragments are removed. -
Page 116: Paper Jam In The Multipurpose Feeder
Clearing jams Paper jam in the multipurpose feeder Remove paper from the multipurpose feeder. Pull out the tray. Remove the jammed paper. Note: Make sure that all paper fragments are removed. Insert the tray. Paper jam in the standard bin Remove the jammed paper. -
Page 117: Paper Jam In Door A
Clearing jams Close doors D and A. Paper jam in door A Paper jam in the fuser Open door A. CAUTION—HOT SURFACE: The inside of the printer might be hot. To reduce the risk of injury from a hot component, allow the surface to cool before touching it. Remove the jammed paper. - Page 118 Clearing jams Open the fuser access door. Remove the jammed paper. Note: Make sure that all paper fragments are removed.
- Page 119 Clearing jams Close door A. Paper jam in the duplex unit Open door A. CAUTION—HOT SURFACE: The inside of the printer might be hot. To reduce the risk of injury from a hot component, allow the surface to cool before touching it.
- Page 120 Clearing jams Open the duplex cover. Remove the jammed paper. Note: Make sure that all paper fragments are removed. Close the duplex cover and door A.
-
Page 121: Troubleshooting
Troubleshooting Troubleshooting Printing problems Print quality is poor Blank or white pages Contact your dealer. Dark print Note: Before solving the problem, print the quality sample pages to determine the missing color. From the home screen, touch Settings > Troubleshooting > Print Quality Test Pages. Action Step 1 Go to step 2. - Page 122 Troubleshooting Action Step 2 Go to step 3. The problem is solved. Depending on your operating system, reduce the toner darkness from the Printing Preferences or Print dialog. Note: You can also change the setting on the printer control panel. From the home screen, touch Settings > Print > Quality >...
- Page 123 Troubleshooting Ghost images Note: Before solving the problem, print the Print Quality Test Pages. From the home screen, touch Settings > Troubleshooting > Print Quality Test Pages. Action Step 1 Go to step 2. The problem is solved. Load the tray with the correct paper type and weight. Print the document.
- Page 124 Troubleshooting Gray or colored background Note: Before solving the problem, print the Print Quality Test Pages. From the home screen, touch Settings > Troubleshooting > Print Quality Test Pages. Action Step 1 Go to step 2. The problem is solved. Depending on your operating system, increase toner darkness from the Printing Preferences or Print dialog.
- Page 125 Troubleshooting Action Step 1 The problem is Go to step 2. solved. Adjust the paper guides to the correct position for the paper loaded. Print the document. Are the margins correct? Step 2 The problem is Contact your dealer. solved. Depending on your operating system, specify the paper size from the Printing Preferences or Print dialog.
- Page 126 Troubleshooting Action Step 2 Go to step 3. The problem is solved. Depending on your operating system, increase the toner darkness from the Printing Preferences or Print dialog. Note: You can also change the setting on the printer control panel. From the home screen, touch Settings > Print > Quality >...
- Page 127 Troubleshooting Missing colors Contact your dealer. Mottled print and dots Note: Before solving the problem, print the Print Quality Test Pages. From the home screen, touch Settings > Troubleshooting > Print Quality Test Pages. Action Step 1 Go to step 2. Contact your dealer.
- Page 128 Troubleshooting Print crooked or skewed Note: Before solving the problem, print the Print Quality Test Pages. From the home screen, touch Settings > Troubleshooting > Print Quality Test Pages. Action Step 1 Go to step 2. The problem is solved. Pull out the tray.
- Page 129 Troubleshooting Text or images cut off Note: Before solving the problem, print the Print Quality Test Pages. From the home screen, touch Settings > Troubleshooting > Print Quality Test Pages. Action Step 1 Go to step 2. The problem is solved.
- Page 130 Troubleshooting Action Contact your dealer. The problem is solved. Depending on your operating system, specify the paper type from the Printing Preferences or Print dialog. Notes: • Make sure that the setting matches the paper loaded. • You can also change the setting on the printer control panel.
- Page 131 Troubleshooting Action Step 1 Go to step 2. The problem is solved. Depending on your operating system, specify the paper source from the Printing Preferences or Print dialog. Print the document. Do horizontal dark lines appear on prints? Step 2 Go to step 3.
- Page 132 Troubleshooting Action Step 1 Go to step 2. The problem is solved. Depending on your operating system, specify the paper type from the Printing Preferences or Print dialog. Notes: • Make sure that the setting matches the paper loaded in the tray.
- Page 133 Troubleshooting Action Step 1 Go to step 2. The problem is solved. Depending on your operating system, specify the paper type from the Printing Preferences or Print dialog. Notes: • Make sure that the setting matches the paper loaded in the tray.
- Page 134 Troubleshooting Action Step 1 Go to step 2. The problem is solved. Depending on your operating system, specify the paper type from the Printing Preferences or Print dialog. Notes: • Make sure that the setting matches the paper loaded in the tray.
- Page 135 Troubleshooting Action Step 2 The problem is Go to step 3. solved. Check if the printer is on. Resolve any error messages that appear on the display. Print the document. Is the document printed? Step 3 The problem is Go to step 4. solved.
- Page 136 Troubleshooting Action Step 3 Go to step 4. The problem is solved. Depending on your operating system, specify the print resolution from the Printing Preferences or Print dialog. Set the resolution to 4800 CQ. Print the document. Is the printer printing slow? Step 4 Go to step 5.
- Page 137 Troubleshooting Action Step 8 Contact your dealer. The problem is solved. Make sure that the printer is not overheating. Notes: • Allow the printer to cool down after a long print job. • Observe the recommended ambient temperature for the printer.
- Page 138 Troubleshooting Confidential and other held documents do not print Action Step 1 The problem is Go to step 2. solved. From the control panel, check if the documents appear in the Held Jobs list. Note: If the documents are not listed, then print the documents using the Print and Hold options.
-
Page 139: The Printer Is Not Responding
Troubleshooting The printer is not responding Action Step 1 The problem is Go to step 2. solved. Check if the power cord is connected to the electrical outlet. CAUTION—POTENTIAL INJURY: To avoid the risk of fire or electrical shock, connect the power cord to an appropriately rated and properly grounded electrical outlet that is near the product and easily accessible. -
Page 140: Unable To Read Flash Drive
Troubleshooting Unable to read flash drive Action Step 1 Go to step 2. Wait for the printer to finish processing the Check if the printer is not busy processing another job. other job. Is the printer ready? Step 2 Go to step 3. Insert the flash drive into the correct port. -
Page 141: Network Connection Problems
Troubleshooting Network connection problems Cannot open Embedded Web Server Action Step 1 Go to step 2. Turn on the printer. Check if the printer is on. Is the printer on? Step 2 Go to step 3. Type the correct printer IP address in Make sure that the printer IP address is correct. - Page 142 Troubleshooting Action Step 7 The problem is Contact your dealer. solved. Access the Embedded Web Server. Did the Embedded Web Server open? Cannot connect the printer to the Wi‑Fi network Action Step 1 The problem is Go to step 2. solved.
-
Page 143: Hardware Options Problems
Troubleshooting Checking the printer connectivity From the home screen, touch Settings > Reports > Network > Network Setup Page. Check the first section of the network setup page, and confirm that the status is connected. If the status is not connected, then the LAN drop may be inactive, or the network cable may be unplugged or malfunctioning. -
Page 144: Paper Feed Problems
Troubleshooting To accept any and all of these risks and to proceed with the use of non-genuine supplies or parts in your printer, from the control panel, press and hold X and # simultaneously for 15 seconds. If you do not want to accept these risks, then remove the third-party supply or part from your printer and install a genuine supply or part from the printer manufacturer. - Page 145 Troubleshooting Action Step 3 The problem is Contact your dealer. solved. Reduce the number of pages to print. Print the document. Are the pages collated correctly? Paper curl Action Step 1 Go to step 2. The problem is solved. Adjust the guides in the tray to the correct position for the paper loaded.
- Page 146 Troubleshooting Action Step 4 Contact your dealer. The problem is solved. Load paper from a fresh package. Note: Paper absorbs moisture due to high humidity. Store paper in its original wrapper until you are ready to use it. Print the document. Is the paper curled? Tray linking does not work Action...
- Page 147 Troubleshooting Paper frequently jams Action Step 1 Go to step 2. The problem is solved. Pull out the tray. Check if paper is loaded correctly. Notes: • Make sure that the paper guides are positioned correctly. • Make sure that the stack height is below the maximum paper fill indicator.
-
Page 148: Color Quality Problems
Troubleshooting Color quality problems Adjusting toner darkness From the home screen, touch Settings > Print > Quality. In the Toner Darkness menu, adjust the settings. Modifying the colors in printed output From the home screen, touch Settings > Print > Quality > Advanced Imaging > Color Correction. In the Color Correction menu, touch Manual >... - Page 149 Troubleshooting What is CMYK color? CMYK color is a method of describing colors by indicating the amount of cyan, magenta, yellow, and black used to reproduce a particular color. Cyan, magenta, yellow, and black inks or toners can be printed in various amounts to produce a large range of colors observed in nature.
-
Page 150: Contacting Your Dealer
Troubleshooting The print appears tinted Action Step 1 Go to step 2. The problem is solved. Perform Color Adjust. From the home screen, touch Settings > Print > Quality > Advanced Imaging > Color Adjust. Print the document. Does the print appear tinted? Step 2 Contact your dealer. -
Page 151: Upgrading And Migrating
Upgrading and migrating Upgrading and migrating Hardware Available internal options • Memory card – DDR3 DIMM – Flash memory • Fonts – Application cards • Forms and Bar Code • PRESCRIBE • IPDS • Internal solutions port (ISP) Note: Some options are available only in some printer models. For more information, contact the place where you purchased the printer. - Page 152 Upgrading and migrating Unpack the memory card. Warning—Potential Damage: Avoid touching the connection points along the edge of the card. Insert the memory card until it clicks into place.
- Page 153 Upgrading and migrating Reattach the access cover. Connect the power cord to the electrical outlet, and then turn on the printer. CAUTION—POTENTIAL INJURY: To avoid the risk of fire or electrical shock, connect the power cord to an appropriately rated and properly grounded electrical outlet that is near the product and easily accessible.
- Page 154 Upgrading and migrating Unpack the internal solutions port (ISP) kit. Mounting bracket Thumbscrews Housing...
- Page 155 Upgrading and migrating ISP extended cable Install the ISP into its housing.
- Page 156 Upgrading and migrating Attach the housing to the controller board access cover.
- Page 157 Upgrading and migrating Connect the ISP extended cable to the ISP connector in the controller board. Reattach the controller board access cover. Connect the power cord to the electrical outlet, and then turn on the printer. CAUTION—POTENTIAL INJURY: To avoid the risk of fire or electrical shock, connect the power cord to an appropriately rated and properly grounded electrical outlet that is near the product and easily accessible.
- Page 158 Upgrading and migrating Installing an optional card CAUTION—SHOCK HAZARD: To avoid the risk of electrical shock, if you are accessing the controller board or installing optional hardware or memory devices sometime after setting up the printer, then turn the printer off, and unplug the power cord from the electrical outlet before continuing. If you have any other devices attached to the printer, then turn them off as well, and unplug any cables going into the printer.
- Page 159 Upgrading and migrating Push the card firmly into place. Note: The entire length of the connector on the card must touch and be flush against the controller board. Warning—Potential Damage: Improper installation of the card may cause damage to the card and the controller board.
- Page 160 Upgrading and migrating Reattach the access cover. Connect the power cord to the electrical outlet, and then turn on the printer. CAUTION—POTENTIAL INJURY: To avoid the risk of fire or electrical shock, connect the power cord to an appropriately rated and properly grounded electrical outlet that is near the product and easily accessible.
- Page 161 Upgrading and migrating Unpack the hard disk. Attach the hard disk to the controller board. Warning—Potential Damage: Do not touch or press the center of the hard disk.
- Page 162 Upgrading and migrating Open door B. Open door C.
- Page 163 Upgrading and migrating Secure the hard disk to the printer using the thumbscrews. Close doors C and B. Reattach the controller board access cover. Connect the power cord to the electrical outlet, and then turn on the printer. CAUTION—POTENTIAL INJURY: To avoid the risk of fire or electrical shock, connect the power cord to an appropriately rated and properly grounded electrical outlet that is near the product and easily accessible.
- Page 164 Upgrading and migrating Installing optional trays CAUTION—SHOCK HAZARD: To avoid the risk of electrical shock, if you are accessing the controller board or installing optional hardware or memory devices sometime after setting up the printer, then turn the printer off, and unplug the power cord from the electrical outlet before continuing. If you have any other devices attached to the printer, then turn them off as well, and unplug any cables going into the printer.
-
Page 165: Software
Upgrading and migrating Software Supported operating systems Using the software CD, you can install the printer software on the following operating systems: • Windows 10 • Windows 8.1 • Windows Server 2012 R2 • Windows Server 2012 • Windows 7 SP1 •... - Page 166 Upgrading and migrating Run the installer, and then follow the instructions on the computer screen. Adding printers to a computer Before you begin, do one of the following: • Connect the printer and the computer to the same network. For more information on connecting the printer to a network, see “Connecting the printer to a Wi‑Fi network”...
-
Page 167: Firmware
Upgrading and migrating • If you want custom printing features, then select the manufacturer print driver. To install the driver, “Installing the printer software” on page 165. Add the printer. Adding available options in the print driver For Windows users Open the printers folder. - Page 168 Upgrading and migrating Updating firmware Some applications require a minimum device firmware level to operate correctly. For more information on updating the device firmware, contact your sales representative. Open a web browser, and then type the printer IP address in the address field. Notes: •...
-
Page 169: Notices
Supplies Standard supplies for this product that can be replaced by the user include toner cartridges. Be sure to use only SHARP-specified products for the toner cartridges. - Page 170 Notices For best copying results, be sure to use only Sharp Genuine Supplies which are designed, engineered, and tested to maximize the life and performance of Sharp products. Look for the Genuine Supplies label on the toner package. GENUINE SUPPLIES...
- Page 171 Notices This product including components, consumables, parts and spares complies with the “India E-Waste Rules” and prohibits use of lead, mercury, hexavalent chromium, polybrominated biphenyls or polybrominated diphenyl ethers in concentrations exceeding 0.1% by weight and 0.01% by weight for cadmium, except for the exemption set in the Rule.
- Page 172 The symbol shown above appears on electrical and electronic equipment (or the packaging) to remind the users of this. If the equipment has been used for BUSINESS PURPOSES, please contact your SHARP dealer who will inform you about take-back. You might be charged for the costs arising from take-back. Small equipment (and small quantities) might be taken back by your local collection facility.
- Page 173 Notices ENERGY STAR ® Any product bearing the ENERGY STAR emblem on the product or on a start-up screen is certified to comply with Environmental Protection Agency (EPA) ENERGY STAR requirements as of the date of manufacture. Temperature information Operating temperature and relative humidity 10 to 32.2°C (50 to 90°F) and 15 to 80% RH 15.6 to 32.2°C (60 to 90°F) and 8 to 80% RH Maximum wet-bulb temperature...
- Page 174 Notices Power consumption Product power consumption The following table documents the power consumption characteristics of the product. Note: Some modes may not apply to your product. Mode Description Power consumption (Watts) Printing The product is generating hard‑copy output from electronic inputs. One-sided: 680 Two-sided: 570 Copy...
- Page 175 Notices Factory default Hibernate Timeout for this product in all countries or regions 3 days The amount of time the printer waits after a job is printed before it enters Hibernate mode can be modified between one hour and one month. Notes on EPEAT-registered imaging equipment products: •...
- Page 176 Notices Federal Communications Commission (FCC) compliance information statement This product has been tested and found to comply with the limits for a Class A digital device, pursuant to Part 15 of the FCC Rules. Operation is subject to the following two conditions: (1) this device may not cause harmful interference, and (2) this device must accept any interference received, including interference that may cause undesired operation.
- Page 177 Notices European Community (EC) directives conformity This product is in conformity with the protection requirements of EC Council directives 2014/30/EU, 2014/35/EU, and 2011/65/EU as amended by (EU) 2015/863 on the approximation and harmonization of the laws of the Member States relating to electromagnetic compatibility, safety of electrical equipment designed for use within certain voltage limits, and on the restrictions of use of certain hazardous substances in electrical and electronic equipment.
-
Page 178: Index
Index Index cleaning default speaker volume exterior of the printer 87 adjusting 83 adding contacts 15 interior of the printer 87 Defective flash detected 143 adding groups 16 cleaning the printer 87 deleting contacts 16 adding hardware options collated printing does not deleting groups 16 print driver 167 work 144... - Page 179 Index font sample list importing a configuration file printing 31 using the Embedded Web maintenance counter forms Server 167 resetting 110 printing 27 indicator light managing screen saver 13 Forms and Favorites understanding the status 11 manual color correction 148 setting up 14 installing a memory card 151 memory card 151...
- Page 180 Index Setup 47 ordering supplies print quality SNMP 64 waste toner bottle 88 replacing imaging kit 92 Solutions LDAP Settings 75 ordering toner cartridges 87 Print Quality Test Pages 77 TCP/IP 63 print quality troubleshooting ThinPrint 68 blank pages 121 Tray Configuration 54 crooked print 128 paper...
- Page 181 Index selecting a location 8 replacing parts supplies shipping 111 pick roller 101 conserving 111 printer configurations 9 separator pad 104 supplies status printer display transfer module 106 checking 87 adjusting the brightness 111 replacing the imaging kit 92 supplies, ordering printer hard disk replacing the pick roller 101 imaging kit 88...
- Page 182 Index confidential and other held using the control panel 10 documents do not print 138 using the home screen 12 envelope seals when printing 144 incorrect margins 124 verify print jobs 30 jammed pages are not vertical dark lines on prints 131 reprinted 147 vertical white lines 133 job prints from the wrong...